Page 4812 of 5621
CHASSIS AND BODY MAINTENANCE
MA-35
C
D
E
F
G
H
I
J
K
MA
B
MA
Revision: 2006 January2006 M35/M45
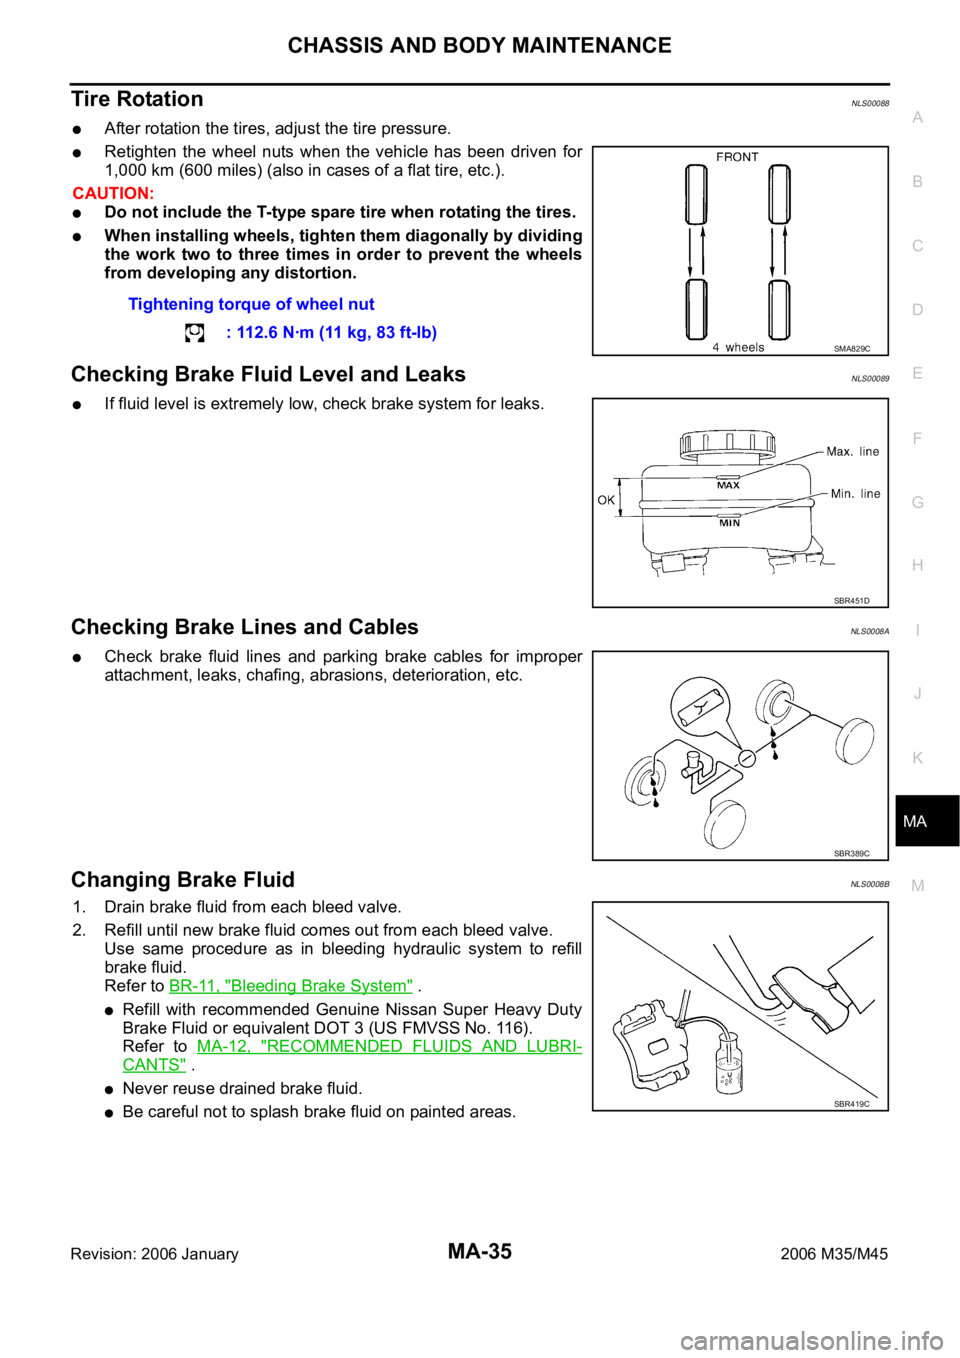
Tire RotationNLS00088
After rotation the tires, adjust the tire pressure.
Retighten the wheel nuts when the vehicle has been driven for
1,000 km (600 miles) (also in cases of a flat tire, etc.).
CAUTION:
Do not include the T-type spare tire when rotating the tires.
When installing wheels, tighten them diagonally by dividing
the work two to three times in order to prevent the wheels
from developing any distortion.
Checking Brake Fluid Level and LeaksNLS00089
If fluid level is extremely low, check brake system for leaks.
Checking Brake Lines and CablesNLS0008A
Check brake fluid lines and parking brake cables for improper
attachment, leaks, chafing, abrasions, deterioration, etc.
Changing Brake FluidNLS0008B
1. Drain brake fluid from each bleed valve.
2. Refill until new brake fluid comes out from each bleed valve.
Use same procedure as in bleeding hydraulic system to refill
brake fluid.
Refer to BR-11, "
Bleeding Brake System" .
Refill with recommended Genuine Nissan Super Heavy Duty
Brake Fluid or equivalent DOT 3 (US FMVSS No. 116).
Refer to MA-12, "
RECOMMENDED FLUIDS AND LUBRI-
CANTS" .
Never reuse drained brake fluid.
Be careful not to splash brake fluid on painted areas.Tightening torque of wheel nut
: 112.6 Nꞏm (11 kg, 83 ft-lb)
SMA829C
SBR451D
SBR389C
SBR419C
Page 4823 of 5621
PB-4
PARKING BRAKE CONTROL
Revision: 2006 January2006 M35/M45
Removal and InstallationNFS000PT
REMOVAL
1. Remove rear tires from vehicle with power tool.
2. Remove instrument driver lower panel. Refer to IP-10, "
INSTRUMENT PANEL ASSEMBLY" .
3. Disconnect parking brake switch connector.
4. Remove adjusting nut and loosen front cable.
5. Remove device assembly mounting nuts and remove device assembly from vehicle.
6. Remove center console. Refer to IP-19, "
CENTER CONSOLE ASSEMBLY" .
7. Separate rear cable from front cable, remove front cable from vehicle.
8. Remove heat insulator of the exhaust center tube from vehicle.
9. Remove parking brake shoe, and remove rear cable from toggle lever. Refer to PB-6, "
Removal and
Installation" .
10. Remove rear cable mounting bolts and nuts, pull out rear cable from vehicle.
INSTALLATION
1. Install in the reverse order of the removal. Refer to PB-3, "Components" for tightening torque.
CAUTION:
Do not reuse adjusting nut.
2. Adjust parking brake. Refer to PB-2, "
ADJUSTMENT" .
Page 4942 of 5621
NOISE, VIBRATION AND HARSHNESS (NVH) TROUBLESHOOTING
PR-3
C
E
F
G
H
I
J
K
L
MA
B
PR
Revision: 2006 January2006 M35/M45
NOISE, VIBRATION AND HARSHNESS (NVH) TROUBLESHOOTINGPFP:00003
NVH Troubleshooting ChartNDS000E9
Use the chart below to help you find the cause of the symptom. If necessary, repair or replace these parts.
: Applicable Reference pageFront
PR-4—
—
—
—
PR-4PR-5
NVH in FFD and RFD section
NVH in FAX, RAX, FSU and RSU section
NVH in WT section
NVH in WT section
NVH in RAX section
NVH in BR section
NVH in PS section
RearPR-6PR-10—
PR-7—
PR-6PR-9
Possible cause and SUSPECTED PARTS
Uneven rotating torque
Center bearing improper installation
Excessive center bearing axial end play
Center bearing mounting (insulator) cracks, damage or deterioration
Excessive joint angle
Rotation imbalance
Excessive runout
DIFFERENTIAL
AXLE AND SUSPENSION
TIRES
ROAD WHEEL
DRIVE SHAFT
BRAKES
STEERING
SymptomNoiseShake
Vibration
Page 4944 of 5621
FRONT PROPELLER SHAFT
PR-5
C
E
F
G
H
I
J
K
L
MA
B
PR
Revision: 2006 January2006 M35/M45
Removal and InstallationNDS000EC
REMOVAL
1. Remove engine undercover with a power tool.
2. If necessary, remove heat bracket.
3. Remove the three way catalyst (right bank) with a power tool. Refer to EX-3, "
EXHAUST SYSTEM" .
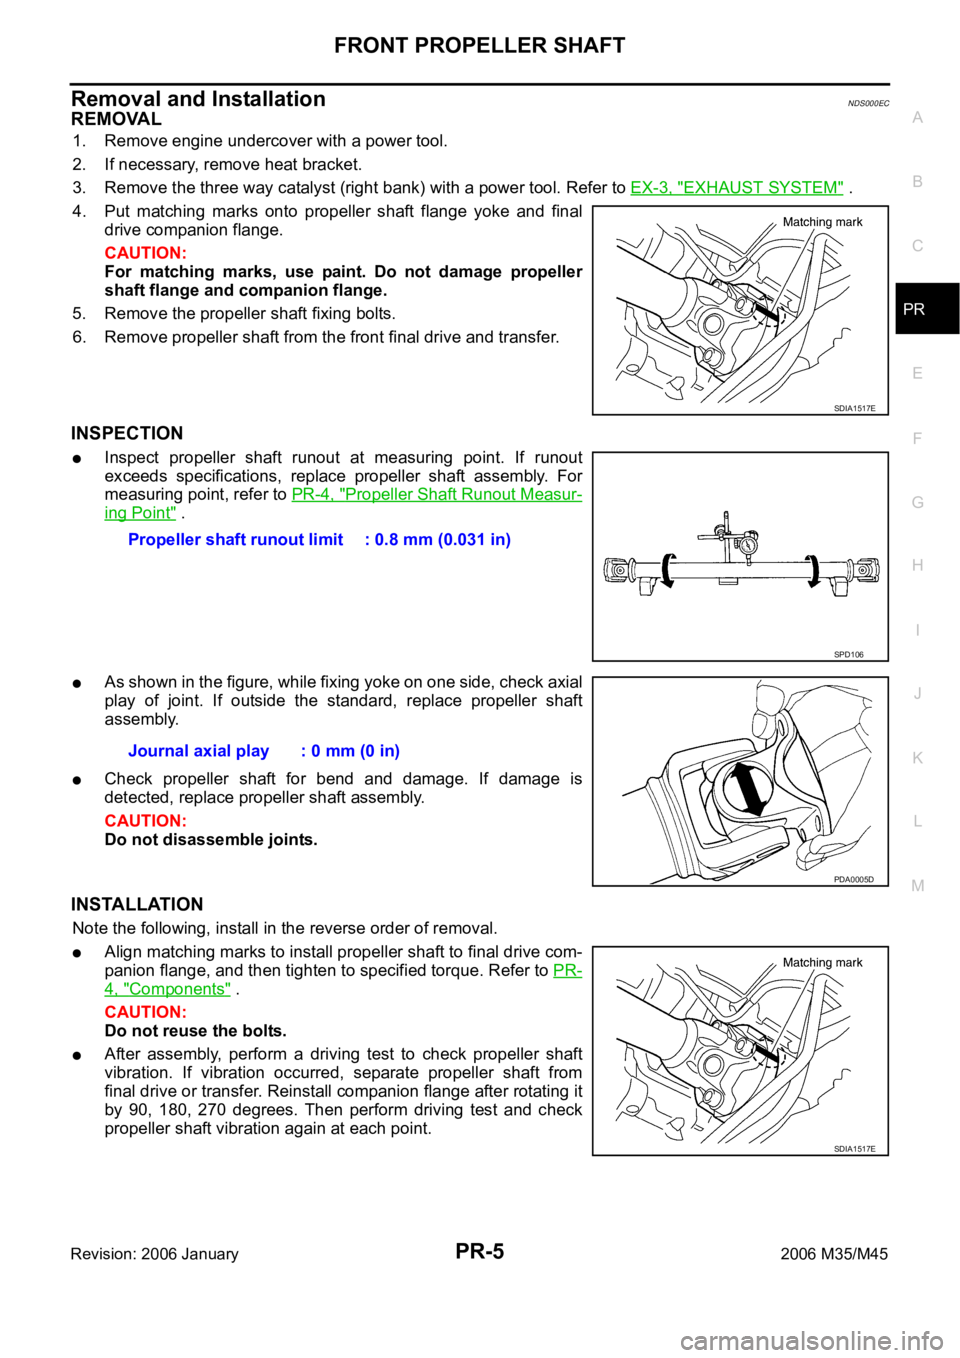
4. Put matching marks onto propeller shaft flange yoke and final
drive companion flange.
CAUTION:
For matching marks, use paint. Do not damage propeller
shaft flange and companion flange.
5. Remove the propeller shaft fixing bolts.
6. Remove propeller shaft from the front final drive and transfer.
INSPECTION
Inspect propeller shaft runout at measuring point. If runout
exceeds specifications, replace propeller shaft assembly. For
measuring point, refer to PR-4, "
Propeller Shaft Runout Measur-
ing Point" .
As shown in the figure, while fixing yoke on one side, check axial
play of joint. If outside the standard, replace propeller shaft
assembly.
Check propeller shaft for bend and damage. If damage is
detected, replace propeller shaft assembly.
CAUTION:
Do not disassemble joints.
INSTALLATION
Note the following, install in the reverse order of removal.
Align matching marks to install propeller shaft to final drive com-
panion flange, and then tighten to specified torque. Refer to PR-
4, "Components" .
CAUTION:
Do not reuse the bolts.
After assembly, perform a driving test to check propeller shaft
vibration. If vibration occurred, separate propeller shaft from
final drive or transfer. Reinstall companion flange after rotating it
by 90, 180, 270 degrees. Then perform driving test and check
propeller shaft vibration again at each point.
SDIA1517E
Propeller shaft runout limit : 0.8 mm (0.031 in)
SPD106
Journal axial play : 0 mm (0 in)
PDA0005D
SDIA1517E
Page 4946 of 5621
REAR PROPELLER SHAFT
PR-7
C
E
F
G
H
I
J
K
L
MA
B
PR
Revision: 2006 January2006 M35/M45
ComponentsNDS000EE
VQ35DE 2WD MODELS (3S80A-1VL107 TYPE)
VK45DE 2WD MODELS (3F-R-2VL107 TYPE)
PDIA0964E
1. Propeller shaft (1st shaft) 2. Center flange 3. Center bearing mounting bracket
(Lower)
4. Floor reinforcement 5. Center bearing assembly 6. Propeller shaft (2nd shaft)
7. Clip 8. Center bearing mounting bracket
(Upper)9. Washer
10. Lock nut
A: Both side
B: For the tightening torque, refer to PR-12, "
ASSEMBLY" .
Refer to GI-11, "
Components" , for the symbols in the figure.
PDIA0965E
1. Propeller shaft (1st shaft) 2. Center bearing mounting bracket
(Lower)3. Floor reinforcement
4. Propeller shaft (2nd shaft) 5. Clip 6. Center bearing mounting bracket
(Upper)
Refer to GI-11, "
Components" , for the symbols in the figure.
Page 4947 of 5621
PR-8
REAR PROPELLER SHAFT
Revision: 2006 January2006 M35/M45
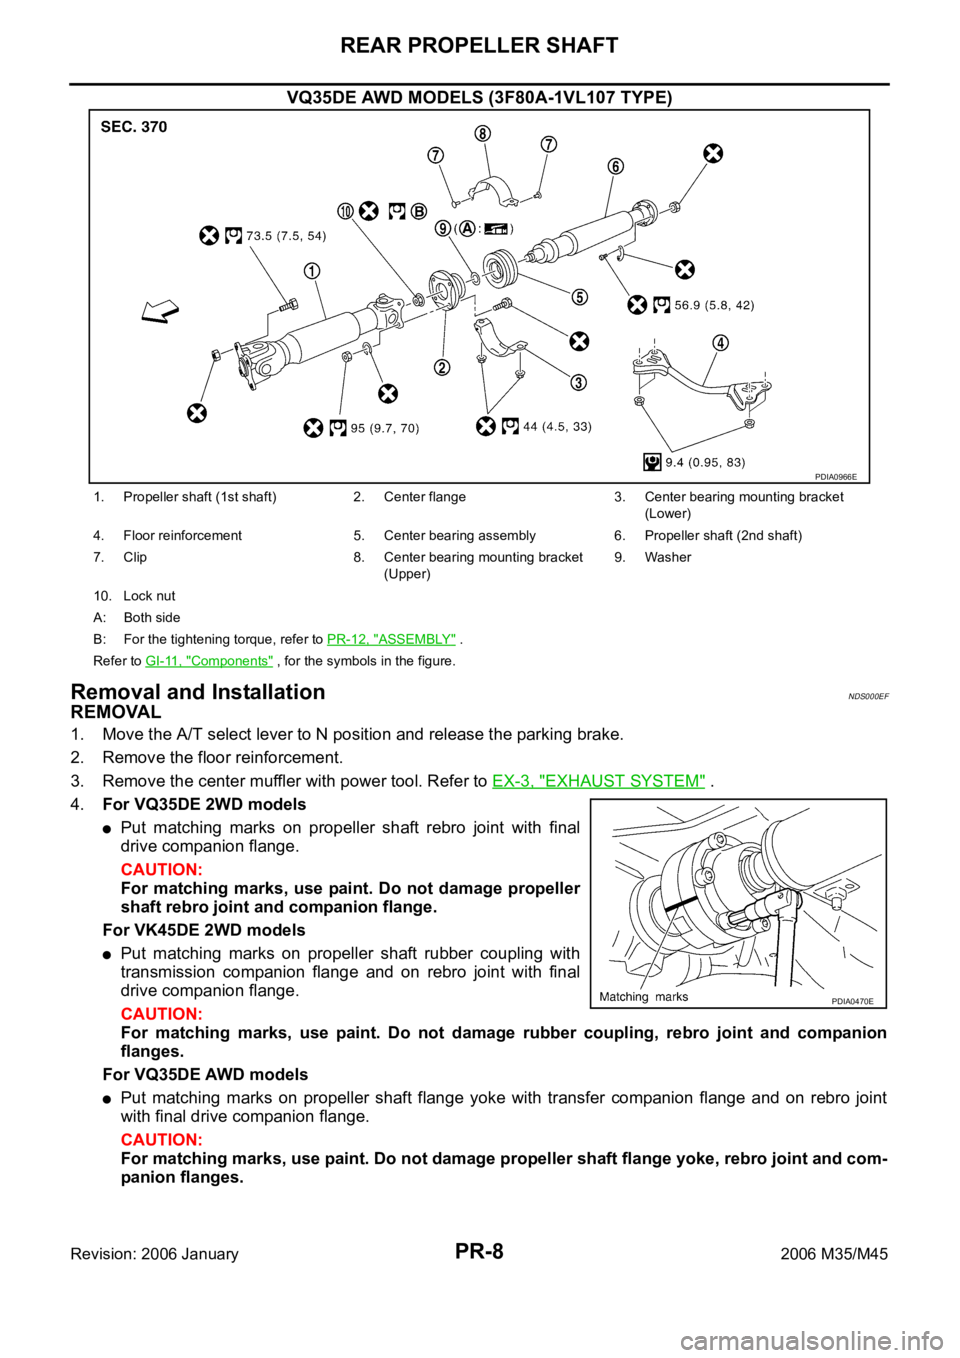
VQ35DE AWD MODELS (3F80A-1VL107 TYPE)
Removal and InstallationNDS000EF
REMOVAL
1. Move the A/T select lever to N position and release the parking brake.
2. Remove the floor reinforcement.
3. Remove the center muffler with power tool. Refer to EX-3, "
EXHAUST SYSTEM" .
4.For VQ35DE 2WD models
Put matching marks on propeller shaft rebro joint with final
drive companion flange.
CAUTION:
For matching marks, use paint. Do not damage propeller
shaft rebro joint and companion flange.
For VK45DE 2WD models
Put matching marks on propeller shaft rubber coupling with
transmission companion flange and on rebro joint with final
drive companion flange.
CAUTION:
For matching marks, use paint. Do not damage rubber coupling, rebro joint and companion
flanges.
For VQ35DE AWD models
Put matching marks on propeller shaft flange yoke with transfer companion flange and on rebro joint
with final drive companion flange.
CAUTION:
For matching marks, use paint. Do not damage propeller shaft flange yoke, rebro joint and com-
panion flanges.
PDIA0966E
1. Propeller shaft (1st shaft) 2. Center flange 3. Center bearing mounting bracket
(Lower)
4. Floor reinforcement 5. Center bearing assembly 6. Propeller shaft (2nd shaft)
7. Clip 8. Center bearing mounting bracket
(Upper)9. Washer
10. Lock nut
A: Both side
B: For the tightening torque, refer to PR-12, "
ASSEMBLY" .
Refer to GI-11, "
Components" , for the symbols in the figure.
PDIA0470E
Page 4949 of 5621
PR-10
REAR PROPELLER SHAFT
Revision: 2006 January2006 M35/M45
INSTALLATION
Note the following, and install in the reverse order of removal.
CAUTION:
Avoid damaging the rebro joint boot, protect it with a shop towel or equivalent.
Align matching marks to install propeller shaft to final drive and transfer (AWD models only) companion
flanges, and then tighten to specified torque. Refer to PR-7, "
Components" .
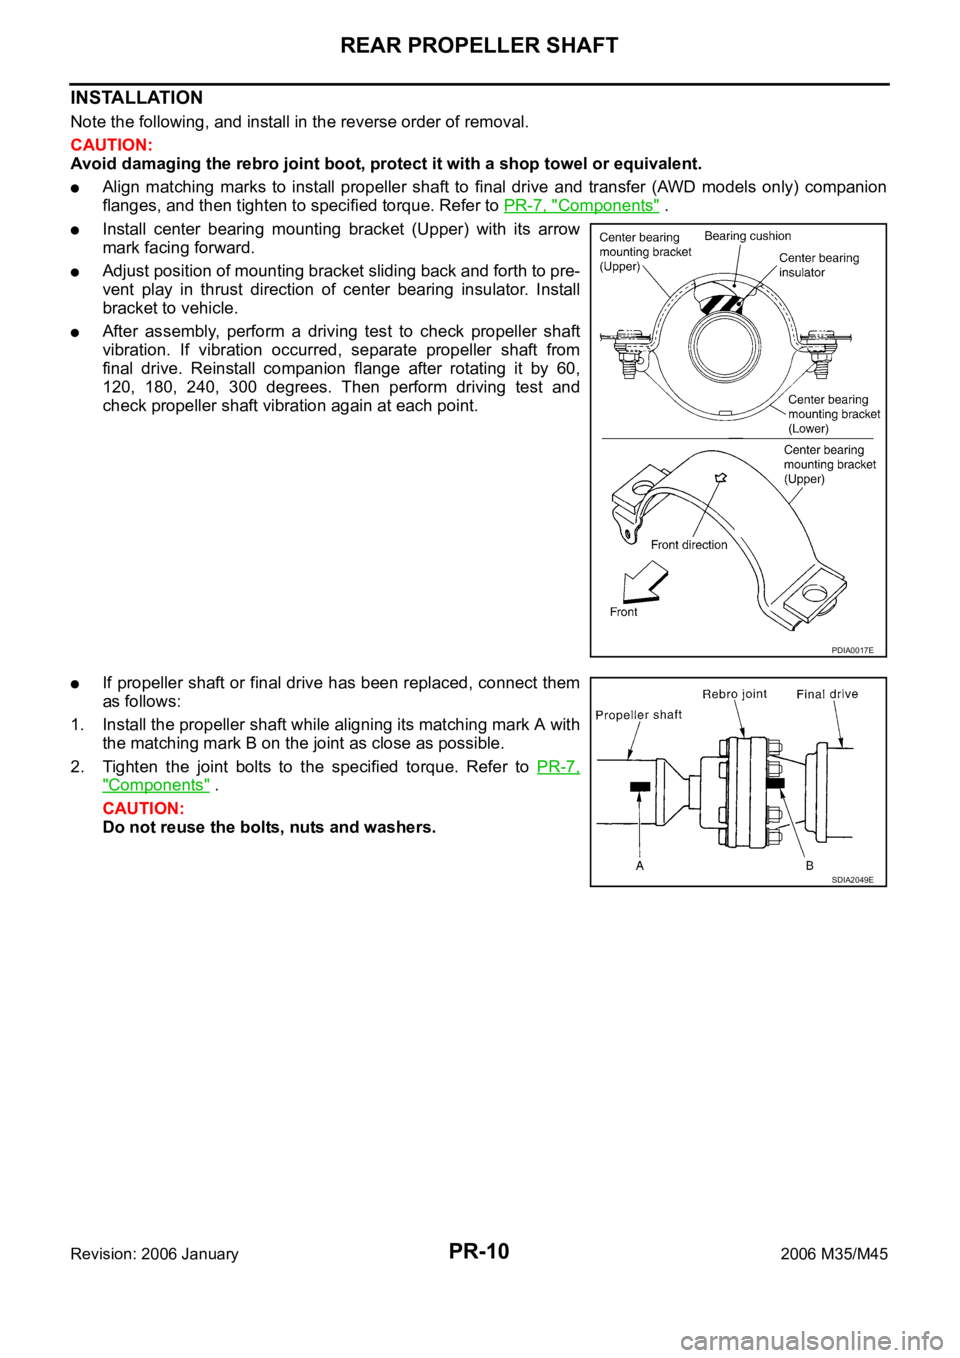
Install center bearing mounting bracket (Upper) with its arrow
mark facing forward.
Adjust position of mounting bracket sliding back and forth to pre-
vent play in thrust direction of center bearing insulator. Install
bracket to vehicle.
After assembly, perform a driving test to check propeller shaft
vibration. If vibration occurred, separate propeller shaft from
final drive. Reinstall companion flange after rotating it by 60,
120, 180, 240, 300 degrees. Then perform driving test and
check propeller shaft vibration again at each point.
If propeller shaft or final drive has been replaced, connect them
as follows:
1. Install the propeller shaft while aligning its matching mark A with
the matching mark B on the joint as close as possible.
2. Tighten the joint bolts to the specified torque. Refer to PR-7,
"Components" .
CAUTION:
Do not reuse the bolts, nuts and washers.
PDIA0017E
SDIA2049E
Page 4951 of 5621

PR-12
REAR PROPELLER SHAFT
Revision: 2006 January2006 M35/M45
ASSEMBLY
1. Install the center bearing with its “F” mark facing the front of the
vehicle.
2. Apply multi-purpose grease to the each face of the washer, then
install washer.
3. Install the center flange onto the propeller shaft with aligning the
marks that are marked while removal.
4. The lock nut is tightened according to the following.
CAUTION:
Do not reuse the lock nut.
a. Using suitable torque wrench and tighten lock nut.
b. Loosen lock nut and tighten specified torque again.
5. Place a piece of wood under the center flange, stake the lock
nut against the propeller shaft groove.
6. Assemble the 1st and 2nd shaft propeller shafts while aligning
the matching marks that are marked during removal.
7. Install and tighten the bolts/nuts and tighten them to specified
torque. Refer to PR-7, "
Components" .
CAUTION:
Do not reuse the bolts, nuts and washers.: 294Nꞏm (30.0kg-m, 217ft-lb)
: 82.9Nꞏm (8.5kg-m, 61ft-lb)
SDIA1542E
SDIA1543E
SDIA1538E