2006 INFINITI M35 stall
[x] Cancel search: stallPage 4741 of 5621

LT-314
ILLUMINATION
Revision: 2006 January2006 M35/M45
Front Ashtray IlluminationNKS003TO
BULB REPLACEMENT, REMOVAL AND INSTALLATION
Refer to LT- 3 1 4 , "Front Ashtray Illumination" .
Rear Ashtray IlluminationNKS003TP
REMOVAL AND INSTALLATION
1. Remove rear door finisher. Refer to EI-34, "DOOR FINISHER" .
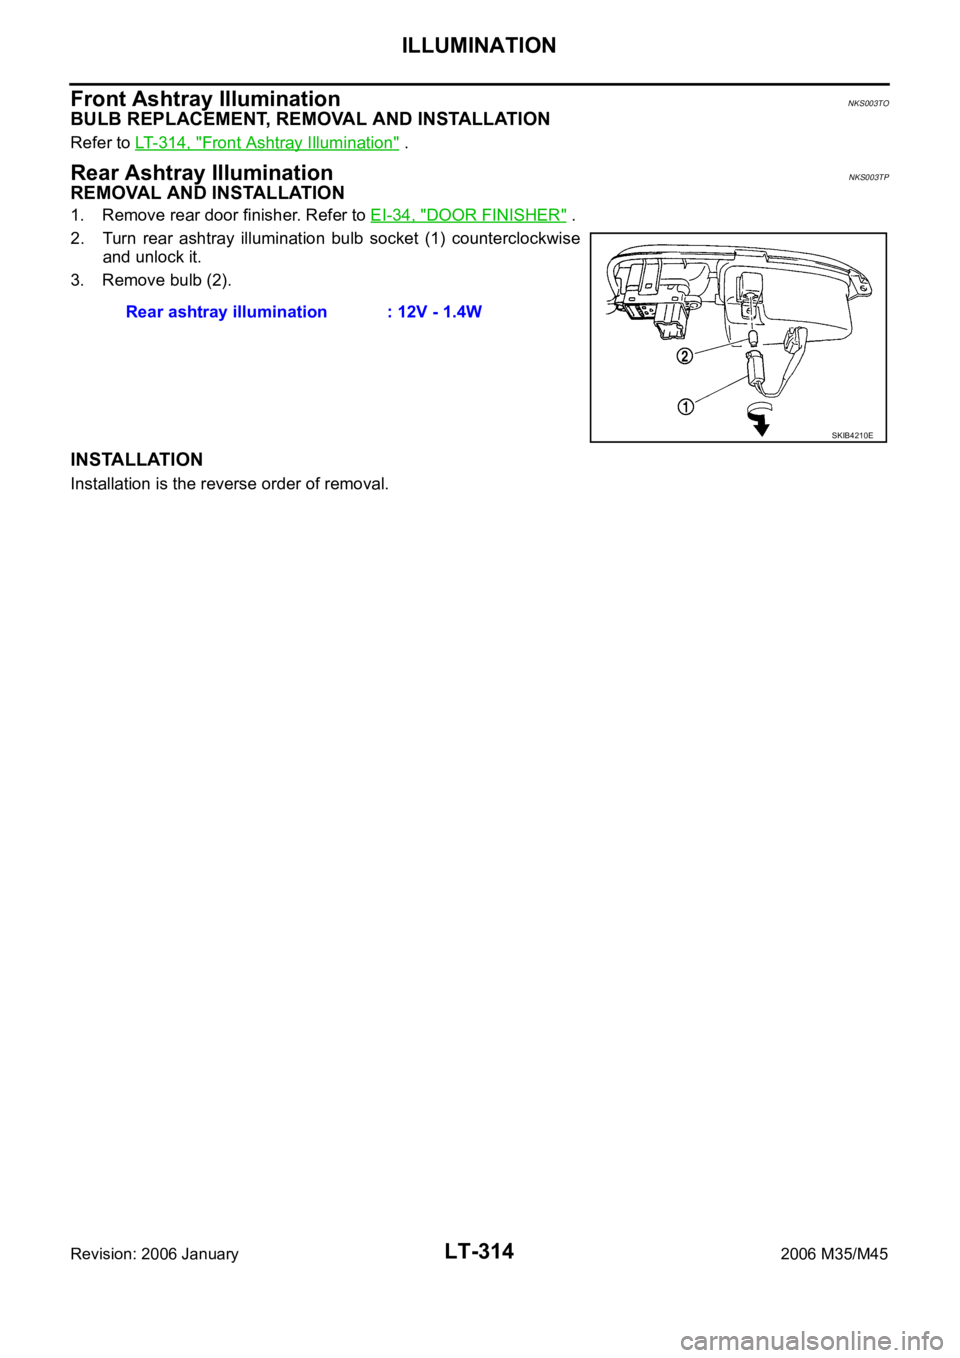
2. Turn rear ashtray illumination bulb socket (1) counterclockwise
and unlock it.
3. Remove bulb (2).
INSTALLATION
Installation is the reverse order of removal.Rear ashtray illumination : 12V - 1.4W
SKIB4210E
Page 4744 of 5621

LU-1
ENGINE LUBRICATION SYSTEM
B ENGINE
CONTENTS
C
D
E
F
G
H
I
J
K
L
M
SECTION LU
A
LU
Revision: 2006 January2006 M35/M45
ENGINE LUBRICATION SYSTEM
VQ35DE
PRECAUTIONS .......................................................... 3
Precautions for Liquid Gasket .................................. 3
LIQUID GASKET APPLICATION PROCEDURE ..... 3
PREPARATION ........................................................... 4
Special Service Tools ............................................... 4
Commercial Service Tools ........................................ 4
LUBRICATION SYSTEM ............................................ 5
Lubrication Circuit .................................................... 5
System Chart ........................................................... 6
ENGINE OIL ............................................................... 7
Inspection ................................................................. 7
ENGINE OIL LEVEL ............................................. 7
ENGINE OIL APPEARANCE ................................ 7
ENGINE OIL LEAKAGE ........................................ 7
OIL PRESSURE CHECK ...................................... 8
Changing Engine Oil ................................................ 9
OIL FILTER ............................................................... 10
Removal and Installation ........................................ 10
REMOVAL ........................................................
... 10
INSTALLATION ................................................... 10
INSPECTION AFTER INSTALLATION ............... 10
OIL FILTER BRACKET (AWD) ................................. 12
Components ........................................................... 12
Removal and Installation ........................................ 12
REMOVAL ........................................................
... 12
INSTALLATION ................................................... 12
INSPECTION AFTER INSTALLATION ............... 13
OIL COOLER ............................................................ 14
Components ........................................................... 14
Removal and Installation ........................................ 15
REMOVAL ........................................................
... 15
INSPECTION AFTER REMOVAL ....................... 16
INSTALLATION ................................................... 16
INSPECTION AFTER INSTALLATION ............... 16
OIL PUMP ................................................................. 18
Components ........................................................... 18
Removal and Installation ........................................ 18
REMOVAL ........................................................
... 18
INSTALLATION ................................................... 18INSPECTION AFTER INSTALLATION ................ 18
Disassembly and Assembly .................................... 18
DISASSEMBLY ................................................... 18
INSPECTION AFTER DISASSEMBLY ................ 19
ASSEMBLY ......................................................... 20
SERVICE DATA AND SPECIFICATIONS (SDS) ...... 21
Standard and Limit .................................................. 21
ENGINE OIL PRESSURE ................................... 21
ENGINE OIL CAPACITY (APPROXIMATE) ........ 21
OIL PUMP ........................................................... 21
REGULATOR VALVE .......................................... 21
VK45DE
PRECAUTIONS ........................................................ 22
Precautions for Liquid Gasket ................................ 22
LIQUID GASKET APPLICATION PROCEDURE ... 22
PREPARATION ......................................................... 23
Special Service Tools ............................................. 23
Commercial Service Tools ...................................... 23
LUBRICATION SYSTEM .......................................... 24
Lubrication Circuit ................................................... 24
System Chart .......................................................... 25
ENGINE OIL .............................................................. 26
Inspection ............................................................... 26
ENGINE OIL LEVEL ............................................ 26
ENGINE OIL APPEARANCE .............................. 26
ENGINE OIL LEAKAGE ...................................... 26
OIL PRESSURE CHECK .................................... 26
Changing Engine Oil ............................................
... 28
OIL FILTER ............................................................... 29
Removal and Installation ........................................ 29
REMOVAL ........................................................
... 29
INSTALLATION ................................................... 29
INSPECTION AFTER INSTALLATION ................ 29
OIL PUMP ................................................................. 30
Components ........................................................... 30
Removal and Installation ........................................ 30
REMOVAL ........................................................
... 30
INSTALLATION ................................................... 30
Page 4745 of 5621

LU-2Revision: 2006 January2006 M35/M45 INSPECTION AFTER INSTALLATION ................ 31
Disassembly and Assembly .................................... 31
DISASSEMBLY ................................................... 31
INSPECTION AFTER DISASSEMBLY ................ 31
ASSEMBLY ......................................................... 32SERVICE DATA AND SPECIFICATIONS (SDS) ...... 33
Standard and Limit .................................................. 33
ENGINE OIL PRESSURE .................................... 33
ENGINE OIL CAPACITY (APPROXIMATE) ........ 33
OIL PUMP ............................................................ 33
REGULATOR VALVE ........................................... 33
Page 4746 of 5621
![INFINITI M35 2006 Factory Service Manual PRECAUTIONS
LU-3
[VQ35DE]
C
D
E
F
G
H
I
J
K
L
MA
LU
Revision: 2006 January2006 M35/M45
[VQ35DE]PRECAUTIONSPFP:00001
Precautions for Liquid GasketNBS004PR
LIQUID GASKET APPLICATION PROCEDURE
1. Remove INFINITI M35 2006 Factory Service Manual PRECAUTIONS
LU-3
[VQ35DE]
C
D
E
F
G
H
I
J
K
L
MA
LU
Revision: 2006 January2006 M35/M45
[VQ35DE]PRECAUTIONSPFP:00001
Precautions for Liquid GasketNBS004PR
LIQUID GASKET APPLICATION PROCEDURE
1. Remove](/manual-img/42/57023/w960_57023-4745.png)
PRECAUTIONS
LU-3
[VQ35DE]
C
D
E
F
G
H
I
J
K
L
MA
LU
Revision: 2006 January2006 M35/M45
[VQ35DE]PRECAUTIONSPFP:00001
Precautions for Liquid GasketNBS004PR
LIQUID GASKET APPLICATION PROCEDURE
1. Remove old liquid gasket adhering to the liquid gasket application surface and the mating surface.
Remove liquid gasket completely from the liquid gasket application surface, mounting bolts, and bolt
holes.
2. Wipe the liquid gasket application surface and the mating surface with white gasoline (lighting and heating
use) to remove adhering moisture, grease and foreign materials.
3. Apply liquid gasket to the liquid gasket application surface.
Use Genuine RTV Silicone Sealant or equivalent. Refer to GI-48, "
RECOMMENDED CHEMICAL
PRODUCTS AND SEALANTS" .
Within five minutes of liquid gasket application, install the mating component.
If liquid gasket protrudes, wipe it off immediately.
Do not retighten mounting bolts or nuts after the installation.
After 30 minutes or more have passed from the installation, fill engine oil and engine coolant.
Page 4747 of 5621
![INFINITI M35 2006 Factory Service Manual LU-4
[VQ35DE]
PREPARATION
Revision: 2006 January2006 M35/M45
PREPARATIONPFP:00002
Special Service ToolsNBS004PS
The actual shapes of Kent-Moore tools may differ from those of special service tools ill INFINITI M35 2006 Factory Service Manual LU-4
[VQ35DE]
PREPARATION
Revision: 2006 January2006 M35/M45
PREPARATIONPFP:00002
Special Service ToolsNBS004PS
The actual shapes of Kent-Moore tools may differ from those of special service tools ill](/manual-img/42/57023/w960_57023-4746.png)
LU-4
[VQ35DE]
PREPARATION
Revision: 2006 January2006 M35/M45
PREPARATIONPFP:00002
Special Service ToolsNBS004PS
The actual shapes of Kent-Moore tools may differ from those of special service tools illustrated here.
Commercial Service ToolsNBS004PT
Tool number
(Kent-Moore No.)
Tool nameDescription
ST25051001
(J25695-1)
Oil pressure gaugeMeasuring oil pressure
Maximum measuring range: 2.452 kPa (25
kg-cm
2 , 356 psi)
ST25052000
(J25695-2)
HoseAdapting oil pressure gauge to oil pan (upper)
KV10115801
(J38956)
Oil filter wrenchRemoving and installing oil filter
(2WD models)
a: 64.3 mm (2.531 in)
WS39930000
(—)
Tube presser Pressing tube of liquid gasket
NT050
S-NT559
S-NT375
NT052
Tool nameDescription
Power toolsLoosening nuts and bolts
Deep socketRemoving and installing oil pressure switch
a: 26 mm (1.02 in)
PBIC0190E
PBIC2072E
Page 4751 of 5621
![INFINITI M35 2006 Factory Service Manual LU-8
[VQ35DE]
ENGINE OIL
Revision: 2006 January2006 M35/M45
Crankshaft oil seals (front and rear)
Camshaft position sensor (PHASE)
OIL PRESSURE CHECK
WAR NING :
Be careful not to get burn yourself, as INFINITI M35 2006 Factory Service Manual LU-8
[VQ35DE]
ENGINE OIL
Revision: 2006 January2006 M35/M45
Crankshaft oil seals (front and rear)
Camshaft position sensor (PHASE)
OIL PRESSURE CHECK
WAR NING :
Be careful not to get burn yourself, as](/manual-img/42/57023/w960_57023-4750.png)
LU-8
[VQ35DE]
ENGINE OIL
Revision: 2006 January2006 M35/M45
Crankshaft oil seals (front and rear)
Camshaft position sensor (PHASE)
OIL PRESSURE CHECK
WAR NING :
Be careful not to get burn yourself, as engine oil may be hot.
Oil pressure check should be done in “Parking position”.
1. Check the engine oil level. Refer to LU-7, "
ENGINE OIL LEVEL" .
2. Remove front engine undercover with power tool.
3. Disconnect harness connector at oil pressure switch, and
remove oil pressure switch using deep socket (commercial ser-
vice tool).
CAUTION:
Do not drop or shock oil pressure switch.
Remove the oil pressure switch using a 26 mm (1.02 in) box
wrench. (AWD models)
4. Install the oil pressure gauge (SST) and hose (SST).
5. Start the engine and warm it up to normal operating temperature.
6. Check the engine oil pressure with engine running under no-load.
NOTE:
When the engine oil temperature is low, the engine oil pressure becomes high.
Engine oil pressure [Engine oil temperature at 80
C (176 F)]
If difference is extreme, check engine oil passage and oil pump for engine oil leaks.
7. After the inspections, install oil pressure switch as follows:
SBIA0452E
SBIA0453E
SLC926
Engine speed (rpm)
Approximate discharge pressure [kPa (kg/cm2 , psi)]
Idle speed More than 98 (1.0, 14)
2,000 More than 294 (3.0, 43)
Page 4752 of 5621
![INFINITI M35 2006 Factory Service Manual ENGINE OIL
LU-9
[VQ35DE]
C
D
E
F
G
H
I
J
K
L
MA
LU
Revision: 2006 January2006 M35/M45
a. Remove old liquid gasket adhering to oil pressure switch and the mating surface.
b. Apply liquid gasket and tig INFINITI M35 2006 Factory Service Manual ENGINE OIL
LU-9
[VQ35DE]
C
D
E
F
G
H
I
J
K
L
MA
LU
Revision: 2006 January2006 M35/M45
a. Remove old liquid gasket adhering to oil pressure switch and the mating surface.
b. Apply liquid gasket and tig](/manual-img/42/57023/w960_57023-4751.png)
ENGINE OIL
LU-9
[VQ35DE]
C
D
E
F
G
H
I
J
K
L
MA
LU
Revision: 2006 January2006 M35/M45
a. Remove old liquid gasket adhering to oil pressure switch and the mating surface.
b. Apply liquid gasket and tighten oil pressure switch to the specification.
Use Genuine RTV Silicone Sealant or equivalent. Refer to GI-48, "
RECOMMENDED CHEMICAL
PRODUCTS AND SEALANTS" .
c. After warming up engine, make sure there is no leakage of engine oil with running engine.
Changing Engine OilNBS004PX
WAR NING :
Be careful not to get burn yourself, as engine oil may be hot.
Prolonged and repeated contact with used engine oil may cause skin cancer; try to avoid direct
skin contact with used engine oil. If skin contact is made, wash thoroughly with soap or hand
cleaner as soon as possible.
1. Warm up the engine, and check for engine oil leakage from engine components. Refer to LU-7, "
ENGINE
OIL LEAKAGE" .
2. Stop the engine and wait for 10 minutes.
3. Loosen oil filler cap.
4. Remove mounting bolts, and then pull down the rear of front
engine undercover (1) and secure it using clip.
5. Remove drain plug (2) and then drain engine oil.
6. Install drain plug with new washer. Refer to EM-29, "
OIL PAN AND OIL STRAINER" .
CAUTION:
Be sure to clean drain plug and install with new washer.
7. Refill with new engine oil.
Engine oil specification and viscosity:
Refer to MA-12, "
RECOMMENDED FLUIDS AND LUBRICANTS" .
Engine oil capacity (Approximate):
Unit: (US qt, lmp qt)
CAUTION:
When filling engine oil, do not pull out oil level gauge.
The refill capacity depends on the engine oil temperature and drain time. Use these specifica-
tions for reference only.
Always use oil level gauge to determine the proper amount of engine oil in engine.
8. Warm up the engine and check area around drain plug and oil filter for engine oil leakage.
9. Stop the engine and wait for 10 minutes.
10. Check the engine oil level. Refer to LU-7, "
ENGINE OIL LEVEL" . Oil pressure switch:
: 14.8 Nꞏm (1.5 kg-m, 11 ft-lb)
KBIA3593J
Oil pan drain plug:
: 34.3 Nꞏm (3.5 kg-m, 25 ft-lb)
Drain and refill With oil filter change 4.7 (5, 4-1/8)
Without oil filter change 4.4 (4-5/8, 3-7/8)
Dry engine (Overhaul)5.4 (5-3/4, 4-3/4)
Page 4753 of 5621
![INFINITI M35 2006 Factory Service Manual LU-10
[VQ35DE]
OIL FILTER
Revision: 2006 January2006 M35/M45
OIL FILTERPFP:15208
Removal and InstallationNBS004PY
REMOVAL
1. Remove front engine undercover with power tool.
2. Using oil filter wrench INFINITI M35 2006 Factory Service Manual LU-10
[VQ35DE]
OIL FILTER
Revision: 2006 January2006 M35/M45
OIL FILTERPFP:15208
Removal and InstallationNBS004PY
REMOVAL
1. Remove front engine undercover with power tool.
2. Using oil filter wrench](/manual-img/42/57023/w960_57023-4752.png)
LU-10
[VQ35DE]
OIL FILTER
Revision: 2006 January2006 M35/M45
OIL FILTERPFP:15208
Removal and InstallationNBS004PY
REMOVAL
1. Remove front engine undercover with power tool.
2. Using oil filter wrench (SST), remove oil filter.
CAUTION:
Oil filter is provided with relief valve. Use Genuine Nissan
Oil Filter or equivalent.
Be careful not to get burned when engine and engine oil
may be hot.
When removing, prepare a shop cloth to absorb any
engine oil leakage or spillage.
Do not allow engine oil to adhere to drive belts.
Completely wipe off any engine oil that adheres to engine
and vehicle.
INSTALLATION
1. Remove foreign materials adhering to oil filter installation surface.
2. Apply engine oil to the oil seal contact surface of new oil filter.
3. Screw oil filter manually until it touches the installation surface,
then tighten it by 2/3 turn. Or tighten to the specification.
INSPECTION AFTER INSTALLATION
1. Check the engine oil level. Refer to LU-7, "ENGINE OIL" .
2. Start the engine, and check there is no leak of engine oil.
SBIA0454E
SBIA0455E
SMA010
Oil filter:
: 17.7 Nꞏm (1.8 kg-m, 13 ft-lb)
SMA229B