Page 4710 of 5621

INTERIOR ROOM LAMP
LT-283
C
D
E
F
G
H
I
J
L
MA
B
LT
Revision: 2006 January2006 M35/M45
Preliminary CheckNKS003T6
CHECK POWER SUPPLY AND GROUND CIRCUIT
1. CHECK FUSE
Check for blown fuses.
Refer to LT-274, "Wiring Diagram — ROOM/L —" .
OK or NG
OK >> GO TO 2.
NG >> If fuse or fusible link is blown, be sure to eliminate cause of malfunction before installing new fuse
or fusible link. Refer to PG-3, "
POWER SUPPLY ROUTING CIRCUIT" .
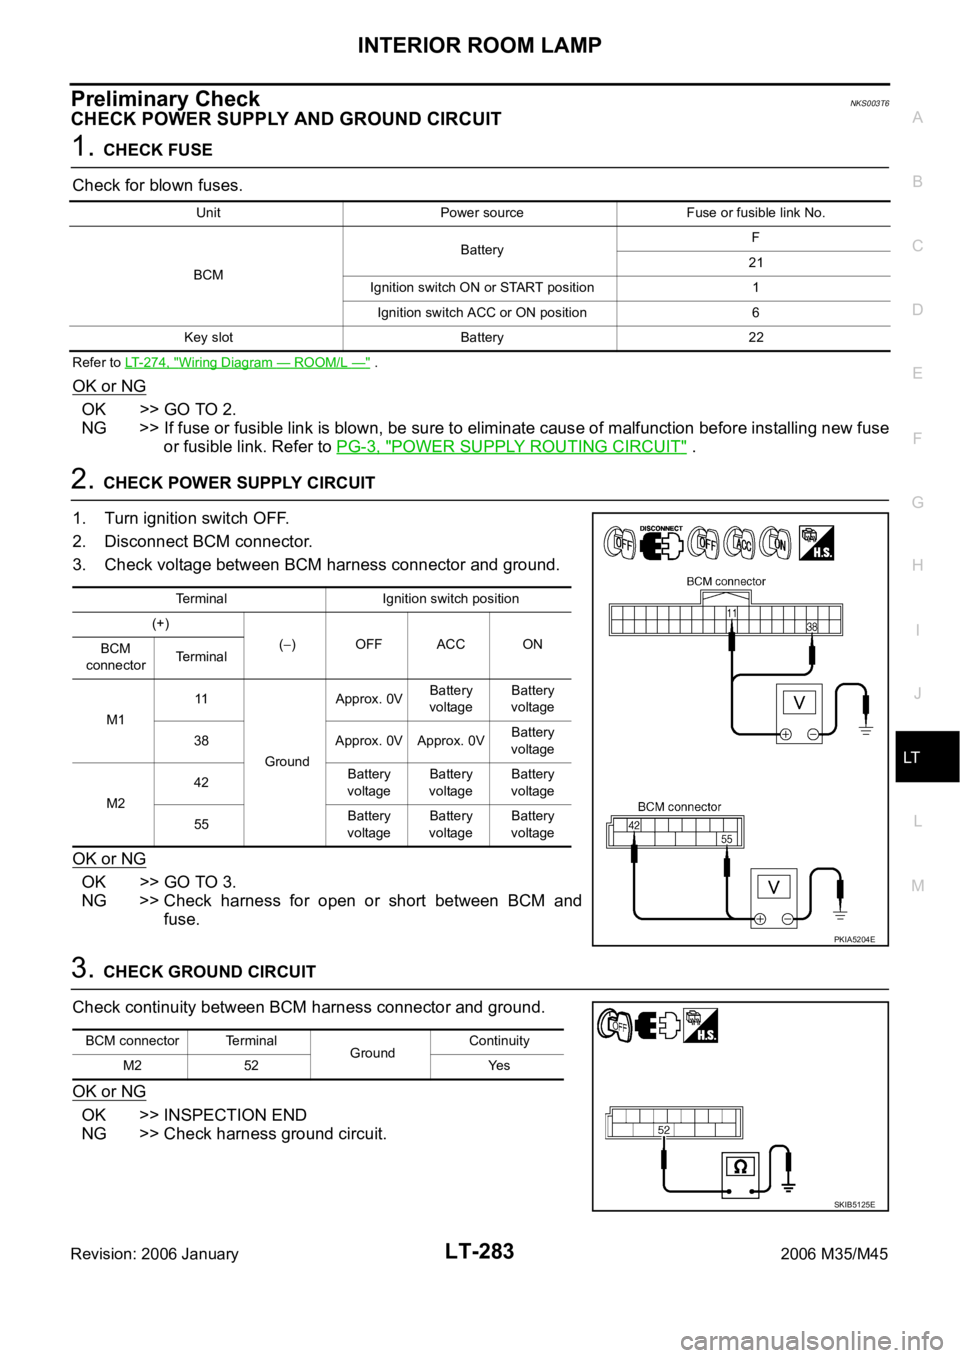
2. CHECK POWER SUPPLY CIRCUIT
1. Turn ignition switch OFF.
2. Disconnect BCM connector.
3. Check voltage between BCM harness connector and ground.
OK or NG
OK >> GO TO 3.
NG >> Check harness for open or short between BCM and
fuse.
3. CHECK GROUND CIRCUIT
Check continuity between BCM harness connector and ground.
OK or NG
OK >> INSPECTION END
NG >> Check harness ground circuit.
Unit Power source Fuse or fusible link No.
BCMBatteryF
21
Ignition switch ON or START position 1
Ignition switch ACC or ON position 6
Key slot Battery 22
Terminal Ignition switch position
(+)
(
)OFFACCON
BCM
connectorTerminal
M111
GroundApprox. 0VBattery
voltageBattery
voltage
38 Approx. 0V Approx. 0VBattery
voltage
M242Battery
voltageBattery
voltageBattery
voltage
55Battery
voltageBattery
voltageBattery
voltage
PKIA5204E
BCM connector Terminal
GroundContinuity
M2 52 Yes
SKIB5125E
Page 4716 of 5621

INTERIOR ROOM LAMP
LT-289
C
D
E
F
G
H
I
J
L
MA
B
LT
Revision: 2006 January2006 M35/M45
Interior Room Lamp Control Does Not OperateNKS003T8
1. SELF-DIAGNOSIS
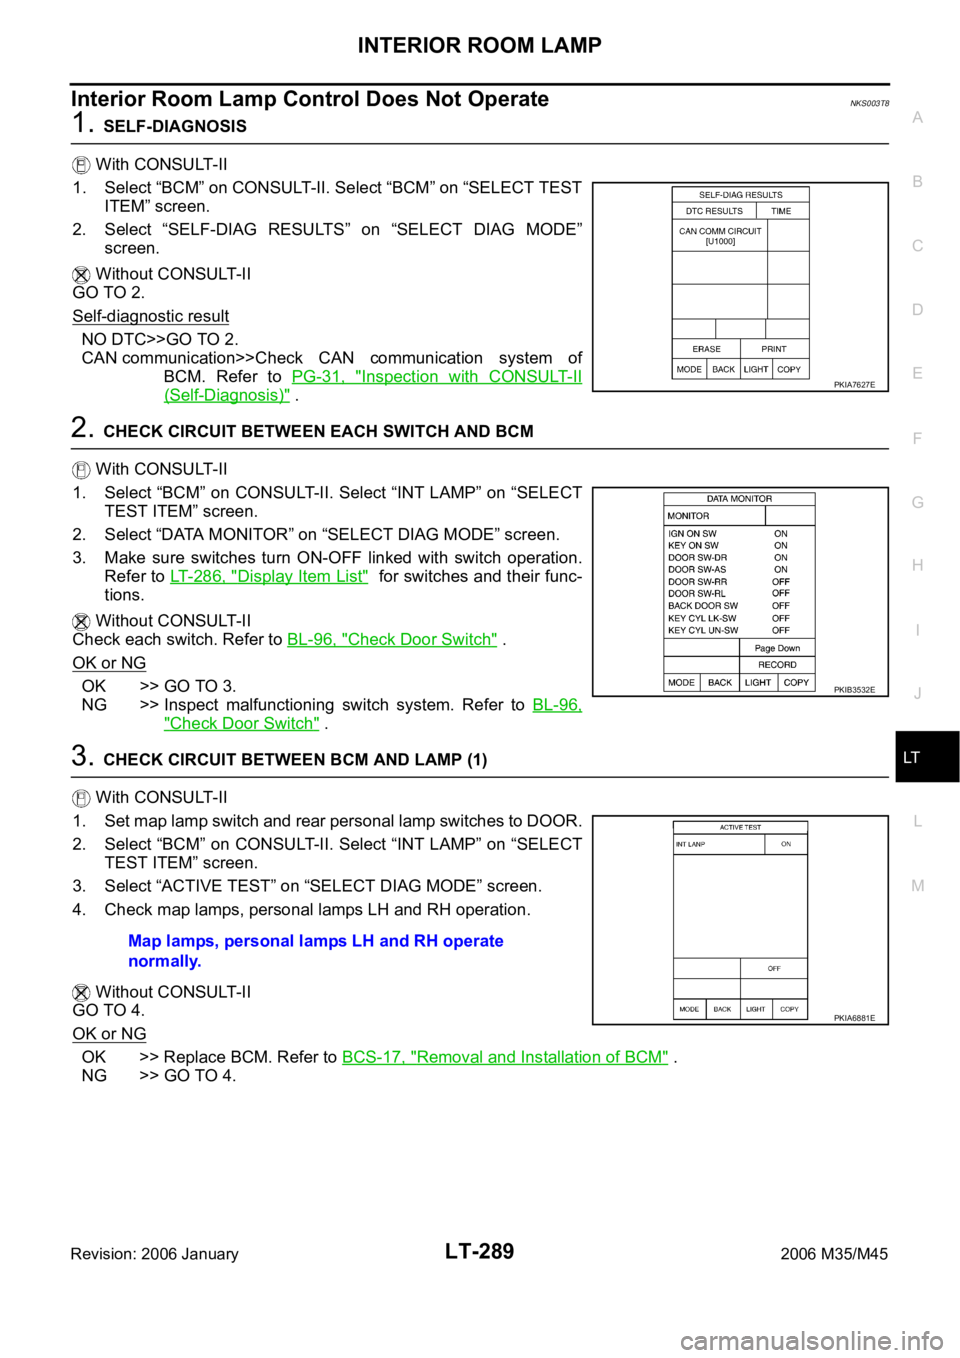
With CONSULT-II
1. Select “BCM” on CONSULT-II. Select “BCM” on “SELECT TEST
ITEM” screen.
2. Select “SELF-DIAG RESULTS” on “SELECT DIAG MODE”
screen.
Without CONSULT-II
GO TO 2.
Self-diagnostic result
NO DTC>>GO TO 2.
CAN communication>>Check CAN communication system of
BCM. Refer to PG-31, "
Inspection with CONSULT-II
(Self-Diagnosis)" .
2. CHECK CIRCUIT BETWEEN EACH SWITCH AND BCM
With CONSULT-II
1. Select “BCM” on CONSULT-II. Select “INT LAMP” on “SELECT
TEST ITEM” screen.
2. Select “DATA MONITOR” on “SELECT DIAG MODE” screen.
3. Make sure switches turn ON-OFF linked with switch operation.
Refer to LT- 2 8 6 , "
Display Item List" for switches and their func-
tions.
Without CONSULT-II
Check each switch. Refer to BL-96, "
Check Door Switch" .
OK or NG
OK >> GO TO 3.
NG >> Inspect malfunctioning switch system. Refer to BL-96,
"Check Door Switch" .
3. CHECK CIRCUIT BETWEEN BCM AND LAMP (1)
With CONSULT-II
1. Set map lamp switch and rear personal lamp switches to DOOR.
2. Select “BCM” on CONSULT-II. Select “INT LAMP” on “SELECT
TEST ITEM” screen.
3. Select “ACTIVE TEST” on “SELECT DIAG MODE” screen.
4. Check map lamps, personal lamps LH and RH operation.
Without CONSULT-II
GO TO 4.
OK or NG
OK >> Replace BCM. Refer to BCS-17, "Removal and Installation of BCM" .
NG >> GO TO 4.
PKIA7627E
PKIB3532E
Map lamps, personal lamps LH and RH operate
normally.
PKIA6881E
Page 4717 of 5621
LT-290
INTERIOR ROOM LAMP
Revision: 2006 January2006 M35/M45
4. CHECK CIRCUIT BETWEEN BCM AND MAP LAMP (2)
1. Turn ignition switch OFF.
2. Disconnect BCM connector and map lamp connector.
3. Check continuity between BCM harness connector (A) M2 termi-
nal 48 and map lamp harness connector (B) R54 terminal 5.
OK or NG
OK >> Replace BCM. Refer to BCS-17, "Removal and Installa-
tion of BCM" . (Reconnect BCM connector and check
the operation of map lamp. If it is faulty, replace BCM.)
NG >> Repair harness or connector between BCM and map
lamp. 48 – 5 : Continuity should exist.
SKIB4867E
Page 4718 of 5621
INTERIOR ROOM LAMP
LT-291
C
D
E
F
G
H
I
J
L
MA
B
LT
Revision: 2006 January2006 M35/M45
Map LampNKS003T9
BULB REPLACEMENT
1. Remove lens (1) using clip driver or suitable tool.
2. Remove bulb (2).
REMOVAL AND INSTALLATION
Refer to EI-52, "HEADLINING" .
Personal LampNKS003TA
BULB REPLACEMENT
1. Insert a screwdriver or similar tool and remove lens (1).
2. Remove bulb (2).
REMOVAL AND INSTALLATION
Removal
1. Remove screw (A).
2. Use a clip driver or similar tool and remove personal lamp (1).
3. Disconnect connector.
Installation
Installation is the reverse order of removal.Map lamp : 12V - 8 W
SKIB4195E
Personal lamp : 12V - 8W
SKIB4200E
SKIB4201E
Page 4719 of 5621
LT-292
INTERIOR ROOM LAMP
Revision: 2006 January2006 M35/M45
Foot Lamp (Driver Side)NKS003TB
BULB REPLACEMENT
1. Insert a screwdriver or similar tool and remove lens (1).
2. Remove bulb (2).
REMOVAL AND INSTALLATION
Removal
1. Use a clip driver or similar tool and remove foot lamp (driver
side) (1).
2. Disconnect connector.
Installation
Installation is the reverse order of removal.Foot lamp (Driver side) : 12V - 3.4W
SKIB4202E
SKIB4203E
Page 4720 of 5621
INTERIOR ROOM LAMP
LT-293
C
D
E
F
G
H
I
J
L
MA
B
LT
Revision: 2006 January2006 M35/M45
Foot Lamp (Passenger Side)NKS003TC
BULB REPLACEMENT
1. Insert a screwdriver or similar tool and remove lens (1).
2. Remove bulb (2).
REMOVAL AND INSTALLATION
Removal
1. Use a clip driver or similar tool and remove foot lamp (passenger
side) (1).
2. Disconnect connector.
Installation
Installation is the reverse order of removal.
Vanity Mirror LampNKS003TD
BULB REPLACEMENT
1. Insert a thin screwdriver in the lens end and remove lens (1).
2. Remove bulb (2).Foot lamp (Passenger side) : 12V - 3.4W
SKIB4204E
SKIB4205E
Vanity mirror lamp : 12V - 1.8 W
SKIB4197E
Page 4721 of 5621
LT-294
INTERIOR ROOM LAMP
Revision: 2006 January2006 M35/M45
Step LampNKS003TE
BULB REPLACEMENT
1. Insert a screwdriver or similar tool and remove lens (1).
2. Remove bulb.
REMOVAL AND INSTALLATION
Remove step lamp integral with door trim. Refer toEI-37, "Removal and Installation" .
Kicking Plate IlluminationNKS003TF
BULB REPLACEMENT
Replacement integral with front kicking plate inner.
REMOVAL AND INSTALLATION
Remove integral with front kicking plate inner. Refer to EI-37, "Removal and Installation" .
Trunk Room Lamp (Upper/Lower)NKS003TG
BULB REPLACEMENT
1. Insert a screwdriver or similar tool and remove lens (1).
2. Remove bulb (2).
REMOVAL AND INSTALLATION
Removal
1. Insert a screwdriver or similar tool and remove trunk room lamp
(1).
2. Disconnect connector.
Installation
Installation is the reverse order of removal. Step lamp : 12V - 5W
SKIB4188E
Trunk room lamp (upper/lower) : 12V - 5W
SKIB4198E
SKIB4199E
Page 4740 of 5621
ILLUMINATION
LT-313
C
D
E
F
G
H
I
J
L
MA
B
LT
Revision: 2006 January2006 M35/M45
Glove Box LampNKS003TM
BULB REPLACEMENT, REMOVAL AND INSTALLATION
Removal
1. Remove glove box cover. Refer to IP-10, "INSTRUMENT PANEL ASSEMBLY" .
2. Turn globe box lamp bulb socket (1) counterclockwise and
unlock it.
3. Remove bulb (2).
Installation
Installation is the reverse order of removal.
Cigarette Lighter IlluminationNKS003TN
BULB REPLACEMENT, REMOVAL AND INSTALLATION
Removal
1. Remove A/T console finisher. Refer to IP-11, "Removal and Installation of Instrument Panel & Pad" .
2. Remove screws (A).
3. Use a screwdriver to undo hooks, remove bulb sockets (1).
4. Remove bulb (2).
Installation
Installation is the reverse order of removal.Glove box lamp : 12V - 1.4W
SKIB4206E
SKIB4207E
Front ashtray and cigarette lighter
illumination: 12V - 1.4W
SKIB4209E