Page 4502 of 5621
HEADLAMP (FOR USA) - XENON TYPE -
LT-75
C
D
E
F
G
H
I
J
L
MA
B
LT
Revision: 2006 January2006 M35/M45
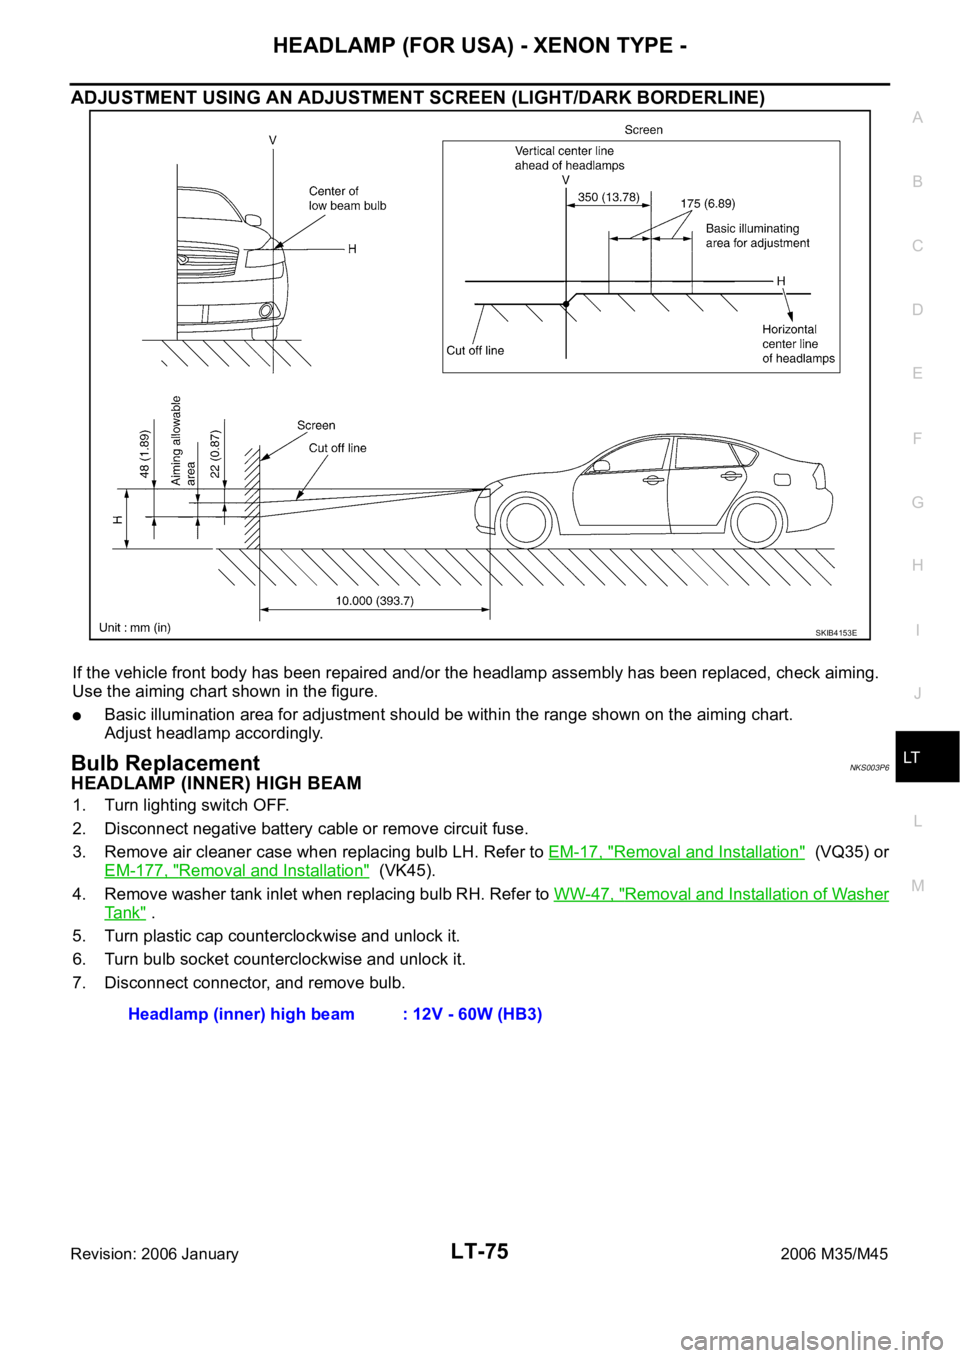
ADJUSTMENT USING AN ADJUSTMENT SCREEN (LIGHT/DARK BORDERLINE)
If the vehicle front body has been repaired and/or the headlamp assembly has been replaced, check aiming.
Use the aiming chart shown in the figure.
Basic illumination area for adjustment should be within the range shown on the aiming chart.
Adjust headlamp accordingly.
Bulb ReplacementNKS003P6
HEADLAMP (INNER) HIGH BEAM
1. Turn lighting switch OFF.
2. Disconnect negative battery cable or remove circuit fuse.
3. Remove air cleaner case when replacing bulb LH. Refer to EM-17, "
Removal and Installation" (VQ35) or
EM-177, "
Removal and Installation" (VK45).
4. Remove washer tank inlet when replacing bulb RH. Refer to WW-47, "
Removal and Installation of Washer
Ta n k" .
5. Turn plastic cap counterclockwise and unlock it.
6. Turn bulb socket counterclockwise and unlock it.
7. Disconnect connector, and remove bulb.
SKIB4153E
Headlamp (inner) high beam : 12V - 60W (HB3)
Page 4503 of 5621
LT-76
HEADLAMP (FOR USA) - XENON TYPE -
Revision: 2006 January2006 M35/M45
HEADLAMP (OUTER) LOW BEAM
1. Turn lighting switch OFF.
2. Disconnect negative battery cable or remove circuit fuse.
3. Remove fender protector (front). Refer toEI-20, "
Removal and Installation" .
4. Turn plastic cap counterclockwise and unlock it.
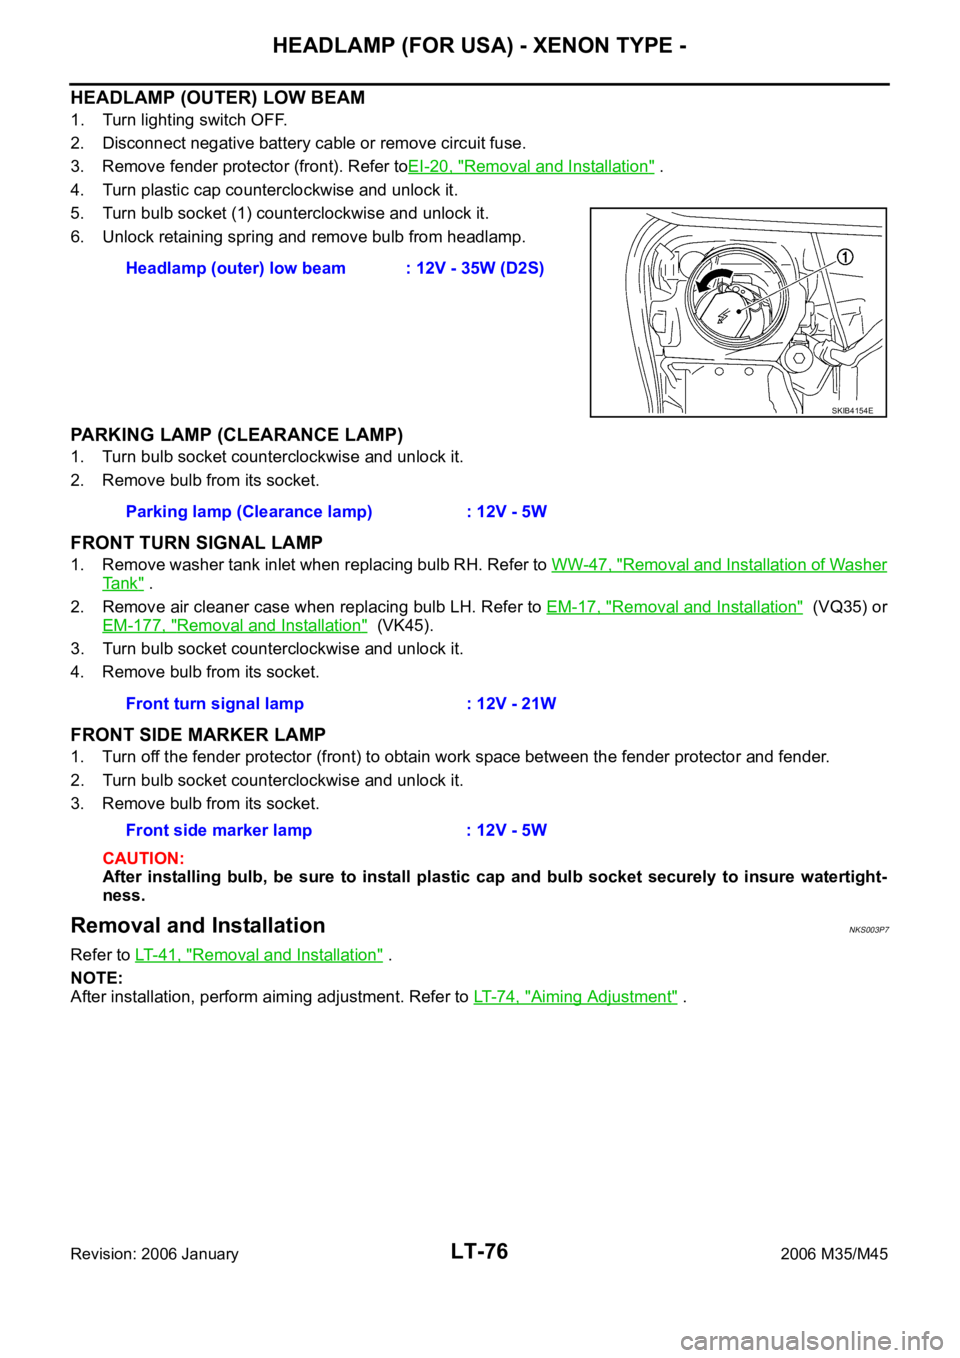
5. Turn bulb socket (1) counterclockwise and unlock it.
6. Unlock retaining spring and remove bulb from headlamp.
PARKING LAMP (CLEARANCE LAMP)
1. Turn bulb socket counterclockwise and unlock it.
2. Remove bulb from its socket.
FRONT TURN SIGNAL LAMP
1. Remove washer tank inlet when replacing bulb RH. Refer to WW-47, "Removal and Installation of Washer
Ta n k" .
2. Remove air cleaner case when replacing bulb LH. Refer to EM-17, "
Removal and Installation" (VQ35) or
EM-177, "
Removal and Installation" (VK45).
3. Turn bulb socket counterclockwise and unlock it.
4. Remove bulb from its socket.
FRONT SIDE MARKER LAMP
1. Turn off the fender protector (front) to obtain work space between the fender protector and fender.
2. Turn bulb socket counterclockwise and unlock it.
3. Remove bulb from its socket.
CAUTION:
After installing bulb, be sure to install plastic cap and bulb socket securely to insure watertight-
ness.
Removal and InstallationNKS003P7
Refer to LT-41, "Removal and Installation" .
NOTE:
After installation, perform aiming adjustment. Refer to LT- 7 4 , "
Aiming Adjustment" . Headlamp (outer) low beam : 12V - 35W (D2S)
SKIB4154E
Parking lamp (Clearance lamp) : 12V - 5W
Front turn signal lamp : 12V - 21W
Front side marker lamp : 12V - 5W
Page 4505 of 5621
LT-78
HEADLAMP (FOR USA) - XENON TYPE -
Revision: 2006 January2006 M35/M45
ASSEMBLY
Note the following, and installation is the reverse order of removal.
CAUTION:
When HID control unit is removed, reinstall it securely and avoid any looseness.
After installing bulb, be sure to install plastic cap and bulb socket securely to insure watertight-
ness HID control unit mounting screw : 3.2 Nꞏm (0.32 kg-m, 28 in-lb)
Page 4519 of 5621
LT-92
HEADLAMP (FOR CANADA) - DAYTIME LIGHT SYSTEM -
Revision: 2006 January2006 M35/M45
Preliminary CheckNKS003PH
INSPECTION FOR POWER SUPPLY AND GROUND CIRCUIT
1. CHECK FUSES
Check for blown fuses or fusible link.
Refer to LT-84, "Wiring Diagram — DTRL —" .
OK or NG
OK >> GO TO 2.
NG >> If fuse is blown, be sure to eliminate cause of malfunction before installing new fuse. Refer to PG-
3, "POWER SUPPLY ROUTING CIRCUIT" .
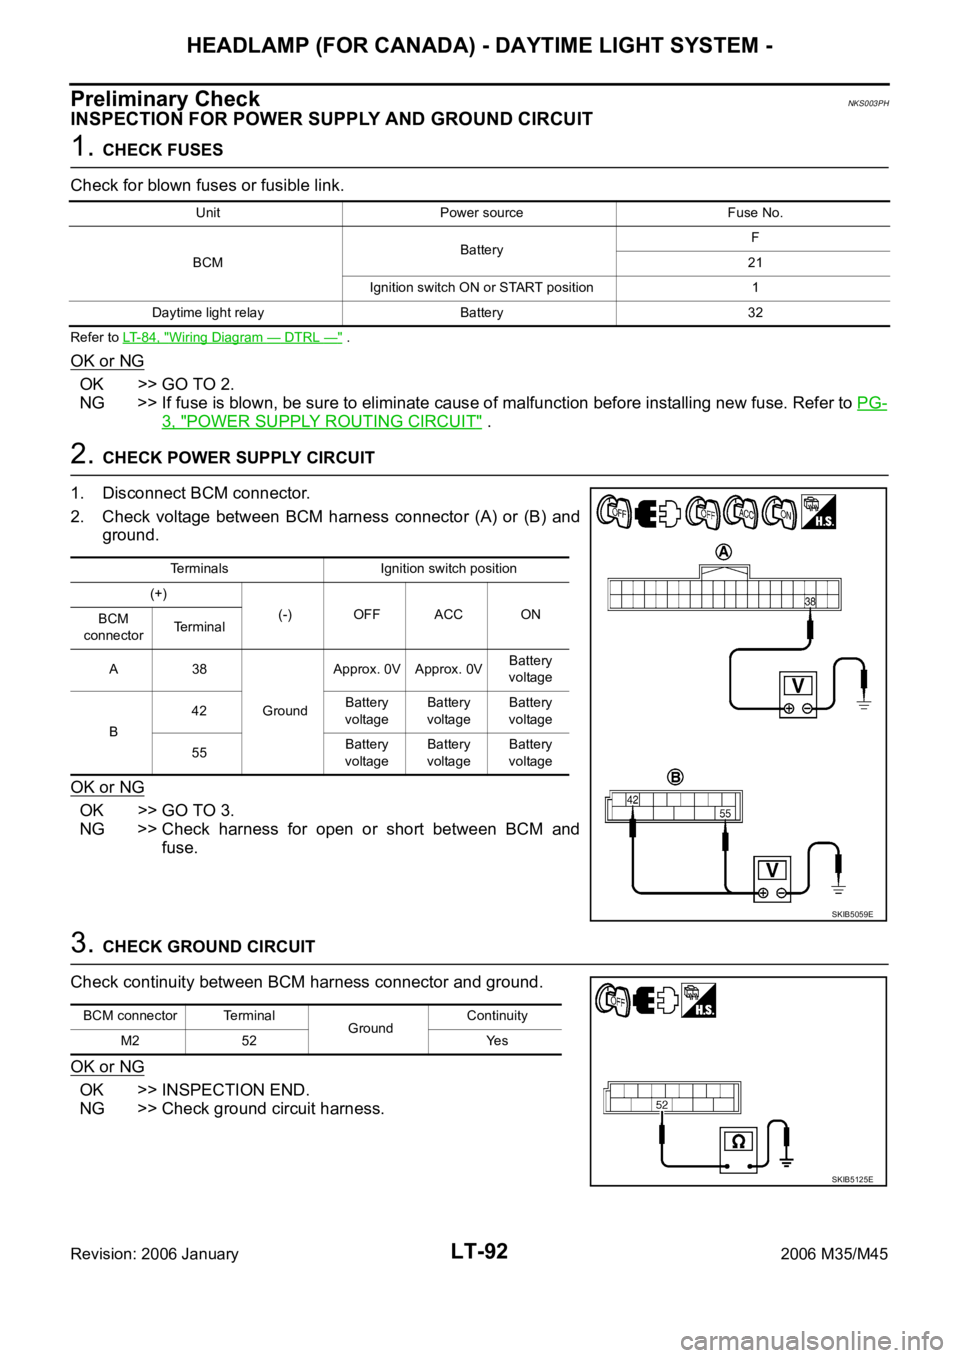
2. CHECK POWER SUPPLY CIRCUIT
1. Disconnect BCM connector.
2. Check voltage between BCM harness connector (A) or (B) and
ground.
OK or NG
OK >> GO TO 3.
NG >> Check harness for open or short between BCM and
fuse.
3. CHECK GROUND CIRCUIT
Check continuity between BCM harness connector and ground.
OK or NG
OK >> INSPECTION END.
NG >> Check ground circuit harness.
Unit Power source Fuse No.
BCMBatteryF
21
Ignition switch ON or START position 1
Daytime light relay Battery 32
Terminals Ignition switch position
(+)
(-) OFF ACC ON
BCM
connectorTerminal
A38
GroundApprox. 0V Approx. 0VBattery
voltage
B42Battery
voltageBattery
voltageBattery
voltage
55Battery
voltageBattery
voltageBattery
voltage
SKIB5059E
BCM connector Terminal
GroundContinuity
M2 52 Yes
SKIB5125E
Page 4526 of 5621
HEADLAMP (FOR CANADA) - DAYTIME LIGHT SYSTEM -
LT-99
C
D
E
F
G
H
I
J
L
MA
B
LT
Revision: 2006 January2006 M35/M45
Daytime Light Control Does Not Operate Properly (Normal Headlamps Operate
Properly)
NKS003PK
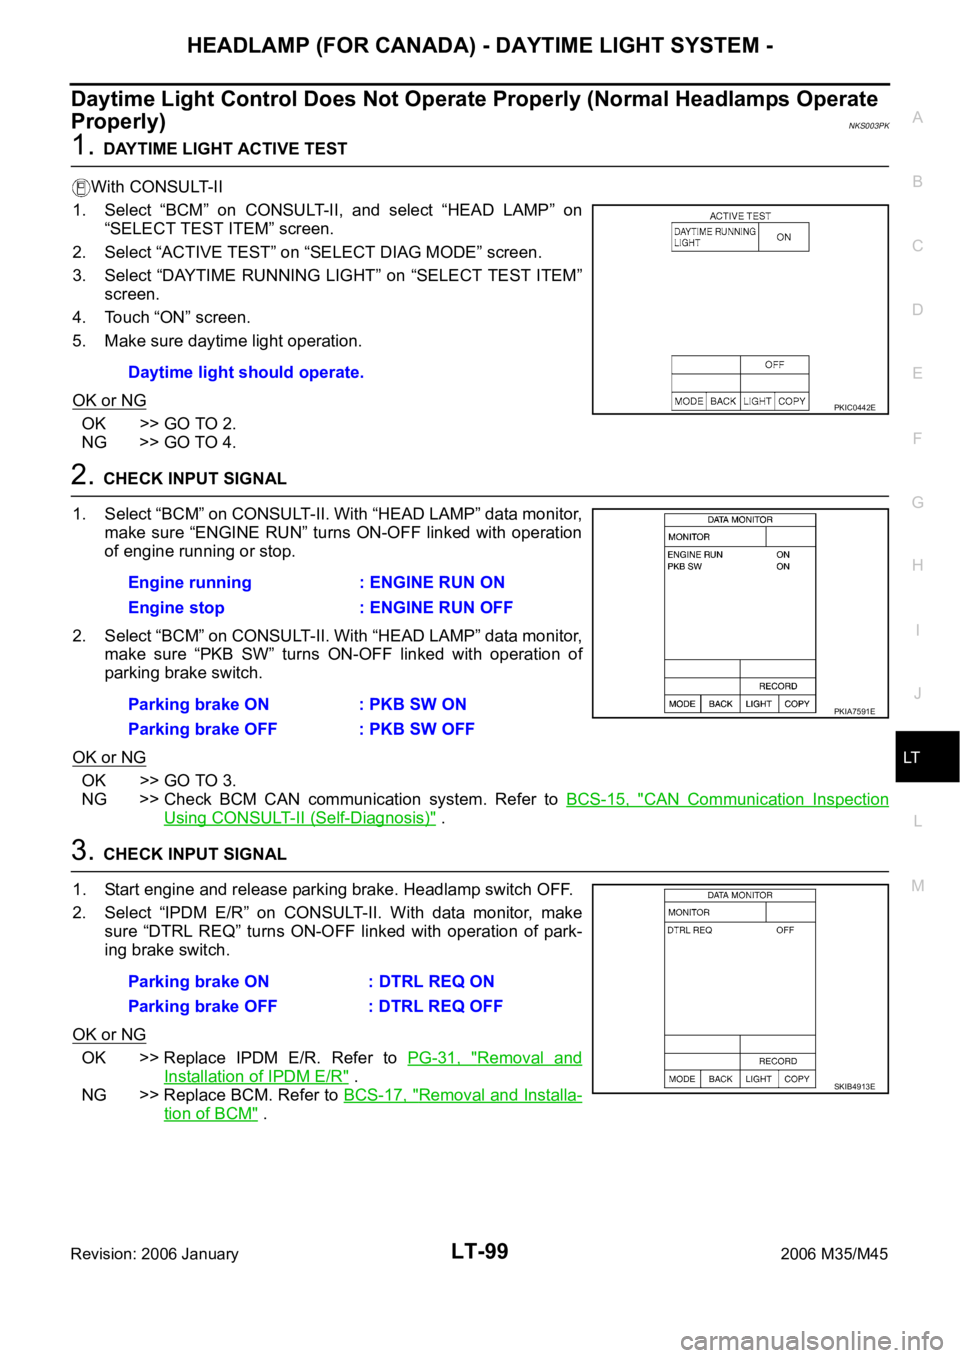
1. DAYTIME LIGHT ACTIVE TEST
With CONSULT-II
1. Select “BCM” on CONSULT-II, and select “HEAD LAMP” on
“SELECT TEST ITEM” screen.
2. Select “ACTIVE TEST” on “SELECT DIAG MODE” screen.
3. Select “DAYTIME RUNNING LIGHT” on “SELECT TEST ITEM”
screen.
4. Touch “ON” screen.
5. Make sure daytime light operation.
OK or NG
OK >> GO TO 2.
NG >> GO TO 4.
2. CHECK INPUT SIGNAL
1. Select “BCM” on CONSULT-II. With “HEAD LAMP” data monitor,
make sure “ENGINE RUN” turns ON-OFF linked with operation
of engine running or stop.
2. Select “BCM” on CONSULT-II. With “HEAD LAMP” data monitor,
make sure “PKB SW” turns ON-OFF linked with operation of
parking brake switch.
OK or NG
OK >> GO TO 3.
NG >> Check BCM CAN communication system. Refer to BCS-15, "
CAN Communication Inspection
Using CONSULT-II (Self-Diagnosis)" .
3. CHECK INPUT SIGNAL
1. Start engine and release parking brake. Headlamp switch OFF.
2. Select “IPDM E/R” on CONSULT-II. With data monitor, make
sure “DTRL REQ” turns ON-OFF linked with operation of park-
ing brake switch.
OK or NG
OK >> Replace IPDM E/R. Refer to PG-31, "Removal and
Installation of IPDM E/R" .
NG >> Replace BCM. Refer to BCS-17, "
Removal and Installa-
tion of BCM" . Daytime light should operate.
PKIC0442E
Engine running : ENGINE RUN ON
Engine stop : ENGINE RUN OFF
Parking brake ON : PKB SW ON
Parking brake OFF : PKB SW OFF
PKIA7591E
Parking brake ON : DTRL REQ ON
Parking brake OFF : DTRL REQ OFF
SKIB4913E
Page 4528 of 5621
HEADLAMP (FOR CANADA) - DAYTIME LIGHT SYSTEM -
LT-101
C
D
E
F
G
H
I
J
L
MA
B
LT
Revision: 2006 January2006 M35/M45
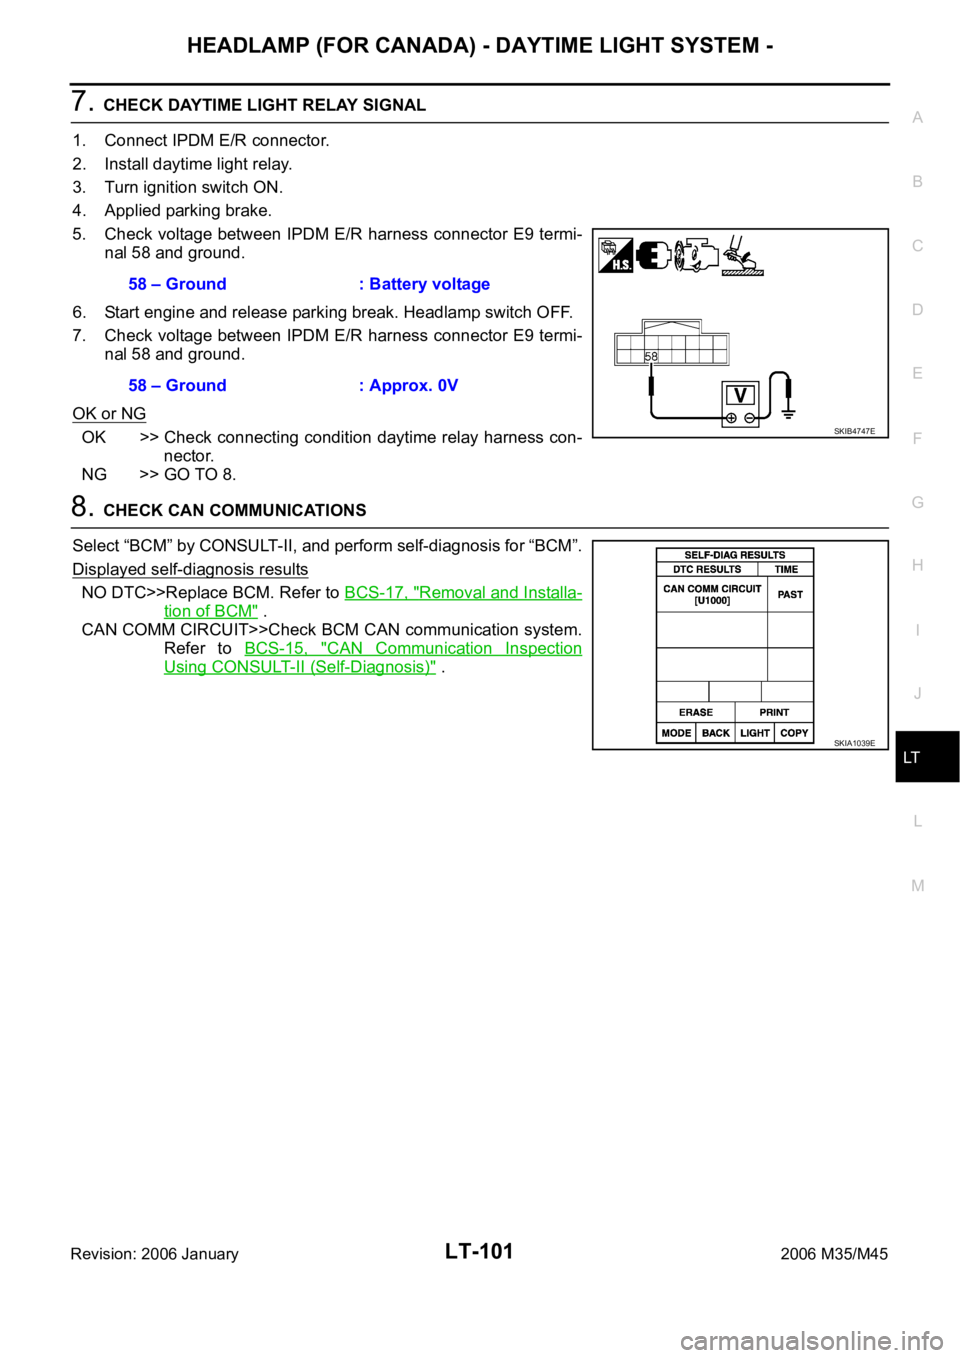
7. CHECK DAYTIME LIGHT RELAY SIGNAL
1. Connect IPDM E/R connector.
2. Install daytime light relay.
3. Turn ignition switch ON.
4. Applied parking brake.
5. Check voltage between IPDM E/R harness connector E9 termi-
nal 58 and ground.
6. Start engine and release parking break. Headlamp switch OFF.
7. Check voltage between IPDM E/R harness connector E9 termi-
nal 58 and ground.
OK or NG
OK >> Check connecting condition daytime relay harness con-
nector.
NG >> GO TO 8.
8. CHECK CAN COMMUNICATIONS
Select “BCM” by CONSULT-II, and perform self-diagnosis for “BCM”.
Displayed self-diagnosis results
NO DTC>>Replace BCM. Refer to BCS-17, "Removal and Installa-
tion of BCM" .
CAN COMM CIRCUIT>>Check BCM CAN communication system.
Refer to BCS-15, "
CAN Communication Inspection
Using CONSULT-II (Self-Diagnosis)" . 58 – Ground : Battery voltage
58 – Ground : Approx. 0V
SKIB4747E
SKIA1039E
Page 4529 of 5621
LT-102
HEADLAMP (FOR CANADA) - DAYTIME LIGHT SYSTEM -
Revision: 2006 January2006 M35/M45
Headlamp High Beam Does Not Illuminate (Both Sides)NKS003PL
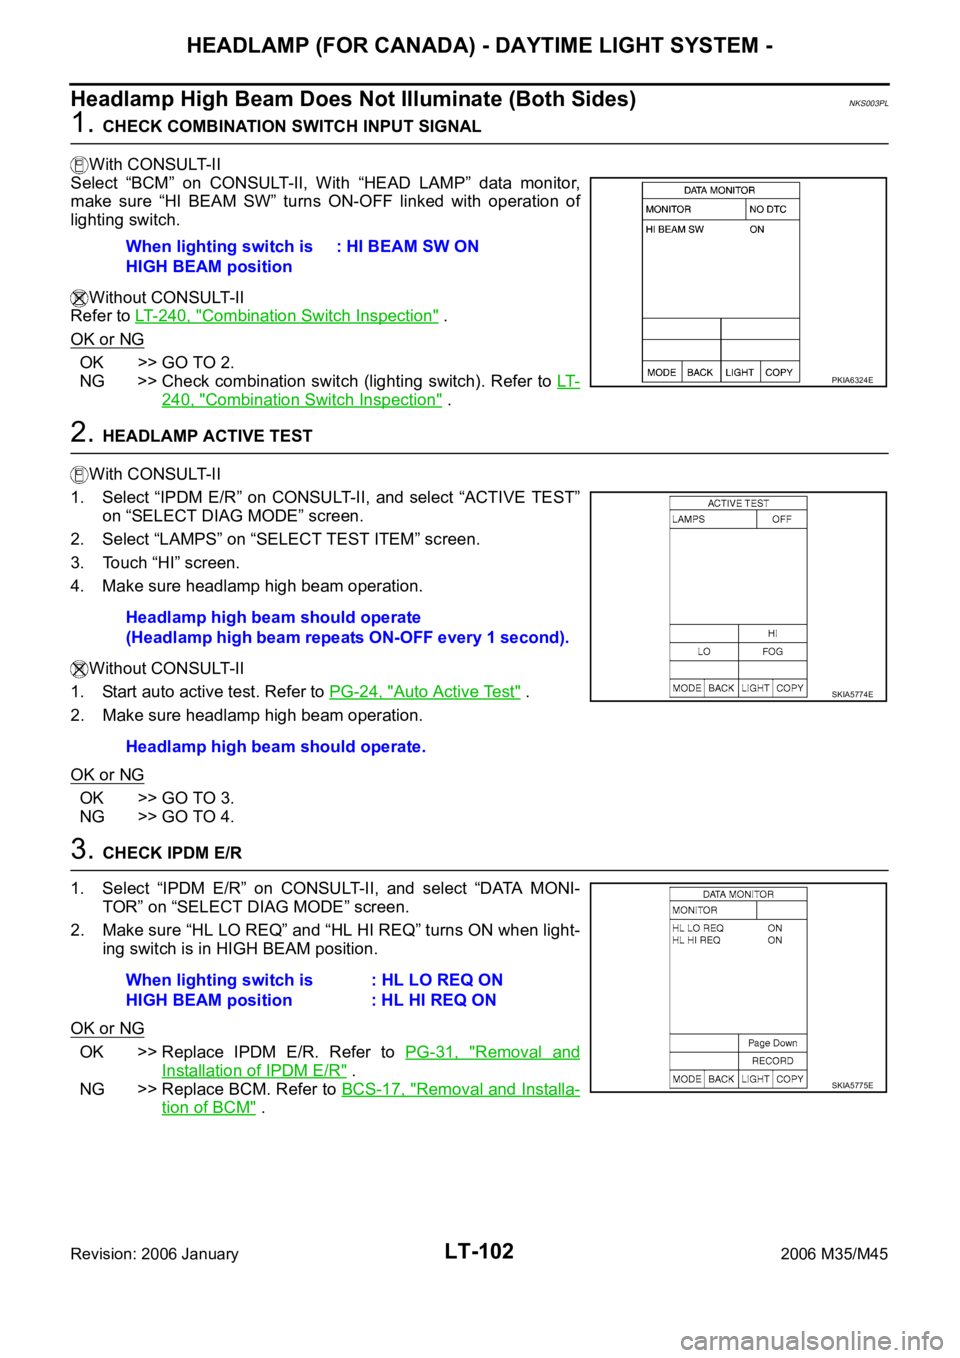
1. CHECK COMBINATION SWITCH INPUT SIGNAL
With CONSULT-II
Select “BCM” on CONSULT-II, With “HEAD LAMP” data monitor,
make sure “HI BEAM SW” turns ON-OFF linked with operation of
lighting switch.
Without CONSULT-II
Refer to LT- 2 4 0 , "
Combination Switch Inspection" .
OK or NG
OK >> GO TO 2.
NG >> Check combination switch (lighting switch). Refer to LT-
240, "Combination Switch Inspection" .
2. HEADLAMP ACTIVE TEST
With CONSULT-II
1. Select “IPDM E/R” on CONSULT-II, and select “ACTIVE TEST”
on “SELECT DIAG MODE” screen.
2. Select “LAMPS” on “SELECT TEST ITEM” screen.
3. Touch “HI” screen.
4. Make sure headlamp high beam operation.
Without CONSULT-II
1. Start auto active test. Refer to PG-24, "
Auto Active Test" .
2. Make sure headlamp high beam operation.
OK or NG
OK >> GO TO 3.
NG >> GO TO 4.
3. CHECK IPDM E/R
1. Select “IPDM E/R” on CONSULT-II, and select “DATA MONI-
TOR” on “SELECT DIAG MODE” screen.
2. Make sure “HL LO REQ” and “HL HI REQ” turns ON when light-
ing switch is in HIGH BEAM position.
OK or NG
OK >> Replace IPDM E/R. Refer to PG-31, "Removal and
Installation of IPDM E/R" .
NG >> Replace BCM. Refer to BCS-17, "
Removal and Installa-
tion of BCM" . When lighting switch is
HIGH BEAM position: HI BEAM SW ON
PKIA6324E
Headlamp high beam should operate
(Headlamp high beam repeats ON-OFF every 1 second).
Headlamp high beam should operate.
SKIA5774E
When lighting switch is
HIGH BEAM position: HL LO REQ ON
: HL HI REQ ON
SKIA5775E
Page 4532 of 5621
HEADLAMP (FOR CANADA) - DAYTIME LIGHT SYSTEM -
LT-105
C
D
E
F
G
H
I
J
L
MA
B
LT
Revision: 2006 January2006 M35/M45
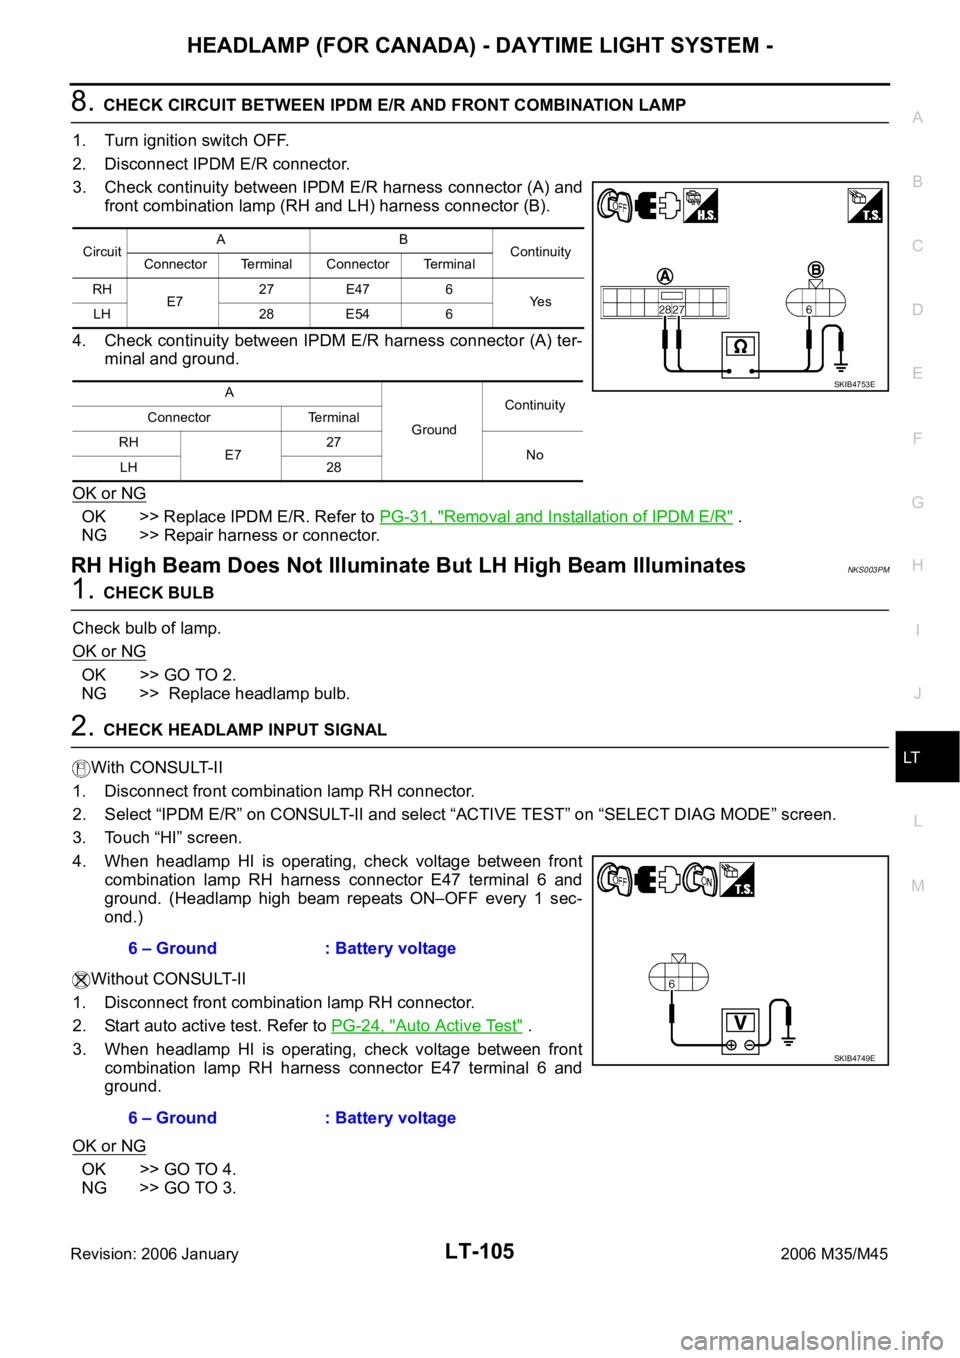
8. CHECK CIRCUIT BETWEEN IPDM E/R AND FRONT COMBINATION LAMP
1. Turn ignition switch OFF.
2. Disconnect IPDM E/R connector.
3. Check continuity between IPDM E/R harness connector (A) and
front combination lamp (RH and LH) harness connector (B).
4. Check continuity between IPDM E/R harness connector (A) ter-
minal and ground.
OK or NG
OK >> Replace IPDM E/R. Refer to PG-31, "Removal and Installation of IPDM E/R" .
NG >> Repair harness or connector.
RH High Beam Does Not Illuminate But LH High Beam IlluminatesNKS003PM
1. CHECK BULB
Check bulb of lamp.
OK or NG
OK >> GO TO 2.
NG >> Replace headlamp bulb.
2. CHECK HEADLAMP INPUT SIGNAL
With CONSULT-II
1. Disconnect front combination lamp RH connector.
2. Select “IPDM E/R” on CONSULT-II and select “ACTIVE TEST” on “SELECT DIAG MODE” screen.
3. Touch “HI” screen.
4. When headlamp HI is operating, check voltage between front
combination lamp RH harness connector E47 terminal 6 and
ground. (Headlamp high beam repeats ON–OFF every 1 sec-
ond.)
Without CONSULT-II
1. Disconnect front combination lamp RH connector.
2. Start auto active test. Refer to PG-24, "
Auto Active Test" .
3. When headlamp HI is operating, check voltage between front
combination lamp RH harness connector E47 terminal 6 and
ground.
OK or NG
OK >> GO TO 4.
NG >> GO TO 3.
CircuitAB
Continuity
Connector Terminal Connector Terminal
RH
E727 E47 6
Ye s
LH 28 E54 6
A
GroundContinuity
Connector Terminal
RH
E727
No
LH 28
SKIB4753E
6 – Ground : Battery voltage
6 – Ground : Battery voltage
SKIB4749E