Page 4502 of 5621

HEADLAMP (FOR USA) - XENON TYPE -
LT-75
C
D
E
F
G
H
I
J
L
MA
B
LT
Revision: 2006 January2006 M35/M45
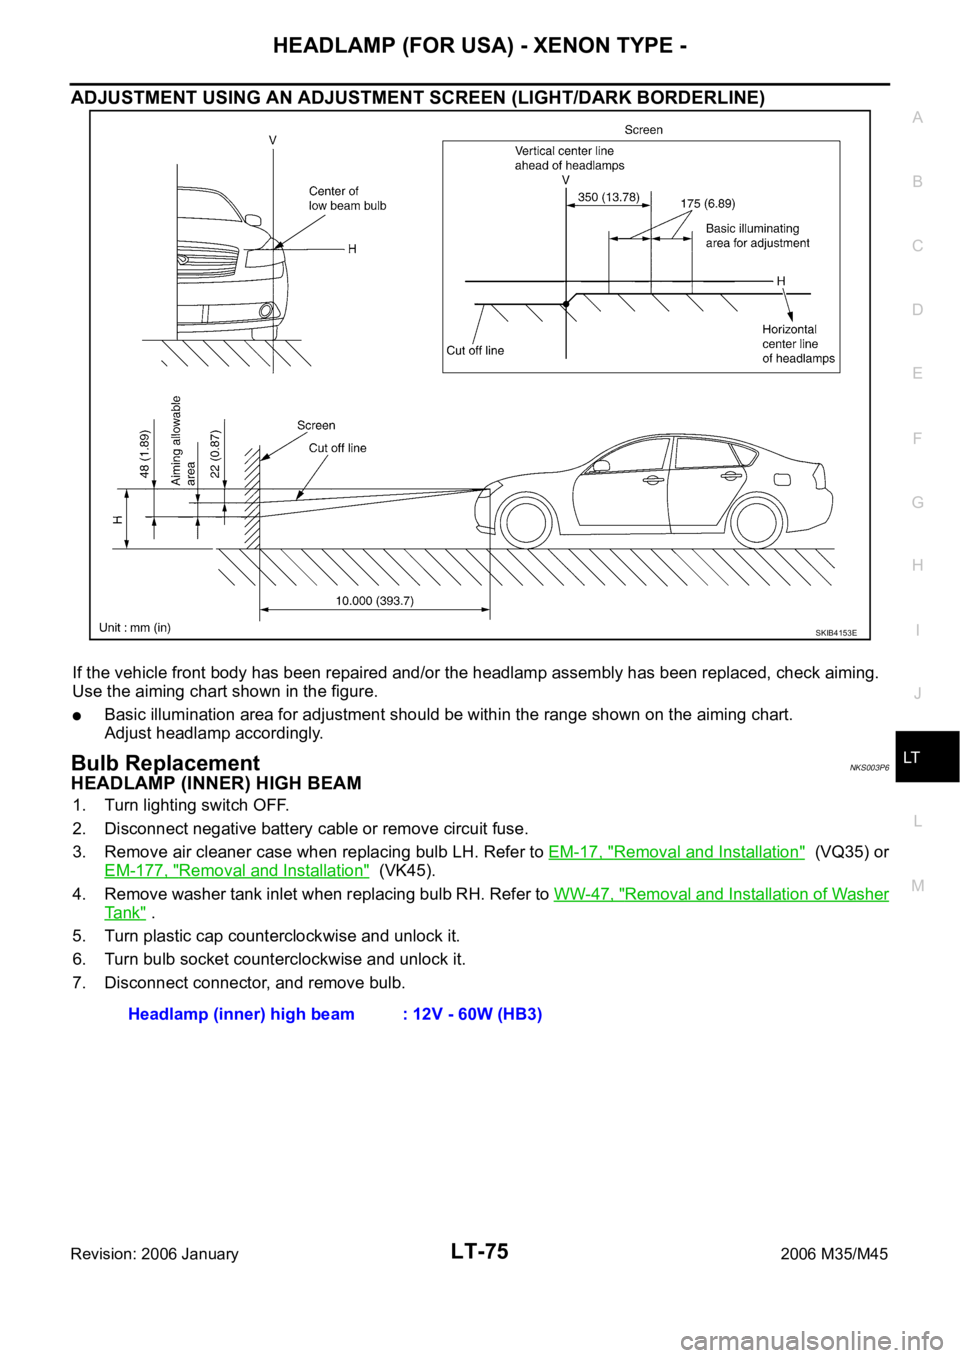
ADJUSTMENT USING AN ADJUSTMENT SCREEN (LIGHT/DARK BORDERLINE)
If the vehicle front body has been repaired and/or the headlamp assembly has been replaced, check aiming.
Use the aiming chart shown in the figure.
Basic illumination area for adjustment should be within the range shown on the aiming chart.
Adjust headlamp accordingly.
Bulb ReplacementNKS003P6
HEADLAMP (INNER) HIGH BEAM
1. Turn lighting switch OFF.
2. Disconnect negative battery cable or remove circuit fuse.
3. Remove air cleaner case when replacing bulb LH. Refer to EM-17, "
Removal and Installation" (VQ35) or
EM-177, "
Removal and Installation" (VK45).
4. Remove washer tank inlet when replacing bulb RH. Refer to WW-47, "
Removal and Installation of Washer
Ta n k" .
5. Turn plastic cap counterclockwise and unlock it.
6. Turn bulb socket counterclockwise and unlock it.
7. Disconnect connector, and remove bulb.
SKIB4153E
Headlamp (inner) high beam : 12V - 60W (HB3)
Page 4503 of 5621

LT-76
HEADLAMP (FOR USA) - XENON TYPE -
Revision: 2006 January2006 M35/M45
HEADLAMP (OUTER) LOW BEAM
1. Turn lighting switch OFF.
2. Disconnect negative battery cable or remove circuit fuse.
3. Remove fender protector (front). Refer toEI-20, "
Removal and Installation" .
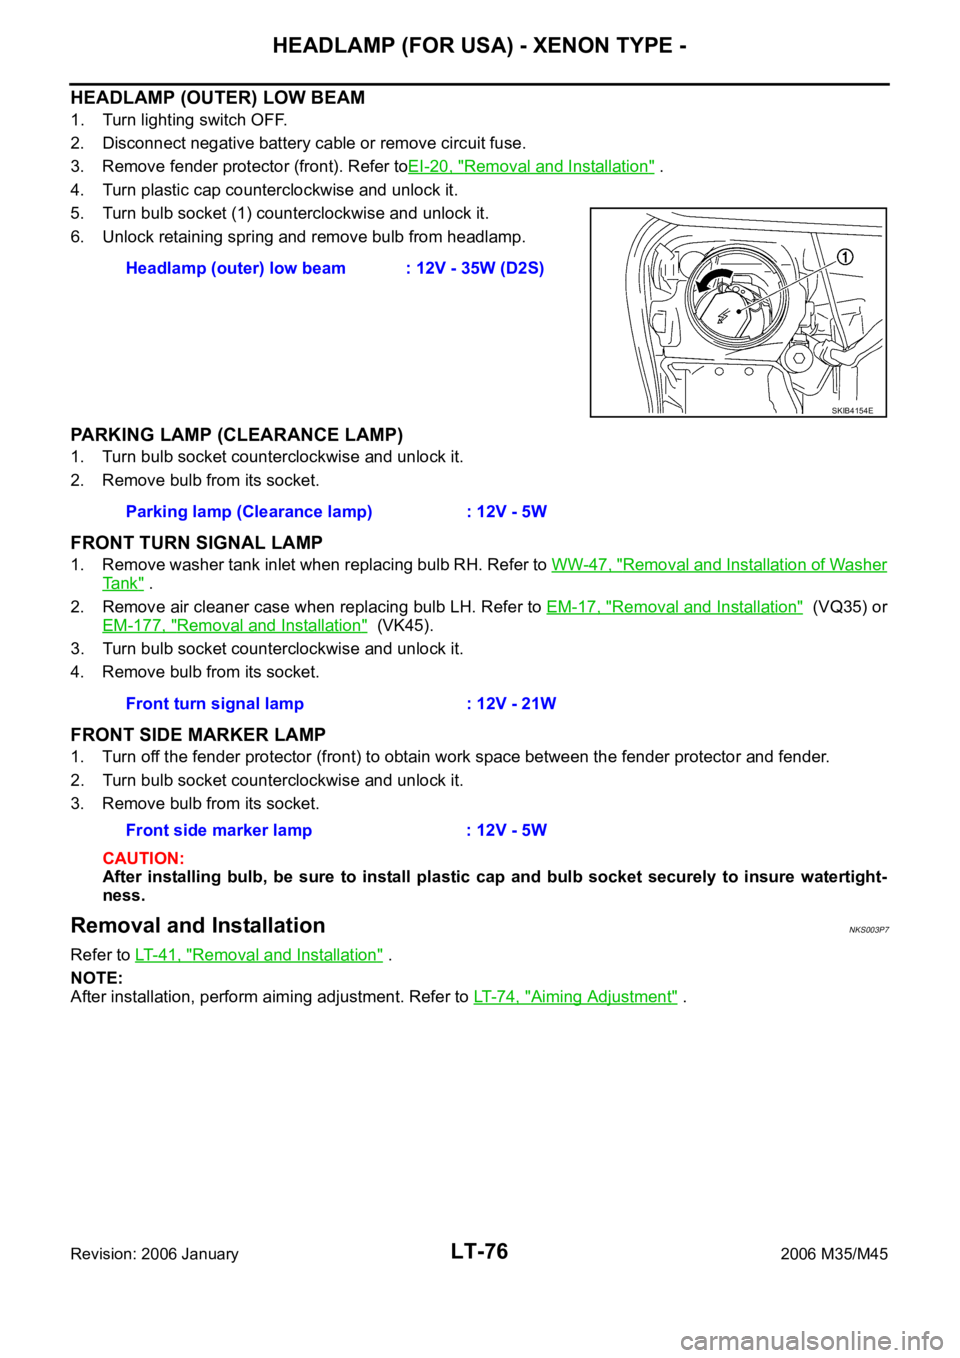
4. Turn plastic cap counterclockwise and unlock it.
5. Turn bulb socket (1) counterclockwise and unlock it.
6. Unlock retaining spring and remove bulb from headlamp.
PARKING LAMP (CLEARANCE LAMP)
1. Turn bulb socket counterclockwise and unlock it.
2. Remove bulb from its socket.
FRONT TURN SIGNAL LAMP
1. Remove washer tank inlet when replacing bulb RH. Refer to WW-47, "Removal and Installation of Washer
Ta n k" .
2. Remove air cleaner case when replacing bulb LH. Refer to EM-17, "
Removal and Installation" (VQ35) or
EM-177, "
Removal and Installation" (VK45).
3. Turn bulb socket counterclockwise and unlock it.
4. Remove bulb from its socket.
FRONT SIDE MARKER LAMP
1. Turn off the fender protector (front) to obtain work space between the fender protector and fender.
2. Turn bulb socket counterclockwise and unlock it.
3. Remove bulb from its socket.
CAUTION:
After installing bulb, be sure to install plastic cap and bulb socket securely to insure watertight-
ness.
Removal and InstallationNKS003P7
Refer to LT-41, "Removal and Installation" .
NOTE:
After installation, perform aiming adjustment. Refer to LT- 7 4 , "
Aiming Adjustment" . Headlamp (outer) low beam : 12V - 35W (D2S)
SKIB4154E
Parking lamp (Clearance lamp) : 12V - 5W
Front turn signal lamp : 12V - 21W
Front side marker lamp : 12V - 5W
Page 4507 of 5621

LT-80
HEADLAMP (FOR CANADA) - DAYTIME LIGHT SYSTEM -
Revision: 2006 January2006 M35/M45
OUTLINE
Power is supplied at all times
to headlamp high relay, located in IPDM E/R (intelligent power distribution module engine room) and
to headlamp low relay, located in IPDM E/R, from battery direct,
through 15A fuse (No. 71, located in IPDM E/R)
to CPU (central processing unit), located in IPDM E/R,
through 15A fuse (No. 78, located in IPDM E/R)
to CPU, located in IPDM E/R,
through 50A fusible link (letter F, located in fuse and fusible link block)
to BCM terminal 55,
through 10A fuse [No. 21, located in fuse block (J/B)]
to BCM terminal 42 and
to combination meter terminal 23,
through 10A fuse (No. 32, located in IPDM E/R)
to daytime light relay terminals 2 and 5,
through 10A fuse [No. 19, located in fuse block (J/B)]
to unified meter and A/C amp. terminal 54,
through 10A fuse [No. 22, located in fuse block (J/B)]
to key slot terminal 1.
When the ignition switch is in ON or START position, power is supplied
to CPU, located in IPDM E/R,
through 15A fuse [No. 1, located in fuse block (J/B)]
to BCM terminal 38,
through 10A fuse [No. 14, located in fuse block (J/B)]
to combination meter terminal 12,
through 10A fuse [No. 12, located in fuse block (J/B)]
to unified meter and A/C amp. terminal 53.
Ground is supplied
to BCM terminal 52
to combination meter terminals 9, 10, and 11
to unified meter and A/C amp. terminal 55 and 71
to push-button ignition switch (push switch) terminal 1
to key slot terminal 8
through grounds M16 and M70,
to IPDM E/R terminals 38 and 51
through grounds E22 and E43.
Page 4517 of 5621
LT-90
HEADLAMP (FOR CANADA) - DAYTIME LIGHT SYSTEM -
Revision: 2006 January2006 M35/M45
35 SBCombination
switch output 2ONLighting, turn, wiper
switch
(Wiper dial position 4)
Any of several con-
ditions below
Lighting switch 2ND
Lighting switch
PASSING (Operates
only PASSING switch)
Approx. 1.2V
OFF
Approx. 7.0 - 7.5V
38 WIgnition switch
(ON) ON — Battery voltage
39 L CAN
H — — —
40 P CAN
L — — —
42 PBattery power
supplyOFF — Battery voltage
52 B Ground ON — Approx. 0V
55 WBattery power
supplyOFF — Battery voltage Terminal
No.Wire
colorSignal nameMeasuring condition
Reference value
Ignition
switchOperation or condition
PKIB4958J
PKIB4960J
Page 4518 of 5621

HEADLAMP (FOR CANADA) - DAYTIME LIGHT SYSTEM -
LT-91
C
D
E
F
G
H
I
J
L
MA
B
LT
Revision: 2006 January2006 M35/M45
Terminals and Reference Values for IPDM E/RNKS003PF
NOTE:
Daytime running light is operating: Lighting switch in OFF position with engine running and parking brake is released.
How to Perform Trouble DiagnosisNKS003PG
1. Confirm the symptom or customer complaint.
2. Understand operation description and function description. Refer to LT- 7 9 , "
System Description" .
3. Perform the Preliminary Check. Refer to LT-92, "
Preliminary Check" .
4. Check symptom and repair or replace the cause of malfunction.
5. Does the headlamp operate normally? If YES: GO TO 6. If NO: GO TO 4.
6. INSPECTION END
Terminal
No.Wire
colorSignal nameMeasuring condition
Reference value
Ignition
switchOperation or condition
20 R Headlamp low (RH) ON Lighting switch 2ND positionOFF Approx. 0V
ON Battery voltage
27 BR Headlamp high (RH) ONLighting switch HIGH or PASSING
positionOFF Approx. 0V
ON Battery voltage
Daytime running light is operating
NOTEApprox. 6.5V
28 R/Y Headlamp high (LH) ONLighting switch HIGH or PASSING
positionOFF Approx. 0V
ON Battery voltage
Daytime running light is operating
NOTEApprox. 6.5V
30 R/B Headlamp low (LH) ON Lighting switch 2ND positionOFF Approx. 0V
ON Battery voltage
38 B Ground ON — Approx. 0V
49 L CAN
H — — —
50 P CAN
L — — —
51 B Ground ON — Approx. 0V
58 SBDaytime light relay
signalONDaytime running light is operating
NOTEApprox. 0V
Daytime running light is not operating Battery voltage
Page 4519 of 5621

LT-92
HEADLAMP (FOR CANADA) - DAYTIME LIGHT SYSTEM -
Revision: 2006 January2006 M35/M45
Preliminary CheckNKS003PH
INSPECTION FOR POWER SUPPLY AND GROUND CIRCUIT
1. CHECK FUSES
Check for blown fuses or fusible link.
Refer to LT-84, "Wiring Diagram — DTRL —" .
OK or NG
OK >> GO TO 2.
NG >> If fuse is blown, be sure to eliminate cause of malfunction before installing new fuse. Refer to PG-
3, "POWER SUPPLY ROUTING CIRCUIT" .
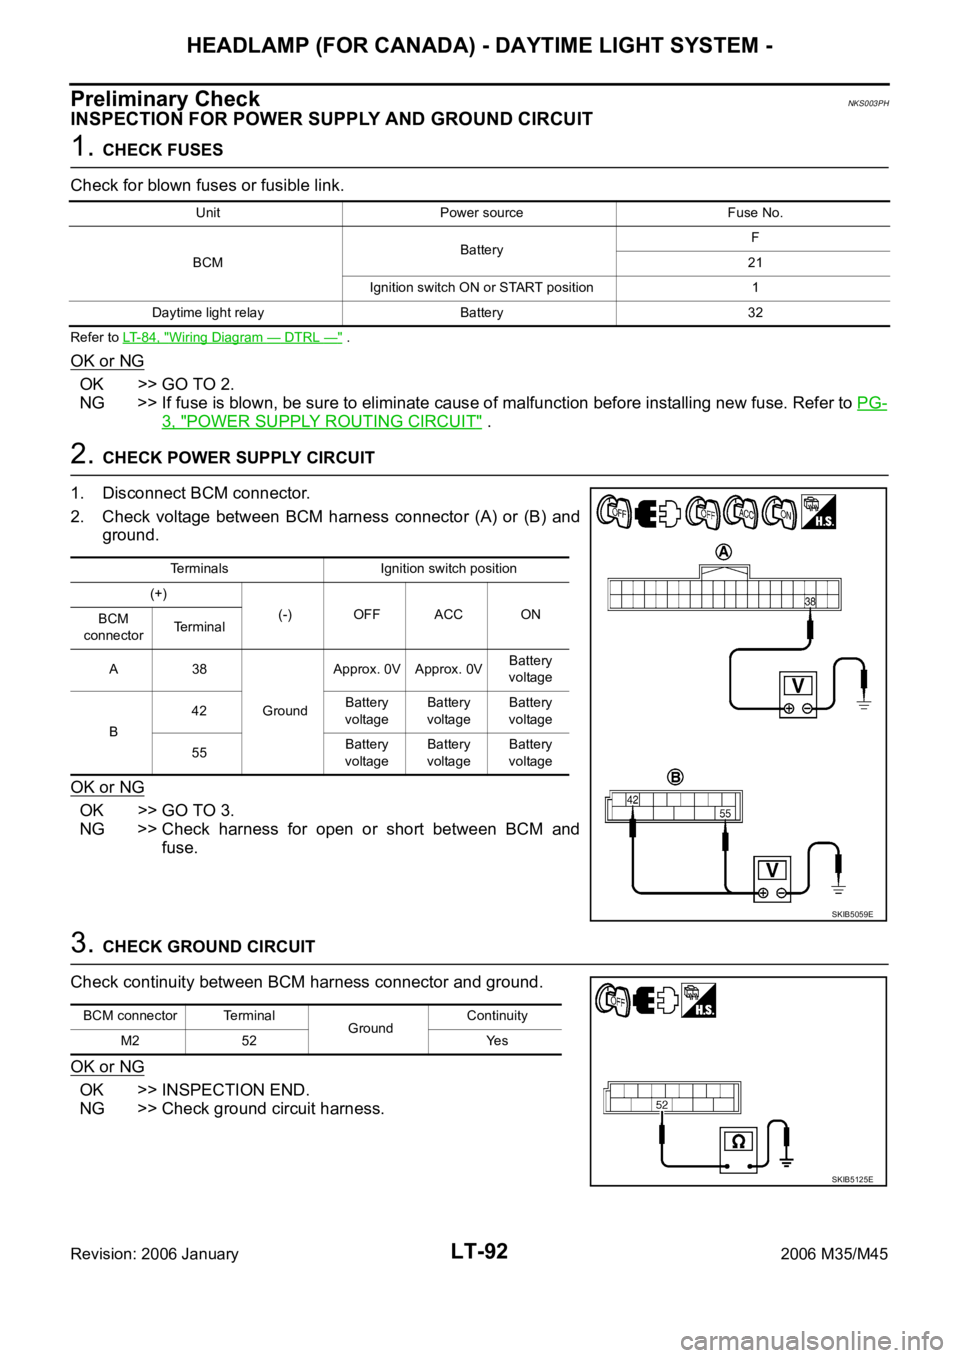
2. CHECK POWER SUPPLY CIRCUIT
1. Disconnect BCM connector.
2. Check voltage between BCM harness connector (A) or (B) and
ground.
OK or NG
OK >> GO TO 3.
NG >> Check harness for open or short between BCM and
fuse.
3. CHECK GROUND CIRCUIT
Check continuity between BCM harness connector and ground.
OK or NG
OK >> INSPECTION END.
NG >> Check ground circuit harness.
Unit Power source Fuse No.
BCMBatteryF
21
Ignition switch ON or START position 1
Daytime light relay Battery 32
Terminals Ignition switch position
(+)
(-) OFF ACC ON
BCM
connectorTerminal
A38
GroundApprox. 0V Approx. 0VBattery
voltage
B42Battery
voltageBattery
voltageBattery
voltage
55Battery
voltageBattery
voltageBattery
voltage
SKIB5059E
BCM connector Terminal
GroundContinuity
M2 52 Yes
SKIB5125E
Page 4520 of 5621

HEADLAMP (FOR CANADA) - DAYTIME LIGHT SYSTEM -
LT-93
C
D
E
F
G
H
I
J
L
MA
B
LT
Revision: 2006 January2006 M35/M45
INSPECTION FOR PARKING BRAKE SWITCH CIRCUIT
1. CHECK BRAKE INDICATOR
1. Turn ignition switch ON.
2. When parking brake is switched ON/OFF, it checks whether the brake indicator lamp of combination meter
lights up / puts out the light.
OK or NG
OK >> INSPECTION END
NG >> GO TO 2.
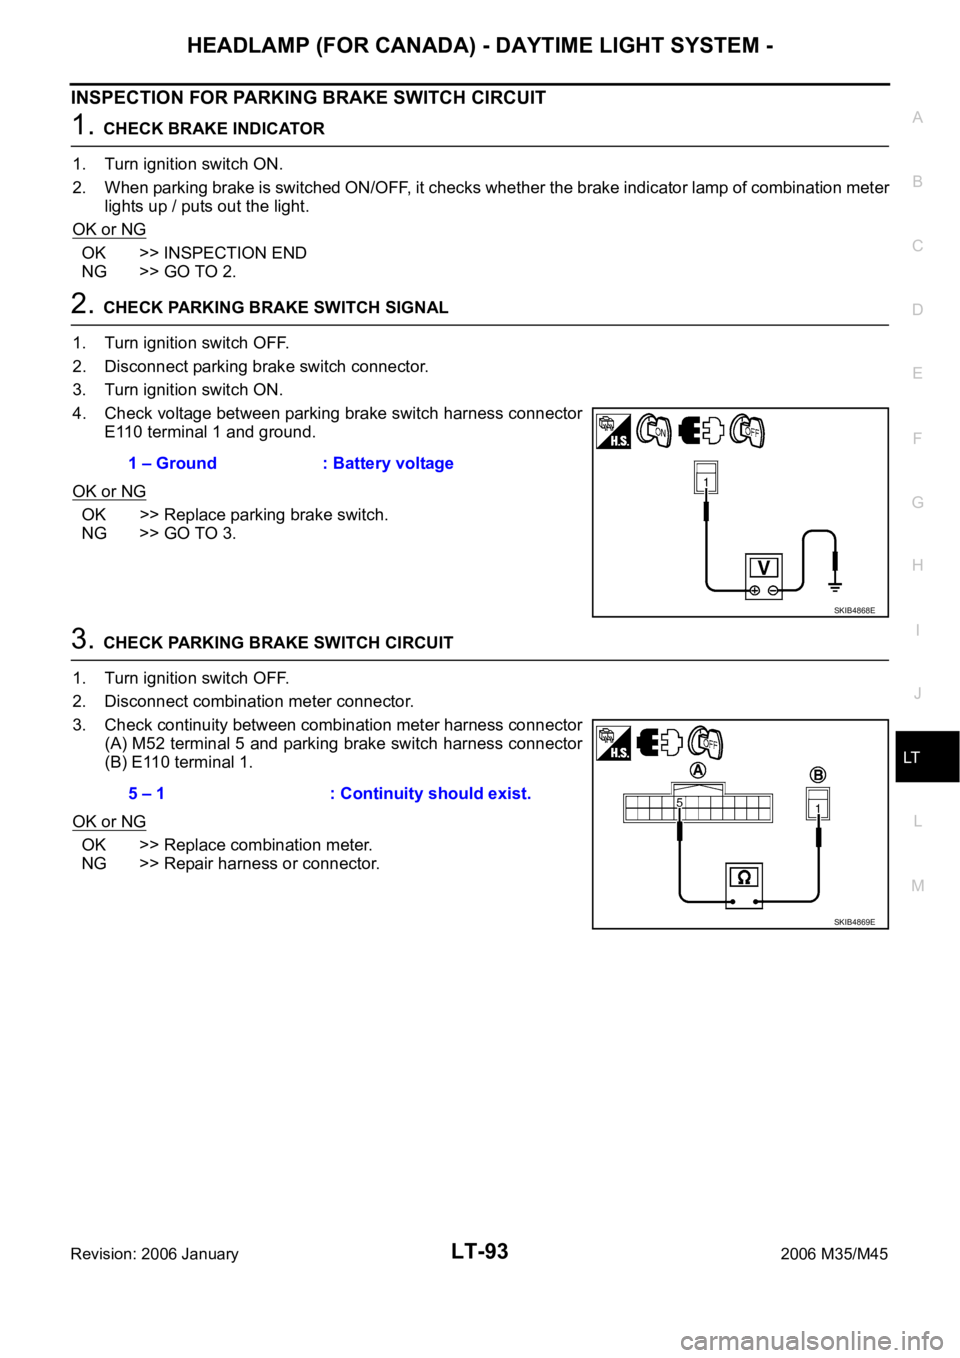
2. CHECK PARKING BRAKE SWITCH SIGNAL
1. Turn ignition switch OFF.
2. Disconnect parking brake switch connector.
3. Turn ignition switch ON.
4. Check voltage between parking brake switch harness connector
E110 terminal 1 and ground.
OK or NG
OK >> Replace parking brake switch.
NG >> GO TO 3.
3. CHECK PARKING BRAKE SWITCH CIRCUIT
1. Turn ignition switch OFF.
2. Disconnect combination meter connector.
3. Check continuity between combination meter harness connector
(A) M52 terminal 5 and parking brake switch harness connector
(B) E110 terminal 1.
OK or NG
OK >> Replace combination meter.
NG >> Repair harness or connector.1 – Ground : Battery voltage
SKIB4868E
5 – 1 : Continuity should exist.
SKIB4869E
Page 4527 of 5621
LT-100
HEADLAMP (FOR CANADA) - DAYTIME LIGHT SYSTEM -
Revision: 2006 January2006 M35/M45
4. CHECK DAYTIME LIGHT RELAY POWER SUPPLY CIRCUIT
1. Turn ignition switch OFF.
2. Remove daytime light relay.
3. Check voltage between daytime light relay harness connector
E34 terminals 2, 5 and ground.
OK or NG
OK >> GO TO 5.
NG >> Repair harness or connector.
5. CHECK DAYTIME LIGHT RELAY
1. Apply battery voltage to daytime light relay terminals 1 and 2.
2. Check continuity between terminals 3 and 5.
OK or NG
OK >> GO TO 6.
NG >> Replace daytime light relay.
6. CHECK CIRCUIT BETWEEN DAYTIME LIGHT RELAY AND IPDM E/R
1. Disconnect IPDM E/R connector.
2. Check continuity between IPDM E/R harness connector (A) E9
terminal 58 and daytime light relay harness connector (B) E34
terminal 1.
OK or NG
OK >> GO TO 7.
NG >> Repair harness or connector.2, 5 – Ground : Battery voltage
SKIB4746E
3 – 5 : Continuity should exist.
SKIB4671E
58 – 1 : Continuity should exist.
SKIB4748E