Page 322 of 420

Your vehicle displays engine oil lif e
and maintenance service items in the
odometer/trip meter display on LX,
EX and EX-L models, or in the multi-
inf ormation display on Touring
models, to show you when you
should have your dealer perf orm
engine oil replacement and indicated
maintenance service.
Based on the engine operating
conditions and accumulated engine
revolutions, the onboard computer in
your vehicle calculates the remaining
engine oil lif e and displays it as a
percentage.To see the current engine oil lif e,
turn the ignition switch to ON (II),
and push and release the SELECT/
RESET knob on the instrument
panel repeatedly, until the engine oil
lif e is displayed.If the oil lif e is 15 percent or less,
you will see the oil lif e indicator f or
everytimeyouturntheignition
switch to the ON (II) position. This
indicator stays on until you cancel it
by pressing the SELECT/RESET
button. The maintenance minder
indicator will also come on, and the
maintenance item code(s) for other
scheduled maintenance items
needing service will be displayed
next to the engine oil lif e indicator.
CONT INUED
On LX, EX and EX-L models
Maintenance Minder
Engine Oil L if e Indicator
Maint enance
321
MAINTENANCE ITEM CODE
ENGINE OIL LIFE
INDICATOR
MAINTENANCE MINDER
INDICATOR
Page 323 of 420
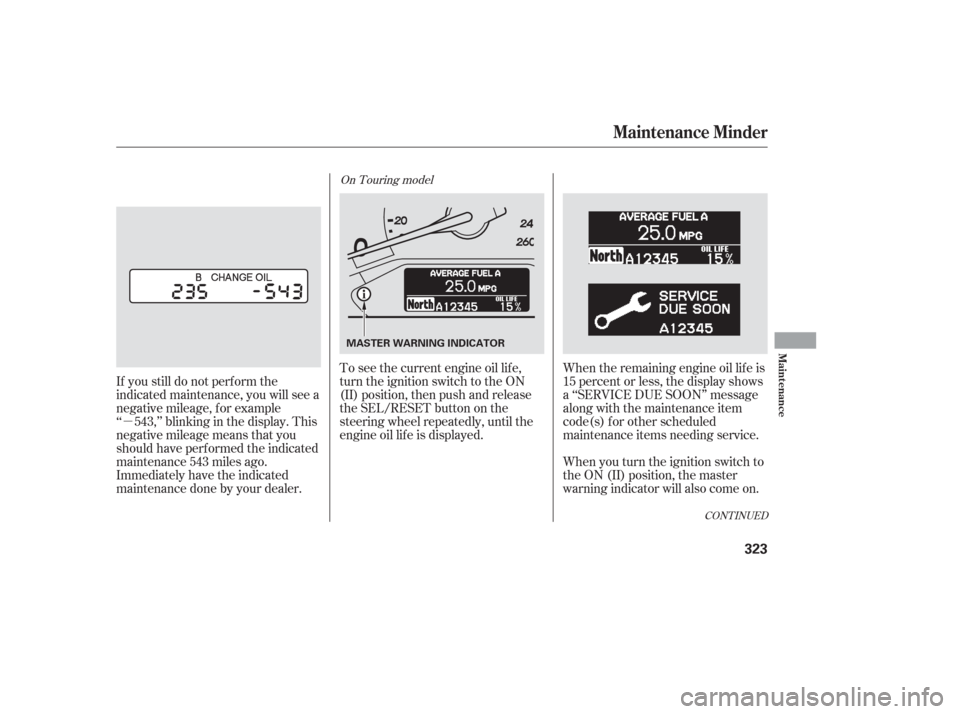
When the remaining engine oil lif e is
less than 5 percent, you will see a
‘‘CHANGE OIL’’ message in the
odometer/trip meter display, along
with the same maintenance item
code(s), every time you turn the
ignition switch to the ON (II)
position.When the remaining engine oil lif e is
0 percent, you will see the above
display. In this display, the remaining
oil lif e indicator will be blinking. This
display comes on and stays on every
time you turn the ignition switch to
the ON (II) position. When you see
this message, have the indicated
maintenance perf ormed by your
dealer as soon as possible.You can change the display to the
odometer, the trip meter, or the
outside temperature by pushing the
SELECT/RESET knob on the
instrument panel.
Maintenance Minder
322
Page 324 of 420
�µ
CONT INUED
When the remaining engine oil lif e is
15 percent or less, the display shows
a ‘‘SERVICE DUE SOON’’ message
along with the maintenance item
code(s) f or other scheduled
maintenance items needing service.
If you still do not perf orm the
indicated maintenance, you will see a
negative mileage, f or example
‘‘ 543,’’ blinking in the display. This
negative mileage means that you
should have perf ormed the indicated
maintenance 543 miles ago.
Immediately have the indicated
maintenancedonebyyourdealer.
When you turn the ignition switch to
the ON (II) position, the master
warning indicator will also come on.
To see the current engine oil lif e,
turn the ignition switch to the ON
(II) position, then push and release
the SEL/RESET button on the
steering wheel repeatedly, until the
engine oil lif e is displayed.
On Touring model
Maintenance Minder
Maint enance
323
MASTER WARNING INDICATOR
Page 327 of 420
Press the SELECT/RESET knob
f or more than 5 seconds. The
maintenance items code(s) will
disappear, and the engine oil lif e
indicator will reset to ‘‘100.’’
Press the SELECT/RESET knob
f or about 10 seconds. The engine
oil lif e indicator and the
maintenance item code(s) will
blink.
Your dealer will reset the display
af ter completing the required
maintenance service. You will see
‘‘OIL LIFE 100 %’’ on the odometer/
trip meter display the next time you
turn the ignition switch to the ON
(II) position.
Press the SELECT/RESET knob
until the engine oil lif e indicator is
displayed. Turn the ignition switch to the ON
(II) position.
If maintenance service is done by
someone other than your dealer,
reset the maintenance minder as
f ollows:
3.
4.
1.
2.
On LX, EX and EX-L models
Maintenance Minder
Resetting the Engine Oil Lif e
Indicator
326
Page 337 of 420
 is required.Turn of f the engine and let it sit
f or several minutes, then check
the oil level on")
Remove the oil f ilter, and let the
remaining oil drain. A special
wrench (available from your
dealer) is required.Turn of f the engine and let it sit
f or several minutes, then check
the oil level on the dipstick. If
necessary, add more oil.
Let the engine run f or several
minutes, then check the drain bolt
and oil f ilter f or leaks. Replace the engine oil f ill cap.
Start the engine. The oil pressure
indicator should go out within 5
seconds. If it does not, turn of f the
engine, and check your work. Engine oil change capacity
(including f ilter): Refill the engine with the
recommended oil. Install a new oil f ilter according to
the instructions that come with it.
Put a new washer on the drain bolt,
then reinstall the drain bolt.
Tighten the drain bolt to:
Make sure the oil f ilter gasket is
not stuck to the engine block. If it
is, remove it bef ore installing a
new oil f ilter. 9.
8. 7. 6. 4.
5.
3.
Changing the Oil and Filter
336
OIL FILTER
4.5 US qt (4.3)
29 lbf·ft (39 N·m , 4.0 kgf·m)
Improper disposal of engine oil can be
harmf ul to the environment. If you
change your own oil, please dispose of
the used oil properly. Put it in a sealed
container, and take it to a recycling
center. Do not discard it in a trash bin
or dump it on the ground.
Page 340 of 420
.
You will see a
‘‘WASHER FLUID LOW’’ message
on the multi-information display")
On Canadian models:On the Touring model:The low washer
level indicator comes on when the
level is low (see page ).
You will see a
‘‘WASHER FLUID LOW’’ message
on the multi-information display
when the level is low.
Fill the reservoir with a good-quality
windshield washer f luid. This
increases the cleaning capability and
prevents f reezing in cold weather.
When you ref ill the reservoir, clean
the edges of the windshield wiper
blades with windshield washer f luid
on a clean cloth. This will help to
condition them.
Check the f luid level in the
windshield washer reservoir at least
monthly during normal use. This
reservoir supplies the windshield and
rear window washers.
Check the f luid level by removing
the cap and looking at the level
gauge attached to the cap.
69
Windshield Washers
Maint enance
339
Do not use engine antif reeze or a
vinegar/water solution in the
windshield washer reservoir. Antif reeze
can damage your vehicle’s paint, while
a vinegar/water solution can damage
the windshield washer pump. Use only
commercially-available windshield
washer f luid.
Page 356 of 420

In addition to proper inf lation,
correct wheel alignment helps to
decrease tire wear. If you f ind a tire
is worn unevenly, have your dealer
check the wheel alignment.
Have your dealer check the tires if
you f eel a consistent vibration while
driving. A tire should always be
rebalanced if it is removed f rom the
wheel. When you have new tires
installed, make sure they are
balanced. This increases riding
comf ort and tire lif e. For best results,
have the installer perform a dynamic
balance.To help increase tire lif e and
distribute wear more evenly, rotate
the tires every 7,500 miles (12,000
km). Move the tires to the positions
showninthecharteachtimethey
are rotated. If you purchase
directional tires, rotate only f ront-to-
back.
Your vehicle’s tires have tread wear
indicators molded into the tread.
When the tread wears down to that
point, you will see a 1/2 inch (12.7
mm) wide band running across the
tread. This shows there is less than
1/16 inch (1.6 mm) of tread lef t on
the tire. A tire that is this worn gives
very little traction on wet roads. You
should replace the tire if you can see
the tread wear indicator in three or
more places around the tire.
On some models
T ire Maintenance
T ire Rotation
Tires
Maint enance
355
Front Front
(For Non-directional
Tires and Wheels) (For Directional
Tires and Wheels)
INDICATOR LOCATION MARKS
TREAD WEAR INDICATORS
Improper wheel weights can damage
your vehicle’s aluminum wheels. Use
only genuine Honda wheel weights f or
balancing.
Page 360 of 420

�µ
Check the condition of the battery
monthlybylookingatthetest
indicator window. The label on the
battery explains the test indicator’s
colors. Check the terminals f or corrosion (a
white or yellowish powder). To
remove it, cover the terminals with a
solution of baking soda and water. It
will bubble up and turn brown. When
this stops, wash it of f with plain
water. Dry off the battery with a
cloth or paper towel. Coat the
terminals with grease to help prevent
f uture corrosion.
If additional battery maintenance is
needed, see your dealer or a
qualif ied technician.
Battery posts,
terminals, and related accessories
contain lead and lead compounds. If you need to connect the battery to
a charger, disconnect both cables to
prevent damaging your vehicle’s
electrical system. Always disconnect
the negative ( ) cable first, and
reconnect it last.
WARNING:
Wash your hands af ter handling.
Checking the Battery
Maint enance
359
TEST INDICATOR WINDOW
The battery gives off explosive
hydrogen gas during normal
operation.
A spark or flame can cause the
battery to explode with enough
force to kill or seriously hurt you.
Wear protective clothing and a
face shield, or have a skilled
mechanic do the battery
maintenance.
, every time y")
 will
disappear, and the engine oil lif e
indicator will reset to ‘‘100.’’
Press the SELECT/RESET knob
f or a")