Page 64 of 420

The instrument panel has many
indicators to give you important
inf ormation about your vehicle.
See page .If this indicator comes on when the
engine is running, the battery is not
being charged. For more inf ormation,
see page .
On the Touring model, you will also
see a ‘‘CHECK CHARGING
SYSTEM’’ message in the multi-
inf ormation display.
On the Touring model, you will also
see a ‘‘CHECK ENGINE OIL
LEVEL’’ message in the multi-
inf ormation display. The engine can be severely damaged
if this indicator f lashes or stays on
when the engine is running. For
more information, see page . This indicator has two f unctions:Itcomesonwhenyouturnthe
ignition switch to the ON (II)
position. It is a reminder to check
the parking brake. Driving with
the parking brake not f ully
released can damage the brakes
and tires. If it stays on af ter you f ully release
the parking brake while the engine
is running, or if it comes on while
driving, there could be a problem
with the brake system. For more
inf ormation, see page .
If you drive without releasing the
parking brake, a chime will sound.
On the Touring model, you will also
see a ‘‘RELEASE PARKING
BRAKE’’ message in the multi-
inf ormation display.
1. 2.
378
377 377
379
Malf unction Indicator
Lamp Charging System
Indicator
L ow Oil Pressure
Indicator Parking Brake and Brake System
Indicator
Instrument Panel Indicators
Inst rument s and Cont rols
63
U.S. Canada
Page 73 of 420

The odometer shows the total
distance your vehicle has been
driven. It measures miles in U.S.
models and kilometers in Canadian
models. It is illegal under U.S.
federal law and Canadian provincial
regulations to disconnect, reset, or
alter the odometer with the intent to
change the number of miles or
kilometers indicated.This indicator displays the outside
temperature in Fahrenheit (U.S.
models) or Centigrade (Canadian
models). To see the outside
temperature, press and release the
Select/Reset button until the
temperature is displayed.
The temperature sensor is in the
f ront bumper. The temperature
reading can be affected by heat
ref lection f rom the road surf ace,
engine heat, and the exhaust f rom
surrounding traf f ic. This can cause
an incorrect temperature reading
when your speed is under
19 mph (30 km/h). When you start
your trip, the sensor is not f ully
acclimatized, theref ore it may take
several minutes until the proper
temperature is displayed.
This meter shows the number of
miles (U.S.) or kilometers (Canada)
driven since you last reset it.
There are two trip meters: Trip A
and Trip B. Switch between these
displays and the outside temperature
display by pressing the Select/Reset
knob repeatedly.
Each trip meter works independently,
so you can keep track of two
dif f erent distances.
To reset a trip meter, display it and
then press and hold the Select/Reset
knob until the number resets to ‘‘0.0.’’
Both trip meters will reset if the
vehicle’s battery goes dead or is
disconnected.If equipped
Gauges
Odometer
Outside T emperature Indicator
Trip Meter
72
Page 87 of 420
Check Emission System
If you see ‘‘CHECK EMISSION
SYSTEM’’ in the multi-inf ormation
display, it means one of the engine’s
emission systems may have a
problem. Have your vehicle checked
by a dealer (see page ).
Check Charging System
If you see ‘‘CHECK CHARGING
SYSTEM’’ in the multi-inf ormation
display, it means the battery is not
being charged. See page f or
more inf ormation.
Check Engine Oil Level
If the engine oil is very low or has
lost pressure, you will see ‘‘CHECK
ENGINE OIL LEVEL’’ in the multi-
inf ormation display. You will also see
the low oil pressure indicator in the
instrument panel f lashing or staying
on. If you see this message, you
should take immediate action since
serious engine damage is possible.
Follow the procedure on page .
377 377
378
Multi-Inf ormation Display
86
Page 137 of 420
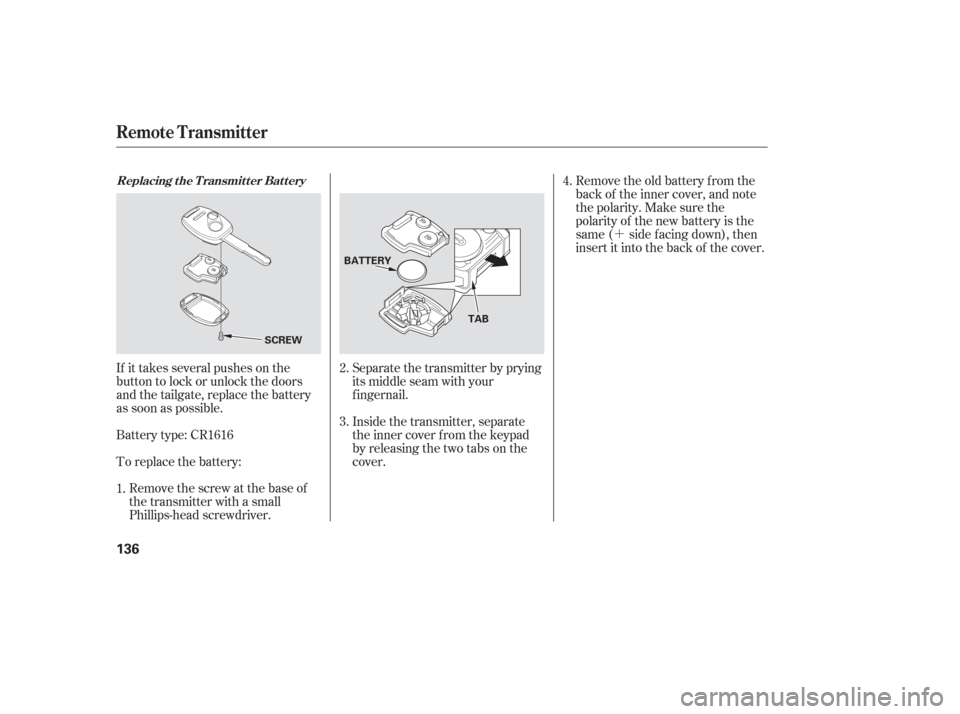
�´
If it takes several pushes on the
button to lock or unlock the doors
and the tailgate, replace the battery
as soon as possible.
Battery type: CR1616
To replace the battery: Remove the screw at the base of
the transmitter with a small
Phillips-head screwdriver. Separate the transmitter by prying
its middle seam with your
f ingernail.
Inside the transmitter, separate
the inner cover f rom the keypad
by releasing the two tabs on the
cover.Remove the old battery from the
back of the inner cover, and note
the polarity. Make sure the
polarity of the new battery is the
same ( side f acing down), then
insert it into the back of the cover.
3. 4.
1. 2.
Replacing the Transmitter Battery
Remote Transmitter
136
SCREW
BATTERY
TAB
Page 141 of 420

�´
If it takes several pushes on the
button to lock or unlock the doors
and the tailgate, replace the battery
as soon as possible.
Battery type: CR2025 To replace the battery, separate the
half s by caref ully prying on the edge
with a coin. Remove the old battery,
and insert a new battery with the
side f acing up. Snap the two halves
of the transmitter case back together.
As required by the FCC:
This device complies with Part 15 of theFCC rules. Operation is subject to thef ollowing two conditions: (1) This devicemay not cause harmf ul interf erence, and(2) this device must accept anyinterf erence received, includinginterf erence that may cause undesiredoperation.
Changes or modif ications not expresslyapproved by the party responsible f orcompliance could void the user’sauthority to operate the equipment.
This device complies with IndustryCanada Standard RSS-210.Operation is subject to the f ollowing twoconditions: (1) this device may not causeinterf erence, and (2) this device mustaccept any interf erence that may causeundesired operation of the device.Replacing the Transmitter
Battery
Remote Transmitter
140
Page 145 of 420

The power tailgate has an auto-
reverse f eature. If it meets
resistance while opening or closing,
it will beep three times and reverse
direction. However, the tailgate may
not reverse immediately. Always
make sure passengers and objects
are clear of the tailgate before
opening or closing it.Also check that passengers,
especially children, do not have their
hands on the edge of the tailgate or
on the tailgate sill. The auto reverse
featurestopsworkingwhenthe
tailgate is about to latch so the motor
can pull the tailgate shut.
If your vehicle’s battery is
disconnected, goes dead, or the f use
is removed while the tailgate is f ully
open, the power tailgate needs to be
reset. After connecting the battery
or installing the f use, close the
tailgate f ully by hand.
The power tailgate may not open or
close under the these conditions: Whenthetailgateortheroof is
covered with snow or ice.
Do not install any accessories on the
tailgate. It may cause the tailgate not
to f unction properly. If there is snow
or ice on the tailgate, make sure to
remove it bef ore you operate the
tailgate.
If you pull the tailgate release handle
while the tailgate is opening or
closing, it will stop moving. You need
to open or close it the rest of the way
manually.
The tailgate has sensors on both
sides. Be caref ul not to damage them.
If the sensors are damaged, the
power tailgate does not f unction
properly.
When the vehicle is swayed in a
strong wind. The vehicle is parked on a steep
hill.
A ut o-Reverse
Tailgate
144
Closing a power tailgate while
anyone is in the path of the
tailgate can cause serious
injury.
Make sure everyone is clear
before closing the power
tailgate.
Page 152 of 420

If the battery is disconnected or goes
dead, close the sliding door
completely by hand. If it still does
not operate properly af ter the
battery is reconnected, have your
vehicle checked by a dealer. If there is a problem in the power
sliding door system, you will see a
‘‘CHECK LEFT SLIDING DOOR’’ or
‘‘CHECK RIGHT SLIDING DOOR’’
message in the multi-inf ormation
display (see page ). If this
message stays on, turn the MAIN
switch to OFF, and have the system
inspected by your dealer.
If the power sliding door indicator
comesonandstayson,thereisa
problem in the system. Turn the
MAIN switch to OFF, and have the
system inspected by a dealer.
Each sliding door has a pinch sensor
on the f ront edge. Do not damage
this sensor, or the power sliding door
may not operate properly. 88
On Touring model
On EX, EX-L and Touring models On EX and EX-L models
Sliding Doors
Power Sliding Door Problems
Pinch Sensor
Inst rument s and Cont rols
151
PINCH SENSOR
POWER SLIDING DOOR INDICATOR
U.S. indicator shown
Page 165 of 420

Follow these precautions when using
the seat heaters:Use the HI setting only to heat the
seats quickly, because it draws
large amounts of current f rom the
battery.
If the engine is lef t idling f or an
extended period, do not use the
seat heaters, even on the LO
setting. It can weaken the battery,
causing hard starting.
Both f ront seats are equipped with
seat heaters. The passenger seat
only has heaters in the seat bottom
because of the side airbag system.
The ignition switch must be in the
ON (II) position to use them. The
seat heater switches are located on
the dashboard above the center
pocket. Push the top of the switch,
HI, to rapidly heat up the seat.
After the seat reaches a comfortable
temperature, select LO by pushing the bottom of the switch. This will
keep the seat warm.
In HI, the heater turns of f when the
seat gets warm, and turns back on
after the seat temperature drops.
In LO, the heater does not cycle with
temperature change.
On EX-L and Touring models
Seat Heaters
164