Page 201 of 420
You can use the rear control panel
when the rear controller dial on the
f ront control panel is in the ON
position.Turn the rear temperature control
dial clockwise to increase the
temperature of the airflow. When is selected, air f lows
f rom the rear f loor vents. When is selected, air f lows
f rom the rear ceiling vents. Select the vents the air flows from
with the mode control dial. Turn the f an speed control dial
clockwise to increase fan speed and
airflow.
When is selected, airf low is
divided between the rear f loor vents
and rear ceiling vents.
You can use the rear control panel
when the indicator in the REAR
LOCK button on the f ront control
panel is off.
When you press the CTRL button in
the left dial, the indicator comes on,
and the f an speed is regulated by the
outer ring of the f an control dial.
LX model EX and EX-L models
Rear Control Panel
Vents, Heating, and A/C
200
LX model
EX and EX-L models
Page 202 of 420
 of the
temperature control button to
increase the tem")
�Û�Ý �Û
�Ý
You can use the rear control panel
when the indicator in the REAR
LOCK button on the f ront control
panel is off.
Press the top ( ) of the
temperature control button to
increase the temperature of airf low,
and the bottom ( ) of the button to
decrease it. The temperature you
adjust is shown in the system display. Press the top ( ) of the f an control
button to increase the f an speed and
airf low. Press the bottom ( ) of the
button to decrease it. The level of
the f an speed is shown in the display.
Each time you press the mode
button, the mode display changes
from , to , then to
.
When is selected, air f lows
f rom the rear ceiling vents.
When is selected, air f lows
f rom the rear f loor vents.
Pressing the AUTO button puts the
system in automatic operation mode.
The rear system automatically
adjusts the fan speed and airflow
levels to maintain the selected temperature of the rear passenger
compartment.
Pressing the OFF button shuts off
the rear climate control system.
When is selected, airf low is
divided between the rear f loor vents
and rear ceiling vents.
Touring models
Rear Climate Control
Features
201
TEMPERATURE
BUTTON FAN CONTROL
BUTTON
Touring models
Page 210 of 420

CONT INUED
The radio can receive the complete
AM and FM bands.
Those bands cover these f requen-
cies:
AM band: 530 to 1,710 kilohertz
FM band: 87.7 to 107.9 megahertz
Radio stations on the AM band are
assigned f requencies at least 10
kilohertz apart (530, 540, 550).
Stations on the FM band are
assigned f requencies at least 0.2
megahertz apart (87.9, 88.1, 88.3).
Stations must use these exact
f requencies. It is f airly common f or
stations to round-of f the f requency in
their advertising, so your radio could
display a f requency of 100.9 even
though the announcer may identif y
the station as ‘‘FM101.’’How well the radio receives stations
is dependent on many f actors, such
as the distance from the station’s
transmitter, nearby large objects,
and atmospheric conditions.
A radio station’s signal gets weaker
as you get f arther away f rom its
transmitter. If you are listening to an
AM station, you will notice the sound
volume becoming weaker, and the
stationdriftinginandout.If youare
listening to an FM station, you will
see the stereo indicator f lickering of f
and on as the signal weakens.
Eventually, the stereo indicator will
go of f and the sound will f ade
completely as you get out of range of
the station’s signal.
Driving very near the transmitter of
a station that is broadcasting on a
f requency close to the f requency of
the station you are listening to can
also af f ect your radio’s reception.
You may temporarily hear both
stations,orhearonlythestationyou
are close to.
Radio Frequencies
Radio Reception
A M/FM Radio Reception
Features
209
Page 218 of 420
�´
�µ �´
�µ
CONT INUED
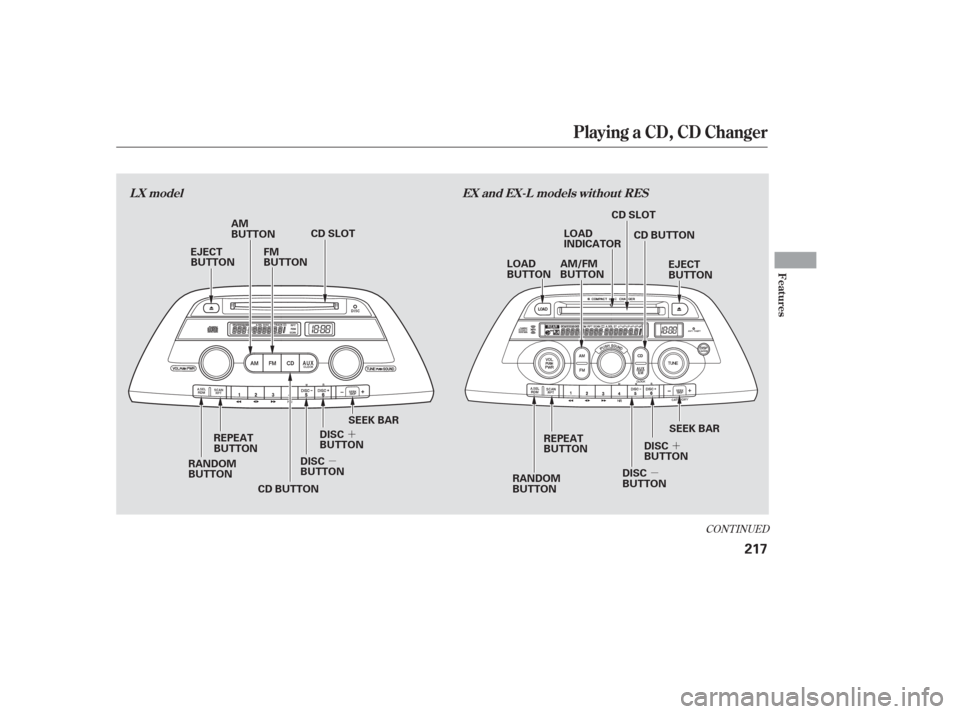
Playing a CD, CD Changer
L X model EX and EX-L models wit hout RES
Features
217
AM
BUTTON
FM
BUTTON CD SLOT
EJECT
BUTTON
RANDOM
BUTTON REPEAT
BUTTON
CD BUTTON DISC
BUTTON
DISC
BUTTON REPEAT
BUTTON
DISC
BUTTON
DISC
BUTTON CD BUTTON
EJECT
BUTTON
SEEK BAR LOAD
INDICATOR
AM/FM
BUTTON
LOAD
BUTTON
SEEK BAR
RANDOM
BUTTON CD SLOT
Page 219 of 420
�´
�µ
�´
�µ
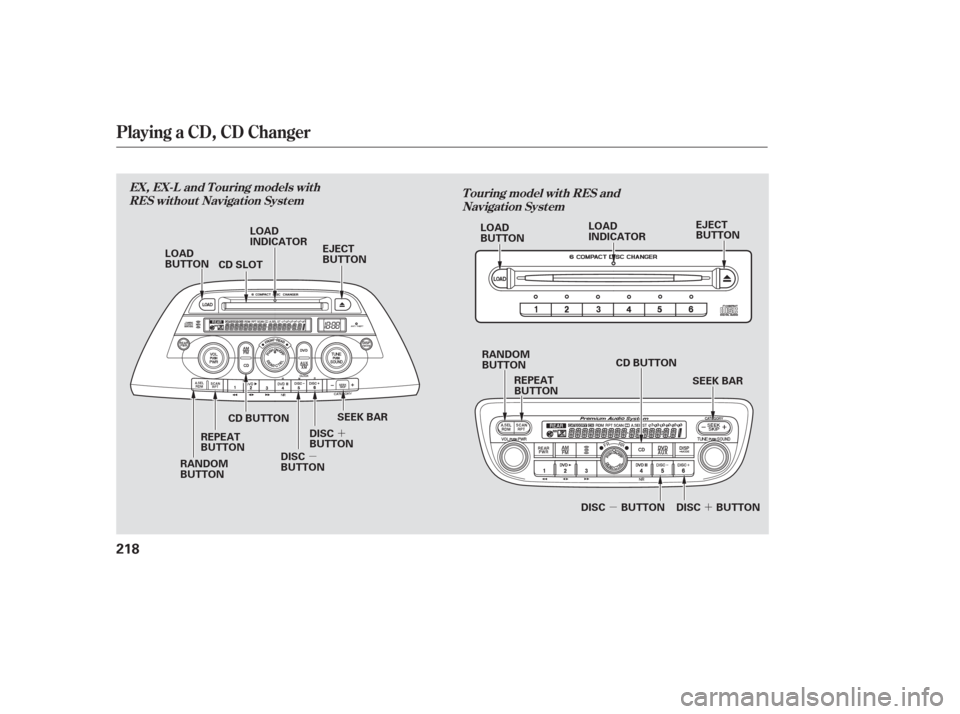
Playing a CD, CD Changer
T ouring model wit h RES and
Navigat ion Syst em
EX, EX-L and T ouring models wit h
RES wit hout Navigat ion Syst em
218
SEEK BAR
EJECT
BUTTON
RANDOM
BUTTON REPEAT
BUTTON
CD BUTTON
DISC
BUTTON
DISC
BUTTON RANDOM
BUTTON
REPEAT
BUTTON
LOAD
INDICATOR
LOAD
BUTTON CD SLOT
SEEK BAR DISC BUTTON
DISC BUTTON LOAD
INDICATOR
LOAD
BUTTON EJECT
BUTTON
CD BUTTON
Page 221 of 420

Your audio system has an in-dash
CD changer that holds up to six CDs,
providing several hours of
continuous entertainment. You
operate this CD changer with the
same controls used f or the radio.
To load CDs or operate the CD
changer, the ignition switch must be
in the ACCESSORY (I) or ON (II)
position.Press and hold the LOAD button
beside the CD slot until you see
‘‘LOADING’’ in the display, then
release the button.
To load multiple CDs in one
operation:
The CD changer is behind the
navigation system screen. To use the
CD changer, press the OPEN button
beside the screen. The screen f olds
back, and the CD changer appears. To return the screen to the upright
position, press the OPEN button
again. Do not use the f olded screen
as a tray. If you put a cup, f or
example, on the screen, the liquid
inside the cup may spill on the
screen when you go over a bump. 1.
On vehicles with navigation system On vehicles with navigation system
EX, EX-L and Touring models
Operating the CD Changer L oading CDs in the Changer
Playing a CD, CD Changer
220
OPEN BUTTONLOAD BUTTON LOAD INDICATOR
Do not use CDs with adhesive labels.
The label can curl up and cause the CD
to jam in the unit.
Page 222 of 420

To load a single CD:
The indicators above the disc
buttons of the empty positions will
blink, and the green load indicator
above the CD slot comes on.
Press and release the LOAD
button.
The system will load the CD and
begin playing it.If you press the LOAD button while
a CD is playing, the system will stop
playing that CD and start the loading
sequence. It will then play the CD
just loaded.
You can also load a CD into an empty
position while a CD is playing by
pressing the appropriate disc button.
Select an empty disc button (the
indicator above the button is of f ),
and press the button. The system
will stop playing the current CD and
start the loading sequence. It will
then play the CD just loaded.
Insert a CD into the CD slot.
Insert it only about halfway; the
drive will pull it in the rest of the
way. You will see ‘‘BUSY’’ in the
display. The CD load indicator
turns red and blinks as the CD is
loaded.
When LOADING appears again in
the display, insert the next CD into
the CD slot.
Repeat this until all six positions
are loaded. The system will then
begin playing the f irst CD loaded.
TheindicatorsabovetheDisc
buttons of the empty positions will
blink, and the green CD load
indicator comes on. When you see
‘‘LOAD’’ in the display, insert the
disc into the CD slot. Insert it only
about half way; the drive will pull it
in the rest of the way.
If you stop loading CDs bef ore all six
positions are f illed, the system will
wait f or 10 seconds, then stop the
load operation and begin playing the
last CD loaded.
2.
2.
3.
4.
5. 1.
3.
CONT INUED
Playing a CD, CD Changer
Features
221
Page 223 of 420

On vehicles without navigation system
To load multiple CDs in one
operation:Press and hold the LOAD button
until you hear a beep and see
‘‘LOAD’’ in the display, then
release the button.
On the upper right side of the
display, the disc number f or an
empty position will begin blinking,
and the green CD load indicator
will come on.
Insert the CD into the CD slot.
Insert it only about halfway; the
drive will pull it in the rest of the
way. You will see ‘‘BUSY’’ in the
display. The CD loaded indicator
turns red and blinks as the CD is
loaded. To load a single CD:
Press and release the LOAD
button.
When the disc number f or an
empty position starts to blink and
the green CD load indicator comes
on, you will see LOAD in the
display. Insert the disc into the CD
slot. Insert it only about half way,
the drive will pull it in the rest of
the way.
The system will load the CD and
begin playing it.
Repeat this until all six positions
are loaded. The system will then
begin playing last CD loaded.
If you are not loading CDs into all six
positions, press the LOAD button
again after the last CD has loaded.
The system will begin playing the
last CD loaded.
If you stop loading CDs bef ore all six
positions are f illed, the system will
wait f or ten seconds, then stop the
load operation and begin playing the
last CD loaded. When ‘‘LOAD’’ appears again in
the display, insert the next CD into
the CD slot.
1. 1.
2.
3. 4.
5.
2.
3.
Playing a CD, CD Changer
222