Page 275 of 420

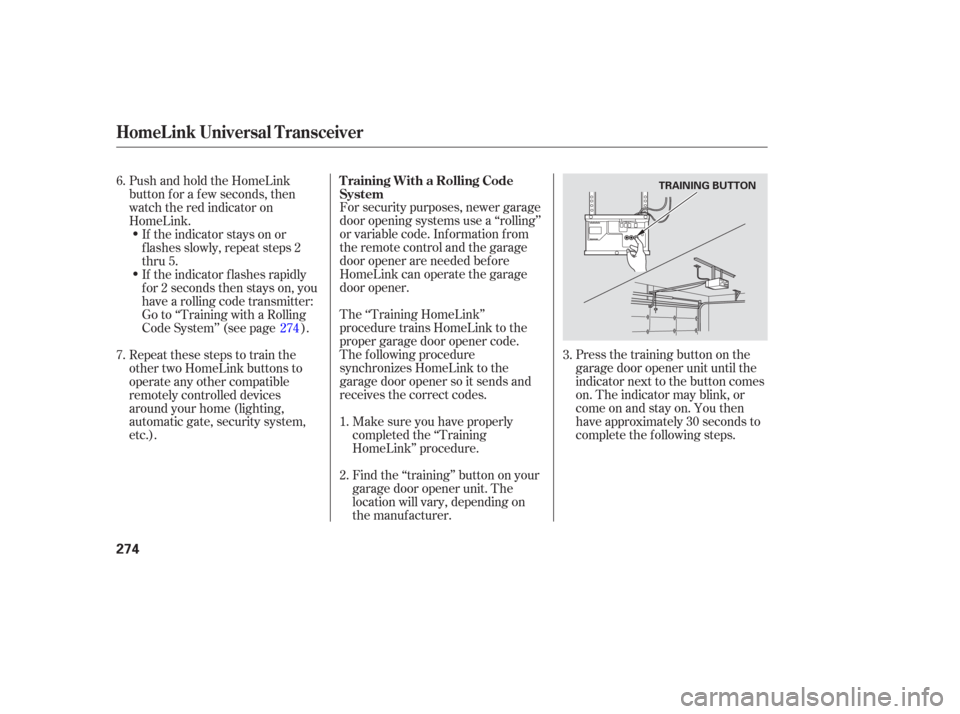
Press the training button on the
garage door opener unit until the
indicator next to the button comes
on. The indicator may blink, or
comeonandstayon.Youthen
have approximately 30 seconds to
complete the f ollowing steps.
For security purposes, newer garage
door opening systems use a ‘‘rolling’’
or variable code. Information from
the remote control and the garage
door opener are needed bef ore
HomeLink can operate the garage
door opener.
The ‘‘Training HomeLink’’
procedure trains HomeLink to the
proper garage door opener code.
The f ollowing procedure
synchronizes HomeLink to the
garage door opener so it sends and
receives the correct codes.
Make sure you have properly
completed the ‘‘Training
HomeLink’’ procedure.
Find the ‘‘training’’ button on your
garage door opener unit. The
location will vary, depending on
the manufacturer.
PushandholdtheHomeLink
button f or a f ew seconds, then
watch the red indicator on
HomeLink.
If the indicator stays on or
flashes slowly, repeat steps 2
thru 5.
If the indicator f lashes rapidly
f or 2 seconds then stays on, you
have a rolling code transmitter:
Go to ‘‘Training with a Rolling
Code System’’ (see page ).
Repeat these steps to train the
other two HomeLink buttons to
operate any other compatible
remotely controlled devices
around your home (lighting,
automatic gate, security system,
etc.).
6.
2. 1.3.
7. 274T raining With a Rolling Code
System
HomeL ink Universal Transceiver
274
TRAINING BUTTON
Page 276 of 420

Press and hold the button on
HomeLink f or 3 to 4 seconds.
Press and hold the HomeLink
button again f or 3 to 4 seconds.
This should turn of f the training
indicator on the garage door
opener unit. (Some systems may
require you to press the button up
to three times.)
Press the HomeLink button again.
It should operate the garage door.Toerasethecodesstoredinallthree
buttons, press and hold the two
outside buttons until the red
indicator begins to f lash, then
release the buttons.
Youshoulderaseallthreecodes
bef ore selling the vehicle.
If you want to retrain a programmed
button f or a new device, you do not
have to erase all button memory.
You can replace the existing memory
code using this procedure:
Press and hold the HomeLink
button to be trained until the
HomeLink indicator begins to
flash slowly.If a rolling code transmitter was
previously programmed, the
indicator will f lash rapidly f or 2
seconds, and then stay on f or
about 23 seconds. Once the HomeLink indicator
begins to f lash slowly, continue to
hold the HomeLink button, and
f ollow steps 3 thru 6 under
‘‘Training HomeLink’’ (see page
).
If a standard transmitter was
programmed, the indicator will
stay on f or about 25 seconds.
2.
1.
4.
5.
6.
273
Erasing Codes
Retraining a Button
HomeL ink Universal Transceiver
Features
275
Page 278 of 420

Your vehicle has a parking sensor
system. The system lets you know
theapproximatedistancebetween
your vehicle and most obstacles
while you are parking. When the
system is on and your vehicle is
nearinganobstacle,youwillhear
beeping and see parking messages in
the multi-information display.To activate the system, push the
button on the dashboard with the
ignition in the ON (II) position. The
indicator in the button comes on
when the system is on. To turn the
system of f , push the button again.The system has two front corner
sensors, two rear corner sensors,
and a rear center sensor.
The rear center sensor works only
when the shif t lever is in Reverse (R),
and the vehicle speed is less than 5
mph (8 km/h).
The corner sensors work only when
the shif t lever is in any position other
than P and the vehicle speed is less
than 5 mph (8 km/h).
All obstacles may not always be
sensed. Even when the system is on,
you should look f or obstacles near
yourvehicletomakesureitissafeto
park.
On Touring models
Parking Sensor System
Features
277
PARKING SENSOR SYSTEM BUTTON
MULTI-INFORMATION DISPLAY
Page 279 of 420
Example shown: Obstacle is at the lef t f ront of the vehicle
When the system senses an obstacle,
the appropriate indicator comes on,
and a beeper sounds as shown in the
f ollowing tables. When you turn the system on, all
indicators come on in the multi-
inf ormation display, and a beeper
sounds once. Distance
BeeperAbout 16-20 in
(40-50 cm)
About 12-16 in
(30-40 cm)
Upper lef t
indicator stays on
Short beeps Continuous
beep
Very short beeps About 12 in
(30 cm) or less
Upper lef t
indicator stays on Upper lef t
indicator stays on
Indicator
Corner Sensor Operat ionMulti-Inf ormation Display
Messages and Beeper Operation
Parking Sensor System
278
Page 280 of 420
If the system develops a problem,
you will see a ‘‘CHECK PARKING
SENSOR SYSTEM’’ message in the
multi-inf ormation display, and a
beeper sounds continuously. Very
of ten, a sensor covered with mud, ice,
snow,etc.isthecauseof this
message. Check the sensors f irst. If
the message stays on or the beeper
does not stop, have the system
checked by your dealer.
Distance
Beeper Short beeps
Continuous
beeps
Very short beeps
Bottom
indicator stays on About 40-70 in
(1-1.8 m)
About 24-40 in
(0.6-1 m)
About 24 in
(0.6 m) or less
Bottom
indicator stays on Bottom
indicator stays on
Indicator
CONT INUED
Rear Cent er Sensor Operat ion
Parking Sensor System
Features
279
Page 285 of 420

Help assure your vehicle’s f uture
reliability and perf ormance by paying
extra attention to how you drive
during the f irst 600 miles (1,000 km).
During this period:Avoid full-throttle starts and rapid
acceleration.
Avoidhardbrakingforthefirst
200 miles (300 km).
Do not change the oil until the
scheduled maintenance time.
You should also f ollow these
recommendations with an
overhauled or exchanged engine, or
when the brakes are replaced. Do not tow a trailer. We recommend quality gasolines
containing detergent additives that
help prevent f uel system and engine
deposits.
In addition, in order to maintain good
perf ormance, f uel economy, and
emissions control, we strongly
recommend, in areas where it is
available, the use of gasoline that
does NOT contain manganese-based
f uel additives such as MMT. If you notice any undesirable
operating symptoms, try another
service station or switch to another
brand of gasoline.
For f urther important f uel-related
inf ormation, please ref er to your
.
Your vehicle is designed to operate
on unleaded gasoline with a pump
octane number of 87 or higher. Use
of a lower octane gasoline can cause
a persistent, heavy, metallic rapping
noise that can lead to engine damage.
Use of gasoline with these additives
may adversely af f ect perf ormance,
and cause the Malfunction Indicator
Lamp on your instrument panel to
come on. If this happens, contact your dealer f or service.
Some gasoline today is blended with
oxygenates such as ethanol or
MTBE. Your vehicle is designed to
operate on oxygenated gasoline
containing up to 10 percent ethanol
by volume and up to 15 percent
MTBE by volume. Do not use
gasoline containing methanol.
Break-in Period, Gasoline Type
Break-in Period
Gasoline Type
Quick Start Guide
284
Page 287 of 420
Park the vehicle, and set the
parking brake. Pull the hood
release handle located under the
lower lef t corner of the dashboard.
The hood will pop up slightly.Put your f ingers under the f ront
edge of the hood. The hood latch
handle is above the ‘‘H’’ logo. Pull
this handle until it releases the
hood, then lif t the hood.
If the hood latch handle moves stif f ly,
or you can open the hood without
lifting the handle, the mechanism
should be cleaned and lubricated.
Screw the fuel fill cap back on
until it clicks at least once. If you
do not properly tighten the cap,
the malf unction indicator lamp
maycomeon(seepage ).You
will also see a ‘‘CHECK FUEL
CAP’’ message on the odometer/
trip meter display (LX, EX and
EX-L models) or ‘‘TIGHTEN
FUEL CAP’’ message on the multi-
inf ormation display (Touring
models).
Push the f uel f ill door closed until
it latches.
1.
5.
6.
2.
378
Service Station Procedures
Opening and Closing the Hood
286
HOOD RELEASE HANDLE
LATCH
Page 299 of 420
Youshoulddothefollowingchecks
and adjustments bef ore you drive
your vehicle.Make sure all windows, mirrors,
and outside lights are clean and
unobstructed. Remove f rost, snow,
or ice.
Check that the hood is f ully closed.
Visually check the tires. If a tire
looks low, use a gauge to check its
pressure.
Check that any items you may be
carrying are stored properly or
f astened down securely. Check the seat adjustment (see
page ).
Check the adjustment of the
inside and outside mirrors (see
page ).
Check the steering wheel
adjustment (see page ).
Make sure the doors and the
tailgate are securely closed and
locked.
Fasten your seat belt. Check that
your passengers have f astened
their seat belts (see page ).
When you start the engine, check
the gauges and indicators in the
instrument panel (see page ).
3.
2.
1.
4. 5.
6.
7.
8.
9.
10. 16
61
153
131
171
Preparing to Drive
298