Page 271 of 425
Reducer
Replace the oil seal on the car
1. Disconnect the reducer from the drive shaft.
a. Make the assembly mark on two flanges.
b. Remove four bolts and nuts.
2. Remove the flange and dustproof cover assembly
3. Remove the oil seal
Use the special tools to remove the oil seal.
bearing spacer
adjusting washer
rear bearing
drive bevel gear
adjusting ring
side bearingdriven bevel gear
differential housing
locking plate
plain washer
flange
dustproof cover
oil seal
oil baffle disc
front bearingbearing glandstop plate
lock washer with
double ears
N m: Specified torque
Used component which can not be used any more.
assembly mark
Page 272 of 425
4. Install the new oil seal
a. Coat the lip of oil seal with the HP-R grease.
b. Use the special tools to knock in the new oil seal.
Insertion depth of oil seal: 1.0mm
5. Install the flange and dustproof cover assembly
6. Rivet the drive bevel gear nut.
7. Connect the drive shaft flange to the reducer
flange Align the assembly mark ; then connect them
by bolt.
Tightening force: 785Nm
8. Check the oil level of reducerReplace the hyperbolic
gear oil if necessary.
Oil number : GL-5 hyperbolic gear
Viscosity : SAE80W/90
Amount: Filled with oil until the oil flows out form oil filling
port.
Removal of reducer
1.Remove the oil drain plug; drain the oil from the
reducer
2. Remove the rear axle
(Refer to Step 2 in “Disassembly of Rear Axle”)
3. Disconnect the drive shaft from the reducer
(Refer to step 1 in “Replace the Oil Seal on Car”)
4Remove the assembly of reducer.
special tools
insertion depth: 1mm
assembly mark
assembly mark
Page 274 of 425
Remarks: Mark the label on the removed components to indi-
cate the position of reassembly.
7. Remove the flange and dustproof cover assembly
a.Use the hammer and chisel to loose the riveted part of nut.
b.Use the special tools to clamps the flange; then remove the nut.
Caution: The used nut can not be used any more.
c.Remove the flange and dustproof cover assembly.
8. Remove the oil seal
Use the tools to pry out the oil seal.
9. Remove the drive bevel gear and spacer
Remove the drive bevel gear, bearing and spacer from the reducer
housing.
10. Remove the oil baffle disc and front bearing inner
race
11. Replace the rear bearing of drive bevel gear
a. Use the press machine and special tools to pull out the rear
bearing from the drive bevel gear.
special tools
special tools
Page 276 of 425

2. Install the rear bearing of drive bevel gear and ad
justing washer
a. Select the proper adjusting washer according to “Meshing Condi
tion of Drive Bevel Gear and Driven Bevel Gear”.
b. Install the rear bearing and selected adjusting washer by press
machine.
3. Install the spacer.
a.Select the adjusting washer between the rear bearing and spacer
based on the experience.
b.Install the spacer.
4. Install the front bearing inner race, oil baffle disc
and oil seal of drive bevel gear
a. Place the front bearing inner race in the reducer housing; place the
oil baffle disc.
b. Coat the position of reducer housing oil seal and lip of oilseal
with grease uniformly; place the oil seal in position. Start the
press machine for installation.
5. Install the drive bevel gear, flange and dustproof
cover assembly
a. Install the flange and dustproof cover assembly in the reducer
housing, Press it to level by hand.
b. Insert the drive bevel gear installed with the spacer, rear bearing
and adjusting washer into the flange through the spline; screw on
the nut.
c. Use the nut to tighten the flange, plain washer and drive gear.
special tools
level
special tools
Page 281 of 425

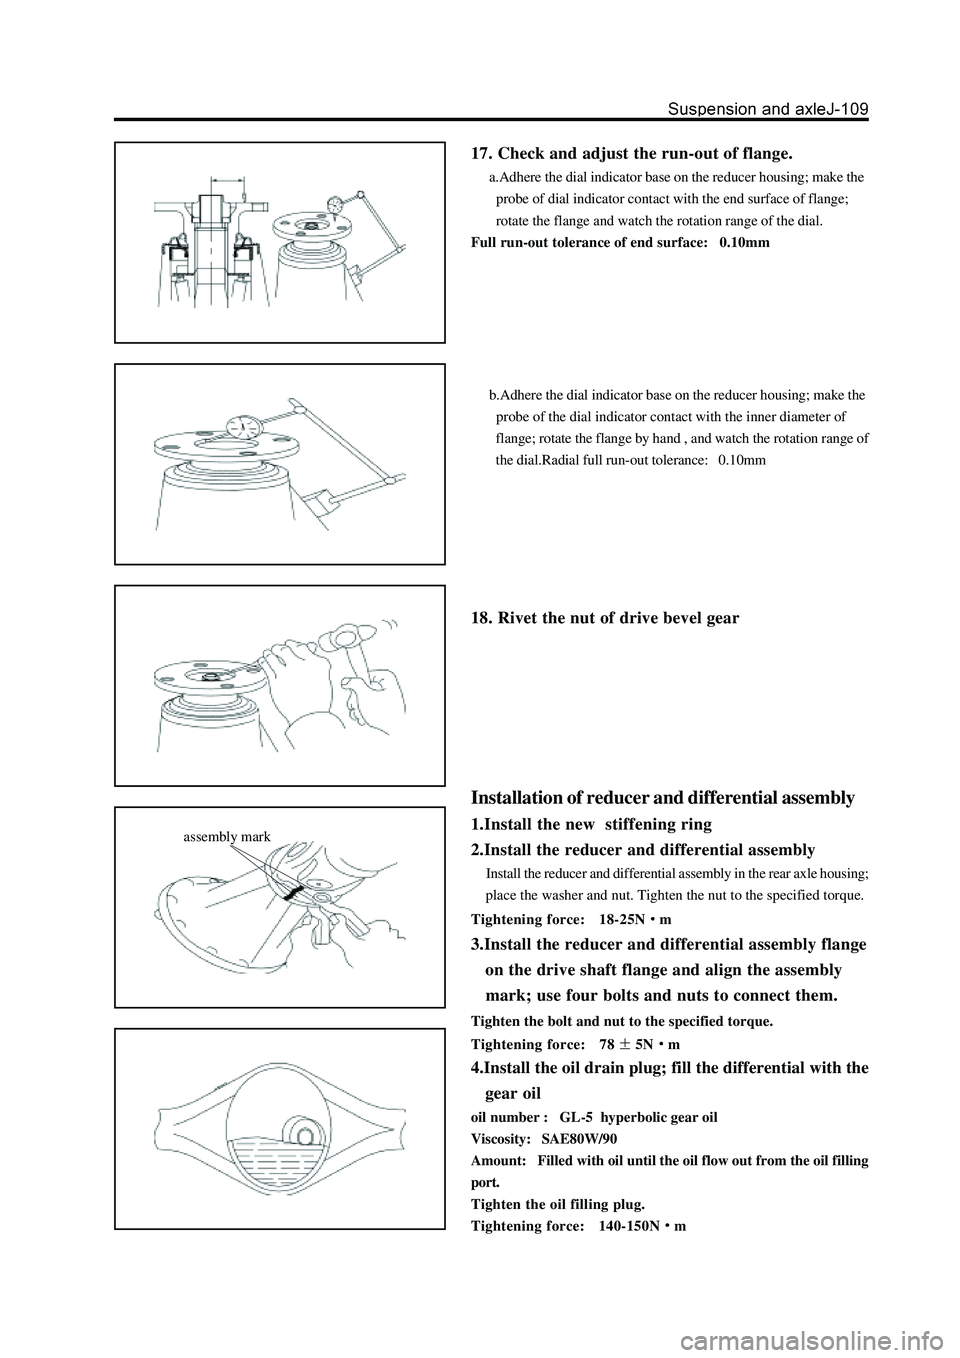
17. Check and adjust the run-out of flange.
a.Adhere the dial indicator base on the reducer housing; make the
probe of dial indicator contact with the end surface of flange;
rotate the flange and watch the rotation range of the dial.
Full run-out tolerance of end surface: 0.10mm
b.Adhere the dial indicator base on the reducer housing; make the
probe of the dial indicator contact with the inner diameter of
flange; rotate the flange by hand , and watch the rotation range of
the dial.Radial full run-out tolerance: 0.10mm
18. Rivet the nut of drive bevel gear
Installation of reducer and differential assembly
1.Install the new stiffening ring
2.Install the reducer and differential assembly
Install the reducer and differential assembly in the rear axle housing;
place the washer and nut. Tighten the nut to the specified torque.
Tightening force: 18-25N
m
3.Install the reducer and differential assembly flange
on the drive shaft flange and align the assembly
mark; use four bolts and nuts to connect them.
Tighten the bolt and nut to the specified torque.
Tightening force: 78
5Nm
4.Install the oil drain plug; fill the differential with the
gear oil
oil number : GL-5 hyperbolic gear oil
Viscosity: SAE80W/90
Amount: Filled with oil until the oil flow out from the oil filling
port.
Tighten the oil filling plug.
Tightening force: 140-150N
m
assembly mark
Page 284 of 425
Rear suspension
N m: specified torque
bush clip
bush
rear stabilizer barrear connecting rod of stabilizer bar assembly
plain washer
short longitudinal
pull-rod fixed bolt
rubber padshort longitudinal
pull-rod fixed bolt
long longitudinal
pull-rod assembly
long longitudinal
pull-rod fixed bolt
long longitudinal
pull-rodassembly
short longitudinal
pull-rod assembly
rear axle
assembly
coil spring
upper support pad
of coil spring
short longitudinal pull-rod assembly
long longitudinal
pull-rod assembly
rear vibration damper
cross pull-rod assembly
cross pull-rod
connecting bolt
Page 285 of 425

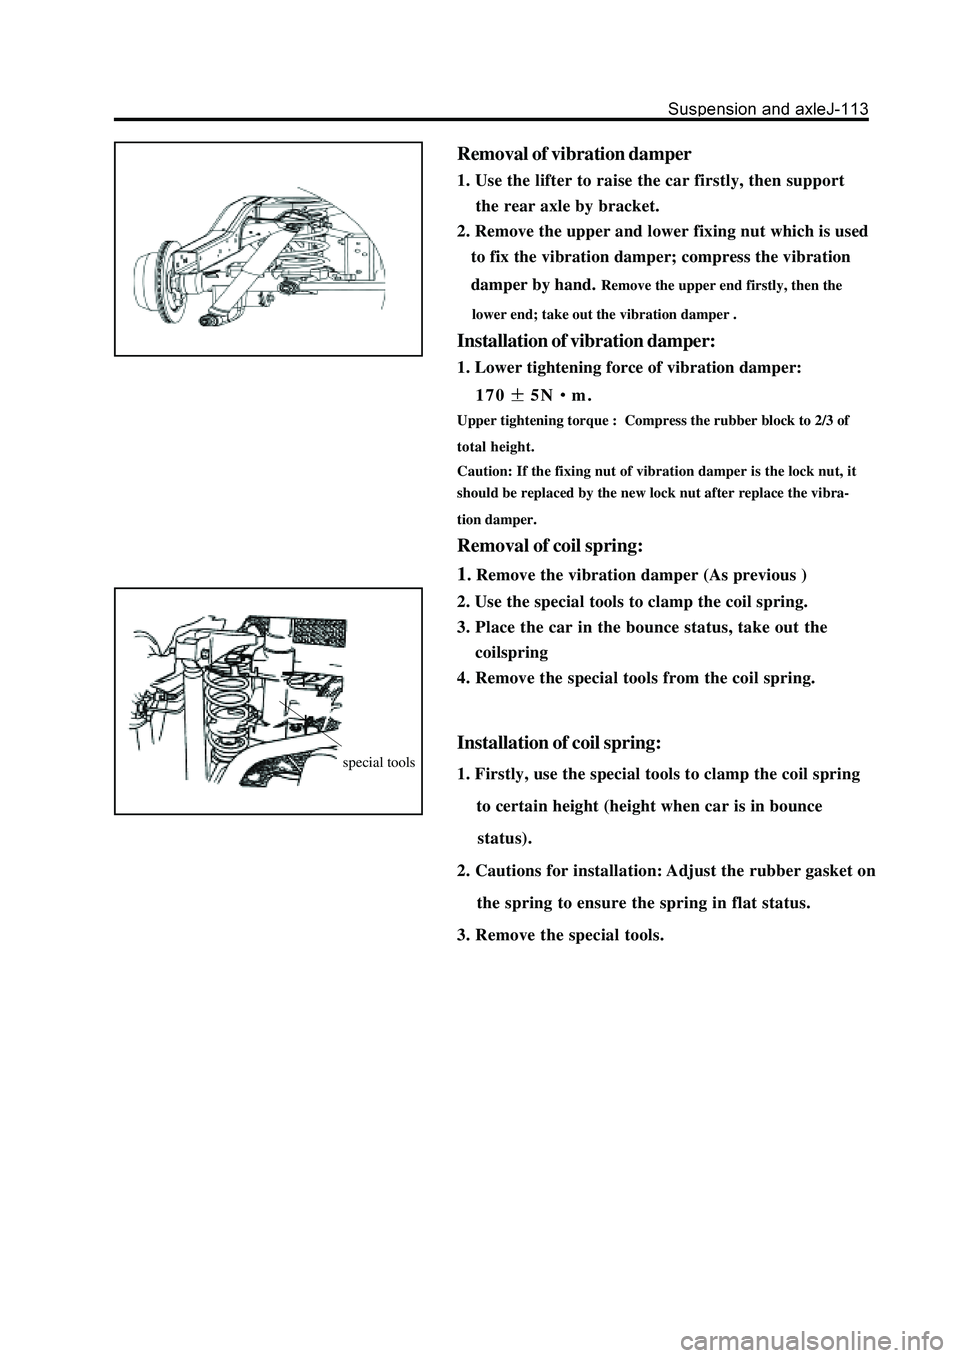
Removal of vibration damper
1. Use the lifter to raise the car firstly, then support
the rear axle by bracket.
2. Remove the upper and lower fixing nut which is used
to fix the vibration damper; compress the vibration
damper by hand.
Remove the upper end firstly, then the
lower end; take out the vibration damper .
Installation of vibration damper:
1. Lower tightening force of vibration damper:
170
5Nm.
Upper tightening torque : Compress the rubber block to 2/3 of
total height.
Caution: If the fixing nut of vibration damper is the lock nut, it
should be replaced by the new lock nut after replace the vibra-
tion damper.
Removal of coil spring:
1
. Remove the vibration damper (As previous )
2. Use the special tools to clamp the coil spring.
3. Place the car in the bounce status, take out the
coilspring
4. Remove the special tools from the coil spring.
Installation of coil spring:
1. Firstly, use the special tools to clamp the coil spring
to certain height (height when car is in bounce
status).
2. Cautions for installation: Adjust the rubber gasket on
the spring to ensure the spring in flat status.
3. Remove the special tools.special tools
Page 288 of 425

Brake-2
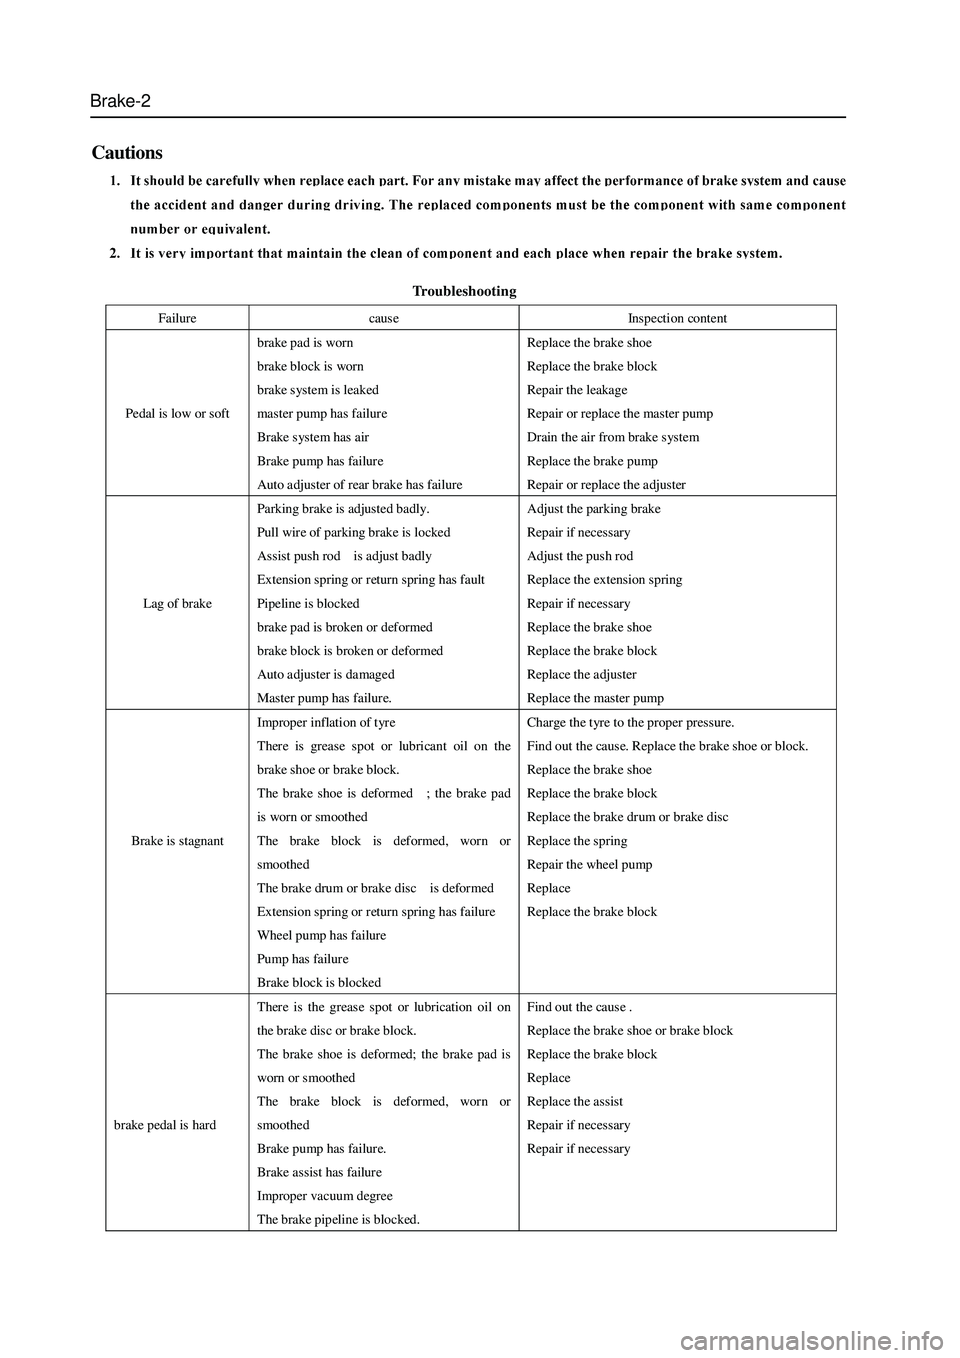
Troubleshooting
Cautions
Failure cause Inspection content
Pedal is low or soft brake pad is worn
brake block is worn
brake system is leaked
master pump has failure
Brake system has air
Brake pump has failure
Auto adjuster of rear brake has failure Replace the brake shoe
Replace the brake block
Repair the leakage
Repair or replace the master pump
Drain the air from brake system
Replace the brake pump
Repair or replace the adjuster
Lag of brake Parking brake is adjusted badly.
Pull wire of parking brake is locked
Assist push rod is adjust badly
Extension spring or return spring has fault
Pipeline is blocked
brake pad is broken or deformed
brake block is broken or deformed
Auto adjuster is damaged
Master pump has failure. Adjust the parking brake
Repair if necessary
Adjust the push rod
Repla ce the extension spring
Repair if necessary
Replace the brake shoe
Replace the brake block
Repla ce the a djuster
Repla ce the master pump
Brake is stagnant Improper inflation of tyre
There is grease spot or lubricant oil on the
brake shoe or brake block.
The brake shoe is deformed ; the brake pad
is worn or smoothed
The brake block is deformed, worn or
smoothed
The brake drum or brake disc is deformed
Extension spring or return spring has failure
Wheel pump has failure
Pump has failure
Brake block is blocked Charge the tyre to the proper pressure.
Find out the cause. Replace the brake shoe or block.
Replace the brake shoe
Replace the brake block
Replace the brake drum or brake disc
Repla ce the spring
Repair the wheel pump
Replace
Replace the brake block
brake pedal is hard There is the grease spot or lubrication oil on
the brake disc or brake block.
The brake shoe is deformed; the brake pad is
worn or s moothed
The brake block is deformed, worn or
smoothed
Brake pump has failure.
Brake assist has failure
Improper vacuum degree
The brake pipeline is blocked. Find out the caus e .
Replace the brake shoe or brake block
Replace the brake block
Replace
Replace the assist
Repair if necessary
Repair if necessary