Page 97 of 133

Reference
At a glance
Controls
Driving tips
Mobility
95
works according to BMW repair procedures
with correspondingly trained personnel.
Approved engine oils
The quality of the engine oil selected has critical
significance for the operation and service life of
an engine. BMW continuously approves spe-
cific oils after confirming their suitability for use
in its vehicles with extensive testing.
Only use approved BMW High Performance
Synthetic Oil.
If you are unable to obtain BMW High Perfor-
mance Synthetic Oil, you can add small
amounts of another synthetic oil in between oil
changes. Only use oils with the API SH specifi-
cation or higher.
Ask your BMW Sports Activity Vehicle
Center for more details concerning BMW
High Performance Synthetic Oil or other
approved synthetic oils.<
You can also call BMW of North America at
1-800-831-1117 or visit website
www.bmwusa.com to obtain this information.
BMW engines are designed to operate
without additives, and their use could
even lead to damage in some cases.<
Viscosity classes
Viscosity is the oil flow rating as defined in
SAE classes.
The selection of the correct SAE class depends
on the climate conditions in the area where you
typically drive your BMW.
Approved oils belong to SAE classes
5W-40 and 5W-30.<
These oils can be used for driving in all ambient
temperatures.
Coolant
Warning lamp
The warning lamp lights up: coolant
level is too low; top off at the next
opportunity.Do not open the cooling system when the
engine is hot. Escaping coolant can cause
burns.<
Coolant consists of water and coolant additive.
Not all commercially available additives are suit-
able for your BMW. Ask your BMW Sports
Activity Vehicle Center for suitable additives.
Only use suitable additives; otherwise,
engine damage may result. The additives
present a health hazard.<
Always observe all applicable environ-
mental laws and regulations when dis-
posing of used coolant additives.<
Checking coolant level
1.The engine must be at ambient tempera-
ture.
2.Turn the cap of the expansion tank counter-
clockwise to allow any accumulated pres-
sure to escape, then continue turning to
open.
3.The coolant level is correct if the upper end
of the red float bar is at least at the same
height as the top edge of the filler neck,
refer to arrow. The bar end may only pro-
trude by a maximum of ιin/2 cm, i.e. up to
the second mark on the float bar, refer also
to drawing beside the filler neck.
4.If the coolant is low, slowly add coolant up to
the specified level – do not overfill.
5.Screw on the cap and tighten snugly.
6.Have the reason for the coolant loss cor-
rected as soon as possible.
Page 98 of 133

Under the hood
96
Brake system
Malfunction
Brake fluid
The warning lamp lights up red despite
the handbrake being released. Stop
immediately.
The brake fluid in the reservoir has fallen to
below the minimum level. At the same time, a
considerably longer brake pedal travel may be
noticeable. Have the system checked immedi-
ately.
During continued driving, increased brake
pedal travel may be necessary, and con-
siderably longer braking distances may result.
Please adapt your driving style accordingly.<
Display of the previously described mal-
function on Canadian models.
Brake pads
The warning lamp lights up.
The brake pads have reached their min-
imum pad thickness. Have brake pads
replaced immediately.
For your own safety, use only brake pads
that BMW has approved for your particu-
lar vehicle model. As BMW cannot assess the
suitability of other brake pads for use in your
vehicle, we are unable to assume continued
responsibility for the vehicle's operating safety
if non-approved pads are installed.<
Page 99 of 133

Reference
At a glance
Controls
Driving tips
Mobility
97
Maintenance
The BMW maintenance
system
The BMW maintenance system supports the
preservation of the road and operating safety of
your BMW.
Regular maintenance is not only required for
the safety of the vehicle, it also improves the
resale value.
Service Interval Display
The BMW maintenance system takes the driv-
ing conditions of the vehicle into account when
determining service intervals:
From the maintenance standpoint,
62,000 miles/100,000 km accumulated in
short-distance urban driving are not the equiva-
lent of the same distance covered at moderate
speeds in long-distance highway travel.
The BMW maintenance system is divided into
engine oil service and Inspections I and II.
Determining the maintenance intervals accord-
ing to the actual loads on the vehicle covers
practically every kind of operating situation.
However, even those who drive only short dis-
tances, significantly less than 6,200 miles/
10,000 km annually, should have the engine oil
changed at least every 2 years since oil deterio-
rates over time, regardless of use.
Brake fluid is hygroscopic: it absorbs
moisture from the atmosphere over the
course of time. To ensure that the brake system
continues to provide safe and reliable perfor-
mance, remember to have the brake fluid changed at least every two years by a BMW
Sports Activity Vehicle Center, also refer to the
Service and Warranty Information Booklet for
US models or the Warranty and Service Guide
Booklet for Canadian models.<
Service and Warranty Information
Booklet for US models and
Warranty and Service Guide Booklet
for Canadian models
Please consult your Service and Warranty Infor-
mation Booklet for US models and Warranty
and Service Guide Booklet for Canadian models
for additional information on service require-
ments.
BMW recommends that you have service
and repair operations performed at your
BMW Sports Activity Vehicle Center.
Take the time to ensure that these service pro-
cedures are confirmed by entries in your vehi-
cle's Service and Warranty Information Booklet
for US models and Warranty and Service Guide
Booklet for Canadian models. These entries
verify that your vehicle has received the speci-
fied regular maintenance.<
Socket for OBD Onboard
Diagnostics
The chief components that make up the emis-
sions content can be checked by a device that
uses the OBD socket.
Page 100 of 133

Maintenance
98 This socket is located under a cover on the left
side of the driver's footwell, just under the dash-
board.
Emissions values
The warning lamp lights up. Exhaust
values are deteriorating. Have the vehi-
cle checked as soon as possible.
Under certain conditions, the indicator will flash.
This indicates a serious rate of engine misfire.
When this occurs, you should reduce speed
and consult the nearest BMW Sports Activity
Vehicle Center as soon as possible. Severe
engine misfire even for only a short period of
time can seriously damage emission control
components, especially the catalytic converter.
Display of the previously described mal-
function on Canadian models.
When the fuel filler cap is not properly
tightened, the OBD system can detect
the vapor leak and the indicator lamp will light
up. If the filler cap is subsequently tightened,
the indicator lamp should go out within a few
days.<
Event data recorders
Your vehicle may be equipped with one or more
sensing and diagnostic modules or a recording
device capable of recording or transmitting cer-
tain vehicle data or information. In addition, if
you have a Subscription Service Agreement for
the BMW Assist system, certain vehicle infor-
mation may be transmitted or recorded in order
to provide such services.
Care
You can find useful information on caring for
your BMW in the Caring for your vehicle bro-
chure.
Page 101 of 133

Reference
At a glance
Controls
Driving tips
Mobility
99
Replacing components
Onboard tool kit
The onboard tool kit is located in a compart-
ment on the left in the cargo area.
Wiper blades
Replacing front wiper blades
1.Move the wiper into the fold-out position,
refer to page40.
2.Lift the wiper arm and press the securing
spring, refer to arrow.
3.Pull the wiper blade off toward the wiper
arm.
4.Insert the new blade and snap it into place.
To prevent damage to the wipers, always
fold them back down onto the windshield
before you turn the ignition key to position 1
or 2 or open the hood.<
Replacing rear wiper blade
1.Lift the wiper arm.
2.Pull off the wiper blade, refer to arrow.
3.Insert a new wiper blade.
Lamps and bulbs
Lamps and bulbs make a significant contribu-
tion to road safety. Therefore, comply fully with
the following instructions during bulb replace-
ment. If you are not familiar with the specified
procedures or they are not described here,
BMW recommends having this work carried out
at your BMW Sports Activity Vehicle Center.
Never touch the glass of new bulbs with
your bare fingers, as even minute
amounts of contamination will burn into the
bulb's surface and reduce its service life. Use
a clean cloth, paper towel, or the like or grasp
bulb by its base.<
A replacement bulb set is available from your
BMW Sports Activity Vehicle Center.
In all work on the electrical system, switch
off the relevant component to prevent
short circuits. To avoid possible injury or equip-
ment damage when replacing bulbs, follow any
instructions provided by the bulb manufac-
turer.<
When maintaining the headlamps, please follow
the instructions in the separate Caring for your
vehicle brochure.
Page 102 of 133

Replacing components
100 Please have your BMW Sports Activity
Vehicle Center work on lamps whose
replacement is not described here.<
Light-emitting diodes LEDs
Light-emitting diodes installed behind translu-
cent lenses serve as the light source for many of
the controls and displays in your vehicle. These
light-emitting diodes are related to ordinary
lasers.
Do not remove the covers, and never
stare into the unfiltered light for several
hours, as irritation of the retina could result.<
Xenon lamps*
The service life of these bulbs is very long and
the probability of failure is very low, provided
that they are not switched on and off an unusual
number of times. If one of these bulbs should
nevertheless fail, it is possible to continue driv-
ing with great caution using the fog lamps, pro-
vided traffic laws in your area do not prohibit
this.
To avoid risk of potentially fatal injuries
due to the extremely high voltages at
which these units operate, service work should
always be entrusted to qualified personnel.<
Parking and roadside parking lamps
In case of a malfunction, please contact your
BMW Sports Activity Vehicle Center.
Halogen low beams
H7 bulb, 55 watts
Always wear gloves and eye protection –
the atmosphere within the bulb is pres-
surized. Failure to observe this precaution can
lead to personal injury should the bulb be dam-
aged.<
For checking and adjusting headlamp
aim, please contact your BMW Sports
Activity Vehicle Center.<
Driver's side
1.Position the screwdriver from the onboard
tool kit and pull off the lamp cover.
Exercise caution when handling the
screwdriver; otherwise, personal
injury can occur or the vehicle can be dam-
aged.<
2.Press the bulb holder downward and
remove.
3.Remove the bulb, install a new bulb.
4.Place the bulb holder with the lower edge
against the bracket and press it in until the
lamp base locks into place.
Front passenger side
Before replacing the bulb, remove the reservoir
for the windshield washing system from the
Page 103 of 133

Reference
At a glance
Controls
Driving tips
Mobility
101
bracket. To do so, loosen the bolt, refer to
arrow, and place the reservoir to one side.
Bear in mind that the windshield washing
system reservoir is heavy. If you do not,
injuries or damage to the vehicle can occur.<
For bulb replacement procedure, refer to
Driver's side.
Halogen high beams
H7 bulb, 55 watts
Always wear gloves and eye protection –
the atmosphere within the bulb is pres-
surized. Failure to observe this precaution can
lead to personal injury should the bulb be dam-
aged.<
For checking and adjusting headlamp
aim, please contact your BMW Sports
Activity Vehicle Center.<
Driver's side
1.Open the clip and remove the lamp cover.
2.Press the bulb holder downward and
remove, refer to Low beams.
3.Pull off the lamp base; plug in a new lamp
base.
4.Place the lamp base with the lower edge
against the bracket and press it in until the
lamp base locks into place.
Make sure that the cover does not fall into
the engine compartment; otherwise, the
vehicle can be damaged or other road users can
be endangered.<
Front passenger side
Before replacing the bulb, remove the reservoir
of the windshield washer system from the
bracket, refer to Halogen low beams on
page100.
For bulb replacement procedure, refer to
Driver's side.
Turn signal, front
21 watt bulb
Access to the turn signal is at the edge of the
lamp unit, refer to arrow.
Make sure that the lamp base does not fall
into the engine compartment; otherwise,
the vehicle can be damaged or other road users
can be endangered.<
1.Turn the lamp base and remove it.
2.Replace the bulb.
3.Insert the lamp base. If it does not snap into
place immediately, turn the lamp base until
it does.
Side-mounted turn signals
5 Watt bulb
1.Use finger pressure against the rear end of
the lamp, refer to arrow, to press it forward
for removal.
Page 104 of 133

Replacing components
102 2.Apply gentle pressure to the bulb while
turning it to the left and pull it out.
3.Install in the reverse order.
Front fog lamps
H11 bulb, 55 watts
Always wear gloves and eye protection –
the atmosphere within the bulb is pres-
surized. Failure to observe this precaution can
lead to personal injury should the bulb be dam-
aged.<
1.Pull the cover in front of the fog lamp for-
ward.
2.Loosen the screws, refer to arrow, and pull
out the headlamp.
3.Turn the lamp base at the back of the head-
lamp to the left and remove it.
4.Replace the bulb.
Tail lamps
21 watt bulb
1Turn signal
2Backup lamp
3Tail lamp/brake lamp
4Tail lamp/brake lamp
*
Replacing tail lamps
1.Open the flap in the side panel, refer to
page72.
2.To release the plug connection of the cable,
press the spring, refer to arrow1.
3.Lift the side panel somewhat.
4.To remove the back panel of the lamp,
release the retainer, refer to arrow2.
5.Apply gentle pressure to the bulb fitting
while turning it to the left for removal and
replacement.
6.Install in the reverse order.
Lamps in the liftgate
In case of a malfunction, please contact your
BMW Sports Activity Vehicle Center.
License plate lamps
10 watt bulb
1.Press the lamp out to the side with a screw-
driver.
2.Remove the lamp and replace the bulb.
 1
1 2
2 3
3 4
4 5
5 6
6 7
7 8
8 9
9 10
10 11
11 12
12 13
13 14
14 15
15 16
16 17
17 18
18 19
19 20
20 21
21 22
22 23
23 24
24 25
25 26
26 27
27 28
28 29
29 30
30 31
31 32
32 33
33 34
34 35
35 36
36 37
37 38
38 39
39 40
40 41
41 42
42 43
43 44
44 45
45 46
46 47
47 48
48 49
49 50
50 51
51 52
52 53
53 54
54 55
55 56
56 57
57 58
58 59
59 60
60 61
61 62
62 63
63 64
64 65
65 66
66 67
67 68
68 69
69 70
70 71
71 72
72 73
73 74
74 75
75 76
76 77
77 78
78 79
79 80
80 81
81 82
82 83
83 84
84 85
85 86
86 87
87 88
88 89
89 90
90 91
91 92
92 93
93 94
94 95
95 96
96 97
97 98
98 99
99 100
100 101
101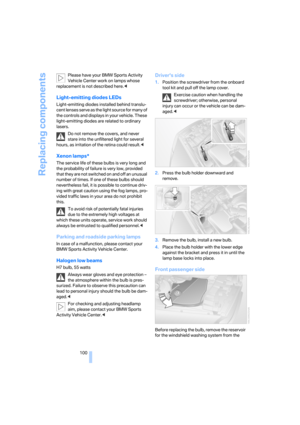 102
102 103
103 104
104 105
105 106
106 107
107 108
108 109
109 110
110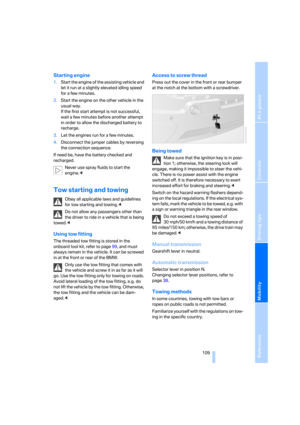 111
111 112
112 113
113 114
114 115
115 116
116 117
117 118
118 119
119 120
120 121
121 122
122 123
123 124
124 125
125 126
126 127
127 128
128 129
129 130
130 131
131 132
132