Page 65 of 133

Reference
At a glance
Controls
Driving tips
Mobility
63
A congenial climate
For almost all conditions, the AUTO pro-
gram12 offers the optimal air distribution and
air volume, refer to AUTO program below. You
need only select an interior temperature that
you find pleasant.
The following sections contain more detailed
information on the available setting options.
Your vehicle has been designed to auto-
matically select your personal climate-
control settings whenever you unlock the doors
using your individually programmed remote
control.<
AUTO program
The AUTO program handles the
adjustment of air distribution to the
windshield and side windows, in
the direction of the upper body, and in the foot-
well. It also adapts your instructions for the air
volume and temperature to outside influences
throughout the year, e.g. solar radiation or win-
dow condensation.
The cooling is switched on automatically along
with the AUTO program.
Manually switching air distribution on/
off
You can direct air to flow onto the
windows , toward the upper
body and into the footwell .
You can reactivate the automatic
air distribution mode by selecting
the AUTO button.
Temperature
Set the desired temperature.
The automatic climate control
assures that this temperature is
reached as quickly as possible any
time of year, using maximum cool-
ing or heating capacity as needed, and then
keeps this temperature constant.When you change between different tem-
perature settings in rapid succession, the
system does not have enough time to achieve
the desired temperature.<
Manually adjusting air volume
By pressing the lower button, you
can reduce the air volume. You can
increase it by pressing the upper
button.
You can reactivate the automatic
air volume mode by pressing the AUTO button.
Switching system on/off
At the lowest fan speed, press the lower button
to turn off the automatic climate control com-
pletely. All displays disappear.
Press any button to turn the automatic climate
control back on again.
Defrosting windows and removing
condensation
This program quickly removes ice
and condensation from the wind-
shield and front door windows.
Switching cooling function on/off
When the air conditioning is on, the
air is cooled, dehumidified, and
then reheated depending on the
temperature setting. Depending on the
weather, the windshield may fog over briefly
when the engine is started.
The cooling function is automatically switched
on along with the AUTO program. It is only pos-
sible to cool the passenger compartment with
the engine running.
AUC Automatic Recirculated-air
Control/recirculated air mode
You can set the desired operating
mode by pressing the button
repeatedly:
>LEDs off: outside air continuously flows into
the vehicle.
Page 66 of 133

Air conditioner
64 >Left LED on, AUC mode: a sensor detects
pollutants in the outside air. The system
suspends the supply of outside air as
needed and recirculates the air currently
within the vehicle. As soon as the concen-
tration of pollutants in the outside air has
decreased sufficiently, the system switches
automatically back to supplying outside air.
>Right LED on, recirculated-air mode: the
outside air supply into the vehicle is shut off
continuously. The system then recirculates
the air currently within the vehicle.
If condensation starts to form on the
inside window surfaces during operation
in the recirculated-air mode, you should switch
it off and increase the air supply as needed.
The recirculated-air mode should not be used
over a sustained period of time; otherwise, the
air quality inside the vehicle will steadily deteri-
orate.<
Rear window defroster
The rear window heating switches
off automatically after a certain
amount of time.
Ventilation
1Knurled wheels for opening and closing the
air vents through an infinitely variable range
2Levers for changing airflow direction
3Knurled wheel for more or less cool air from
the air vents for the upper body region
Ventilation for cooling
Adjust the vents to direct the flow of cool air in
your direction, for instance, if the interior has
become too warm.
Draft-free ventilation
Set the vent outlets so that the air flows past
you and is not directed straight at you.
Microfilter/activated-charcoal filter*
The microfilter removes dust and pollen from
the incoming outside air. The activated-char-
coal filter provides additional protection by fil-
tering gaseous pollutants from the outside air.
This combined filter is replaced when mainte-
nance is performed by your BMW Sports Activ-
ity Vehicle Center. A substantial reduction in
air supply indicates that the filter should be
replaced before normal maintenance.
Page 67 of 133

Reference
At a glance
Controls
Driving tips
Mobility
65
Practical interior accessories
Integrated universal remote
control*
The concept
The integrated universal remote control
replaces up to three different hand-held trans-
mitters for various items of radio-controlled
equipment such as door openers and house
alarm systems. The integrated universal remote
control recognizes and learns the transmitted
signal of each of the original hand-held trans-
mitters.
The signal of an original hand-held transmitter
can be programmed on one of the three mem-
ory buttons1. Once this is done, each of the
devices can be actuated with the appropriately
programmed memory button 1. The LED2 indi-
cates transmission of the signal.
Should you sell your vehicle one day, be sure to
delete the stored programs beforehand for your
security, refer to page66.
To prevent possible damage or injury,
before programming or using the inte-
grated universal remote control, always inspect
the immediate area to make certain that no peo-
ple, animals or objects are within the travel
range of the device. Also, comply with the
safety precautions of the original hand-held
transmitter.<
Checking compatibility
If you see this symbol on the packaging
or in the manual supplied with the origi-
nal hand-held transmitter, then it is safe
to assume that the radio-controlled device is
compatible with the integrated universal
remote control.
If you have additional questions, please
ask at your BMW Sports Activity Vehicle
Center or call: 1-800-355-3515.
You can find also information on the Internet at:
www.bmwusa.com or
www.homelink.com. HomeLink is a registered trademark of
Johnson Controls, Inc.<
Programming
1Memory buttons
2LED
Fixed-code hand-held transmitters
1.Turn the ignition key to position 2.
2.For initial use:
Press both outer buttons 1 for approx.
20 seconds, maintaining pressure until the
LED2 starts to flash. All stored programs
are deleted.
3.Hold the original hand-held transmitter at a
distance of approx. 2in/5cm to 8in/20cm
from the memory buttons1.
The required distance between the
hand-held transmitter and memory
buttons1 depends on the relevant system
of the original hand-held transmitter used.<
4.Simultaneously press the transmit button
on the original hand-held transmitter and
the desired memory button 1 of the inte-
grated universal remote control. Initially, the
LED2 flashes slowly. Release both buttons
as soon as the LED2 flashes rapidly. If the
LED2 does not flash rapidly after approx.
15 seconds, then change the distance.
5.To program other original hand-held trans-
mitters, repeat steps 3 and 4.
Page 68 of 133

Practical interior accessories
66 The corresponding memory button1 is now
programmed with the signal of the original
hand-held transmitter.
You can use the system when the engine is run-
ning or when the ignition is switched on.
If the system cannot be operated after
repeated programming, check whether
the original hand-held transmitter uses an alter-
nating-code system. To do so, either read the
instructions of the original hand-held transmit-
ter or press and hold down the programmed
memory button 1 of the integrated universal
remote control. If the LED2 on the integrated
universal remote control flashes rapidly for a
short time then lights up for approx. 2 seconds,
this indicates that the original hand-held trans-
mitter uses an alternating-code system. In the
case of an alternating-code system, program
the memory buttons 1 as described in the sec-
tion below on alternating-code transmitters.<
Alternating-code transmitters
Consult the operating instructions of the unit
you wish to set when programming the univer-
sal remote control. You will find information
there on the possibilities for synchronization.
When programming hand-held transmitters
that employ an alternating code, please follow
these additional instructions:
Programming will be easier with the aid of
a second person.<
1.Park your vehicle within the range of the
remote-controlled equipment.
2.Program the integrated universal remote
control as described above in the section on
Fixed-code hand-held transmitters.
3.Locate the button on the receiver of the
equipment to be set, e.g. on its drive unit.
4.Press the button on the receiver of the
device you want to set up. After step 4, you
have approx. 30 seconds for step 5.
5.Press the programmed memory button1
of the integrated universal remote control
three times.The corresponding memory button1 is now
programmed with the signal of the original
hand-held transmitter.
If you have questions, please contact your
BMW Sports Activity Vehicle Center.<
Deleting stored programs
Press both outer buttons1 for approx. 20 sec-
onds, maintaining pressure until the LED2
starts to flash: all stored programs are deleted.
It is not possible to delete individual programs.
Cup holders
Do not place glass containers in the cup
holders; otherwise, there is a danger of
injury in the event of an accident.<
Front
Depending on your optional equipment, the
center console contains either one or two cup
holders.
Passenger side*
The cup holder for the front passenger is
located beneath the air vent.
Page 69 of 133

Reference
At a glance
Controls
Driving tips
Mobility
67
To open: briefly press the cover in the middle.
To close: press the cover in the middle and slide
the cup holder in.
Rear
A cup holder is located in the center armrest at
the rear:
Press the button to open.
Glove compartment
Opening
Pull the handle. The lamp inside the glove com-
partment comes on.
Closing
Fold the cover up.
To prevent injury in the event of an acci-
dent while the vehicle is being driven,
close the glove compartment immediately after
use.<
Locking
Use one of the master keys. A master key is also
required for unlocking.
If you only hand over the spare key, e.g.
for valet parking at a hotel, refer to
page18, then the glove compartment cannot
be unlocked.<
Rechargeable flashlight
The flashlight is located on the left side of the
glove compartment. It can remain plugged in
continuously. Remove the flashlight from the
socket whenever you need it.
To avoid damage, be sure that the flash-
light is switched off when it is inserted
into its holder.<
Storage compartments
Armrest, front*
The armrest contains two storage compart-
ments.
>Compartment for CDs:
Press button1.
>Compartment for coins and miscellaneous
items:
Press button2.
Page 70 of 133

Practical interior accessories
68
Armrest, rear
The rear armrest contains a storage compart-
ment:
To open, pull the cover upward.
Storage compartment in the
instrument panel*
Opening
Press the button in the direction of the arrow.
Closing
Fold the cover down.
Storage package*
Your convenience is enhanced by:
>Armrest, front
>Sliding lashing eyes in cargo area, refer to
page73
>Floor cover in cargo area that can be used in
two positions, refer to page72
>Nets in cargo area, on rear side of front seat,
and in passenger footwell
Clothes hooks
When suspending clothing from the
hooks ensure that it will not obstruct the
driver's vision. Do not hang heavy objects on
the hooks. If you do so, they could endanger
passengers during braking or evasive maneu-
vers.<
Ashtray*
Emptying
Press the edge of the opened cover: the ashtray
moves up and can be removed.
On vehicles with the non-smoker's equipment
package, the insert is removed in the same way.
Lighter*
Press in the cigarette lighter1.
The lighter can be removed as soon as it pops
out.
Hold or touch the hot cigarette lighter by
the knob only. Holding or touching it in
other areas could result in burns.
The cigarette lighter remains operational when
the ignition key has been removed. For this rea-
son, do not leave unsupervised children in the
vehicle.<
Page 71 of 133

Reference
At a glance
Controls
Driving tips
Mobility
69
Connecting electrical devices
You can use electrical devices such as flash-
lights, car vacuum cleaners, or the like with
power ratings of up to approx. 200 W at 12 V if
at least one of the following connection points
is provided. Avoid damage to the socket caused
by inserting plugs of the wrong shape or size.
Lighter socket
Remove cigarette lighter from its socket.
With the non-smoker's equipment package the
socket is covered with a removable cap.
Power socket in cargo area
Fold the cover upward.
Car phone preparation*
Hands-free system
In vehicles with car phone preparation*, the
hands-free microphone is located on the head-
liner near the interior lamp.
For more information on the car phone, refer to
the Owner's Manual for Telephone.
Ski bag*
The ski bag allows the safe and clean transport
of up to four pairs of standard skis or up to two
snowboards.
The ski bag allows you to stow skis up to a
length of up to 6.8 ft/2.1 m. When skis of 6.8 ft/
2.1 m in length are loaded, the ski bag will tend
to narrow, reducing its overall capacity.
Loading
1.Fold down the center armrest, pull off the
cover panel, press the button and disen-
gage the door.
2.Press the button again; the door in the
cargo area opens. If you press the button
firmly the first time, this also opens the door
in the cargo area.
3.Place the ski bag between the front seats
and load.
The zipper facilitates access to the stowed
items.
4.Insert the latch plate of the ski bag retaining
belt into the center safety belt buckle.
Make sure to load only clean skis into the ski
bag. Wrap sharp edges so that no damage
occurs.
Page 72 of 133

Practical interior accessories
70
Securing load
After loading, secure the ski bag and its con-
tents. Tension the retaining strap on the ten-
sioning buckle for this purpose.
Always secure the ski bag in this way.
If you fail to do so, it can endanger occu-
pants during braking or evasive maneuvers.<
To store the ski bag, perform the above steps in
reverse order.
Inserting ski bag
The ski bag is located in the cargo area under
the floor cover.
1.Fold down the center armrest and pull off
the cover.
2.Remove the tray behind the cover with a
screwdriver by placing it against the indi-
cated location in the center of the tray.
3.Position the ski bag on the lower edge of the
opening, refer to arrow 1, then insert it, refer
to arrow 2.
Removing ski bag
Pull the handle forward and remove the ski bag
upward.
Do not position cargo at the opening. If
you do, it can endanger the passengers
during braking or evasive maneuvers.<
Cargo area
When loading, follow the instructions on
page78.
Enlarging cargo area
The rear backrest is split. You can fold down
both seats individually to enlarge the cargo
area.
Reach into the opening and pull forward, refer
to arrow.
Before folding down the rear backrest,
remove the cover caps for the LATCH
child-restraint fixing system
*. Otherwise,
impressions can be left in the seat cushion.<
When you fold back the backrest, be sure
that the catch engages securely. This
causes the red warning field in the recess to dis-
appear. Otherwise, cargo can be thrown into
the passenger compartment during braking or
 1
1 2
2 3
3 4
4 5
5 6
6 7
7 8
8 9
9 10
10 11
11 12
12 13
13 14
14 15
15 16
16 17
17 18
18 19
19 20
20 21
21 22
22 23
23 24
24 25
25 26
26 27
27 28
28 29
29 30
30 31
31 32
32 33
33 34
34 35
35 36
36 37
37 38
38 39
39 40
40 41
41 42
42 43
43 44
44 45
45 46
46 47
47 48
48 49
49 50
50 51
51 52
52 53
53 54
54 55
55 56
56 57
57 58
58 59
59 60
60 61
61 62
62 63
63 64
64 65
65 66
66 67
67 68
68 69
69 70
70 71
71 72
72 73
73 74
74 75
75 76
76 77
77 78
78 79
79 80
80 81
81 82
82 83
83 84
84 85
85 86
86 87
87 88
88 89
89 90
90 91
91 92
92 93
93 94
94 95
95 96
96 97
97 98
98 99
99 100
100 101
101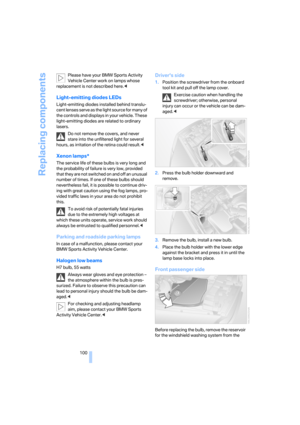 102
102 103
103 104
104 105
105 106
106 107
107 108
108 109
109 110
110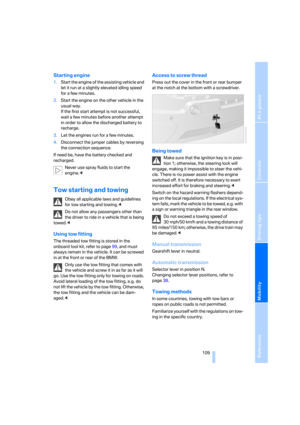 111
111 112
112 113
113 114
114 115
115 116
116 117
117 118
118 119
119 120
120 121
121 122
122 123
123 124
124 125
125 126
126 127
127 128
128 129
129 130
130 131
131 132
132