Page 1820 of 2893
�������
����
�(�#�'���������������
���������������
� �����)����
20-13820-138 Seats
Rear Seat Armrest Beverage Holder
Replacement (cont’d)
Rear Seat Armrest Replacement
A
B C
B A
B
A
B
C
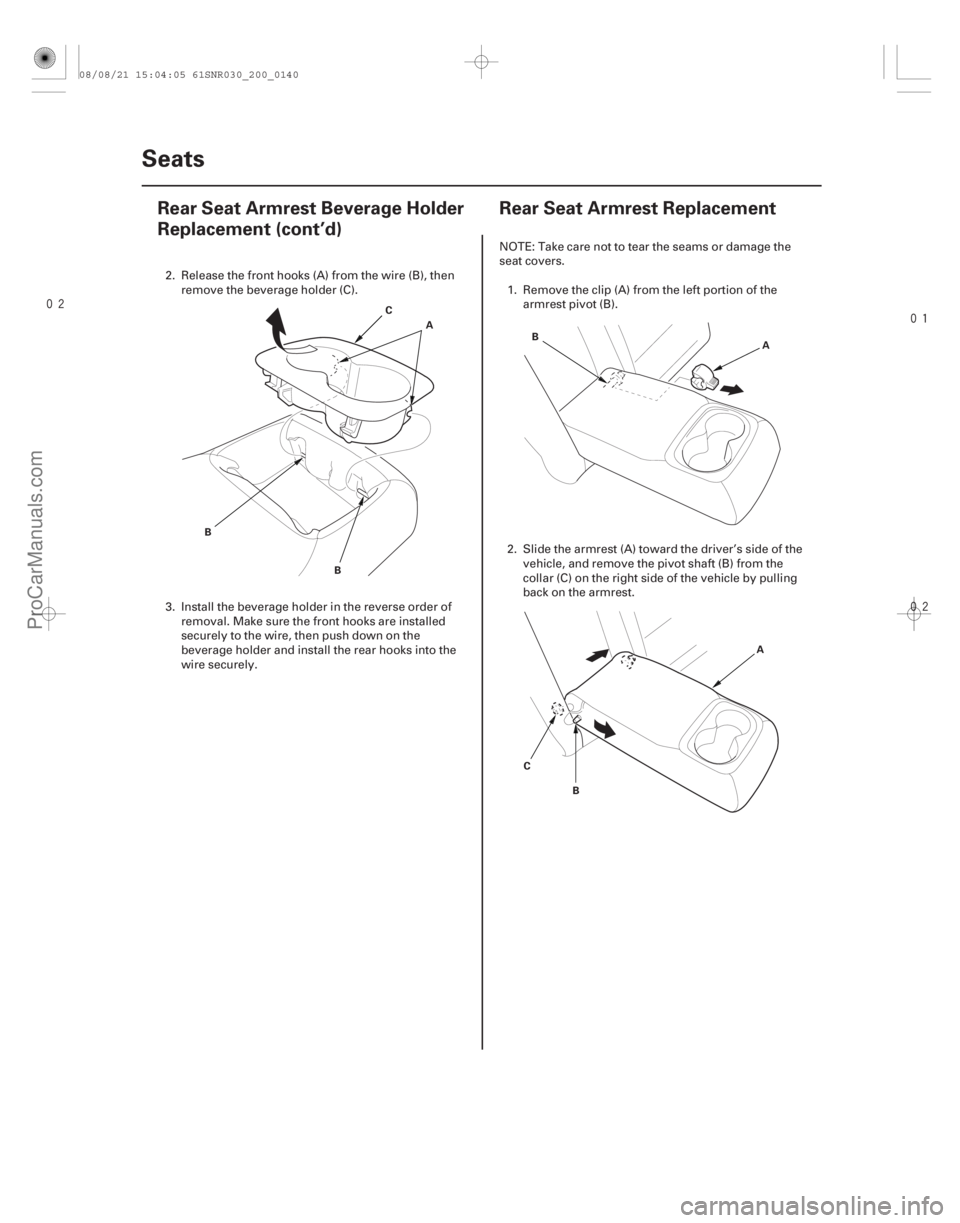
2. Release the front hooks (A) from the wire (B), then
remove the beverage holder (C).
3. Install the beverage holder in the reverse order of removal. Make sure the front hooks are installed
securely to the wire, then push down on the
beverage holder and install the rear hooks into the
wire securely. NOTE: Take care not to tear the seams or damage the
seat covers.
1. Remove the clip (A) from the left portion of the armrest pivot (B).
2. Slide the armrest (A) toward the driver’s side of the vehicle, and remove the pivot shaft (B) from the
collar (C) on the right side of the vehicle by pulling
back on the armrest.
08/08/21 15:04:05 61SNR030_200_0140
ProCarManuals.com
DYNOMITE -2009-
Page 1825 of 2893
����
��������
Left seat-back
Right seat-back
20-142 Seats
Rear Seat-back Cover Replacement (cont’d)
A
B
A B
D
B
C
A
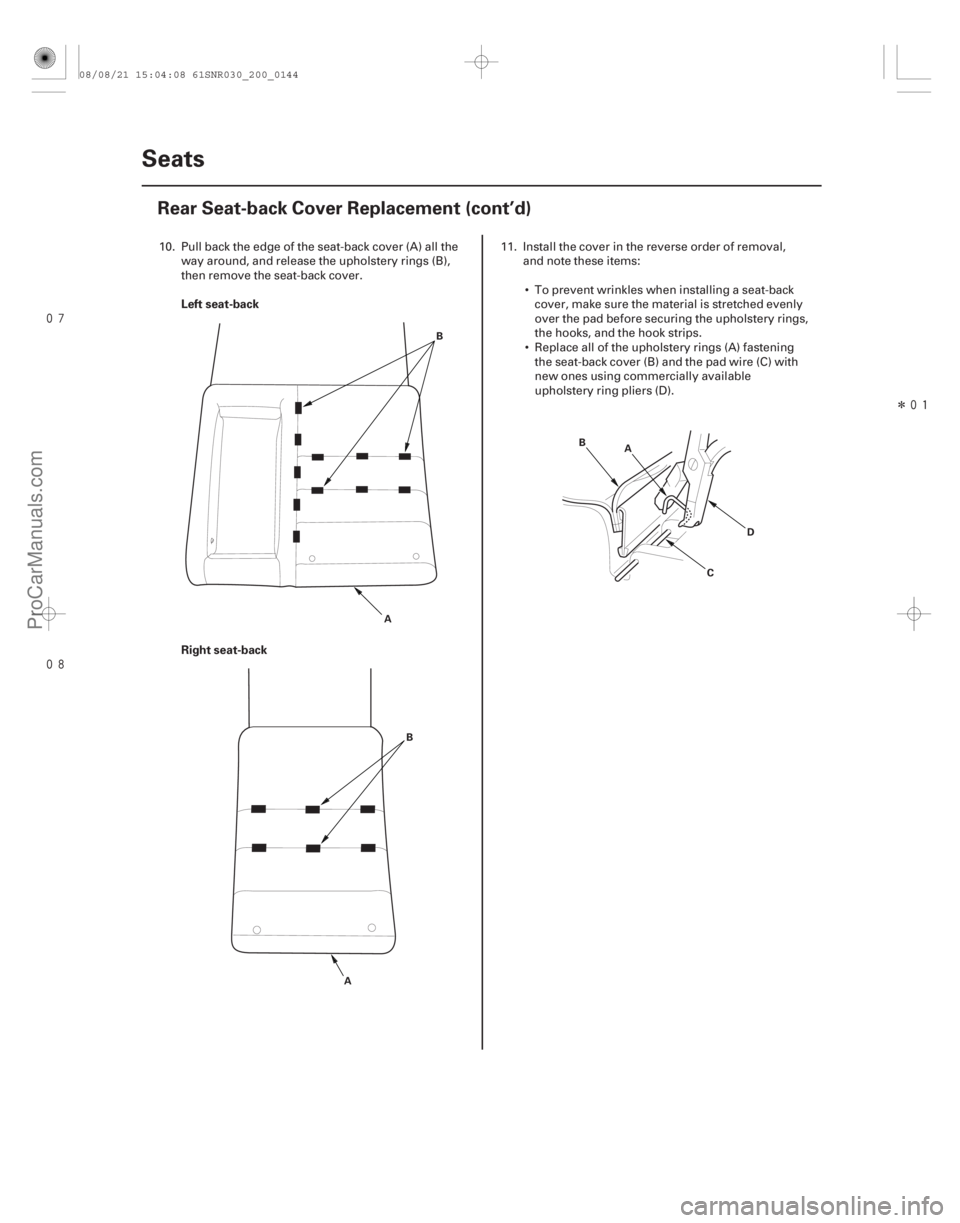
10. Pull back the edge of the seat-back cover (A) all the
way around, and release the upholstery rings (B),
then remove the seat-back cover. 11. Install the cover in the reverse order of removal,
and note these items:
To prevent wrinkles when installing a seat-back cover, make sure the material is stretched evenly
over the pad before securing the upholstery rings,
the hooks, and the hook strips.
Replace all of the upholstery rings (A) fastening the seat-back cover (B) and the pad wire (C) with
new ones using commercially available
upholstery ring pliers (D).
08/08/21 15:04:08 61SNR030_200_0144
ProCarManuals.com
DYNOMITE -2009-
Page 1827 of 2893
����
����
�(�#�'���������������
���������������
� �����)����
20-14420-144 Seats
Rear Seat Cushion Cover
Replacement (cont’d)
Rear Seat Armrest Cover
Replacement
D
B
C
A
A
B C
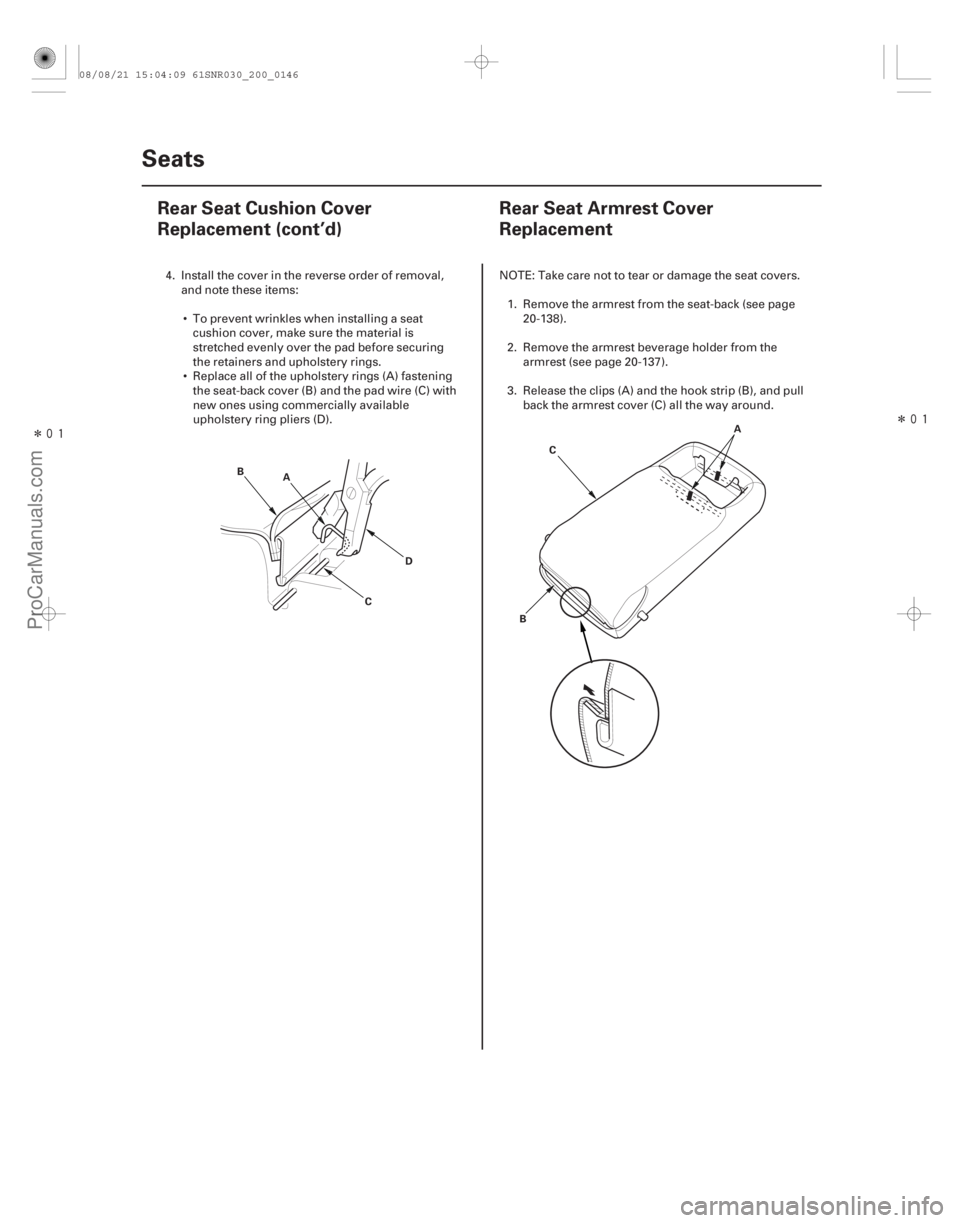
4. Install the cover in the reverse order of removal,
and note these items:
To prevent wrinkles when installing a seat cushion cover, make sure the material is
stretched evenly over the pad before securing
the retainers and upholstery rings.
Replace all of the upholstery rings (A) fastening the seat-back cover (B) and the pad wire (C) with
new ones using commercially available
upholstery ring pliers (D). NOTE: Take care not to tear or damage the seat covers.
1. Remove the armrest from the seat-back (see page 20-138).
2. Remove the armrest beverage holder from the armrest (see page 20-137).
3. Release the clips (A) and the hook strip (B), and pull back the armrest cover (C) all the way around.
08/08/21 15:04:09 61SNR030_200_0146
ProCarManuals.com
DYNOMITE -2009-
Page 1828 of 2893
����
����
�(�#�'���������������
���������������
� �����)����
20-14420-144 Seats
Rear Seat Cushion Cover
Replacement (cont’d)
Rear Seat Armrest Cover
Replacement
D
B
C
A
A
B C
4. Install the cover in the reverse order of removal,
and note these items:
To prevent wrinkles when installing a seat cushion cover, make sure the material is
stretched evenly over the pad before securing
the retainers and upholstery rings.
Replace all of the upholstery rings (A) fastening the seat-back cover (B) and the pad wire (C) with
new ones using commercially available
upholstery ring pliers (D). NOTE: Take care not to tear or damage the seat covers.
1. Remove the armrest from the seat-back (see page 20-138).
2. Remove the armrest beverage holder from the armrest (see page 20-137).
3. Release the clips (A) and the hook strip (B), and pull back the armrest cover (C) all the way around.
08/08/21 15:04:09 61SNR030_200_0146
ProCarManuals.com
DYNOMITE -2009-
Page 2690 of 2893

40 °
40 °40 °
40 °
15 ° 15 °
15 °
15 °
A Inside Front
3. Replace the seat belt with a new assembly if there
is any abnormality.")
����Rear center
In-vehicle
24-10Seat Belts
Inspection (cont’d)
40 °
40 °40 °
40 °
15 ° 15 °
15 °
15 °
A Inside Front
3. Replace the seat belt with a new assembly if there
is any abnormality. Do not disassemble any part of
the seat belt for any reason. 1. Check that the seat belt is not twisted or caught on
anything.
2. After installing the anchors, check for free movement on the anchor bolts. If necessary,
remove the anchor bolts and check that the
washers and other parts are not damaged or
improperly installed.
3. Check the seat belts for damage or discoloration. Clean with a shop towel if necessary. Use only
soap and water to clean the seat belts.
NOTE: Dirt build-up in the loops of the upper
anchors can cause the seat belts to retract slowly.
Wipe the inside of the loops with a clean cloth
dampened in isopropyl alcohol.
4. Check that the seat belt does not lock when pulled out slowly. The seat belt is designed to lock only
during a sudden stop or impact.
5. Make sure that the seat belt will retract automatically when released.
6. For front passenger’s seat belt and all rear seat belts, check the seat belt retractor locking
mechanism automatic locking retractor (ALR). This
function is for securing child seats.
–1 Pull the seat belt all the way out to engage the ALR. The seat belt should retract with a
ratcheting sound, but not extend. This is
normal.
–2 To disengage the ALR, release the seat belt and allow it to fully retract, then pull the seat belt
out part-way. The seat belt should retract and
extend normally.
7. Replace the seat belt with a new assembly if there is any abnormality. Do not disassemble any part of
the seat belt for any reason.
08/08/21 13:54:10 61SNR030_240_0010
ProCarManuals.com
DYNOMITE -2009-
Page 2699 of 2893
���������
Seats with Side AirbagsDisconnecting System Connectors
Driver’s Airbag
24-19
SIDE AIRBAG
LABEL
A
B
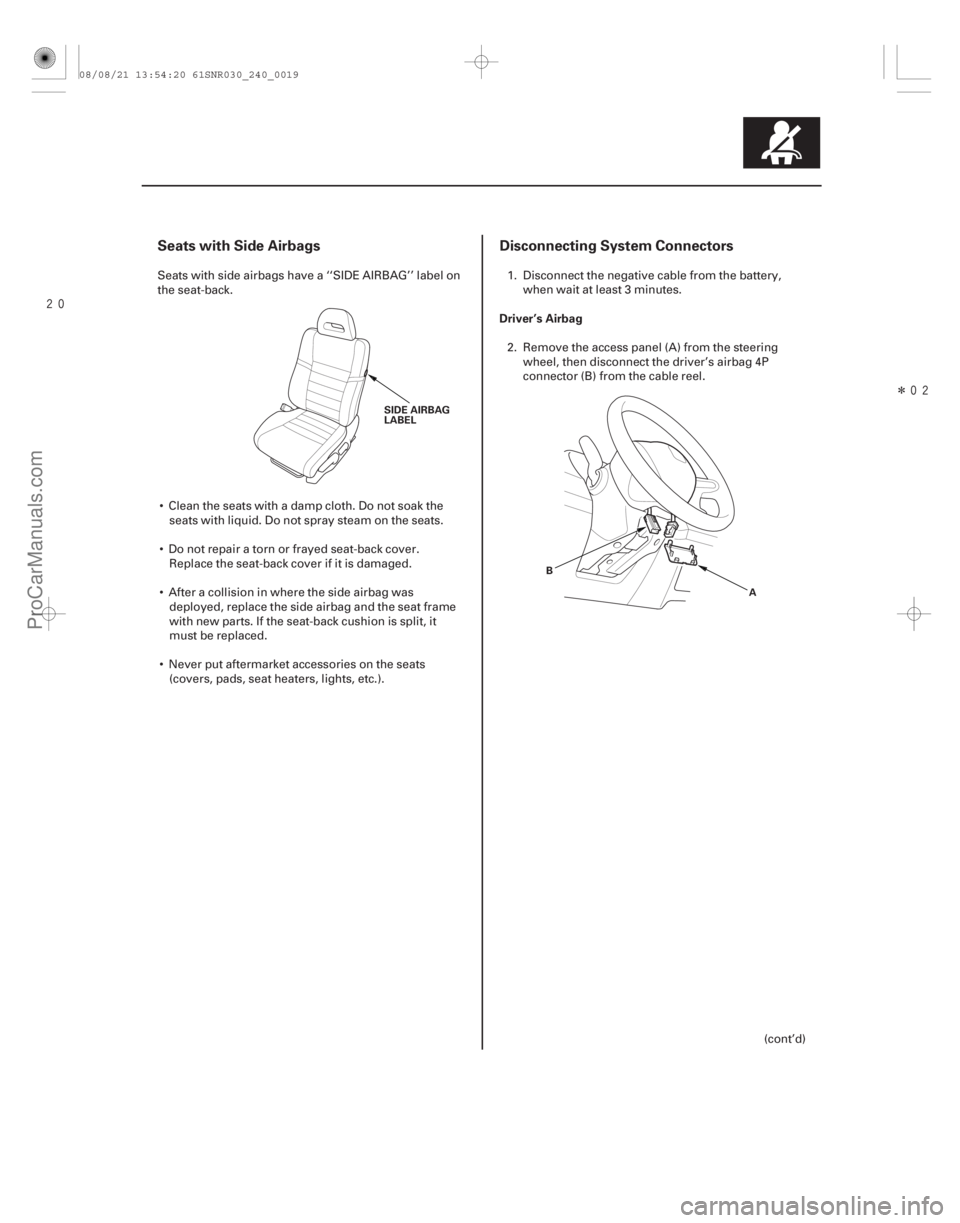
Seats with side airbags have a ‘‘SIDE AIRBAG’’ label on
the seat-back.
Clean the seats with a damp cloth. Do not soak the seats with liquid. Do not spray steam on the seats.
Do not repair a torn or frayed seat-back cover. Replace the seat-back cover if it is damaged.
After a collision in where the side airbag was deployed, replace the side airbag and the seat frame
with new parts. If the seat-back cushion is split, it
must be replaced.
Never put aftermarket accessories on the seats (covers, pads, seat heaters, lights, etc.). 1. Disconnect the negative cable from the battery,
when wait at least 3 minutes.
2. Remove the access panel (A) from the steering wheel, then disconnect the driver’s airbag 4P
connector (B) from the cable reel.
(cont’d)
08/08/21 13:54:20 61SNR030_240_0019
ProCarManuals.com
DYNOMITE -2009-