Page 1762 of 2893

Cushion tape B: P/N 91902-SNA-003 50x50mm(1.97x1.97in.)
20-86Interior Trim
Headliner Removal/Installation (cont’d)
B
Fastener Locati")
���
����
Cushion tape A: P/N 91903-SNA-003
100x50mm(3.94x1.97in.)
Cushion tape B: P/N 91902-SNA-003 50x50mm(1.97x1.97in.)
20-86Interior Trim
Headliner Removal/Installation (cont’d)
B
Fastener Locations
:Clip,2(White)
A B
C
B
C
F
Without moonroof
BD
C
D
C
D
A
ED
With moonroof
C
D
Fastener Locations
: Cushion tape, 8
BB
BB
B B
B
A
A, B
13. Lower the headliner (A).
–1 Remove the front door opening seals (B) andrear door opening seals (C) from each roof
portion.
–2 With the help of an assistant, detach the rear clips by pulling the rear portion of the
headliner down.
–3 With moonroof: Release the Velcro fastener (D) by lowering the headliner.
–4 With moonroof: Release the hook (E) of the moonroof by moving the headliner rearward.
14. Lower the front of the headliner below the steering wheel. Rotate the liner, and pull it along with the
roof wire harness (F) (without moonroof) out
through the passenger’s front door. Do not bend
the liner. Bending the liner will crease and damage
it. 15. If necessary, remove the cushion tape (A, B)
fastening the roof wire harness (C) to the headliner
(D), then remove them from the headliner.
08/08/21 15:01:41 61SNR030_200_0088
ProCarManuals.com
DYNOMITE -2009-
Page 1795 of 2893
����
S
pecial Tools Required
20-118 Seats
Front Seat Removal/Installation
A
A
7/16
-20 UNF
32 N·m
(3.3 kgf·m, 24 lbf·ft)
A
B
KTC trim t")
���
����
����
�(�#�'���������������
���������������
� �����)����
S
pecial Tools Required
20-118 Seats
Front Seat Removal/Installation
A
A
7/16
-20 UNF
32 N·m
(3.3 kgf·m, 24 lbf·ft)
A
B
KTC trim tool set SOJATP2014
SRS components are located in this area. Review the
S
RS component locations (see page 24-11) and the
precautions and procedures (see page 24-13) before
doing repairs or service.
NOTE: Put on gloves to protect your hands.
When prying with a flat-tip screwdriver, wrap it with protective tape to prevent damage.
Take care not to scratch the body or tear the seat covers.
Use the appropriate tool from the KTC trim tool set to avoid damage when removing components.
1. Do the battery terminal disconnection procedure (see page 22-68), and wait at least 3 minutes before
beginning work.
2. Tilt the steering wheel all the way up, and push it all the way in. Adjust the seat-back recline to a
middle position.
3. Slide the front seat forward fully. Carefully pry up on the bottom edge of the anchor cover (A) to
release the hooks, and remove the cover. 4.
Remove the lower anchor bolt (A).
5. Remove the seat track outer end covers (A) and the seat track center end covers (B) from the back of
both seat tracks.
08/08/21 15:03:07 61SNR030_200_0120
ProCarManuals.com
DYNOMITE -2009-
Page 1830 of 2893
���
����
���
�(�#�'�����������
�����
�����
�����
�
� �����)����
’06-08 models
’09 model
20-146Bumpers
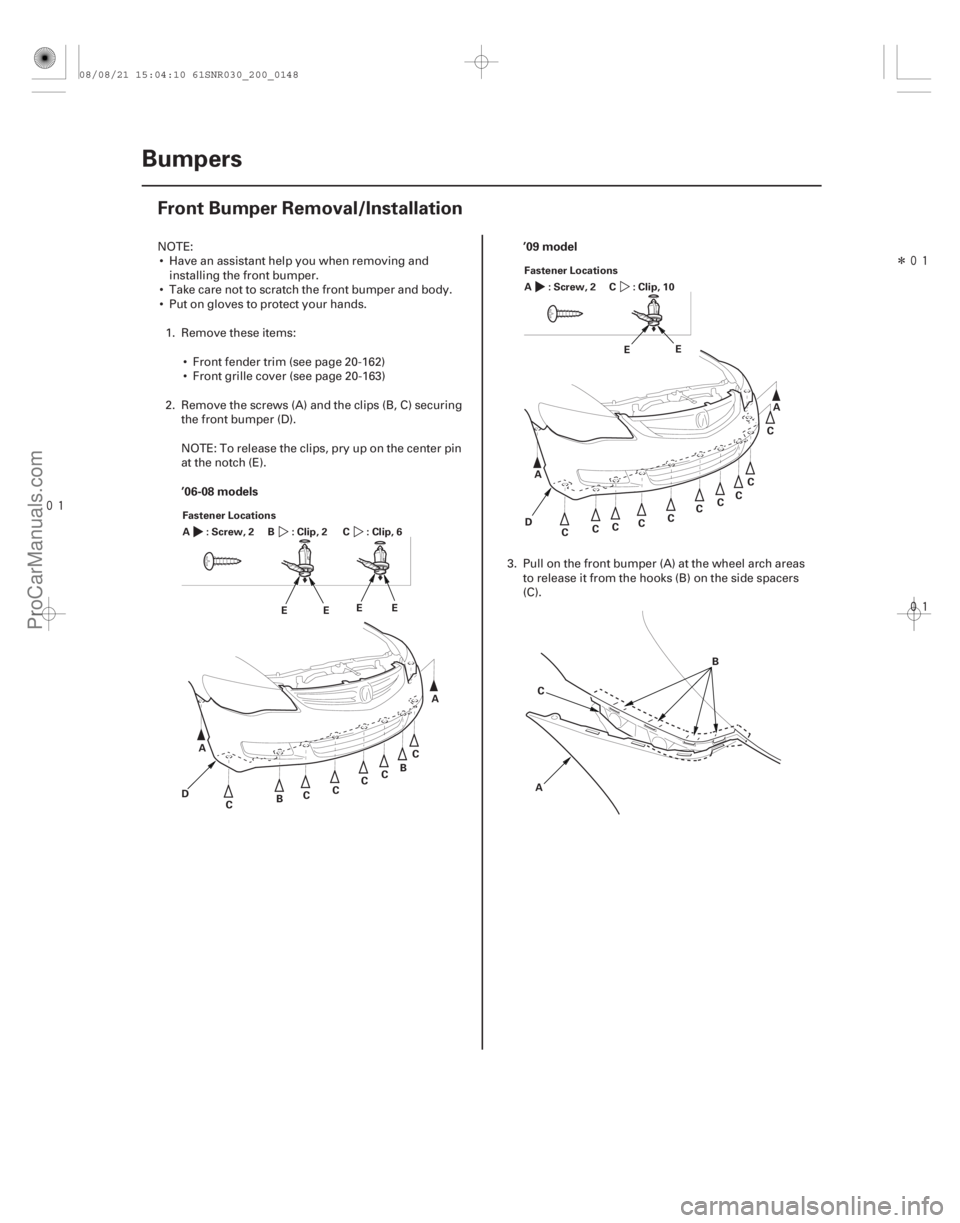
Front Bumper Removal/Installation
Fastener Locations
:Screw,2
A : Clip, 2 B:Clip,6C
A B
C
D E
E
C CC
C C
B A
E
E Fastener Locations
:Screw,2
A : Clip, 10
C
C
A A
C
C
C
C
C
C
C
C
C
D E
E
A B
C
NOTE: Have an assistant help you when removing and installing the front bumper.
Take care not to scratch the front bumper and body.
Put on gloves to protect your hands.
1. Remove these items: Front fender trim (see page 20-162)
Front grille cover (see page 20-163)
2. Remove the screws (A) and the clips (B, C) securing the front bumper (D).
NOTE: To release the clips, pry up on the center pin
at the notch (E).
3. Pull on the front bumper (A) at the wheel arch areasto release it from the hooks (B) on the side spacers
(C).
08/08/21 15:04:10 61SNR030_200_0148
ProCarManuals.com
DYNOMITE -2009-
Page 1831 of 2893
����
����� ����
20-147
A
B
C
B
A
A
B C
B
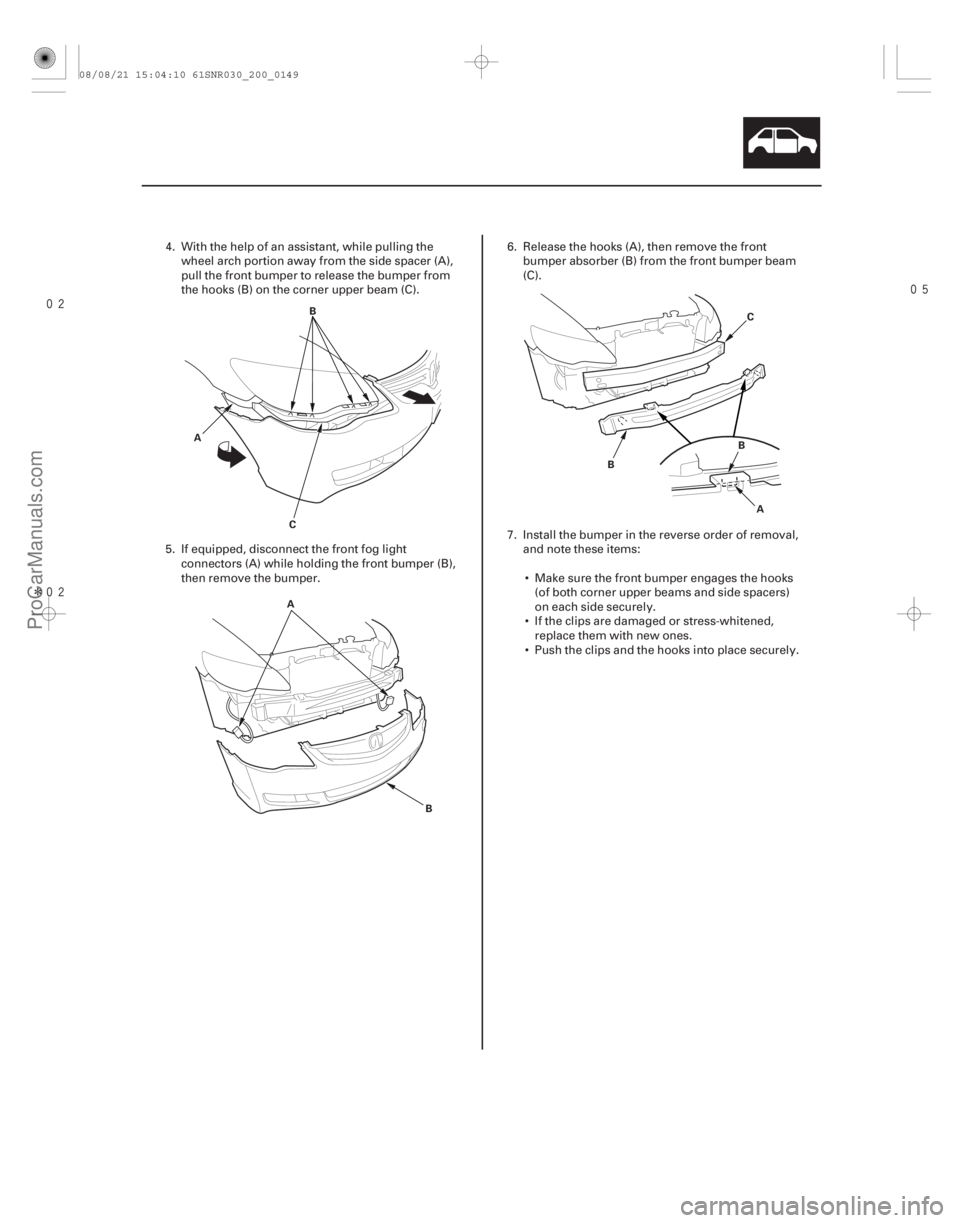
4. With the help of an assistant, while pulling the wheel arch portion away from the side spacer (A),
pull the front bumper to release the bumper from
the hooks (B) on the corner upper beam (C).
5. If equipped, disconnect the front fog light connectors (A) while holding the front bumper (B),
then remove the bumper. 6. Release the hooks (A), then remove the front
bumper absorber (B) from the front bumper beam
(C).
7. Install the bumper in the reverse order of removal, and note these items:
Make sure the front bumper engages the hooks (of both corner upper beams and side spacers)
on each side securely.
If the clips are damaged or stress-whitened, replace them with new ones.
Push the clips and the hooks into place securely.
08/08/21 15:04:10 61SNR030_200_0149
ProCarManuals.com
DYNOMITE -2009-
Page 1833 of 2893
���
����
����
�(�#�'�����������
�����
�����
�����
��� �����)����
20-149
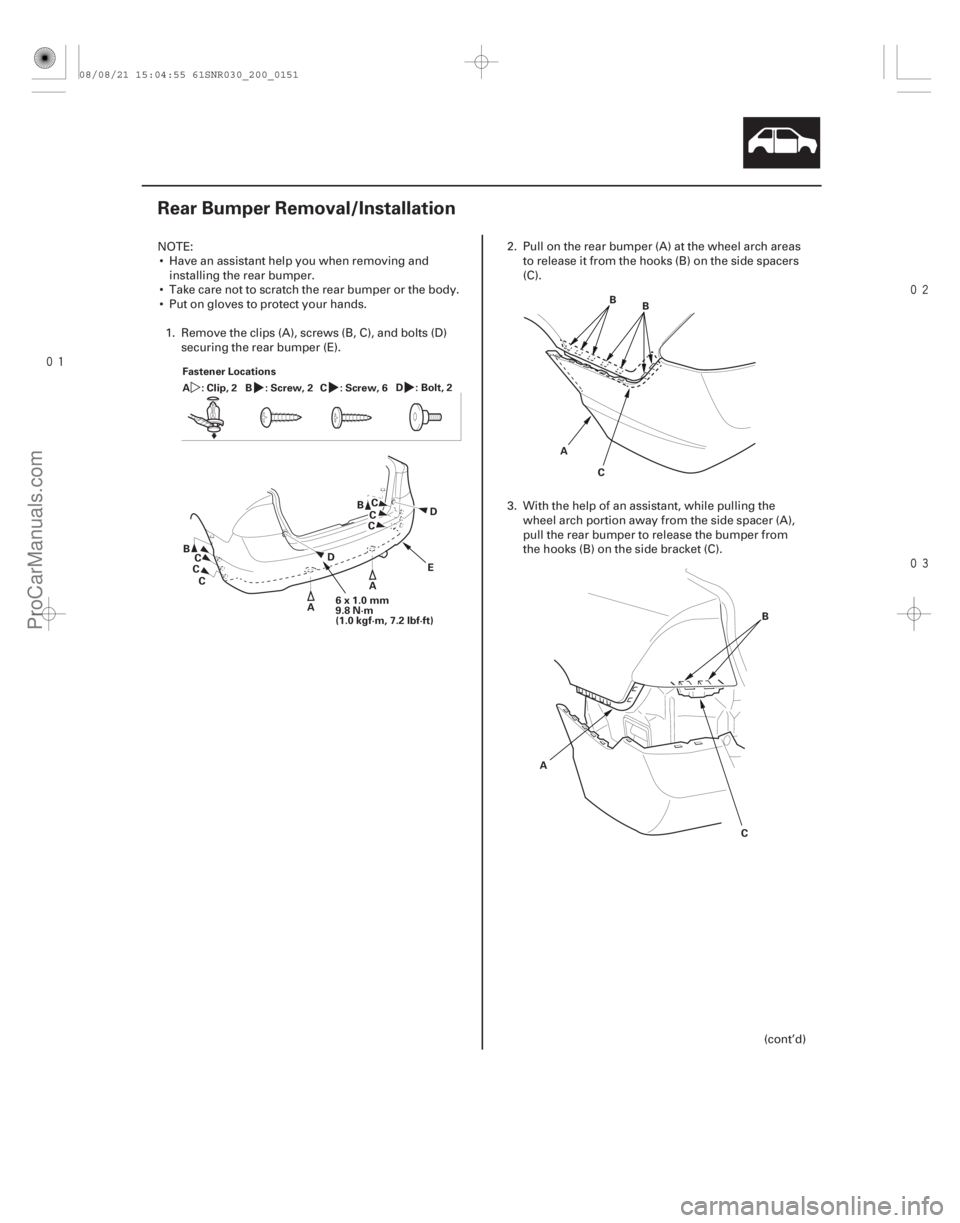
Rear Bumper Removal/Installation
6x1.0mm
9.8 N·m
(1.0 kgf·m, 7.2 lbf·ft)
A
B
C
D E
C B
D
A
C
C C
C
Fastener Locations
:Clip,2
A
:Screw,2
B :Bolt,2
D
:Screw,6
C
AB
C B
A B
C
NOTE: Have an assistant help you when removing and installing the rear bumper.
Take care not to scratch the rear bumper or the body.
Put on gloves to protect your hands.
1. Remove the clips (A), screws (B, C), and bolts (D) securing the rear bumper (E). 2. Pull on the rear bumper (A) at the wheel arch areas
to release it from the hooks (B) on the side spacers
(C).
3. With the help of an assistant, while pulling the wheel arch portion away from the side spacer (A),
pull the rear bumper to release the bumper from
the hooks (B) on the side bracket (C).
(cont’d)
08/08/21 15:04:55 61SNR030_200_0151
ProCarManuals.com
DYNOMITE -2009-
Page 1858 of 2893
����
20-171
Fenderwell
Front Inner Fender Replacement
Fastener Locations
:Screw,3
B :Clip,2
E, H :Clip,1
G : Clip, 8
I : Clip, 3
J
E
K
L
L
L L
A
F GD")
���
�(�#�'�����������
��������������������� �����)����
20-171
Fenderwell
Front Inner Fender Replacement
Fastener Locations
:Screw,3
B :Clip,2
E, H :Clip,1
G : Clip, 8
I : Clip, 3
J
E
K
L
L
L L
A
F GD
H
AI
I
I
J
J
J
B B
B I
I
I I
I
C
NOTE: Take care not to scratch the body.1. Remove the front inner fender (A).
–1 On the back of the wheel arch, remove the screws (B), and remove the front splash guard (C).
–2 From under the front bumper (D), remove the clips (E) securing the splash shield (F) and the front inner fenderto the front bumper.
–3 From the wheel arch, remove the clips (G, H, I, J) securing the front inner fender (and splash shield) to the body.
–4 Release the hook (K) of the splash shield, then remove the front inner fender.
NOTE: To release the clips E, H and G, pry up on the center pin at the notch (L).
2. Install the inner fender in the reverse order of removal, and note these items: If the clips are damaged or stress-whitened, replace them with new ones.
Push the clips and the hooks into place securely.
08/08/21 15:05:06 61SNR030_200_0173
ProCarManuals.com
DYNOMITE -2009-
Page 1860 of 2893
���
��������
�(�#�'�����������
��������������������� �����)����
20-173
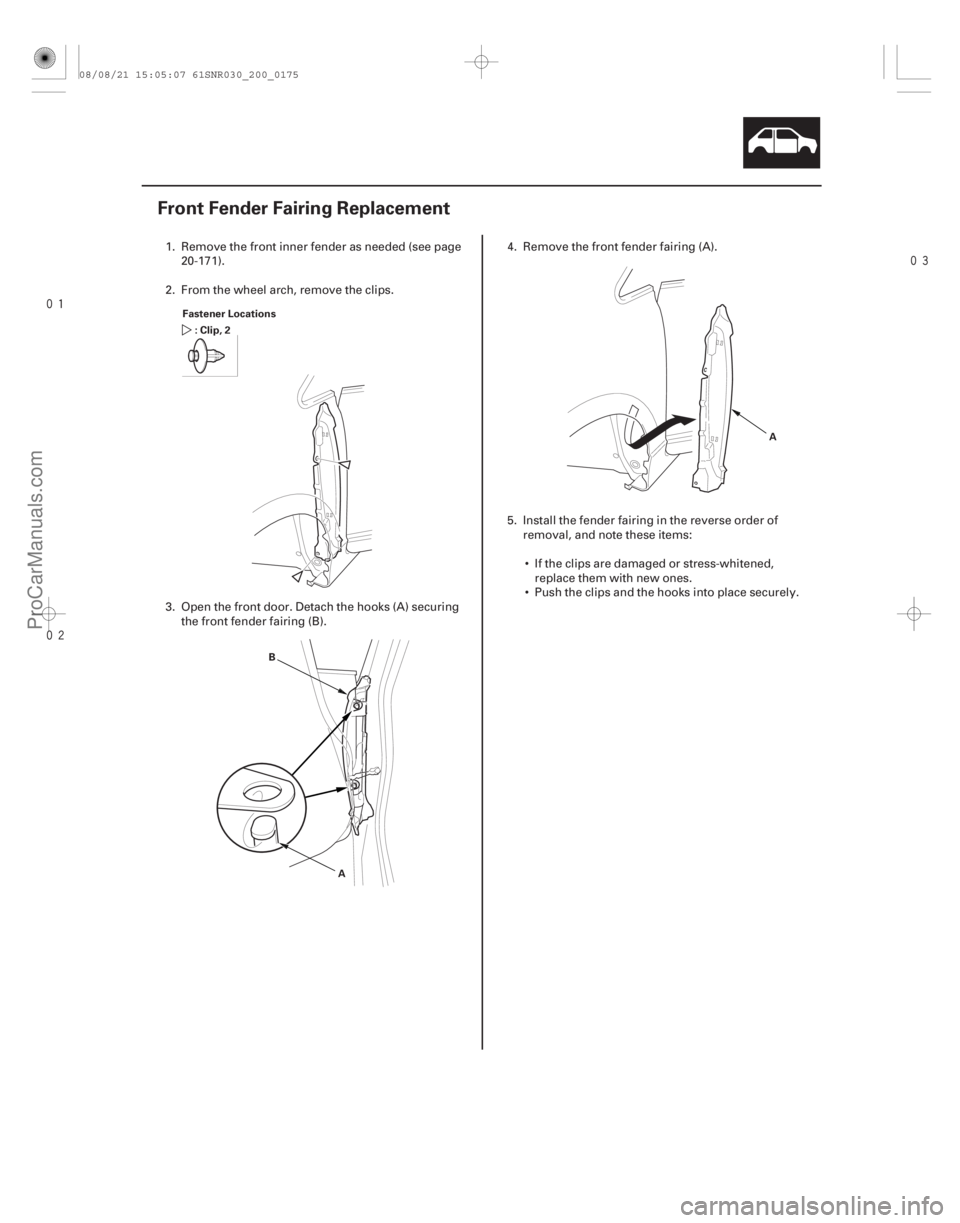
Front Fender Fairing Replacement
Fastener Locations :Clip,2
A
B A
1. Remove the front inner fender as needed (see page
20-171).
2. From the wheel arch, remove the clips.
3. Open the front door. Detach the hooks (A) securing the front fender fairing (B). 4. Remove the front fender fairing (A).
5. Install the fender fairing in the reverse order of
removal, and note these items:
If the clips are damaged or stress-whitened, replace them with new ones.
Push the clips and the hooks into place securely.
08/08/21 15:05:07 61SNR030_200_0175
ProCarManuals.com
DYNOMITE -2009-
Page 1862 of 2893
���� ���
�(�#������������
��������������������� �����)����
20-17520-175
Fuel Pipe Protector Replacement Rear Fender Cover Replacement
Fastener Lo")
����
�(�#�'�����������
���������������
���
� �����)���� ���
�(�#�'�����������
��������������������� �����)����
20-17520-175
Fuel Pipe Protector Replacement Rear Fender Cover Replacement
Fastener Locations :Clip,3
A Fastener Locations
:Screw,2 :Clip,1
B
A
NOTE: Take care not to scratch the body.
Put on gloves to protect your hands.
1. Remove the left rear wheel (see page 18-32).
2. Remove the clips, then remove the fuel pipe protector (A).
3. Install the protector in the reverse order of removal, and note these items:
If the clips are damaged or stress-whitened, replace them with new ones.
Push the clips into place securely. NOTE: Take care not to scratch the rear bumper and the
body.
1. Remove the screws and the clip, then remove the rear fender cover (A) from the rear bumper (B) and
the body.
2. Install the fender cover in the reverse order of removal, and if the clip is damaged or stress-
whitened, replace them with a new one.
08/08/21 15:05:08 61SNR030_200_0177
ProCarManuals.com
DYNOMITE -2009-