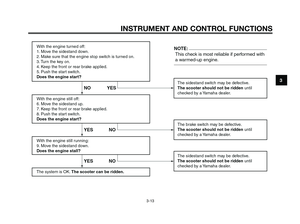
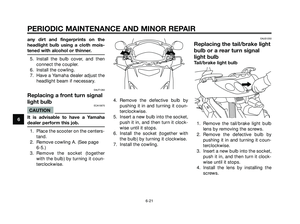
Page 25 of 68

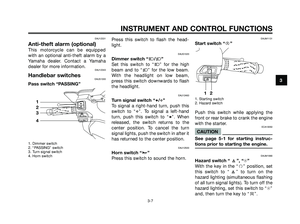
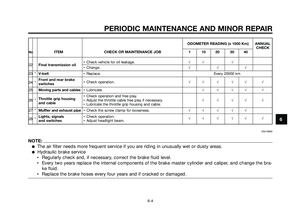
EAU14540
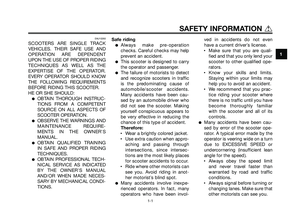
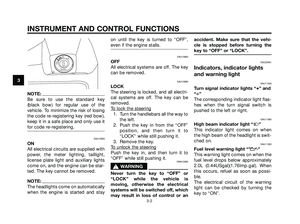
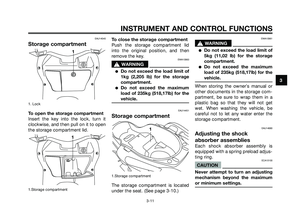
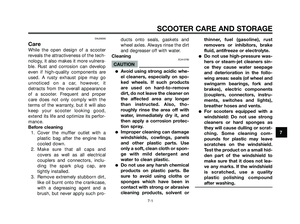
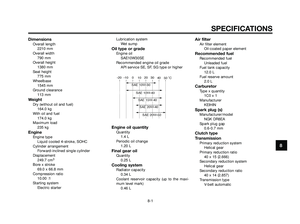
Storage compartment
1. Lock
To open the storage compartment
Insert the key into the lock, turn it
clockwise, and then pull on it to open
the storage compartment lid.
1.Storage compartment
To close the storage compartment
Push the storage compartment lid
into the original position, and then
remove the key.
EWA10960
s s
WARNING
�Do not exceed the load limit of
1kg (2,205 lb) for the storage
compartment.
�Do not exceed the maximum
load of 235kg (518,17lb) for the
vehicle.
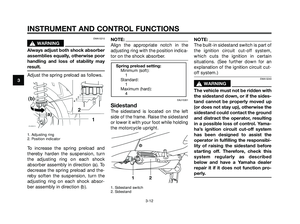
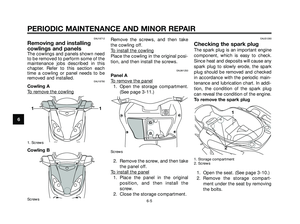
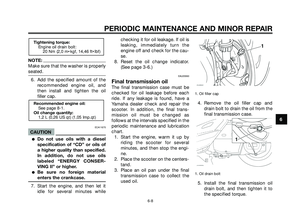
EAU14451
Storage compartment
1.Storage compartment
The storage compartment is located
under the seat. (See page 3-10.)
EWA10961
s s
WARNING
�Do not exceed the load limit of
5kg (11,02 lb) for the storage
compartment.
�Do not exceed the maximum
load of 235kg (518,17lb) for the
vehicle.
When storing the owner’s manual or
other documents in the storage com-
partment, be sure to wrap them in a
plastic bag so that they will not get
wet. When washing the vehicle, be
careful not to let any water enter the
storage compartment.
EAU14880
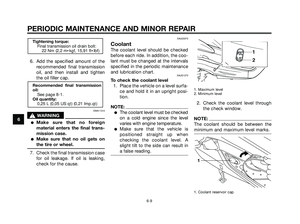
Adjusting the shock
absorber assemblies
Each shock absorber assembly is
equipped with a spring preload adjus-
ting ring.
ECA10100
CAUTION
Never attempt to turn an adjusting
mechanism beyond the maximum
or minimum settings.
1
1
1
3
INSTRUMENT AND CONTROL FUNCTIONS
3-11
1C0-F8199-E0.qxd 13/04/2005 16:58 Página 3-11
Page 26 of 68

EWA10210
s
sWARNING
Always adjust both shock absorber
assemblies equally, otherwise poor
handling and loss of stability may
result.
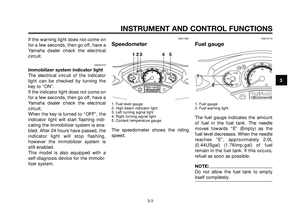
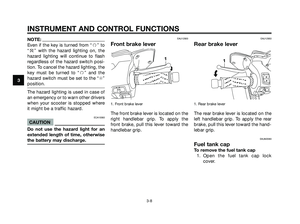
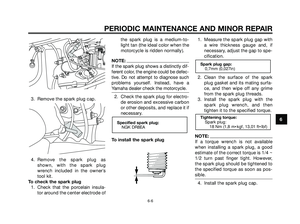
Adjust the spring preload as follows.
1. Adjusting ring
2. Position indicator
To increase the spring preload and
thereby harden the suspension, turn
the adjusting ring on each shock
absorber assembly in direction (a). To
decrease the spring preload and the-
reby soften the suspension, turn the
adjusting ring on each shock absor-
ber assembly in direction (b).
NOTE:
Align the appropriate notch in the
adjusting ring with the position indica-
tor on the shock absorber.
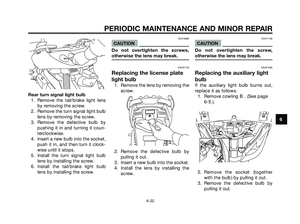
EAU15301
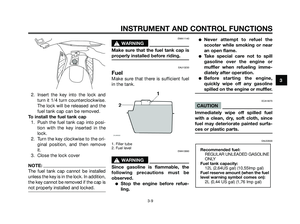
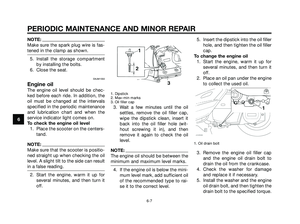
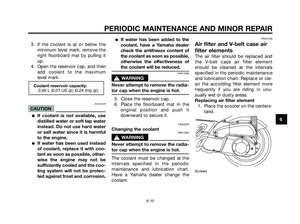
Sidestand
The sidestand is located on the left
side of the frame. Raise the sidestand
or lower it with your foot while holding
the motorcycle upright.
1. Sidestand switch
2. Sidestand
NOTE:
The built-in sidestand switch is part of
the ignition circuit cut-off system,
which cuts the ignition in certain
situations. (See further down for an
explanation of the ignition circuit cut-
off system.)
EWA10240
s s WARNING
The vehicle must not be ridden with
the sidestand down, or if the sides-
tand cannot be properly moved up
(or does not stay up), otherwise the
sidestand could contact the ground
and distract the operator, resulting
in a possible loss of control. Yama-
ha’s ignition circuit cut-off system
has been designed to assist the
operator in fulfilling the responsibi-
lity of raising the sidestand before
starting off. Therefore, check this
system regularly as described
below and have a Yamaha dealer
repair it if it does not function pro-
perly.
12
Spring preload setting: Minimum (soft):1
Standard: 1
Maximum (hard): 4
3
INSTRUMENT AND CONTROL FUNCTIONS
3-12
1C0-F8199-E0.qxd 13/04/2005 16:58 Página 3-12
Page 27 of 68
3
INSTRUMENT AND CONTROL FUNCTIONS
3-13
1C0-F8199-E0.qxd 13/04/2005 16:58 Página 3-13
Page 28 of 68
4
PRE-OPERATION CHECKS
4-1
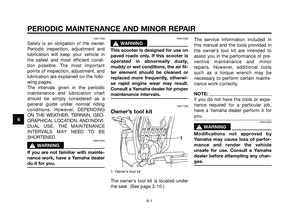
EAU15591
The condition of a vehicle is the
owner’s responsibility. Vital compo-
nents can start to deteriorate quickly
and unexpectedly, even if the vehicle
remains unused (for example, as a
result of exposure to the elements).
Any damage, fluid leakage or loss of
tire air pressure could have serious
consequences. Therefore, it is very
important, in addition to a thorough
visual inspection, to check the follo-
wing points before each ride.
NOTE:
Pre-operation checks should be
made each time the vehicle is used.
Such an inspection can be accom-
plished in a very short time; and the
added safety it assures is more than
worth the time involved.
EWA11150
s s
WARNING
If any item in the Pre-operation
check list is not working properly,
have it inspected and repaired
before operating the vehicle.
1C0-F8199-E0.qxd 13/04/2005 16:58 Página 28
Page 29 of 68

4
PRE-OPERATION CHECKS
4-2
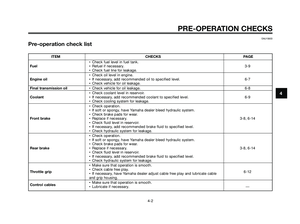
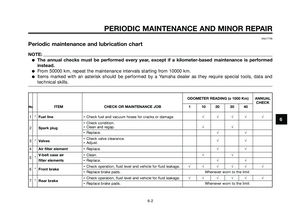
EAU15603
Pre-operation check list
ITEM CHECKS PAGE
• Check fuel level in fuel tank.
Fuel• Refuel if necessary.3-9
• Check fuel line for leakage.
• Check oil level in engine.
Engine oil• If necessary, add recommended oil to specified level. 6-7
• Check vehicle for oil leakage.
Final transmission oil• Check vehicle for oil leakage. 6-8
• Check coolant level in reservoir.
Coolant• If necessary, add recommended coolant to specified level. 6-9
• Check cooling system for leakage.
• Check operation.
• If soft or spongy, have Yamaha dealer bleed hydraulic system.
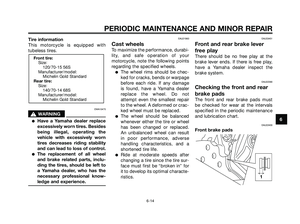
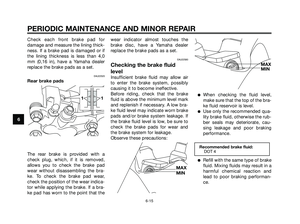
• Check brake pads for wear.
Front brake• Replace if necessary. 3-8, 6-14
• Check fluid level in reservoir.
• If necessary, add recommended brake fluid to specified level.
• Check hydraulic system for leakage.
• Check operation.
• If soft or spongy, have Yamaha dealer bleed hydraulic system.
• Check brake pads for wear.
Rear brake• Replace if necessary. 3-8, 6-14
• Check fluid level in reservoir.
• If necessary, add recommended brake fluid to specified level.
• Check hydraulic system for leakage.
• Make sure that operation is smooth.
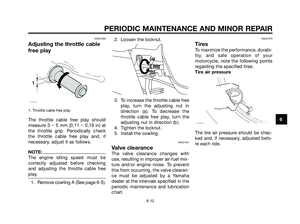
Throttle grip• Check cable free play.
6-12
• If necessary, have Yamaha dealer adjust cable free play and lubricate cable
and grip housing.
Control cables• Make sure that operation is smooth.
• Lubricate if necessary. —
1C0-F8199-E0.qxd 13/04/2005 16:58 Página 29
Page 30 of 68
4
PRE-OPERATION CHECKS
4-3
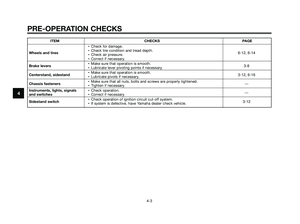
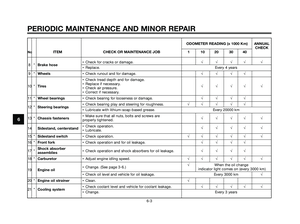
ITEM CHECKS PAGE
• Check for damage.
Wheels and tires• Check tire condition and tread depth.
6-12, 6-14
• Check air pressure.
• Correct if necessary.
Brake levers• Make sure that operation is smooth.
3-8
• Lubricate lever pivoting points if necessary.
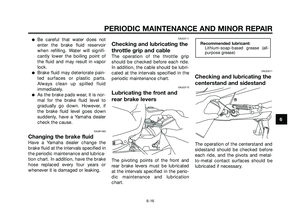
Centerstand, sidestand• Make sure that operation is smooth.
3-12, 6-16
• Lubricate pivots if necessary.
Chassis fasteners• Make sure that all nuts, bolts and screws are properly tightened.
—
• Tighten if necessary.
Instruments, lights, signals • Check operation.
—
and switches• Correct if necessary.
Sidestand switch• Check operation of ignition circuit cut-off system.
3-12
• If system is defective, have Yamaha dealer check vehicle.
1C0-F8199-E0.qxd 13/04/2005 16:58 Página 30
Page 31 of 68

EAU15970
EWA11250
s s
WARNING
�Become thoroughly familiar
with all operating controls and
their functions before riding.
Consult a Yamaha dealer
regarding any control or func-
tion that you do not thoroughly
understand.
�Never start the engine or ope-
rate it in a closed area for any
length of time. Exhaust fumes
are poisonous, and inhaling
them can cause loss of cons-
ciousness and death within a
short time. Always make sure
that there is adequate ventila-
tion.
�For safety, always start the
engine with the centerstand
down.
�When the centerstand is down
and the engine is idling, keep
your hands and feet away from
the rear wheel.
EAUM1210
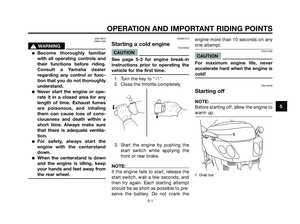
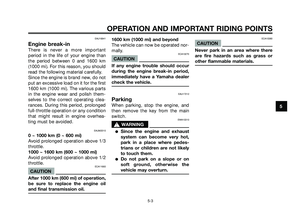
Starting a cold engineECA10250
CAUTION
See page 5-3 for engine break-in
instructions prior to operating the
vehicle for the first time.
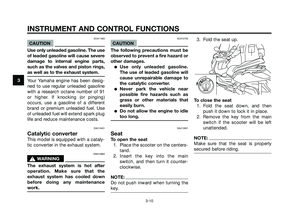
1. Turn the key to “f”.
2. Close the throttle completely.
3. Start the engine by pushing the
start switch while applying the
front or rear brake.
NOTE:
If the engine fails to start, release the
start switch, wait a few seconds, and
then try again. Each starting attempt
should be as short as possible to pre-
serve the battery. Do not crank theengine more than 10 seconds on any
one attempt.
ECA11040
CAUTION
For maximum engine life, never
accelerate hard when the engine is
cold!
EAU16760
Starting off
NOTE:
Before starting off, allow the engine to
warm up.
1. Grab bar
1
5
OPERATION AND IMPORTANT RIDING POINTS
5-1
1C0-F8199-E0.qxd 13/04/2005 16:58 Página 5-1
Page 32 of 68

1. While pulling the rear brake lever
with your left hand and holding
the grab bar with your right hand,
push the scooter off the centers-
tand.
2. Sit astride the seat, and then
adjust the rear view mirrors.
3. Switch the turn signal on.
4. Check for oncoming traffic, and
then slowly turn the throttle grip
(on the right) in order to take off.
5. Switch the turn signal off.
EAU16780
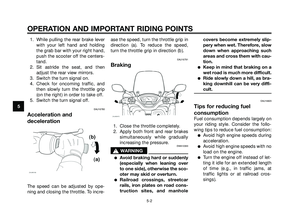
Acceleration and
deceleration
The speed can be adjusted by ope-
ning and closing the throttle. To incre-ase the speed, turn the throttle grip in
direction (a). To reduce the speed,
turn the throttle grip in direction (b).
EAU16791
Braking
1. Close the throttle completely.
2. Apply both front and rear brakes
simultaneously while gradually
increasing the pressure.
EWA10300
s s
WARNING
�Avoid braking hard or suddenly
(especially when leaning over
to one side), otherwise the sco-
oter may skid or overturn.
�Railroad crossings, streetcar
rails, iron plates on road cons-
truction sites, and manholecovers become extremely slip-
pery when wet. Therefore, slow
down when approaching such
areas and cross them with cau-
tion.
�Keep in mind that braking on a
wet road is much more difficult.
�Ride slowly down a hill, as bra-
king downhill can be very diffi-
cult.
EAU16820
Tips for reducing fuel
consumption
Fuel consumption depends largely on
your riding style. Consider the follo-
wing tips to reduce fuel consumption:
�Avoid high engine speeds during
acceleration.
�Avoid high engine speeds with no
load on the engine.
�Turn the engine off instead of let-
ting it idle for an extended length
of time (e.g., in traffic jams, at
traffic lights or at railroad cros-
sings).
5
OPERATION AND IMPORTANT RIDING POINTS
5-2
1C0-F8199-E0.qxd 13/04/2005 16:58 Página 5-2