Page 1147 of 5135
05±1134
±
DIAGNOSTICS AIR CONDITIONING SYSTEM
AVENSIS REPAIR MANUAL (RM1018E)
INSPECTION PROCEDURE
1PERFORM ACTUATOR CHECK
(a)Set the actuator check mode (See page 05±1091).
(b) Press the DEF switch (passenger side) and change to step operation.
(c) Check the air flow temperature by hand.
Display CodeAir Mix Damper Operation
0COOL side (0% open)
1COOL side (0% open)
2COOL side (0% open)
3COOL side (0% open)
4COOL/HOT (50% open)
5COOL/HOT (50% open)
6HOT side (100% open)
7HOT side (100% open)
8HOT side (100% open)
9HOT side (100% open)
OK PROCEED TO NEXT CIRCUIT INSPECTION SHOWN ON PROBLEM SYMPTOMS TABLE
NG
Page 1148 of 5135
I35383
LHD Models:
MAX. COOL MAX. HOT
1
2
3
4
5
MAX HOTMAX COOL
I36141
LHD Models:
MAX. COOL MAX. HOT
MAX HOTMAX COOL
±
DIAGNOSTICS AIR CONDITIONING SYSTEM
05±1135
AVENSIS REPAIR MANUAL (RM1018E)
2INSPECT AIRMIX NO.2 DAMPER SERVO SUB±ASSY
(a)Remove the air mix damper servo sub±assy.
(b)Connect the positive (+) lead from the battery to terminal
MAX HOT and negative (±) lead to terminal MAX COOL,
then check that the lever turns to ºHOTº side smoothly.
(c)Connect the positive (+) lead from the battery to terminal MAX COOL and negative (±) lead to terminal MAX HOT,
then check that the lever turns to ºCOOLº side smoothly.
NGREPLACE AIRMIX NO.2 DAMPER SERVO SUB±ASSY
OK
3CHECK HARNESS AND CONNECTOR(AIRMIX DAMPER NO.2 SERVO SUB±ASSY ± A/C AMPLIFIER)
(a)Check for an open or short circuit in harness and connector between air mix d\
amper control servomotor
and A/C amplifier (See page 01±32).
NG REPAIR OR REPLACE HARNESS ORCONNECTOR
OK
REPLACE AIR CONDITIONING AMPLIFIER
Page 1149 of 5135
4(V)
1
0
100%
TPI terminal voltage
Damper opening angle
I35378
A23
Air Mix Control Servo Motor (Driver Side) A/C Control Assembly
M
MAX
HOT4P±L
A15 AMDH12
MAX
COOL5B
A15 AMDC11
PT 3GR
A16 TPD8
VZ 2Y±B
A16 S5±22
GND 1Y±R
A15 SG±214
± DIAGNOSTICSAIR CONDITIONING SYSTEM
05±1129
AVENSIS REPAIR MANUAL (RM1018E)
DTC 36 AIR MIX DAMPER POSITION SENSOR
CIRCUIT (DRIVER SIDE)
CIRCUIT DESCRIPTION
This sensor detects the position of the air mix damper and
sends the appropriate signals to the A/C amplifier. The position
sensor is built in the air mix damper servo sub±assy.
DTC No.Detection ItemTrouble Area
36Short to ground or power source circuit in air mix damper posi-
tion sensor circuit.
�Air mix damper servo sub±assy (Air mix damper position
sensor)
�Harness or connector between air mix damper servo sub±
assy (air mix damper position sensor) and A/C amplifier assy
�A/C amplifier assy
WIRING DIAGRAM
05A80±02
Page 1150 of 5135
I36144
TPD
SG±2
A16A15
05±1130
± DIAGNOSTICSAIR CONDITIONING SYSTEM
AVENSIS REPAIR MANUAL (RM1018E)
1 INSPECT AIR CONDITIONING AMPLIFIER(TPD ± SG±2)
(a) Remove the A/C amplifier with connectors being con-
nected.
(b) Turn the ignition switch to ON.
(c) Change the set temperature to activate the air mix damp-
er and measure the voltage between terminal TPD and
SG±2 of A/C amplifier.
Standard:
MAX. COOL: 3.5 to 4.5 V
MAX HOT: 0.5 to 1.8 V
HINT:
As the set temperature increases, the voltage decreases grad-
ually without interruption.
OK PROCEED TO NEXT CIRCUIT INSPECTION
SHOWN ON PROBLEM SYMPTOMS TABLE
NG
Page 1151 of 5135

I35383
RHD Models:
MAX. COOL MAX. HOT
12345
P
T V
Z GND
I36141
LHD Models:
MAX. COOL MAX. HOT
P T VZGND
±
DIAGNOSTIC SAIR CONDITIONING SYSTEM
05± 1131
A VENSIS RE PAIR MANUAL (RM1018E)
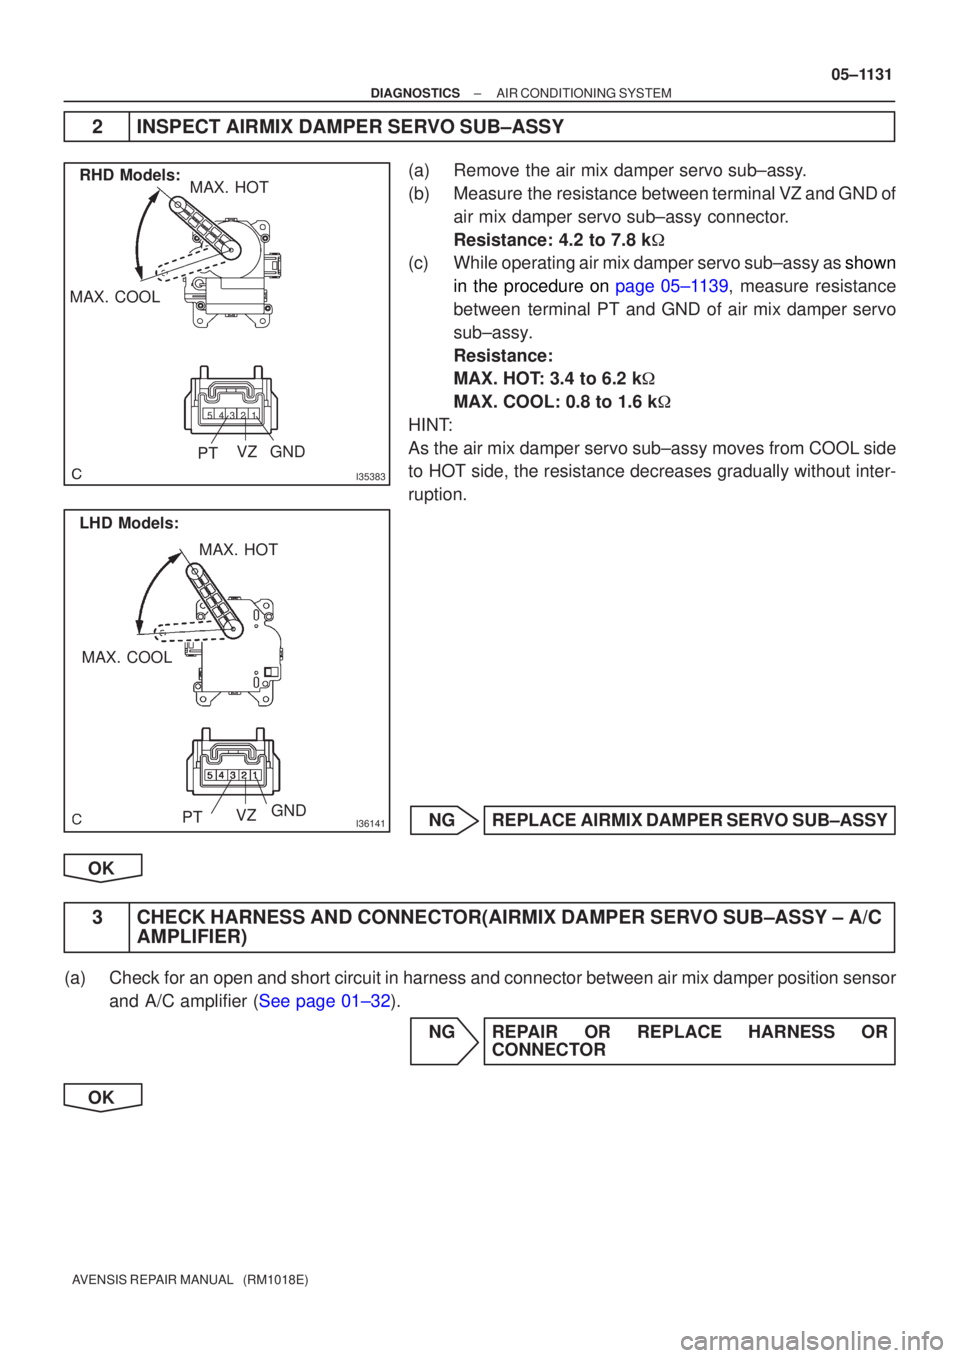
2 INSPEC T AIRMIX DAMPER SE RVO SUB±ASSY
(a ) Remov e the air mix damper servo sub±ass y.
(b ) Measur e the resistance between terminal VZ and GND of
air mix damper servo sub±assy connecto r.
Resistance: 4.2 to 7.8 k �
(c ) Whil e operating air mix damper servo sub±assy as shown
i n the procedure on page 05±1139 , measure resistance
betwee n terminal PT and GND of air mix damper servo
sub±ass y.
Resistance :
MAX. HO T: 3.4 to 6.2 k�
MAX. COOL: 0.8 to 1.6 k�
HIN T:
A s the air mix damper servo sub±assy moves from COOL side
t o HOT side, the resistance decreases gradually without inter-
ruption.
NG REPLAC E AIRMIX DAMPER SE RVO SUB±ASSY
OK
3 CHEC K HARNESS AND CONNEC TOR(AIRMIX DAMPER SE RVO SUB±ASSY ± A/C
AMPLIFIER)
(a ) Chec k for an open and short circuit in harness and connector between air mix damper p\
osition sensor
an d A/C amplifier ( See page 01±32 ).
NG REPAIR OR REPLACE HARNESS OR CONNECTOR
OK
Page 1152 of 5135
05±1132
± DIAGNOSTICSAIR CONDITIONING SYSTEM
AVENSIS REPAIR MANUAL (RM1018E)
4 READ OUTPUT DTC
(a) Clear the DTCs.
(b) Read the DTC at least 1.0 minutes after turning the ignition switch ON.
Standard: Normal codes are output.
NG REPLACE AIR CONDITIONING AMPLIFIER
OK
PROCEED TO NEXT CIRCUIT INSPECTION SHOWN ON PROBLEM SYMPTOMS TABLE
Page 1153 of 5135
TPM terminal voltage
(V)
4
1
0 100%
Damper opening angle
I35378
A25
Air Vent Mode Control Servo Motor A/C Control Assembly
M
FACE 5L±B
A15 AOF4
DEF 4LG±B
A15 AOD3
PT 3GR±R
A16 TPM19
VZ 2BR±W
A16 S5±314
GND 1G±W
A15 SG±315 05±1126
± DIAGNOSTICSAIR CONDITIONING SYSTEM
AVENSIS REPAIR MANUAL (RM1018E)
DTC 33 AIR OUTLET DAMPER POSITION SENSOR
CIRCUIT
CIRCUIT DESCRIPTION
This sensor detects the position of the mode damper and sends
the appropriate signals to the A/C amplifier. The position sensor
is built in the mode damper servo sub±assy.
DTC No.Detection ItemTrouble Area
33Short to ground or power source circuit in mode damper posi-
tion sensor circuit.
�Mode damper servo sub±assy (mode damper position sen-
sor)
�Harness or connector between mode damper servo sub±
assy (mode damper position sensor) and A/C amplifier assy
�A/C amplifier assy
WIRING DIAGRAM
05A7X±02
Page 1154 of 5135

I36144
TPM SG±3
A16A15
I35385
DEF
F
ACE
12345
PTV
Z GND
±
DIAGNOSTIC SAIR CONDITIONING SYSTEM
05± 1127
A VENSIS RE PAIR MANUAL (RM1018E)
INSPECTIO N PROCEDURE
1 INSPEC T AIR CONDITIONING AMPLIFIER(TPM ± SG±3)
(a ) Remov e the A/C amplifier with being connectors con-
nected.
(b ) Tur n the ignition switch to ON.
(c ) Chang e the set to activate the mode damper sub±assy
an d measure voltage between terminal TPM and SG±3
o f A/C amplifier ass y.
Standard:
F ACE: 3.5 to 4.5 V
DEF: 0.5 to 1.5 V
HIN T:
As the is moved from F ACE side to DEF side, the voltage de-
creases gradually with out interruption.
OK PROCEE D TO NEXT CIRCUIT INSPECTION
SHOW N ON PROBLEM SYMP TOMS TABLE
NG
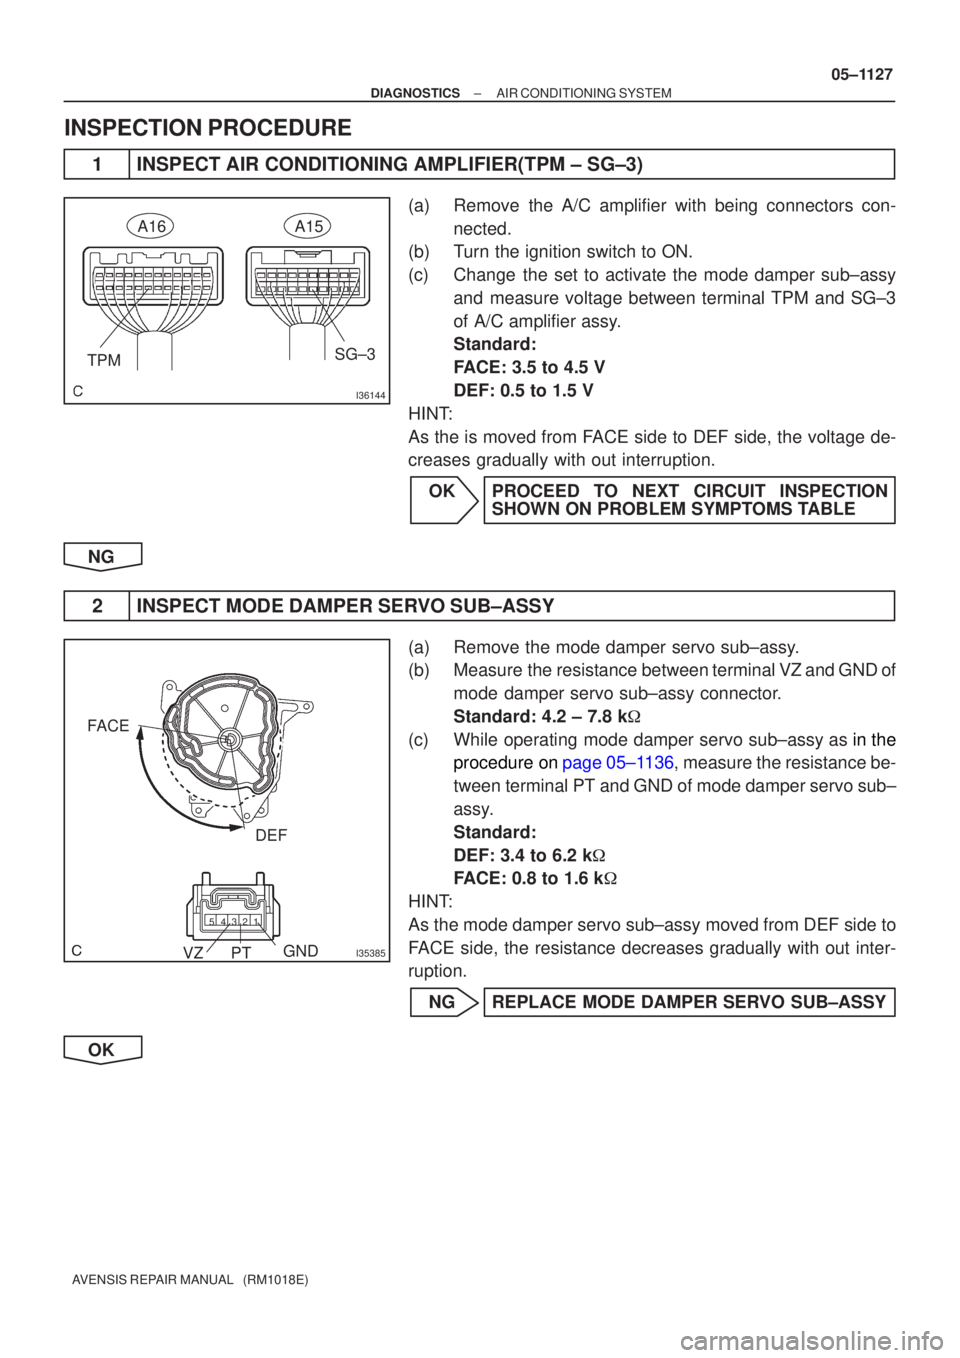
2 INSPECT MODE DAMPER SE RVO SUB±ASSY
(a ) Remove the mode damper servo sub±ass y.
(b ) Measur e the resistance between terminal VZ and GND of
mod e damper servo sub±assy connecto r.
Standard: 4.2 ± 7.8 k�
(c ) While operating mode damper servo sub±assy as in the
procedur e on page 05± 1136 , measure the resistance be-
tween terminal PT and GND of mode damper servo sub±
assy.
Standard:
DEF: 3.4 to 6.2 k �
FACE: 0.8 to 1.6 k �
HINT:
As the mode damper servo sub±assy moved from DEF side to
FACE side, the resistance decreases gradually with out inter-
ruption.
NG REPLACE MODE DAMPER SERVO SUB±ASSY
OK