Page 2514 of 5135
C95318
C87504
C86742
AA
AAB
B
C95317
AA
A
B
26±18
±
FRONT SUSPENSION FRONT SUSPENSION ARM SUB±ASSY LOWER NO.1
LH(ATM)
AVENSIS REPAIR MANUAL (RM1018E)
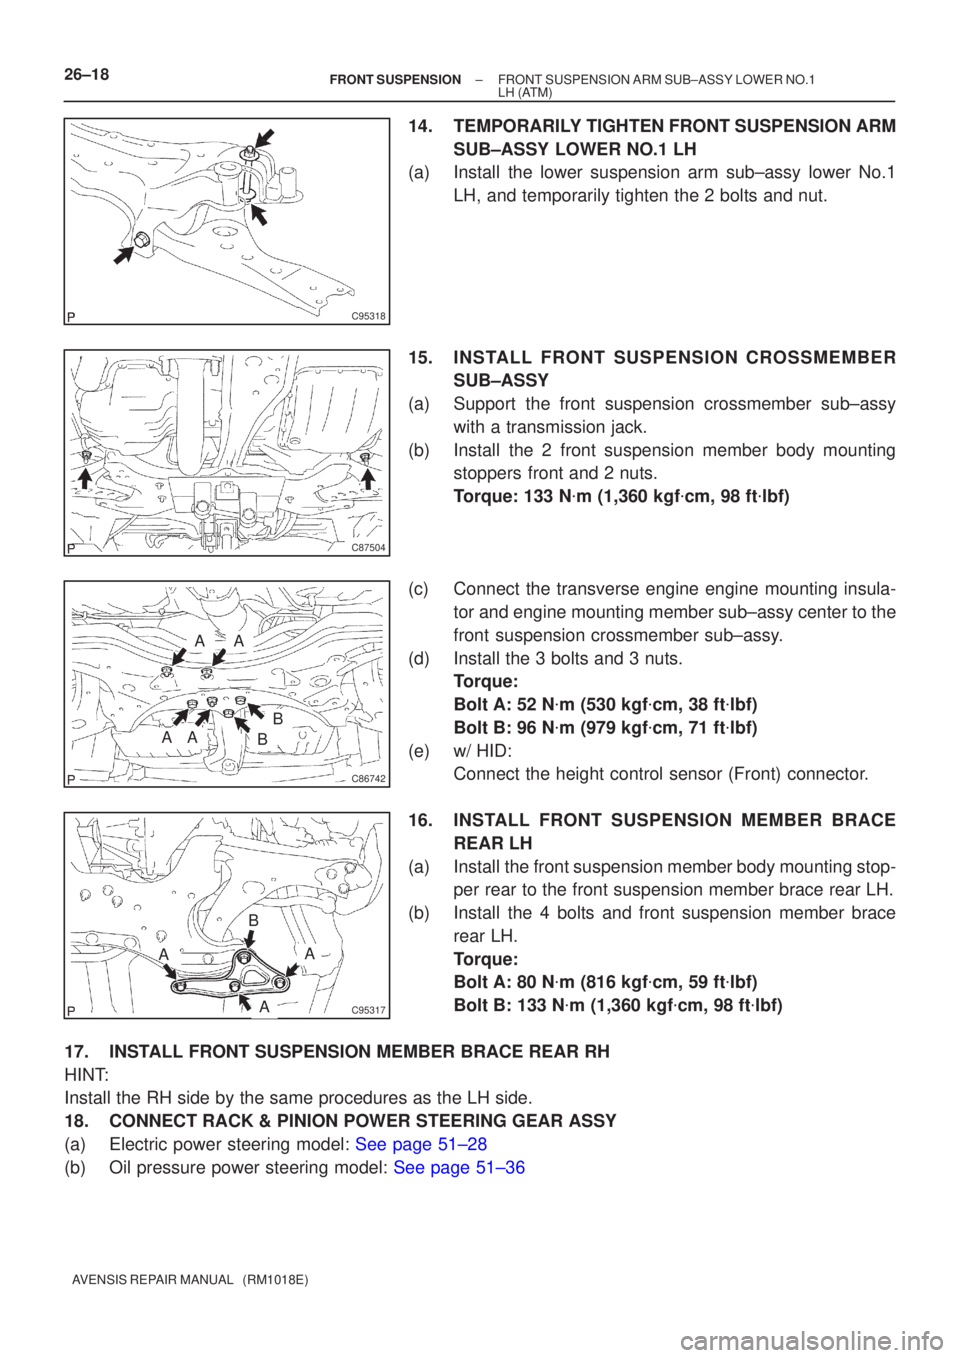
14.TEMPORARILY TIGHTEN FRONT SUSPENSION ARM SUB±ASSY LOWER NO.1 LH
(a)Install the lower suspension arm sub±assy lower No.1
LH, and temporarily tighten the 2 bolts and nut.
15.INSTALL FRONT SUSPENSION CROSSMEMBER SUB±ASSY
(a)Support the front suspension crossmember sub±assy with a transmission jack.
(b)Install the 2 front suspension member body mounting stoppers front and 2 nuts.
Torque: 133 N �m (1,360 kgf �cm, 98 ft �lbf)
(c)Connect the transverse engine engine mounting insula- tor and engine mounting member sub±assy center to the
front suspension crossmember sub±assy.
(d)Install the 3 bolts and 3 nuts. Torque:
Bolt A: 52 N �m (530 kgf �cm, 38 ft �lbf)
Bolt B: 96 N �m (979 kgf �cm, 71 ft �lbf)
(e)w/ HID: Connect the height control sensor (Front) connector.
16.INSTALL FRONT SUSPENSION ME MBER BRACE
REAR LH
(a)Install the front suspension member body mounting stop- per rear to the front suspension member brace rear LH.
(b)Install the 4 bolts and front suspension member brace rear LH.
Torque:
Bolt A: 80 N �m (816 kgf �cm, 59 ft �lbf)
Bolt B: 133 N �m (1,360 kgf �cm, 98 ft �lbf)
17.INSTALL FRONT SUSPENSION MEMBER BRACE REAR RH
HINT:
Install the RH side by the same procedures as the LH side.
18.CONNECT RACK & PINION POWER STEERING GEAR ASSY
(a)Electric power steering model: See page 51±28
(b)Oil pressure power steering model: See page 51±36
Page 2523 of 5135
2600L±02
F44617
Front:AB
F44618
Rear:
C D
SA3213
A
D B
Front
C
F44619
26±6
±
FRONT SUSPENSION FRONT WHEEL ALIGNMENT
AVENSIS REPAIR MANUAL (RM1018E)
FRONT WHEEL ALIGNMENT
ADJUSTMENT
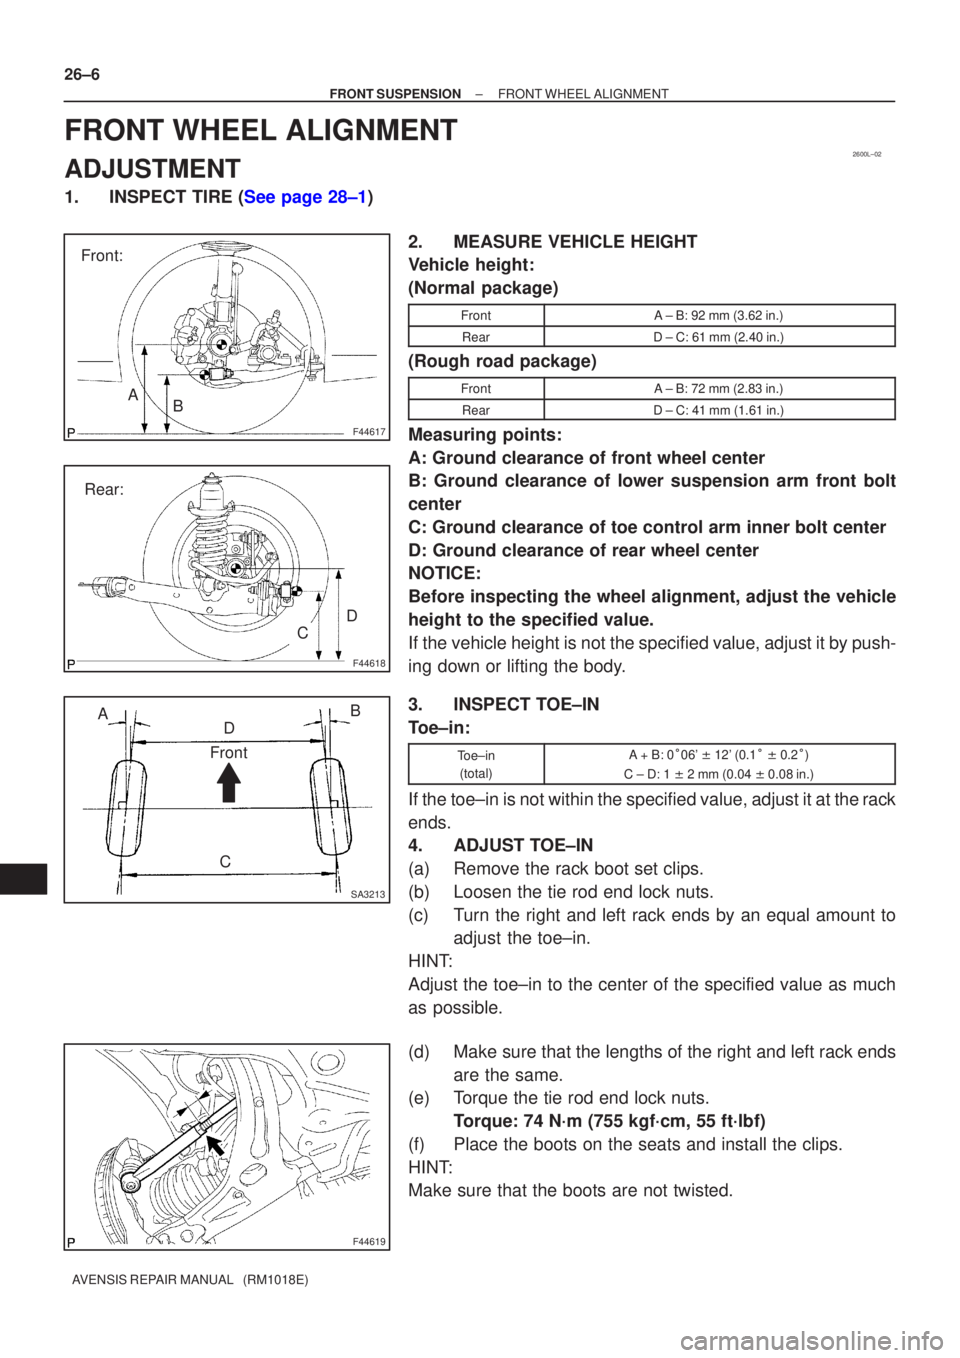
1.INSPECT TIRE (See page 28±1) 2. MEASURE VEHICLE HEIGHT
Vehicle height:
(Normal package)
FrontA ± B: 92 mm (3.62 in.)
RearD ± C: 61 mm (2.40 in.)
(Rough road package)
FrontA ± B: 72 mm (2.83 in.)
RearD ± C: 41 mm (1.61 in.)
Measuring points:
A: Ground clearance of front wheel center
B: Ground clearance of lower suspension arm front bolt
center
C: Ground clearance of toe control arm inner bolt center
D: Ground clearance of rear wheel center
NOTICE:
Before inspecting the wheel alignment, adjust the vehicle
height to the specified value.
If the vehicle height is not the specified value, adjust it by push-
ing down or lifting the body.
3. INSPECT TOE±IN
Toe±in:
Toe±in(total)A + B: 0 �06' � 12' (0.1 � � 0.2 �)
C ± D: 1 � 2 mm (0.04 � 0.08 in.)
If the toe±in is not within the specified value, adjust it at the rack
ends.
4. ADJUST TOE±IN
(a) Remove the rack boot set clips.
(b) Loosen the tie rod end lock nuts.
(c) Turn the right and left rack ends by an equal amount to
adjust the toe±in.
HINT:
Adjust the toe±in to the center of the specified value as much
as possible.
(d) Make sure that the lengths of the right and left rack ends are the same.
(e) Torque the tie rod end lock nuts.
Torque: 74 N´m (755 kgf´cm, 55 ft´lbf)
(f) Place the boots on the seats and install the clips.
HINT:
Make sure that the boots are not twisted.
Page 2562 of 5135
270E4±01
G23906
G25775
G23871
������G25777
27±24
±
REAR SUSPENSION LOWER CONTROL ARM ASSY LH
AVENSIS REPAIR MANUAL (RM1018E)
LOWER CONTROL ARM ASSY LH
REPLACEMENT
HINT:
COMPONENTS: See page 27±2.
1. REMOVE REAR WHEEL 2. REMOVE LOWER CONTROL ARM ASSY LH
(a) RH side (w/ Height control sensor):Remove the nut, and separate the height control sensor
sub±assy from the lower control arm assy RH.
(b) Support the rear suspension arm assy No.1 LH.
(c) Remove the bolt, and separate the member side lower control arm assy LH.
(d) Remove the clip and nut.
Page 2564 of 5135
G23871
G23906
27±26
±
REAR SUSPENSION LOWER CONTROL ARM ASSY LH
AVENSIS REPAIR MANUAL (RM1018E)
7. FULLY TIGHTEN LOWER CONTROL ARM ASSY LH
(a) Fully tighten the bolt. Torque: 105 N �m (1,071 kgf �cm, 77 ft �lbf)
(b) RH side (w/ Height control sensor): Install the height control sensor sub±assy and nut to the
lower control arm assy RH.
Torque: 5.8 N �m (59 kgf �cm, 51 in. �lbf)
(c) RH side (w/ Height control sensor): Headlight aim only (See page 65±19).
8.INSPECT AND ADJUST REAR WHEEL ALIGNMENT (See page 27±4)
Page 2579 of 5135
F42620
F40019
32±20
±
BRAKE BRAKE BOOSTER ASSY (LHD)
AVENSIS REPAIR MANUAL (RM1018E)
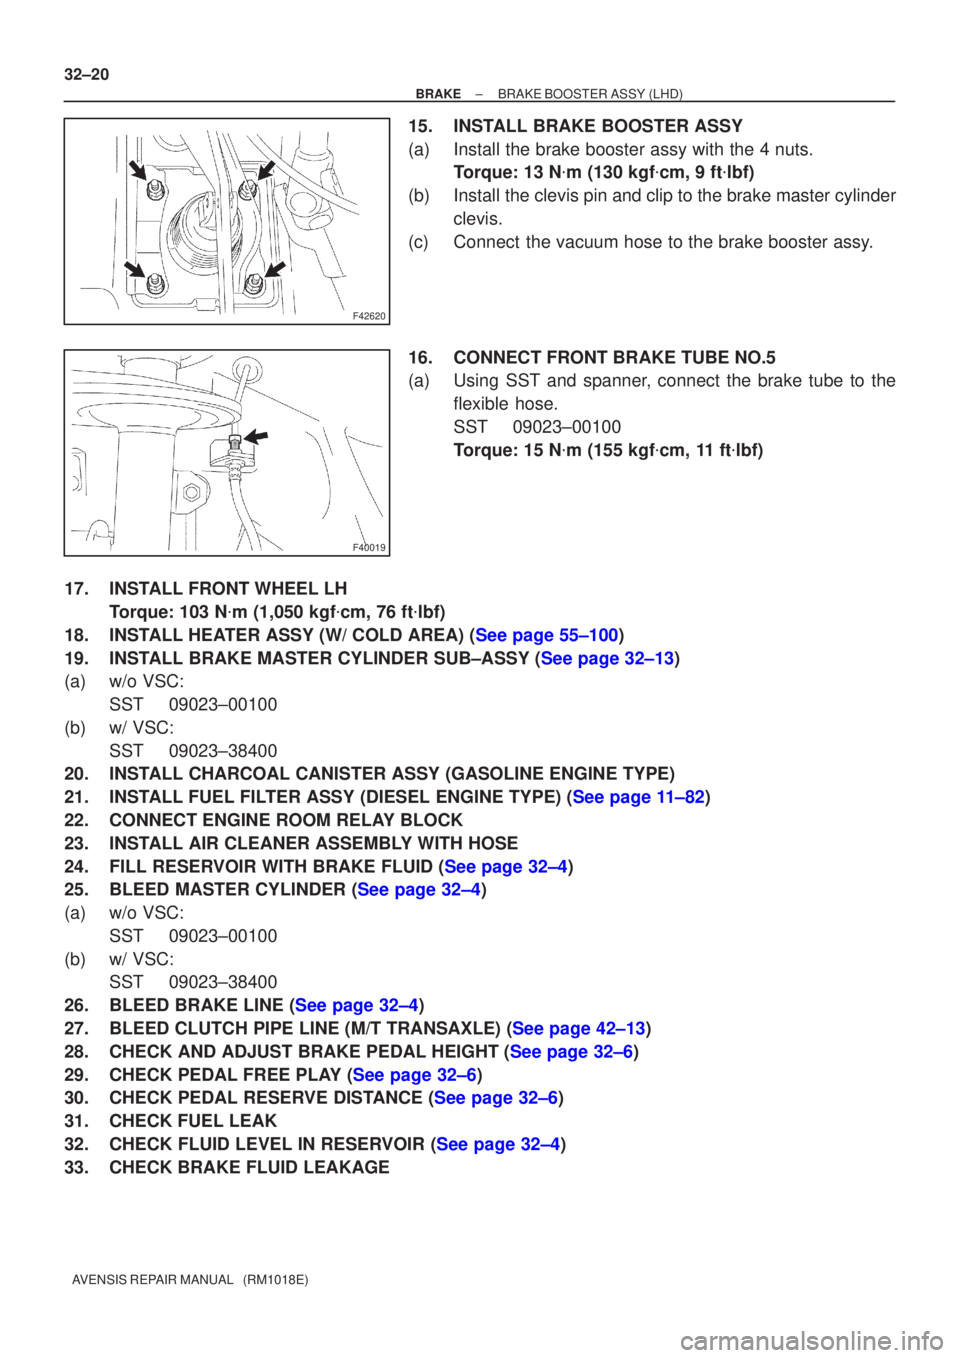
15. INSTALL BRAKE BOOSTER ASSY
(a) Install the brake booster assy with the 4 nuts. Torque: 13 N �m (130 kgf �cm, 9 ft �lbf)
(b) Install the clevis pin and clip to the brake master cylinder clevis.
(c) Connect the vacuum hose to the brake booster assy.
16. CONNECT FRONT BRAKE TUBE NO.5
(a) Using SST and spanner, connect the brake tube to the flexible hose.
SST 09023±00100
Torque: 15 N �m (155 kgf �cm, 11 ft �lbf)
17. INSTALL FRONT WHEEL LH Torque: 103 N �m (1,050 kgf �cm, 76 ft �lbf)
18.INSTALL HEATER ASSY (W/ COLD AREA) (See page 55±100)
19.INSTALL BRAKE MASTER CYLINDER SUB±ASSY (See page 32±13)
(a) w/o VSC: SST 09023±00100
(b) w/ VSC: SST 09023±38400
20. INSTALL CHARCOAL CANISTER ASSY (GASOLINE ENGINE TYPE)
21.INSTALL FUEL FILTER ASSY (DIESEL ENGINE TYPE) (See page 11±82)
22. CONNECT ENGINE ROOM RELAY BLOCK
23. INSTALL AIR CLEANER ASSEMBLY WITH HOSE
24.FILL RESERVOIR WITH BRAKE FLUID (See page 32±4)
25.BLEED MASTER CYLINDER (See page 32±4)
(a) w/o VSC:
SST 09023±00100
(b) w/ VSC: SST 09023±38400
26.BLEED BRAKE LINE (See page 32±4)
27.BLEED CLUTCH PIPE LINE (M/T TRANSAXLE) (See page 42±13)
28.CHECK AND ADJUST BRAKE PEDAL HEIGHT (See page 32±6)
29.CHECK PEDAL FREE PLAY (See page 32±6)
30.CHECK PEDAL RESERVE DISTANCE (See page 32±6)
31. CHECK FUEL LEAK
32.CHECK FLUID LEVEL IN RESERVOIR (See page 32±4)
33. CHECK BRAKE FLUID LEAKAGE
Page 2589 of 5135
G23175
G23220
32±10
±
BRAKE BRAKE PEDAL SUB±ASSY
AVENSIS REPAIR MANUAL (RM1018E)
8. INSTALL BRAKE PEDAL SUB±ASSY
(a) Apply lithium soap base glycol grease to the inside surface of 2 new bus\
hes.
(b) Install the brake pedal sub±assy and 2 bushes to the brake pedal supp\
ort sub±assy with the brake pedal shaft and nut.
Torque: 37 N �m (375 kgf �cm, 27 ft �lbf)
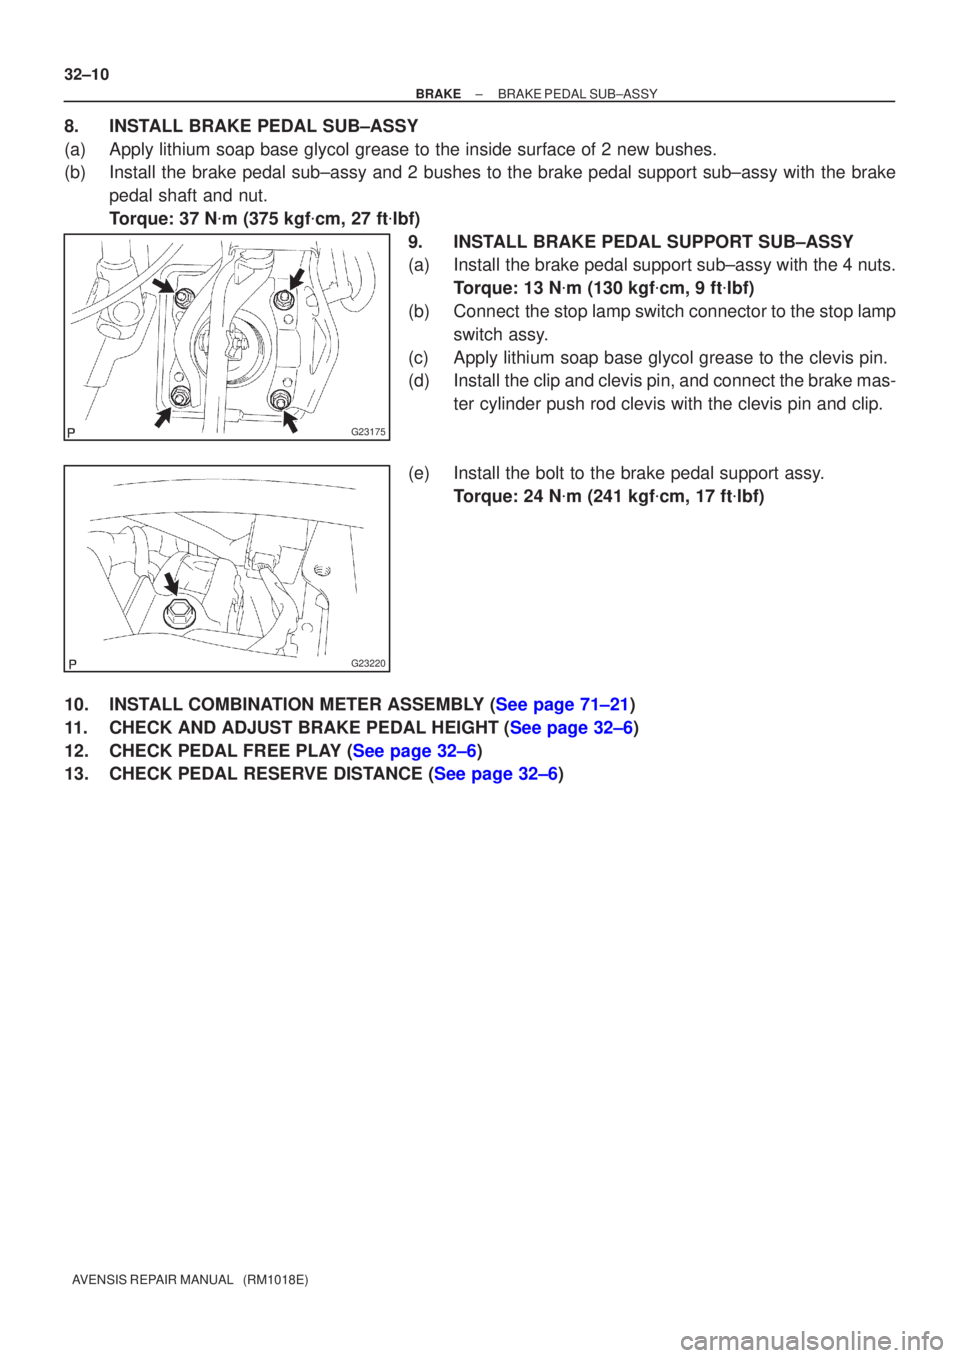
9. INSTALL BRAKE PEDAL SUPPORT SUB±ASSY
(a) Install the brake pedal support sub±assy with the 4 nuts. Torque: 13 N �m (130 kgf �cm, 9 ft �lbf)
(b) Connect the stop lamp switch connector to the stop lamp switch assy.
(c) Apply lithium soap base glycol grease to the clevis pin.
(d) Install the clip and clevis pin, and connect the brake mas- ter cylinder push rod clevis with the clevis pin and clip.
(e) Install the bolt to the brake pedal support assy. Torque: 24 N �m (241 kgf �cm, 17 ft �lbf)
10.INSTALL COMBINATION METER ASSEMBLY (See page 71±21)
11.CHECK AND ADJUST BRAKE PEDAL HEIGHT (See page 32±6)
12.CHECK PEDAL FREE PLAY (See page 32±6)
13.CHECK PEDAL RESERVE DISTANCE (See page 32±6)
Page 2591 of 5135
320VI±01
G23173
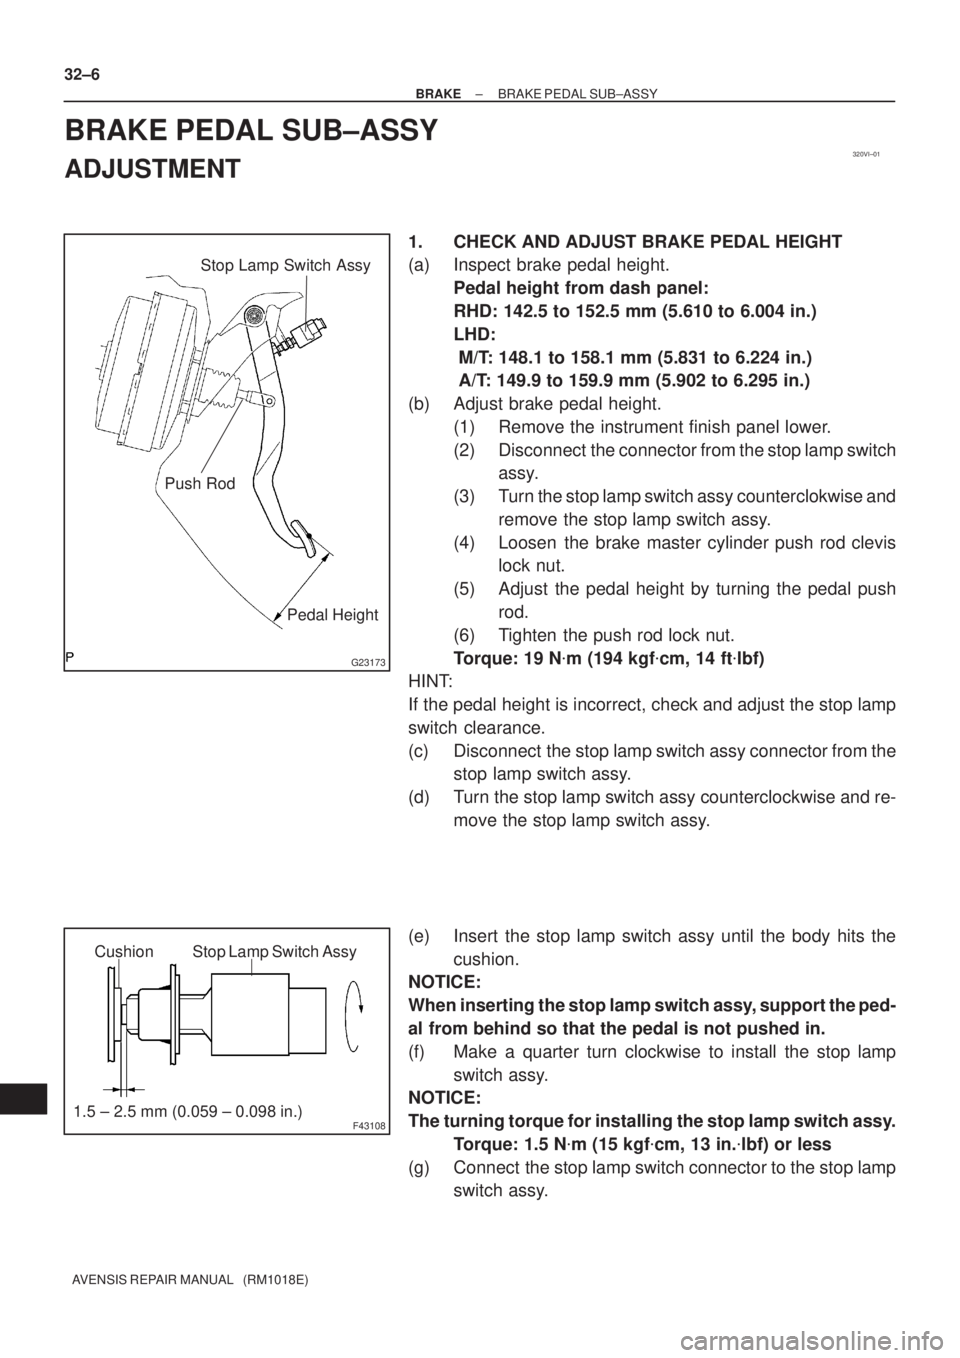
Stop Lamp Switch Assy
Push Rod
Pedal Height
F43108
Stop Lamp Switch Assy Cushion
1.5 ± 2.5 mm (0.059 ± 0.098 in.) 32±6
± BRAKEBRAKE PEDAL SUB±ASSY
AVENSIS REPAIR MANUAL (RM1018E)
BRAKE PEDAL SUB±ASSY
ADJUSTMENT
1. CHECK AND ADJUST BRAKE PEDAL HEIGHT
(a) Inspect brake pedal height.
Pedal height from dash panel:
RHD: 142.5 to 152.5 mm (5.610 to 6.004 in.)
LHD:
M/T: 148.1 to 158.1 mm (5.831 to 6.224 in.)
A/T: 149.9 to 159.9 mm (5.902 to 6.295 in.)
(b) Adjust brake pedal height.
(1) Remove the instrument finish panel lower.
(2) Disconnect the connector from the stop lamp switch
assy.
(3) Turn the stop lamp switch assy counterclokwise and
remove the stop lamp switch assy.
(4) Loosen the brake master cylinder push rod clevis
lock nut.
(5) Adjust the pedal height by turning the pedal push
rod.
(6) Tighten the push rod lock nut.
Torque: 19 N�m (194 kgf�cm, 14 ft�lbf)
HINT:
If the pedal height is incorrect, check and adjust the stop lamp
switch clearance.
(c) Disconnect the stop lamp switch assy connector from the
stop lamp switch assy.
(d) Turn the stop lamp switch assy counterclockwise and re-
move the stop lamp switch assy.
(e) Insert the stop lamp switch assy until the body hits the
cushion.
NOTICE:
When inserting the stop lamp switch assy, support the ped-
al from behind so that the pedal is not pushed in.
(f) Make a quarter turn clockwise to install the stop lamp
switch assy.
NOTICE:
The turning torque for installing the stop lamp switch assy.
Torque: 1.5 N�m (15 kgf�cm, 13 in.�lbf) or less
(g) Connect the stop lamp switch connector to the stop lamp
switch assy.
Page 2592 of 5135
G23176
Pedal Free Play
R00934
Pedal Reserve
Distance
± BRAKEBRAKE PEDAL SUB±ASSY
32±7
AVENSIS REPAIR MANUAL (RM1018E)
(h) Check the protrusion of the rod.
Protrusion of the rod: 0.5 to 2.6 mm (0.020 to 0.102 in.)
(i) Install the clevis pin and clip.
(j) After adjusting the pedal height, check the pedal free
play.
2. CHECK PEDAL FREE PLAY
(a) Stop the engine and depress the brake pedal several
times until there is no more vacuum left in the booster.
(b) Push in the pedal until the beginning of the resistance is
felt. Measure the distance, as shown.
Pedal free play: 1 to 6 mm (0.04 to 0.24 in.)
3. CHECK PEDAL RESERVE DISTANCE
(a) Release the parking brake lever.
With the engine running, depress the pedal and measure
the pedal reserve distance, as shown.
Pedal reserve distance from asphalt sheet at 490 N
(50 kgf, 110.2 lbf): More than 50 mm (1.97 in.)
If the distance is out of the specification , troubleshoot the brake
system.