Page 3088 of 5135

5.")
E68141
E67355
Wagon Type:
Automatic Stop Position
Automatic Stop Position Lift Back Type:170� � 3�
160� � 3�
E68111
66±10
± WIPER & WASHERWIPER AND WASHER SYSTEM
AVENSIS REPAIR MANUAL (RM1018E)
5. REAR WIPER MOTOR ASSY
(a) Connect the battery (+) to the terminal 1 (+B) of the con-
nector, the battery (±) to the terminal 3 (LS) of the connec-
tor and rear wiper motor assy body, and check that the
rear wiper motor assy operate.
(b) Automatic Stop Position Operation Check
(1) Connect the battery (+) to the terminal 1 (+B) of the
connector, the battery (±) to the terminal 3 (LS) of
the connector and rear wiper motor assy body. With
the motor being rotated disconnect the terminal 3
(LS) from the battery (±), then check that the wiper
motor stops automatically at the automatic stop
position.
6. HEADLAMP CLEANER SWITCH ASSY
(a) Check that there is continuity between terminal at each
switch position as shown in the chart.
Switch operationTester connectionSpecified condition
OFF1 (E) ± 4 (R)No continuity
ON1 (E) ± 4 (R)Continuity
Illumination circuit2 (ILL) ± 3 (ILL+)Continuity
(b) Inspect illumination operation.
(1) Connect the positive (+) lead from the battery to the
terminal 3 and negative (±) lead to the terminal 2,
then check that the illumination comes on.
Page 3091 of 5135

ON±VEHICLE INSPECTION
1. WINDSHIELD WASHER MOTOR AND PUMP ASSY
(a) Operation Che")
660CL±01
E67356
E67356
E67352
E68115
66±4
± WIPER & WASHERWIPER AND WASHER SYSTEM
AVENSIS REPAIR MANUAL (RM1018E)
ON±VEHICLE INSPECTION
1. WINDSHIELD WASHER MOTOR AND PUMP ASSY
(a) Operation Check
(1) Pour the washer fluid into the washer jar with the
washer motor and the pump installed to the washer
jar assy.
(2) Connect the battery (+) to the terminal 1 of the wind-
shield washer motor and pump assy, the battery (±)
to the terminal 2 of the windshield washer motor and
pump assy. Check that the washer fluid comes out
from the washer jar.
2. REAR WASHER MOTOR ASSY
(a) Operation Check
(1) Pour the washer fluid into the washer jar with the
washer motor and the pump installed to the washer
jar assy.
(2) Connect the battery (+) to the terminal 1 of the rear
washer motor assy, the battery (±) to the terminal 2
of the rear washer motor assy. Check that the wash-
er fluid comes out from the washer jar.
3. HEADLAMP CLEANER MOTOR AND PUMP ASSY
(a) Operation Check
(1) Pour the washer fluid into the washer jar with the
washer motor and the pump installed to the washer
jar assy.
(2) Connect the battery (+) to the terminal 2 of the head-
lamp cleaner motor and pump assy, the battery (±)
to the terminal 1 of the headlamp cleaner motor and
pump assy. Check that the washer fluid comes out
from the washer jar.
4. RAIN SENSOR
(a) Check voltage of each terminal of the connector
Standard:
Tester connectionConditionSpecified voltage
2 ± 3Rain sensor is covered by
handSignal waveform
Page 3093 of 5135

PROBLEM SYMPTOMS TABLE
1.FRONT WIPER AND WASHER SYSTEM (W/O AUTO WIPER SYSTEM)
SymptomSuspect AreaSee page
F")
660CK±01
66±2
±
WIPER & WASHER WIPER AND WASHER SYSTEM
AVENSIS REPAIR MANUAL (RM1018E)
PROBLEM SYMPTOMS TABLE
1.FRONT WIPER AND WASHER SYSTEM (W/O AUTO WIPER SYSTEM)
SymptomSuspect AreaSee page
Front wipers and washers do not operate.
1. IG relay
2. WIP fuse
3. Windshield wiper switch assy
4. Wire harness or connector±
±
66±6 ±
Front wipers do not operate in LO or HI.
1. Windshield wiper switch assy
2. Windshield wiper motor assy
3. Wire harness or connector66±6
66±6±
Front wipers do not operate in INT.
1. Windshield wiper switch assy
2. Windshield wiper motor assy
3. Wire harness or connector66±6
66±6±
Front washer motor does not operate.
1 Windshield washer switch assy
2. Windshield washer motor assy
3. Wire harness or connector66±6
66±6±
Front wipers does not operate when washer switch in ON.
1. Windshield wiper switch assy
2. Windshield wiper motor assy
3. Wire harness or connector66±6
66±6±
Washer fluid does not operate.Washer hose and nozzle±
� When front wiper switch is in HI position, the wiper blade is in
contact with the body.
� When the front wiper switch is OFF, the wiper blade does not
retract or the retract position is wrong.
1. Windshield wiper motor assy
2. Front wiper arm installation position66±6
66±13
2. FRONT WIPER AND WASHER SYSTEM (W/ AUTO WIPER SYSTEM)
SymptomSuspect AreaSee page
Front wipers and washer do not operate.
1. IG1 relay
2. WIP fuse
3. Windshield wiper switch assy
4. Windshield wiper relay assy
5. Wire harness or connector±
±
66±6
66±6 ±
Front wipers does not operate in LO
(Auto wiper system is normal).Windshield wiper switch assy66±6
Front wipers does not operate in HI
(Auto wiper system is normal).1. Windshield wiper switch assy
2. Wire harness or connector66±6
±
Front washer motor does not operate.
1. Windshield wiper switch assy
2. Windshield washer motor assy
3. Wire harness or connector66±6
66±6±
Auto wiper system does not operate.
1. Windshield wiper switch assy
2. Windshield wiper relay assy
3. Rain sensor
4. Wire harness or connector66±6
66±6
66±4±
Page 3094 of 5135

3. REAR WIPER AND WASHER SYSTEM
SymptomSuspect AreaSee page
Rear wiper and washers do not operate.
1. AMI fuse
2. RR W")
±
WIPER & WASHER WIPER AND WASHER SYSTEM
66±3
AVENSIS REPAIR MANUAL (RM1018E)
3. REAR WIPER AND WASHER SYSTEM
SymptomSuspect AreaSee page
Rear wiper and washers do not operate.
1. AMI fuse
2. RR WIP fuse
3. Windshield wiper switch assy
4. Wire harness or connector±
±
66±6 ±
Rear wiper does not operate in INT.
1. Windshield wiper switch assy
2. Rear wiper motor assy
3. Wire harness or connector66±6
66±6±
Rear washer motor does not operate.
1. Windshield washer switch assy
2. Rear washer motor assy
3. Wire harness or connector66±6
66±6±
Rear wiper does not operate when washer switch is in ON.
1. Windshield wiper switch assy
2. Rear wiper motor assy
3. Wire harness or connector66±6
66±6±
Rear washer fluid does not operate.Washer hose and nozzle±
�When rear wiper switch is in ON position, the wiper blade is in
contact with the body.
� When the wiper switch is OFF, the wiper blade does not retract
or the retract position is wrong.
1. Rear wiper motor assy
2. Rear wiper blade installation position66±6
66±17
4. HEADLAMP CLEANER SYSTEM
SymptomSuspect AreaSee page
Headlamp cleaner system does not operate.
1. H/CLN fuse
2. Headlamp cleaner switch assy
3. Windshield wiper switch assy (w/ HID)
4. Headlamp cleaner control relay
5. Intergeneration Relay
6. Wire harness or connector±
66±6
66±6
66±6 ±
±
Page 3126 of 5135
I35187
I35180
I35181
I35182
67±8
± AUDIO & VISUAL SYSTEMMULTI±DISPLAY (CRT DISPLAY) DISPLAY
AVENSIS REPAIR MANUAL (RM1018E)
(d) Remove the 3 screws and instrument panel support No.1.
(e) Remove the 3 screws and instrument panel support No.2.
(f) Remove the instrument panel support No.3.
(g) Remove the 4 screws and slide the instrument panel box
door cover upward of the screen to remove it.
(h) Remove the instrument panel register control gear.
(i) Remove the 3 screws and door control motor.
Page 3129 of 5135
670S5±01
I35223
Instrument Cluster Finish Panel Garnish No.2
Radio Bracket No.2Radio Receiver Assy
Instrument Panel
Register Assy CTR
Air Conditioning Control AssyConsole Panel
Sub±assy Upper
Navigation System:Navigation Computer Cover
Instrument Panel
Support No.3 Instrument Panel
Support No.1Instrument Panel
Support No.2
Door Control Motor
Door Control Switch
Assy (TILT)
Instrument Cluster Finish Panel AssyDoor Control Switch Instrument Cluster Finish
Upper PanelMulti±display Instrument Panel Box
Door CoverRadio Bracket No.1
Instrument Panel
Register Control Gear
Control Knob
Protector No.1
Position Sensor
67±2
± AUDIO & VISUAL SYSTEMAUDIO & VISUAL SYSTEM
AVENSIS REPAIR MANUAL (RM1018E)
COMPONENTS
Page 3142 of 5135
660CO±02
������������I35264
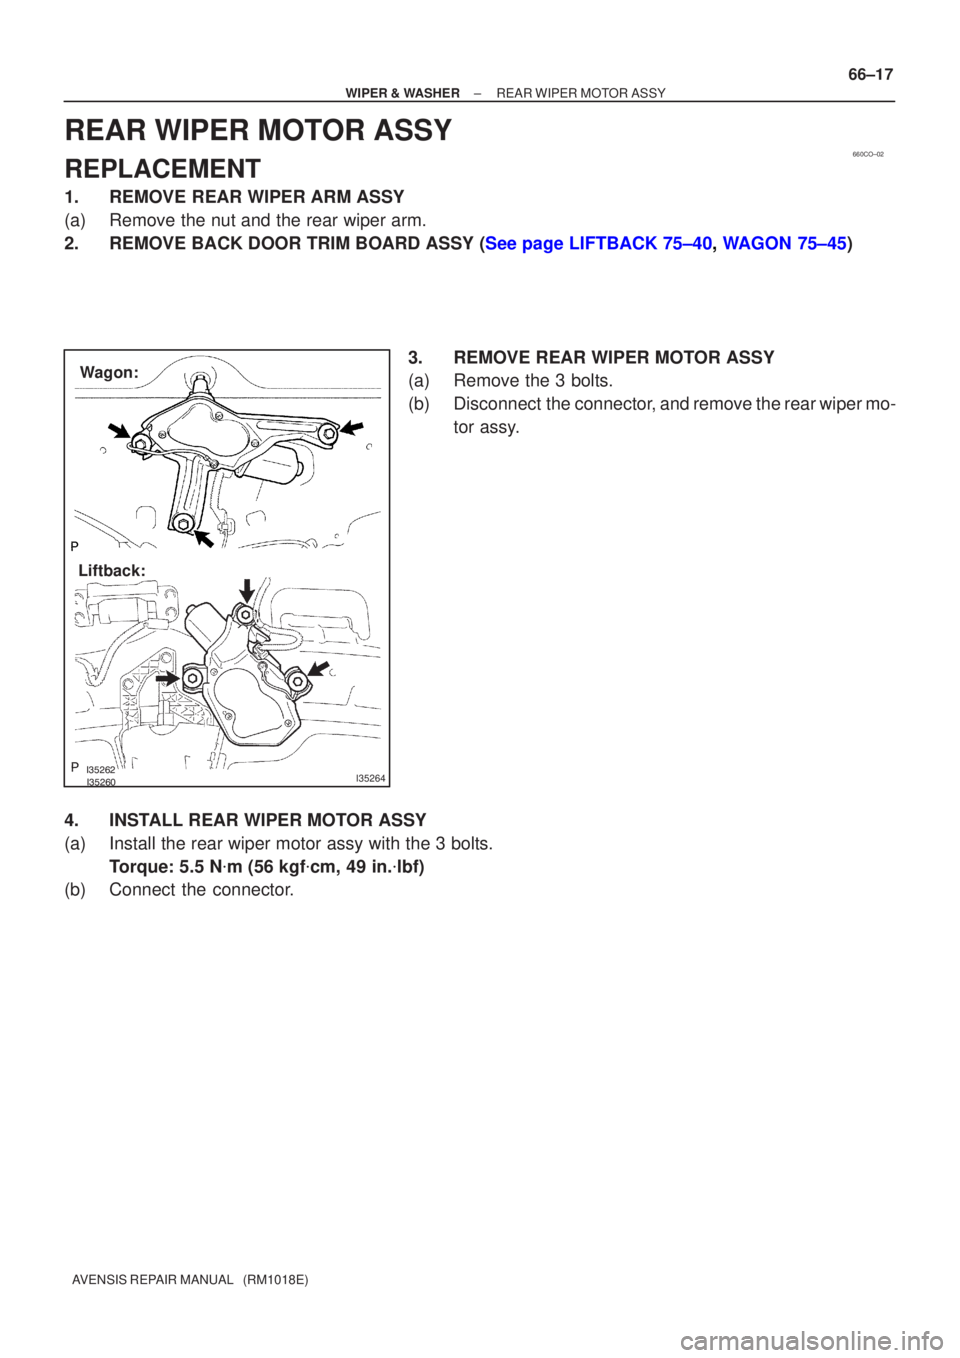
Wagon:
Liftback:
±
WIPER & WASHE R REAR WIPER MO TOR ASSY
66±17
A VENSIS RE PAIR MANUAL (RM1018E)
REA R WIPER MO TOR ASSY
REPLACEMENT
1 . REMOV E REAR WIPER ARM ASSY
(a ) Remove the nut and the rear wiper arm.
2 . REMOVE BACK DOOR TRIM BOARD ASSY ( See page LIFTBACK 75±40, W AGON 75±45 )
3. REMOVE REAR WIPER MOTOR ASSY
(a) Remove the 3 bolts.
(b) Disconnect the connector, and remove the rear wiper mo- tor assy.
4. INSTALL REAR WIPER MOTOR ASSY
(a) Install the rear wiper motor assy with the 3 bolts. Torque: 5.5 N �m (56 kgf �cm, 49 in. �lbf)
(b) Connect the connector.
Page 3143 of 5135
E58837
Wiper Arm Serration
Wiper Pivot Serration
Wire Brush
I35779
Defogger Line
30±50mm
(1.18±1.97 in.)
(1.18±1.97 in.) Wagon:
Liftback:
30±50mm 66±18
± WIPER & WASHERREAR WIPER MOTOR ASSY
AVENSIS REPAIR MANUAL (RM1018E)
5. INSTALL REAR WIPER ARM ASSY
(a) Scrape off the serration part of the wiper arm with a round
file or equivalent.
(b) Clean the rear wiper pivot serration with a brush.
(c) Stop the rear wiper motor assy to the automatic stop posi-
tion. Install the rear wiper arm to the position as shown in
the illustration.
Torque: 5.5 N�m (56 kgf�cm, 49 in.�lbf)
 DISPLAY
AVENSIS REPAIR MANUAL (RM1018E)
(d) Remove the 3 screws and instrument panel support No.1.
(e) Remove t")


(1.18±1.97 in.) Wagon:
Liftback:
30±50mm 66±18
± WIPER & WASHERREAR WIPER MOTOR ASSY
AVEN")