Page 3966 of 4555
SC-6
BATTERY
Battery Test and Charging ChartEKS00314
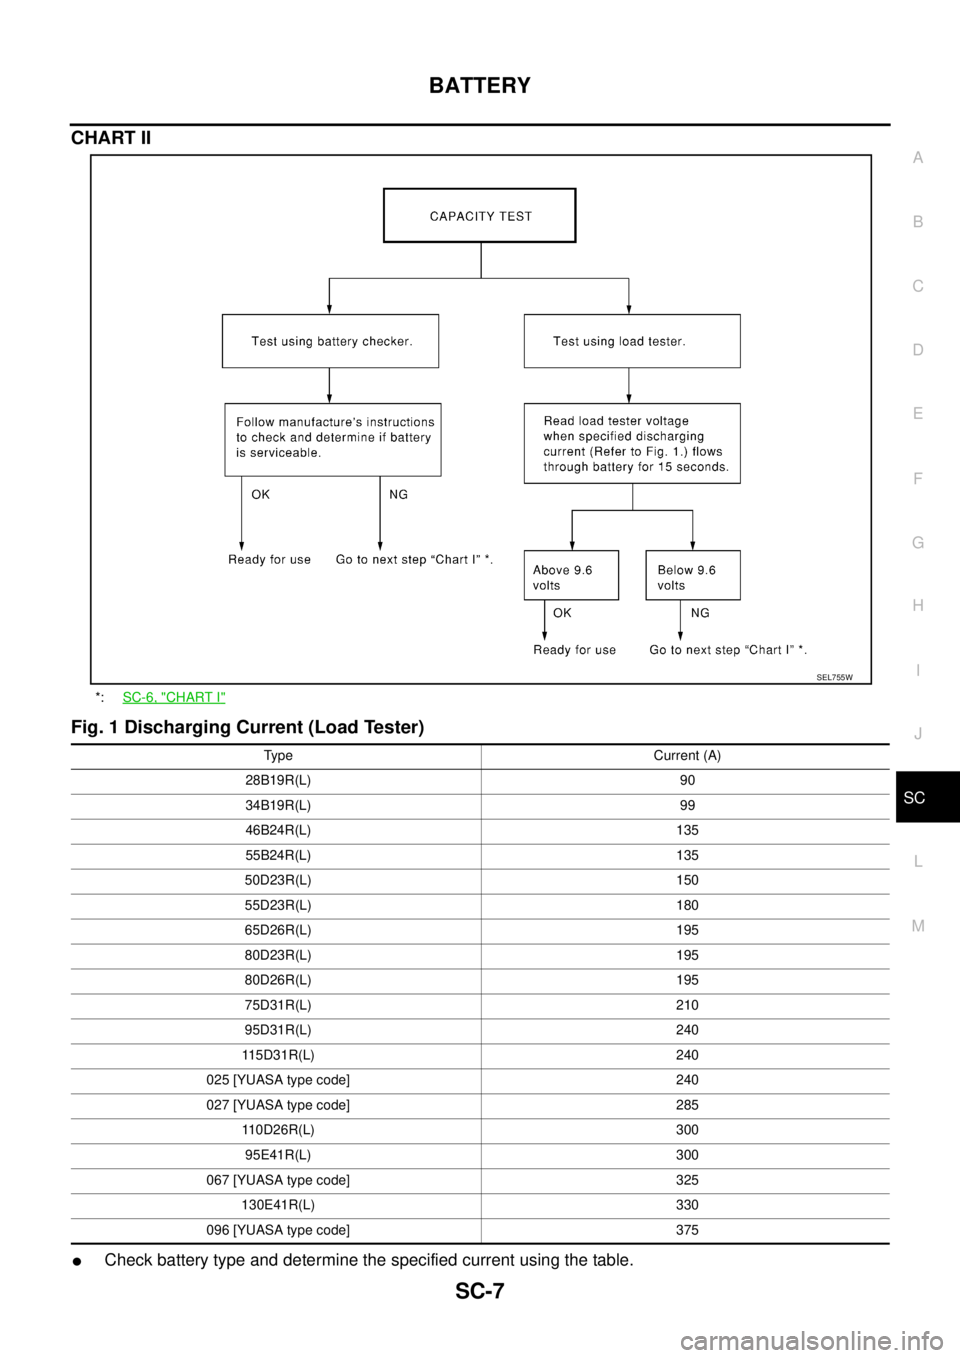
CHART I
*1:SC-5, "SPECIFIC GRAVITY
CHECK"
*2:SC-7, "CHART II"*3:SC-8, "A: SLOW CHARGE"
*4:SC-9, "B: STANDARD CHARGE"*5:SC-11, "C: QUICK CHARGE"
PKIA3696E
Page 3967 of 4555
BATTERY
SC-7
C
D
E
F
G
H
I
J
L
MA
B
SC
CHART II
Fig. 1 Discharging Current (Load Tester)
�Check battery type and determine the specified current using the table.
*:SC-6, "CHART I"
SEL755W
Type Current (A)
28B19R(L) 90
34B19R(L) 99
46B24R(L) 135
55B24R(L) 135
50D23R(L) 150
55D23R(L) 180
65D26R(L) 195
80D23R(L) 195
80D26R(L) 195
75D31R(L) 210
95D31R(L) 240
115D31R(L) 240
025 [YUASA type code] 240
027 [YUASA type code] 285
110D26R(L) 300
95E41R(L) 300
067 [YUASA type code] 325
130E41R(L) 330
096 [YUASA type code] 375
Page 3968 of 4555
SC-8
BATTERY
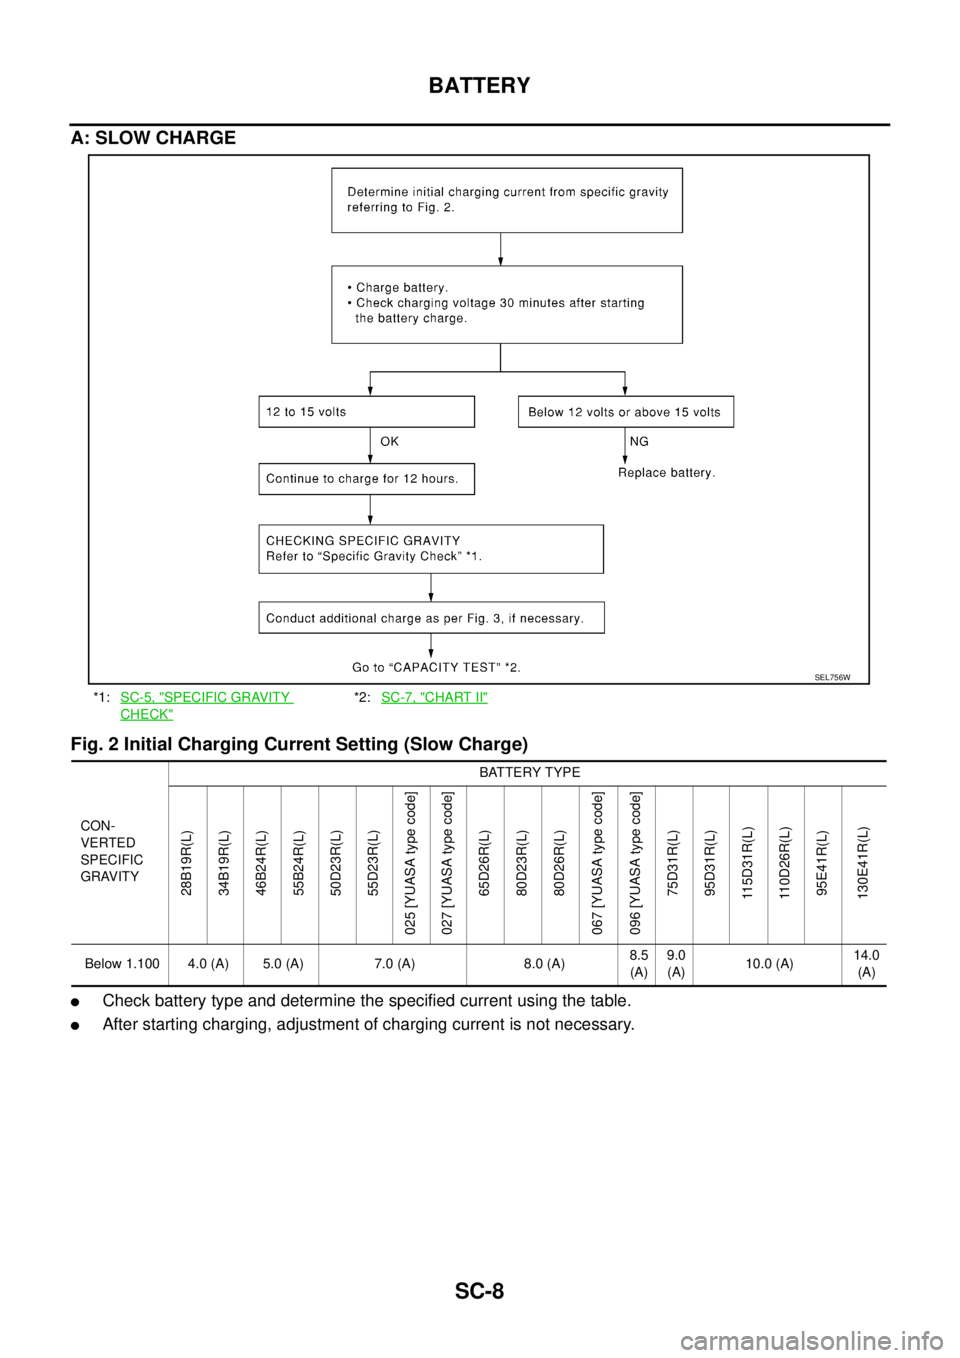
A: SLOW CHARGE
Fig. 2 Initial Charging Current Setting (Slow Charge)
�Check battery type and determine the specified current using the table.
�After starting charging, adjustment of charging current is not necessary.
*1:SC-5, "SPECIFIC GRAVITY
CHECK"
*2:SC-7, "CHART II"
SEL756W
CON-
VERTED
SPECIFIC
GRAVITYBATTERY TYPE
28B19R(L)
34B19R(L)
46B24R(L)
55B24R(L)
50D23R(L)
55D23R(L)
025 [YUASA type code]
027 [YUASA type code]
65D26R(L)
80D23R(L)
80D26R(L)
067 [YUASA type code]
096 [YUASA type code]
75D31R(L)
95D31R(L)
115D31R(L)
110D26R(L)
95E41R(L)
130E41R(L)
Below 1.100 4.0 (A) 5.0 (A) 7.0 (A) 8.0 (A)8.5
(A)9.0
(A)10.0 (A)14.0
(A)
Page 3969 of 4555

CAUTION:
�Set charging current to specified value in Fig. 2. If charger is not capable of producing specified
current va")
BATTERY
SC-9
C
D
E
F
G
H
I
J
L
MA
B
SC
Fig. 3 Additional Charge (Slow Charge)
CAUTION:
�Set charging current to specified value in Fig. 2. If charger is not capable of producing specified
current value, set its charging current as close to that value as possible.
�Keep battery away from open flame while it is being charged.
�When connecting charger, connect leads first, then turn on charger. Never turn on charger first, as
this may cause a spark.
�If battery temperature rises above 55 °C (131 °F), stop charging. Always charge battery when its
temperature is below 55 °C (131 °F).
B: STANDARD CHARGE
Fig. 4 Initial Charging Current Setting (Standard Charge)
*:SC-7, "CHART II"
SEL757W
*1:SC-5, "SPECIFIC GRAVITY
CHECK"
*2:SC-7, "CHART II"
SEL758W
CON-
VERTED
SPECIFIC
GRAVITYBATTERY TYPE
28B19R(L)
34B19R(L)
46B24R(L)
55B24R(L)
50D23R(L)
55D23R(L)
025 [YUASA type code]
027 [YUASA type code]
65D26R(L)
80D23R(L)
80D26R(L)
067 [YUASA type code]
096 [YUASA type code]
75D31R(L)
95D31R(L)
115D31R(L)
110D26R(L)
95E41R(L)
130E41R(L)
1.100 - 1.130 4.0 (A) 5.0 (A) 6.0 (A) 7.0 (A)8.0
(A)9.0 (A)13.0
(A)
1.130 - 1.160 3.0 (A) 4.0 (A) 5.0 (A) 6.0 (A)7.0
(A)8.0 (A)11 . 0
(A)
Page 3970 of 4555

SC-10
BATTERY
�Check battery type and determine the specified current using the table.
�After starting charging, adjustment of charging current is not necessary.
Fig. 5 Additional Charge (Standard Charge)
CAUTION:
�Never use standard charge method on a battery whose specific gravity is less than 1.100.
�Set charging current to specified value in Fig. 4. If charger is not capable of producing specified
current value, set its charging current as close to that value as possible.
�Keep battery away from open flame while it is being charged.
�When connecting charger, connect leads first, then turn on charger. Never turn on charger first, as
this may cause a spark.
�If battery temperature rises above 55 °C (131 °F), stop charging. Always charge battery when its
temperature is below 55 °C (131 °F).
1.160 - 1.190 2.0 (A) 3.0 (A) 4.0 (A) 5.0 (A)6.0
(A)7.0 (A)9.0
(A)
1.190 - 1.220 2.0 (A) 2.0 (A) 3.0 (A) 4.0 (A)5.0
(A)5.0 (A)7.0
(A) CON-
VERTED
SPECIFIC
GRAVITYBATTERY TYPE
28B19R(L)
34B19R(L)
46B24R(L)
55B24R(L)
50D23R(L)
55D23R(L)
025 [YUASA type code]
027 [YUASA type code]
65D26R(L)
80D23R(L)
80D26R(L)
067 [YUASA type code]
096 [YUASA type code]
75D31R(L)
95D31R(L)
115D31R(L)
110D26R(L)
95E41R(L)
130E41R(L)
*:SC-7, "CHART II"
SEL759W
Page 3971 of 4555

�Check battery type and determine the specified current using the tab")
BATTERY
SC-11
C
D
E
F
G
H
I
J
L
MA
B
SC
C: QUICK CHARGE
Fig. 6 Initial Charging Current Setting and Charging Time (Quick Charge)
�Check battery type and determine the specified current using the table.
�After starting charging, adjustment of charging current is not necessary.
CAUTION:
�Never use quick charge method on a battery whose specific gravity is less than 1.100.
�Set initial charging current to specified value in Fig. 6. If charger is not capable of producing spec-
ified current value, set its charging current as close to that value as possible.
�Keep battery away from open flame while it is being charged.
�When connecting charger, connect leads first, then turn on charger. Never turn on charger first, as
this may cause a spark.
�Be careful of a rise in battery temperature because a large current flow is required during quick-
charge operation.
If battery temperature rises above 55 °C (131 °F), stop charging. Always charge battery when its
temperature is below 55 °C (131 °F).
�Never exceed the charging time specified in Fig. 6, because charging battery over the charging
time can cause deterioration of the battery.
*:SC-7, "CHART II"
SEL760W
BATTERY TYPE
28B19R(L)
34B19R(L)
46B24R(L)
55B24R(L)
50D23R(L)
55D23R(L)
65D26R(L)
80D23R(L)
80D26R(L)
025 [YUASA type code]
027 [YUASA type code]
067 [YUASA type code]
096 [YUASA type code]
75D31R(L)
95D31R(L)
115D31R(L)
110D26R(L)
95E41R(L)
130E41R(L)
CURRENT [A] 10 (A) 15 (A) 20 (A) 25 (A) 30 (A)40
(A)
CONVERTED SPECIFIC GRAVITY
1.100 -
1.1302.5 hours
1.130 -
1.1602.0 hours
1.160 -
1.1901.5 hours
1.190 -
1.2201.0 hour
Above
1.2200.75 hour (45 min.)
Page 3976 of 4555
SC-16
CHARGING SYSTEM
Trouble DiagnosisEKS00319
Before performing an alternator test, make sure that the battery is fully charged. A 30-volt voltmeter and suit-
able test probes are necessary for the test. The alternator can be checked easily by referring to the Inspection
Ta b l e .
�Before starting, inspect the fusible link.
�Use fully charged battery.
WITH IC REGULATOR
NOTE:
�If the inspection result is OK even though the charging system is malfunctioning, check the “B” terminal
connection. (Check the tightening torque and voltage drop.)
�Check condition of rotor coil, rotor slip ring, brush and stator coil. If necessary, replace malfunctioning
parts with new ones.
MALFUNCTION INDICATOR
The IC regulator warning function activates to illuminate charge warning lamp, if any of the following symp-
toms occur while alternator is operating:
�Excessive voltage is produced.
�No voltage is produced.
PKIA3570E
Page 3977 of 4555

1. Disconnect the battery cable from the negative terminal.
2. Remove drive belt. Refer t")
CHARGING SYSTEM
SC-17
C
D
E
F
G
H
I
J
L
MA
B
SC
Removal and Installation EKS0031A
REMOVAL (QR ENGINE MODELS)
1. Disconnect the battery cable from the negative terminal.
2. Remove drive belt. Refer to EM-13, "
Checking Drive Belts" in EM section.
3. Remove alternator harness mounting bolt, ground mounting
bolt, alternator connector and “B” terminal mounting nut.
4. Remove alternator assembly upward.
5. Remove alternator mounting bolts.
REMOVAL (YD ENGINE MODELS)
1. Disconnect the battery cable from the negative terminal.
2. Remove alternator harness mounting bolt, alternator connector
and “B” terminal mounting nut.
3. Remove alternator and water pump belt. Refer to EM-140,
"Checking Drive Belts" in EM section.
4. Remove alternator bracket mounting bolts and alternator
bracket.
5. Remove alternator mounting bolts.
6. Remove alternator assembly upward.
ALTERNATOR PULLEY INSPECTION (QR ENGINE MODELS)
One-Way Clutch Pulley Check
Fix rotor with inserting a suitable tool rolled with a cloth.
CAUTION:
Be careful not to damage the rotor.
1. Check for locking. (Outer ring is turned clockwise when viewed
from the front.)
�If it rotates in both directions... Replace pulley.
2. Check for dragging. (Outer ring is turned counterclockwise when
viewed from the front.)
�If it locks or unusual resistance is felt... Replace pulley.
PKIA2496E
MEL948N
SKIB0529E