Page 3496 of 4555
PS-34
POWER STEERING OIL PUMP
DISASSEMBLY
CAUTION:
�Parts which can be disassembled are strictly limited. Never disassemble parts other than those
specified.
�Disassemble in as clean a place as possible.
�Clean your hands before disassembly.
�Do not use rags; use nylon cloths or paper towels.
�Follow the procedure and cautions in the Service Manual.
�When disassembling and reassembling, do not let foreign matter enter or contact the parts.
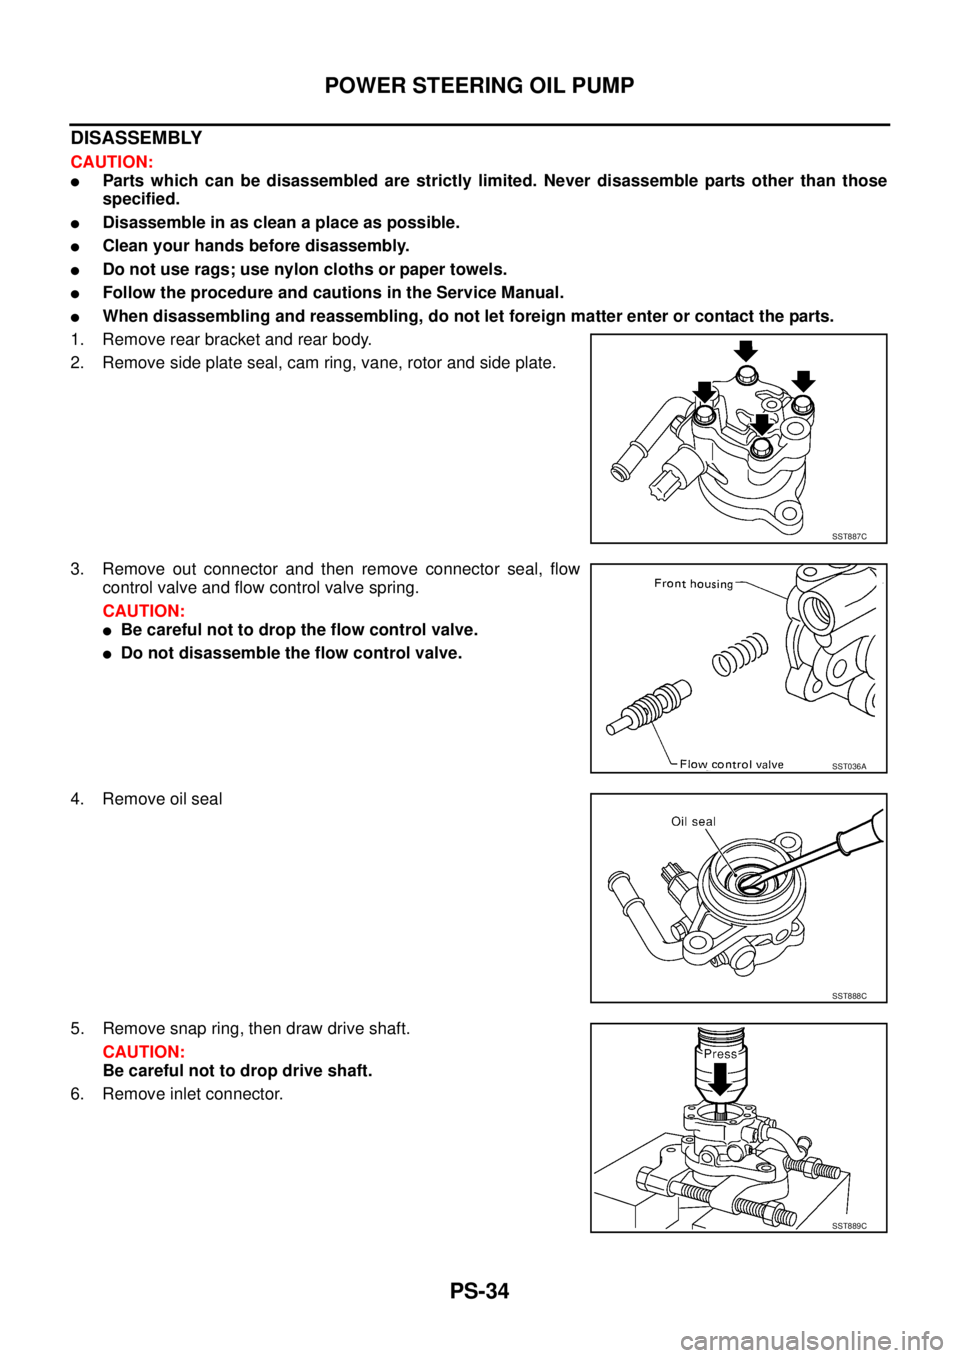
1. Remove rear bracket and rear body.
2. Remove side plate seal, cam ring, vane, rotor and side plate.
3. Remove out connector and then remove connector seal, flow
control valve and flow control valve spring.
CAUTION:
�Be careful not to drop the flow control valve.
�Do not disassemble the flow control valve.
4. Remove oil seal
5. Remove snap ring, then draw drive shaft.
CAUTION:
Be careful not to drop drive shaft.
6. Remove inlet connector.
SST887C
SST036A
SST888C
SST889C
Page 3506 of 4555

SERVICE DATA AND SPECIFICATIONS (SDS)PFP:00030
Steering WheelEGS0004P
Steering AngleEGS0004Q
Steering ColumnEGS0004R
Steering Outer Socket and Inner Socke")
PS-44
SERVICE DATA AND SPECIFICATIONS (SDS)
SERVICE DATA AND SPECIFICATIONS (SDS)PFP:00030
Steering WheelEGS0004P
Steering AngleEGS0004Q
Steering ColumnEGS0004R
Steering Outer Socket and Inner SocketEGS0004S
Steering wheel axial end play 0 mm (0 in)
Steering wheel play 0 - 35 mm (0 - 1.38 in)
Inner wheel
Degree minute (Decimal degree)Minimum 36° 00′ (36.0°)
Nominal 39° 00′ (39.0°)
Maximum 40° 00′ (40.0°)
Outer wheel
Degree minute (Decimal degree)31° 00′ (31.0°)
Steering column length “L” 405.3 mm (15.96 in)
SGIA0883E
Steering gear type PR24AD
Outer socketSwing torque 0.3 - 2.9 N·m (0.03 - 0.29 kg-m, 3.0 - 25 in-lb)
Measurement on spring balance
Measuring point: cotter pin hole of stud4.84 - 47.4 N (0.49 - 4.84 kg, 1.08 - 10.7 lb)
Rotating torque 0.3 - 2.9 N·m (0.03 - 0.29 kg-m, 3.0 - 25 in-lb)
Axial endplay 0.5 mm (0.02 in) or less
Inner socketSwing torque 1.0 - 7.8 N·m (0.10 - 0.80 kg-m, 9.0 - 69 in-lb)
�Measurement on spring balance
�Measuring point at* mark shown in the figure5.2 - 41 N (0.53 - 4.1 kg, 1.17 - 9.07 lb)
Axial endplay 0.2 mm (0.008 in) or less
Inner socket length “L” 169.67 mm (6.68 in)
SGIA0950E
Page 3799 of 4555

REAR DOOR GLASS AND REGULATOR
GW-85
C
D
E
F
G
H
J
K
L
MA
B
GW
16. Remove regulator assembly and the guide rail mounting bolts
through the access hole.
INSTALLATION
Install in the reverse order of removal.
INSPECTION AFTER REMOVAL
Check regulator assembly for the following items. If a malfunction is
detected, replace or grease it.
�Gear wear
�Regulator deformation
�Spring damage
�Grease condition for each sliding part
The arrows in the figure show body grease application points of the
grease “Dow Corning Moly Coat SK 623” or equivalent.
FITTING INSPECTION
�Check that glass is securely fit into glass run groove.
�While raising and lowering the window, check for abnormal operation.
�Lower the glass slightly [approx. 10 to 20 mm (0.39 to 0.79 in)], and check that the clearance to the sash
is parallel. If the clearance between the glass and sash is not parallel, loosen the regulator mounting bolts,
guide rail mounting bolts, and glass & carrier plate mounting bolts to correct the glass position.
PIIA0556E
OCC3565D
Page 3989 of 4555
STARTING SYSTEM
SC-29
C
D
E
F
G
H
I
J
L
MA
B
SC
A/T Models
1. Pinion stopper clip 2. Pinion stopper 3. Pinion
4. Pinion spring 5. Gear case assembly 6. Shift lever set
7. Dust cover kit 8. Magnetic switch assembly 9. Clutch assembly
10. E-ring 11. Thrust washer 12. Center bracket (P)
13. Packing 14. Planetary gear 15. Internal gear
16. Center bracket (A) 17. Yoke assembly 18. Armature assembly
19. Brush holder assembly 20. Brush (-) 21. Brush spring
22. Thrust washer 23. Rear cover assembly
Through-bolt:
: 4.9 - 6.4 N·m (0.50 - 0.65 kg-m, 43.4 - 56.4 in-lb)
PKIA0466E
Page 3990 of 4555
SC-30
STARTING SYSTEM
YD ENGINE MODELS
1. Stopper clip 2. Pinion stopper 3. Pinion
4. Spring 5. Gear case 6. Plate
7. Packing 8. Adjusting plate 9. Magnetic switch assembly
10. Snap ring 11. Retainer ring 12. Over running clutch
13. Internal gear 14. Planetary gear 15. Ball
16. Packing 17. Cover 18. Yoke
19. Armature 20. Washer 21. Rear bearing
22. Brush holder assembly 23. Brush spring 24. Brush (-)
25. Rear cover
Through-bolt:
: 5.6 - 10.4 N·m (0.57 - 1.06 kg-m, 49.5 - 92.0 in-lb)
PKIA0465E
Page 3992 of 4555
SC-32
STARTING SYSTEM
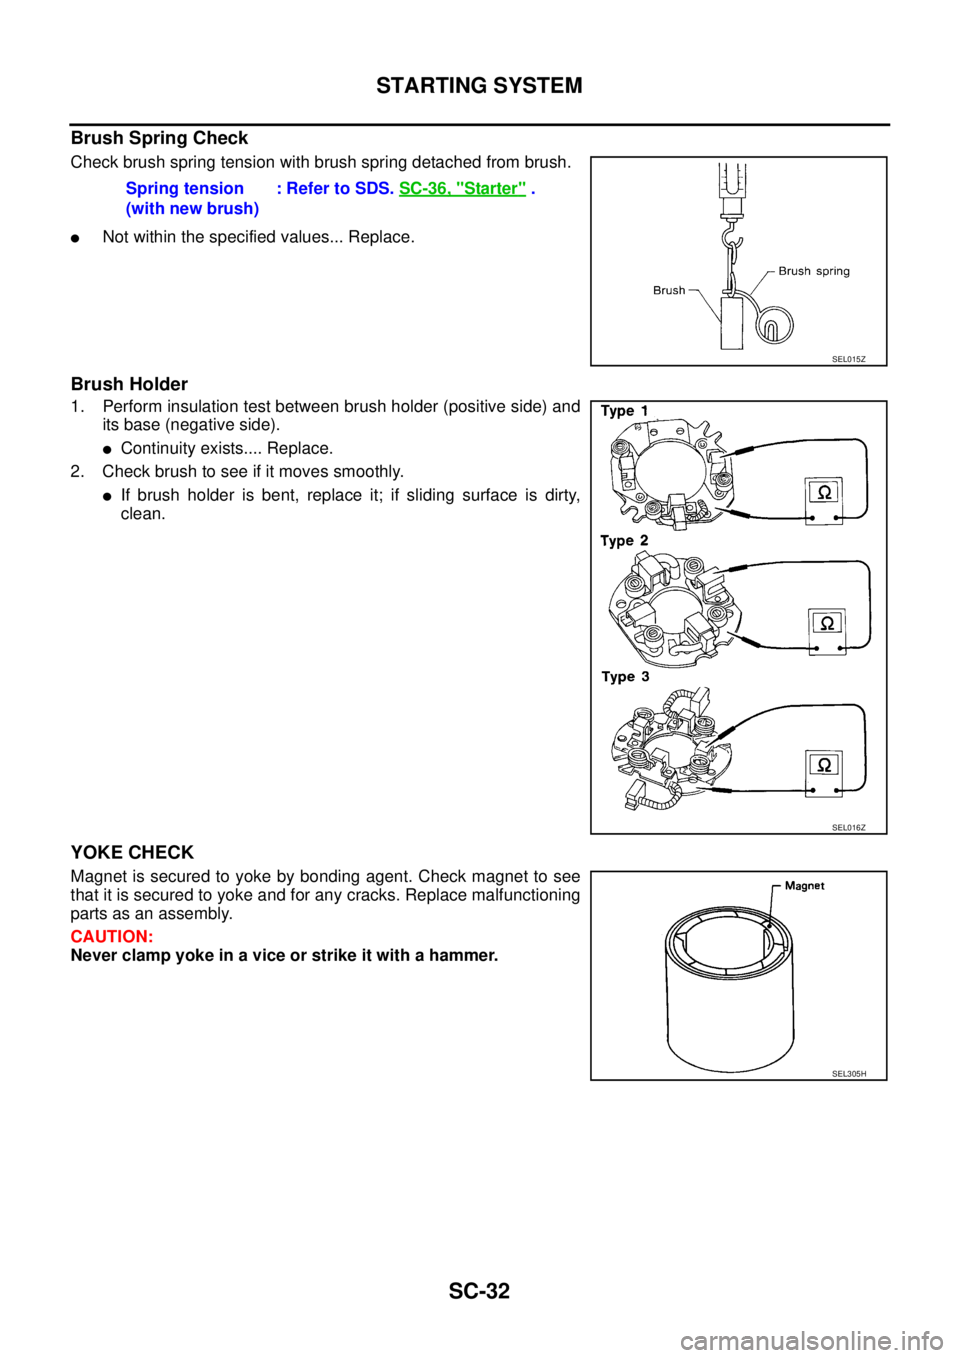
Brush Spring Check
Check brush spring tension with brush spring detached from brush.
�Not within the specified values... Replace.
Brush Holder
1. Perform insulation test between brush holder (positive side) and
its base (negative side).
�Continuity exists.... Replace.
2. Check brush to see if it moves smoothly.
�If brush holder is bent, replace it; if sliding surface is dirty,
clean.
YOKE CHECK
Magnet is secured to yoke by bonding agent. Check magnet to see
that it is secured to yoke and for any cracks. Replace malfunctioning
parts as an assembly.
CAUTION:
Never clamp yoke in a vice or strike it with a hammer.Spring tension
(with new brush): Refer to SDS. SC-36, "
Starter" .
SEL015Z
SEL016Z
SEL305H
Page 3996 of 4555

SERVICE DATA AND SPECIFICATIONS (SDS)PFP:00030
BatteryEKS0031Q
StarterEKS0031R
AlternatorEKS0031S
Applied modelQR20, QR25 engine
YD22 engine
Except
for N")
SC-36
SERVICE DATA AND SPECIFICATIONS (SDS)
SERVICE DATA AND SPECIFICATIONS (SDS)PFP:00030
BatteryEKS0031Q
StarterEKS0031R
AlternatorEKS0031S
Applied modelQR20, QR25 engine
YD22 engine
Except
for Northern EuropeFor Northern
Europe
Type 55D23L 80D23L 110D26L
Capacity [V - AH] 12-48 12-52 12-64
Applied modelQR20, QR25 engine
YD22 engine
A/T M/T
Ty p eS114-844 M0T87081 M8T71471
HITACHI make MITSUBISHI make
Reduction
System voltage [V] 12
No-loadTerminal voltage [V] 11.0
Current [A] Less than 90 Less than 90 Less than 145
Revolution [rpm] More than 2,700 More than 2,500 More than 3,300
Minimum diameter of commutator [mm (in)] 28.0 (1.102) 28.8 (1.134) 31.4 (1.236)
Minimum length of brush [mm (in)] 10.5 (0.413) 7.0 (0.276) 11.0 (0.433)
Brush spring tension [N (kg, lb)] 16.2 (1.65, 3.64)15.0 - 20.4
(1.5 - 2.1, 3.4 - 4.6)26.7 - 36.1
(2.7 - 3.7, 6.0 - 8.2)
Clearance between bearing metal and armature shaft [mm (in)] Less than 0.2 (0.008) —
Clearance “L” between pinion front edge and pinion
stopper[mm (in)] —0.5 - 2.0
(0.020 - 0.079)—
Movement “L” in height of pinion assembly [mm (in)]0.3 - 2.5
(0.012 - 0.098)—0.5 - 2.0
(0.020 - 0.079)
Applied model QR20, QR25 engine YD22 engine
Ty p eLR1110-713V A3TB0771
HITACHI make MITSUBISHI make
Nominal rating [V - A] 12-110 12-90
Ground polarityNegative
Minimum revolutions under no-load
(When 13.5 V is applied)[rpm] Less than 1,100 Less than 1,300
Hot output current (When 13.5 V is applied) [A/rpm](More than 35/1,300)
More than 70/1,800
More than 91/2,500
More than 110/5,000More than 29/1,300
More than 76/2,500
More than 88/5,000
Regulated output voltage [V] 14.1 - 14.7
Minimum length of brush [mm (in)] More than 6.0 (0.236) More than 5.0 (0.197)
Brush spring pressure [N (g, oz)]1.0 - 3.43
(102 - 350, 3.60 - 12.34)4.8 - 6.0
(490 - 610, 17.28 - 21.51)
Slip ring minimum diameter [mm (in)] More than 26.0 (1.024) More than 22.1 (0.870)
Rotor coil resistance at 20 °C (68 °F) [Ω] 2.16 - 2.46 2.1 - 2.5
Page 4016 of 4555

ADJUSTING
1. Set the distance between the screen and the center of driving lamp lens as shown in the figur")
LT-20
HEADLAMP - XENON TYPE -
ADJUSTMENT USING AN ADJUSTMENT SCREEN (LIGHT/DARK BORDERLINE)
ADJUSTING
1. Set the distance between the screen and the center of driving lamp lens as shown in the figure.
2. Turn headlamp switch high and driving lamp switch ON so that front driving lamps turn ON.
3. Adjust driving lamps using adjusting screws make sure of the following.
�When performing this adjustment, cover headlamps and the opposite driving lamp, if necessary.
�Vertical deflection of maximum illuminance point to be adjusted to stand at 218 mm (8.58 in) below driv-
ing lamp height (h).
�Horizontal deflection of maximum illuminance point to be adjusted to stand within 0 ± 125 mm (0 ± 4.92
in) against line (V) on screen where a line passing through driving lamp center, parallel to vehicle center
line, cross screen.
Bulb Replacement of Headlamp and Clearance LampEKS00N51
HEADLAMP (UPPER SIDE), FOR LOW BEAM
1. Turn lighting switch OFF.
2. Disconnect the battery cable from the negative terminal or
remove power fuse.
3. Disconnect headlamp connector.
4. Remove air cleaner duct (when replacing LH bulb). Refer to EM-
16, "AIR CLEANER AND AIR DUCT" (QR), EM-142, "AIR
CLEANER AND AIR DUCT" (YD22) in “ENGINE MECHANICAL
(EM)” section.
5. Turn plastic cap counterclockwise and unlock it.
6. Turn bulb socket counterclockwise and unlock it.
7. Unlock retaining spring and remove bulb from headlamp.
8. Installation is the reverse order of removal.
PKIC0980E
Headlamp (Upper side), For Low Beam : 12V - 35W (D2R)
SKIA1465E