Page 307 of 498
305 Operation
At the gas station
�At the gas station
Refueling
The fuel filler flap is located on the
right-hand side of the vehicle towards the
rear. Locking/unlocking the vehicle with
the SmartKey or the SmartKey with
KEYLESS-GO* automatically locks/un-
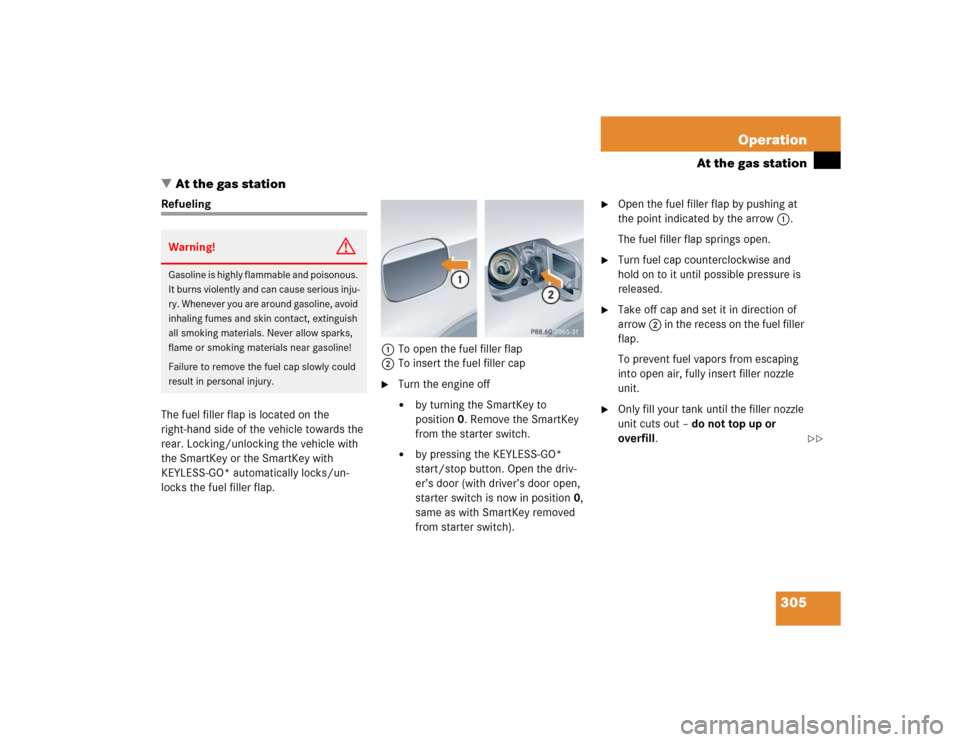
locks the fuel filler flap.1To open the fuel filler flap
2To insert the fuel filler cap
�
Turn the engine off�
by turning the SmartKey to
position0. Remove the SmartKey
from the starter switch.
�
by pressing the KEYLESS-GO*
start/stop button. Open the driv-
er’s door (with driver’s door open,
starter switch is now in position0,
same as with SmartKey removed
from starter switch).
�
Open the fuel filler flap by pushing at
the point indicated by the arrow 1.
The fuel filler flap springs open.
�
Turn fuel cap counterclockwise and
hold on to it until possible pressure is
released.
�
Take off cap and set it in direction of
arrow 2 in the recess on the fuel filler
flap.
To prevent fuel vapors from escaping
into open air, fully insert filler nozzle
unit.
�
Only fill your tank until the filler nozzle
unit cuts out – do not top up or
overfill.
Warning!
G
Gasoline is highly flammable and poisonous.
It burns violently and can cause serious inju-
ry. Whenever you are around gasoline, avoid
inhaling fumes and skin contact, extinguish
all smoking materials. Never allow sparks,
flame or smoking materials near gasoline!
Failure to remove the fuel cap slowly could
result in personal injury.
��
Page 308 of 498
306 OperationAt the gas station�
Replace fuel cap by turning it
clockwise.
You will hear when the fuel cap is
tightened.
�
Close fuel filler flap.Warning!
G
Overfilling of the fuel tank may create
pressure in the system which could cause a
gas discharge. This could cause the gas to
spray back out when removing the fuel
pump nozzle, which could cause personal
injury.
iOnly use premium unleaded gasoline
with a minimum Posted Octane Rating
of 91 (average of 96 RON / 86 MON).
Information on gasoline quality can
normally be found on the fuel pump.
For more information on gasoline, see
“Premium unleaded gasoline”
(�page 450) or the Factory Approved
Service Products pamphlet.
iLeaving the engine running and the fuel
cap open can cause theú malfunc-
tion indicator lamp (USA only) or
the± malfunction indicator lamp
(Canada only) to illuminate.
More information can be found in the
“Practical hints” section (
�page 356).
��
Page 310 of 498
308 OperationEngine compartmentHood
Opening
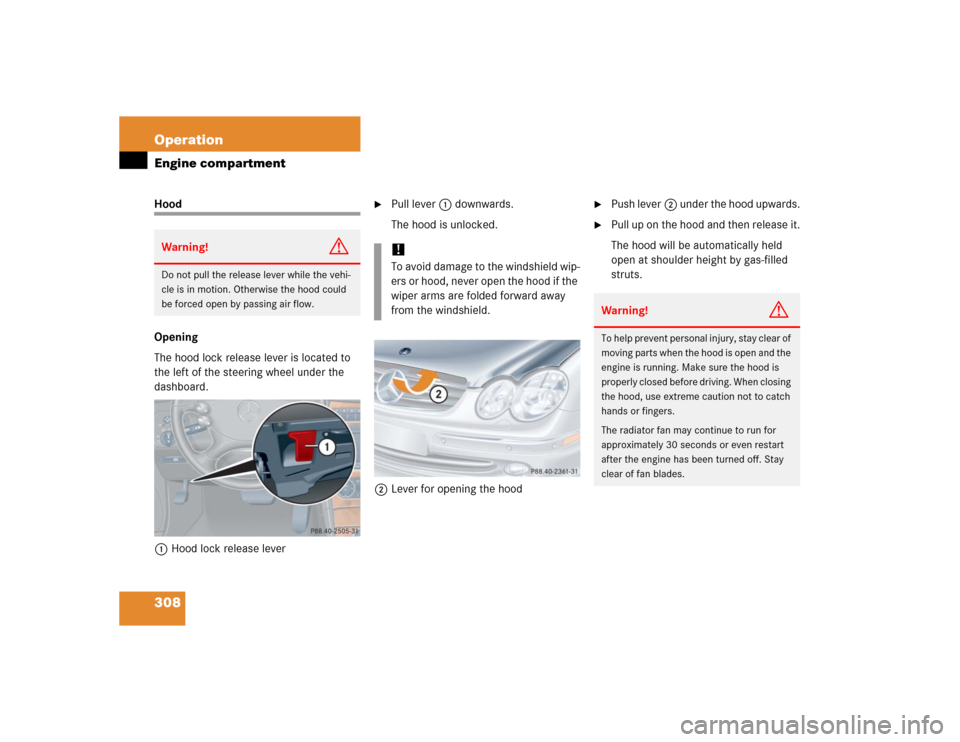
The hood lock release lever is located to
the left of the steering wheel under the
dashboard.
1Hood lock release lever
�
Pull lever 1 downwards.
The hood is unlocked.
2Lever for opening the hood
�
Push lever2 under the hood upwards.
�
Pull up on the hood and then release it.
The hood will be automatically held
open at shoulder height by gas-filled
struts.
Warning!
G
Do not pull the release lever while the vehi-
cle is in motion. Otherwise the hood could
be forced open by passing air flow.
!To avoid damage to the windshield wip-
ers or hood, never open the hood if the
wiper arms are folded forward away
from the windshield.
Warning!
G
To help prevent personal injury, stay clear of
moving parts when the hood is open and the
engine is running. Make sure the hood is
properly closed before driving. When closing
the hood, use extreme caution not to catch
hands or fingers.
The radiator fan may continue to run for
approximately 30 seconds or even restart
after the engine has been turned off. Stay
clear of fan blades.
Page 311 of 498
309 Operation
Engine compartment
Closing�
Let the hood drop from a height of
approximately 1 ft (30 cm).
The hood will lock audibly.
�
Check to make sure the hood is fully
closed.
If you can raise the hood at a point
above the headlamps, then it is not
properly closed. Open it again and let it
drop with somewhat greater force.
Engine oil
The amount of oil your engine needs will
depend on a number of factors, including
driving style. Higher oil consumption can
occur when�
the vehicle is new
�
the vehicle is driven frequently at
higher engine speeds
Engine oil consumption checks should only
be made after the vehicle break-in period.
Warning!
G
If you see flames or smoke coming from the
engine compartment, or if the coolant tem-
perature gauge indicates that the engine is
overheated, do not open the hood. Move
away from vehicle and do not open the hood
until the engine has cooled. If necessary,
call the fire department.Warning!
G
The engine is equipped with a transistorized
ignition system. Because of the high voltage
it is dangerous to touch any components
(ignition coils, spark plug sockets, diagnos-
tic socket) of the ignition system�
with the engine running
�
while starting the engine
�
if ignition is “on” and the engine is
turned manually
Warning!
G
Be careful that you do not close the hood on
anyone.
iDo not use any special lubricant addi-
tives, as these may damage the drive
assemblies. Using special additives not
approved by Mercedes-Benz may
cause damage not covered by the
Mercedes-Benz Limited Warranty.
More information on this subject is
available at any Mercedes-Benz
Center.
Page 345 of 498
343 Operation
Winter driving
Block heater (Canada only)
The engine is equipped with a block
heater.
The electrical cable may be installed at an
authorized Mercedes-Benz Center.
Snow chains
Snow chains should only be driven on
snow-covered roads at speeds not to
exceed 30 mph (50 km/h). Remove chains
as soon as possible when driving on roads
without snow.
Please observe the following guidelines
when using snow chains:�
Use of snow chains is not permissible
with all wheel/tire combinations.
�
Snow chains should only be used on
the rear wheels. Follow the manufac-
turer’s mounting instructions.
�
Only use snow chains that are
approved by Mercedes-Benz. Your
authorized Mercedes-Benz Center will
be glad to advise you on this subject.
�
Use of snow chains may be prohibited
depending on location. Always check
local and state laws before installing
snow chains.
iWhen driving with snow chains, you
may wish to deactivate the ESP
(�page 87) before setting the vehicle
in motion. This will improve the
vehicle’s traction.
!Use of snow chains is not permissible
with tire sizes:�
225/50 R16 92H
�
245/40 R17 91W
�
245/40 R17 91Y
�
255/35 R18 94Y
�
T 125/90 R 16 98M
�
T 125/80 R17 99M
Page 350 of 498
348 OperationVehicle careWe have selected car-care products and
compiled recommendations which are
specially matched to our vehicles and
which always reflect the latest technology.
You can obtain Mercedes-Benz approved
car-care products at an authorized
Mercedes-Benz Center.
Scratches, corrosive deposits, corrosion or
damage due to negligent or incorrect care
cannot always be removed or repaired with
the car-care products recommended here.
In such cases it is best to seek aid at an
authorized Mercedes-Benz Center.
The following topics deal with the cleaning
and care of your vehicle and give important
“how-to” information as well as references
to Mercedes-Benz approved car-care
products.Power washer
When using a power washer for cleaning
the vehicle, always observe the manufac-
turer’s operating instructions.Tar stains
Quickly remove tar stains before they dry
and become more difficult to remove. A tar
remover is recommended.
Paintwork, painted body components
Mercedes-Benz approved Paint Care
should be applied when water drops on the
paint surface do not “bead up”, normally
every three to five months, depending on
climate and washing detergent used.
Mercedes-Benz approved Paint Cleaner
should be applied if the paint surface
shows signs of embedded dirt (i.e. loss of
gloss).
Do not apply any of these products or wax
if your vehicle is parked in the sun or if the
hood is still hot.
Use the appropriate MB-Touch-Up Stick
for quick and provisional repairs of minor
paint damage (i.e. chips from stones, vehi-
cle doors, etc.).
iVehicles with KEYLESS-GO*:
If a door handle is hit by a strong jet of
water, and a SmartKey with
KEYLESS-GO* is in close proximity, i.e.
within approximately 3 ft
(approximately 1 m), the vehicle could
be inadvertently locked or unlocked. !Never use a round nozzle to
power-wash tires. The intense jet of
water can result in damage to the tire.
Always replace a damaged tire.
Always keep the jet of water moving
across the surface. Do not aim directly
at electrical parts, electrical connec-
tors, seals, or other rubber parts.
Page 351 of 498

349 Operation
Vehicle care
Engine cleaning
Prior to cleaning the engine compartment,
make sure to protect electrical compo-
nents and connectors from the intrusion of
water and cleaning agents.
Corrosion protection, such as MB Anticor-
rosion Wax, should be applied to the
engine compartment after every engine
cleaning. Before applying, all control
linkage bushings and joints should be
lubricated. The poly-V-belt and all pulleys
should be protected from any wax. Vehicle washing
Do not use hot water or wash your vehicle
in direct sunlight. Only use a mild car wash
detergent, such as Mercedes-Benz
approved Car Shampoo.
Thoroughly spray the vehicle with a dif-
fused jet of water. Direct only a very weak
spray towards the ventilation intake. Use
plenty of water and rinse the sponge and
chamois frequently.
Rinse with clear water and thoroughly dry
with a chamois. Do not allow cleaning
agents to dry on the finish.
Due to the width of the vehicle, fold in
exterior rear view mirrors prior to running
the vehicle through an automatic car wash
to prevent damage to the mirrors.
In the winter, thoroughly remove all traces
of road salt as soon as possible.
When washing the underbody, do not
forget to clean the inner sides of the
wheels.Ornamental moldings
For regular cleaning and care of very dirty
chrome-plated parts, use a chrome
cleaner.
Headlamps, tail lamps, side markers,
turn signal lenses
Use a mild car wash detergent, such as
Mercedes-Benz approved Car Shampoo,
with plenty of water.
To prevent scratches, never apply strong
force and only use a soft, non-scratchy
cloth when cleaning the lenses. Do not
attempt to wipe dirty lenses with a dry
cloth or sponge.
iVehicles with KEYLESS-GO*:
If a door handle is hit by a strong jet of
water, and a SmartKey with
KEYLESS-GO* is in close proximity, i.e.
within approximately 3 ft
(approximately 1 m), the vehicle could
be inadvertently locked or unlocked.
Page 355 of 498
353 Practical hints
What to do if …?
Where will I find...?
Unlocking/locking in an emergency
Opening/closing in an emergency
Replacing bulbs
Replacing wiper blades
Flat tire
Battery
Jump starting
Towing the vehicle
Fuses