Page 356 of 498
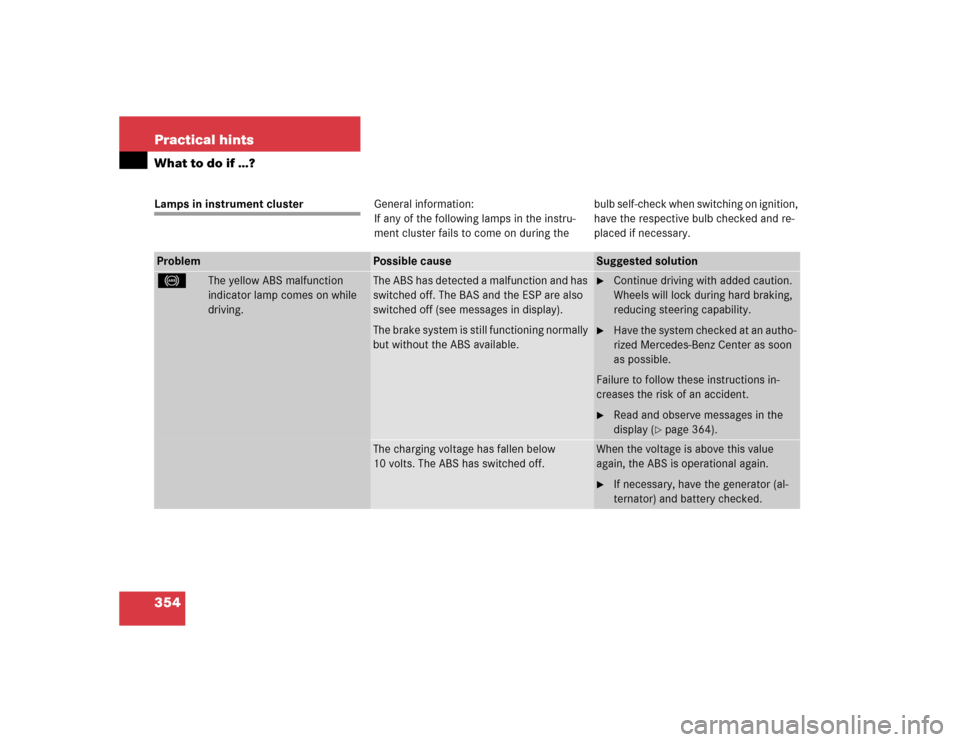
354 Practical hintsWhat to do if …?Lamps in instrument clusterGeneral information:
If any of the following lamps in the instru-
ment cluster fails to come on during thebulb self-check when switching on ignition,
have the respective bulb checked and re-
placed if necessary.Problem
Possible cause
Suggested solution
-
The yellow ABS malfunction
indicator lamp comes on while
driving.
The ABS has detected a malfunction and has
switched off. The BAS and the ESP are also
switched off (see messages in display).
The brake system is still functioning normally
but without the ABS available.
�
Continue driving with added caution.
Wheels will lock during hard braking,
reducing steering capability.
�
Have the system checked at an autho-
rized Mercedes-Benz Center as soon
as possible.
Failure to follow these instructions in-
creases the risk of an accident.
�
Read and observe messages in the
display (
�page 364).
The charging voltage has fallen below
10 volts. The ABS has switched off.
When the voltage is above this value
again, the ABS is operational again.�
If necessary, have the generator (al-
ternator) and battery checked.
Page 366 of 498
364 Practical hintsWhat to do if …?Text messagesDisplay
Display message
Possible cause
Possible solution
ABS
malfunction
Visit workshop
The ABS has detected a malfunction and
has switched off. The ESP and the BAS are
also deactivated.
The brake system is still functioning nor-
mally but without the ABS available.
�
Continue driving with added caution.
Wheels will lock during hard braking,
reducing steering capability.
�
Have the system checked at an autho-
rized Mercedes-Benz Center as soon
as possible.
Failure to follow these instructions in-
creases the risk of an accident.
Display defective
Visit workshop!
The ABS or the ABS display is malfunc-
tioning.
�
Continue driving with added caution.
Wheels will lock during hard braking,
reducing steering capability.
�
Have the system checked at an autho-
rized Mercedes-Benz Center as soon
as possible.
Failure to follow these instructions in-
creases the risk of an accident.
Page 367 of 498
365 Practical hints
What to do if …?
Display
Display message
Possible cause
Possible solution
ABS
Anti-lock
braking system
not working!
The charging voltage has fallen below
10 volts and the ABS has switched off.
The brake system is still functioning nor-
mally but without the ABS available.
�
When the voltage is above this value
again, the ABS is operational again.
�
Continue driving with added caution.
Wheels will lock during hard braking,
reducing steering capability.
�
Have the system checked at an autho-
rized Mercedes-Benz Center as soon
as possible.
Failure to follow these instructions in-
creases the risk of an accident.
Page 383 of 498
381 Practical hints
What to do if …?
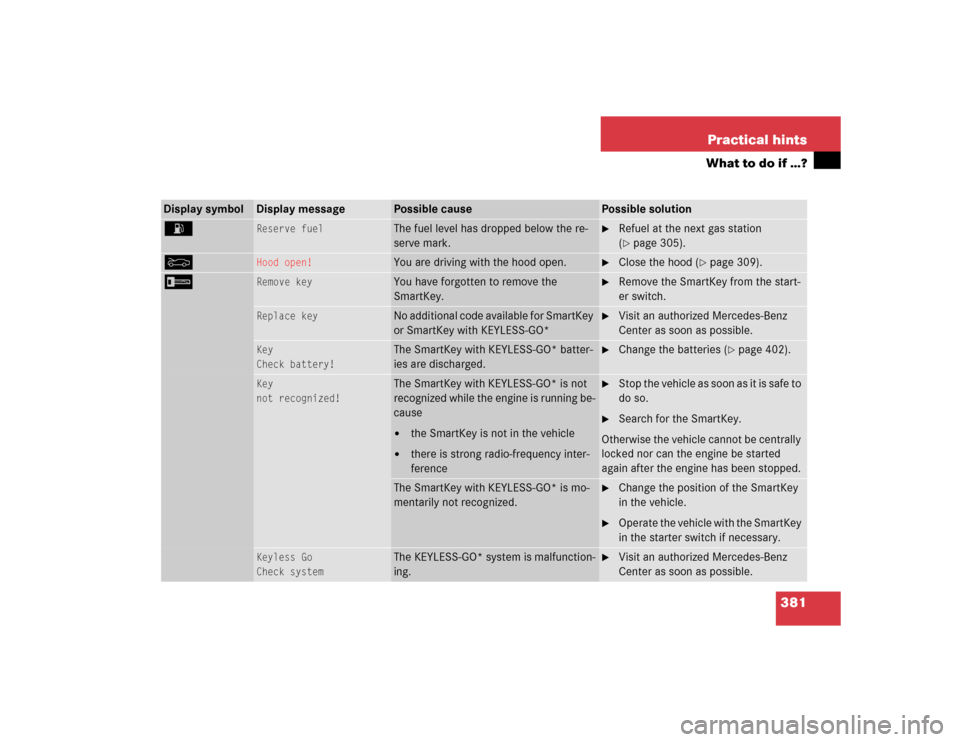
Display symbol
Display message
Possible cause
Possible solution
A
Reserve fuel
The fuel level has dropped below the re-
serve mark.
�
Refuel at the next gas station
(�page 305).
Y
Hood open!
You are driving with the hood open.
�
Close the hood (
�page 309).
I
Remove key
You have forgotten to remove the
SmartKey.
�
Remove the SmartKey from the start-
er switch.
Replace key
No additional code available for SmartKey
or SmartKey with KEYLESS-GO*
�
Visit an authorized Mercedes-Benz
Center as soon as possible.
Key
Check battery!
The SmartKey with KEYLESS-GO* batter-
ies are discharged.
�
Change the batteries (
�page 402).
Key
not recognized!
The SmartKey with KEYLESS-GO* is not
recognized while the engine is running be-
cause�
the SmartKey is not in the vehicle
�
there is strong radio-frequency inter-
ference
�
Stop the vehicle as soon as it is safe to
do so.
�
Search for the SmartKey.
Otherwise the vehicle cannot be centrally
locked nor can the engine be started
again after the engine has been stopped.
The SmartKey with KEYLESS-GO* is mo-
mentarily not recognized.
�
Change the position of the SmartKey
in the vehicle.
�
Operate the vehicle with the SmartKey
in the starter switch if necessary.
Keyless Go
Check system
The KEYLESS-GO* system is malfunction-
ing.
�
Visit an authorized Mercedes-Benz
Center as soon as possible.
Page 384 of 498
382 Practical hintsWhat to do if …?Display symbol
Display message
Possible cause
Possible solution
I
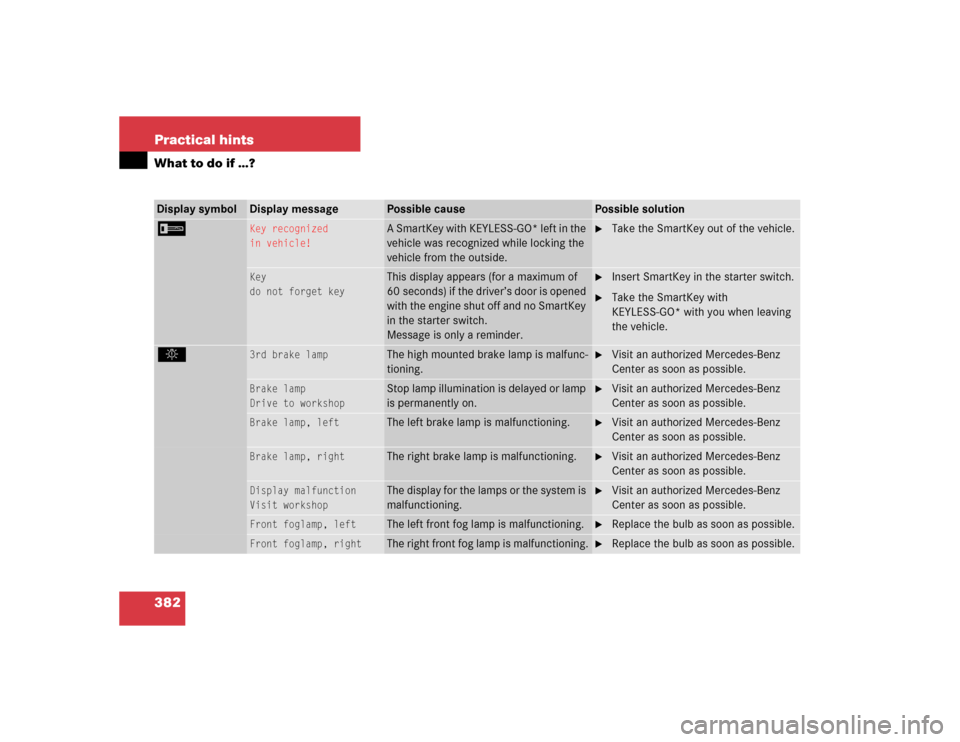
Key recognized
in vehicle!
A SmartKey with KEYLESS-GO* left in the
vehicle was recognized while locking the
vehicle from the outside.
�
Take the SmartKey out of the vehicle.
Key
do not forget key
This display appears (for a maximum of
60 seconds) if the driver’s door is opened
with the engine shut off and no SmartKey
in the starter switch.
Message is only a reminder.
�
Insert SmartKey in the starter switch.
�
Take the SmartKey with
KEYLESS-GO* with you when leaving
the vehicle.
.
3rd brake lamp
The high mounted brake lamp is malfunc-
tioning.
�
Visit an authorized Mercedes-Benz
Center as soon as possible.
Brake lamp
Drive to workshop
Stop lamp illumination is delayed or lamp
is permanently on.
�
Visit an authorized Mercedes-Benz
Center as soon as possible.
Brake lamp, left
The left brake lamp is malfunctioning.
�
Visit an authorized Mercedes-Benz
Center as soon as possible.
Brake lamp, right
The right brake lamp is malfunctioning.
�
Visit an authorized Mercedes-Benz
Center as soon as possible.
Display malfunction
Visit workshop
The display for the lamps or the system is
malfunctioning.
�
Visit an authorized Mercedes-Benz
Center as soon as possible.
Front foglamp, left
The left front fog lamp is malfunctioning.
�
Replace the bulb as soon as possible.
Front foglamp, right
The right front fog lamp is malfunctioning.
�
Replace the bulb as soon as possible.
Page 391 of 498
389 Practical hints
Where will I find...?
�Where will I find...?
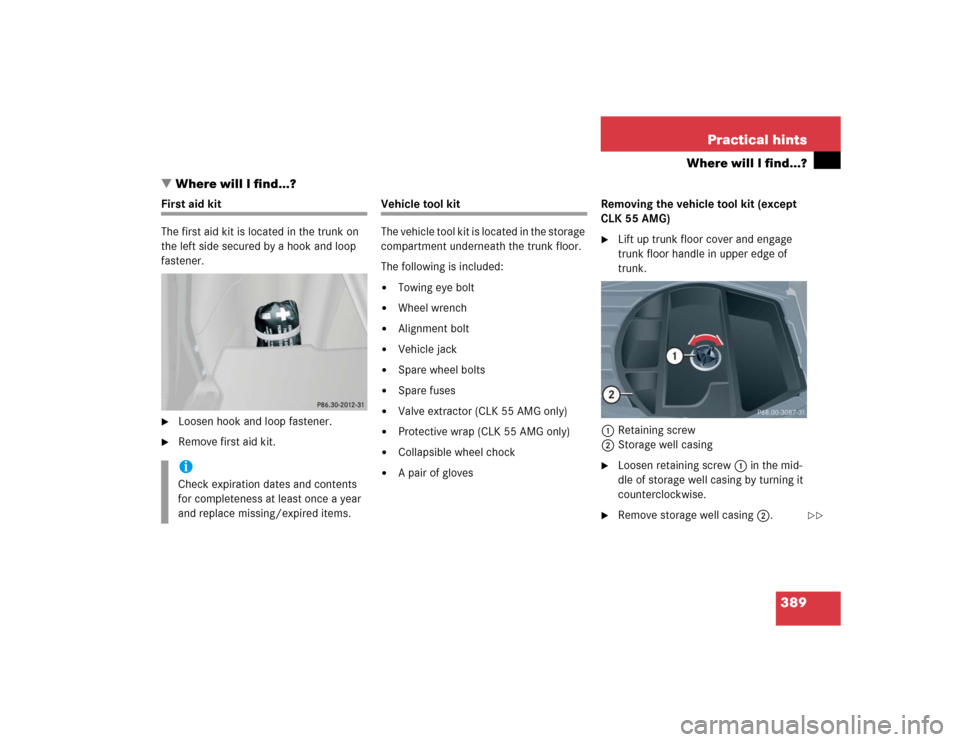
First aid kit
The first aid kit is located in the trunk on
the left side secured by a hook and loop
fastener.�
Loosen hook and loop fastener.
�
Remove first aid kit.
Vehicle tool kit
The vehicle tool kit is located in the storage
compartment underneath the trunk floor.
The following is included:�
Towing eye bolt
�
Wheel wrench
�
Alignment bolt
�
Vehicle jack
�
Spare wheel bolts
�
Spare fuses
�
Valve extractor (CLK 55 AMG only)
�
Protective wrap (CLK 55 AMG only)
�
Collapsible wheel chock
�
A pair of gloves Removing the vehicle tool kit (except
CLK 55 AMG)
�
Lift up trunk floor cover and engage
trunk floor handle in upper edge of
trunk.
1Retaining screw
2Storage well casing
�
Loosen retaining screw1 in the mid-
dle of storage well casing by turning it
counterclockwise.
�
Remove storage well casing2.
iCheck expiration dates and contents
for completeness at least once a year
and replace missing/expired items.
��
Page 392 of 498
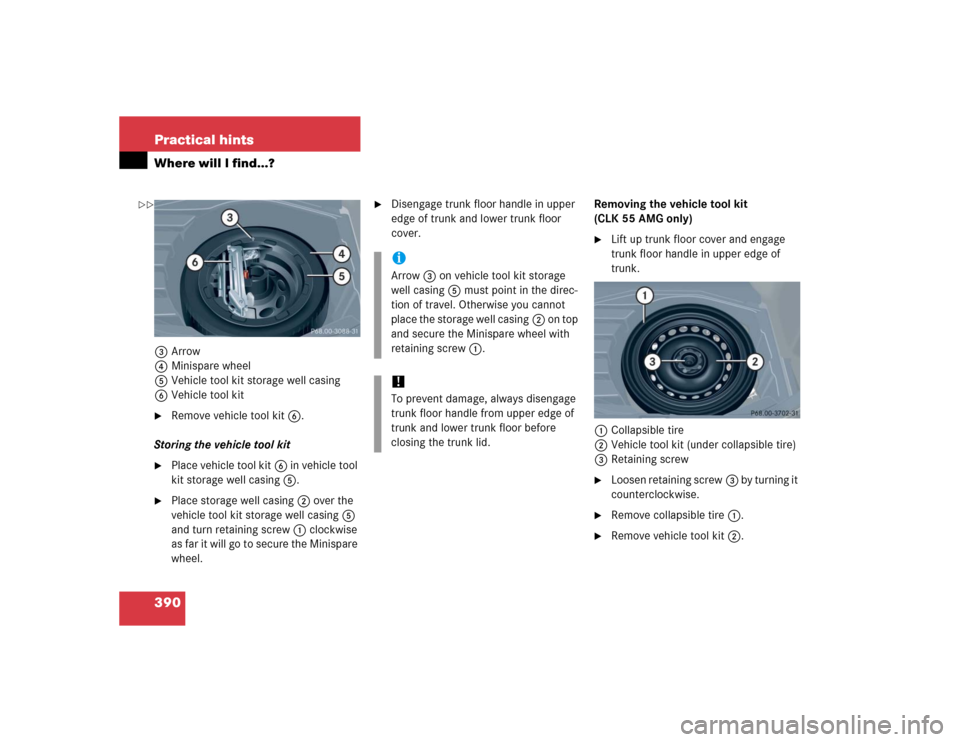
390 Practical hintsWhere will I find...?3Arrow
4Minispare wheel
5Vehicle tool kit storage well casing
6Vehicle tool kit�
Remove vehicle tool kit6.
Storing the vehicle tool kit
�
Place vehicle tool kit6 in vehicle tool
kit storage well casing5.
�
Place storage well casing2 over the
vehicle tool kit storage well casing5
and turn retaining screw1 clockwise
as far it will go to secure the Minispare
wheel.
�
Disengage trunk floor handle in upper
edge of trunk and lower trunk floor
cover.Removing the vehicle tool kit
(CLK 55 AMG only)
�
Lift up trunk floor cover and engage
trunk floor handle in upper edge of
trunk.
1Collapsible tire
2Vehicle tool kit (under collapsible tire)
3Retaining screw
�
Loosen retaining screw3 by turning it
counterclockwise.
�
Remove collapsible tire1.
�
Remove vehicle tool kit2.
iArrow3 on vehicle tool kit storage
well casing5 must point in the direc-
tion of travel. Otherwise you cannot
place the storage well casing2 on top
and secure the Minispare wheel with
retaining screw1.!To prevent damage, always disengage
trunk floor handle from upper edge of
trunk and lower trunk floor before
closing the trunk lid.
��
Page 393 of 498
391 Practical hints
Where will I find...?
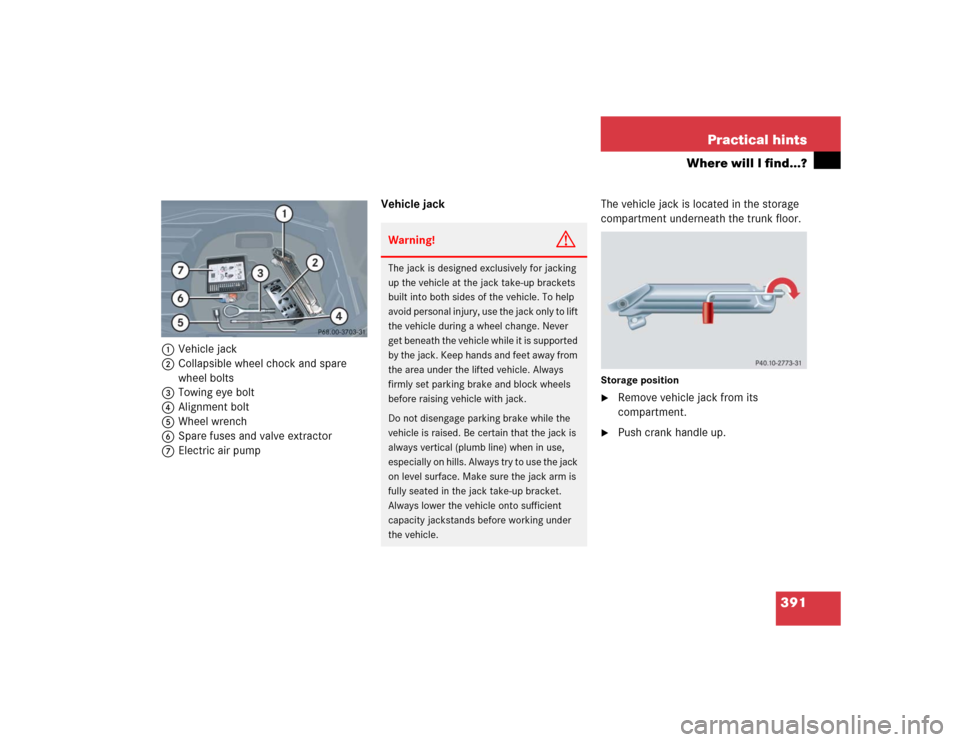
1Vehicle jack
2Collapsible wheel chock and spare
wheel bolts
3Towing eye bolt
4Alignment bolt
5Wheel wrench
6Spare fuses and valve extractor
7Electric air pumpVehicle jackThe vehicle jack is located in the storage
compartment underneath the trunk floor.
Storage position�
Remove vehicle jack from its
compartment.
�
Push crank handle up.
Warning!
G
The jack is designed exclusively for jacking
up the vehicle at the jack take-up brackets
built into both sides of the vehicle. To help
avoid personal injury, use the jack only to lift
the vehicle during a wheel change. Never
get beneath the vehicle while it is supported
by the jack. Keep hands and feet away from
the area under the lifted vehicle. Always
firmly set parking brake and block wheels
before raising vehicle with jack.
Do not disengage parking brake while the
vehicle is raised. Be certain that the jack is
always vertical (plumb line) when in use,
especially on hills. Always try to use the jack
on level surface. Make sure the jack arm is
fully seated in the jack take-up bracket.
Always lower the vehicle onto sufficient
capacity jackstands before working under
the vehicle.