Page 25 of 498
23 At a glance
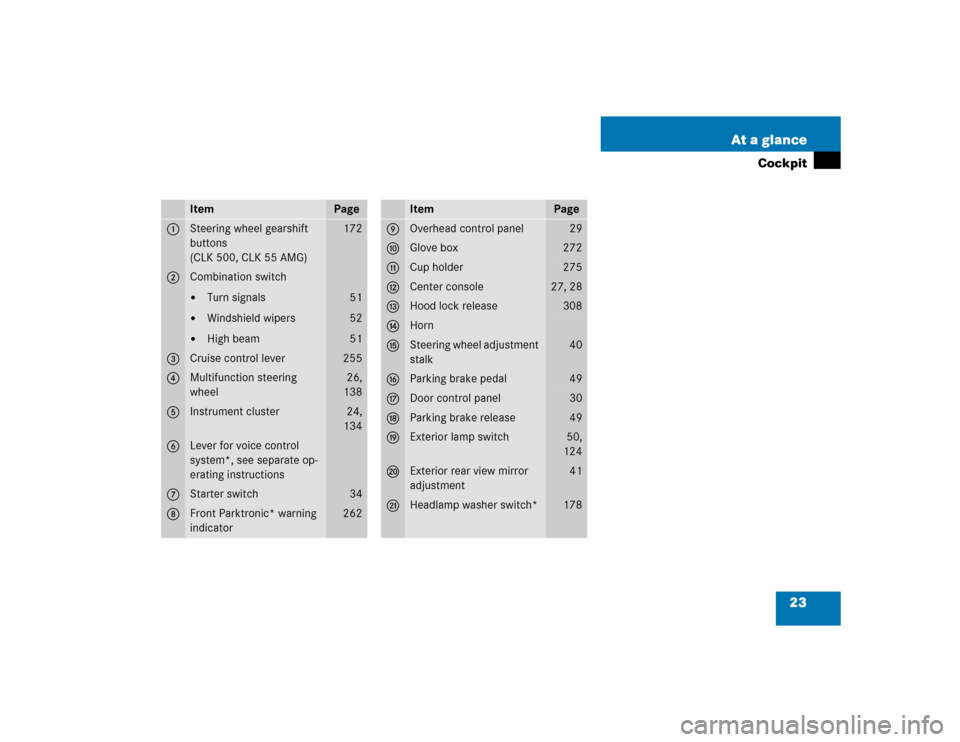
Cockpit
Item
Page
1
Steering wheel gearshift
buttons
(CLK 500, CLK 55 AMG)
172
2
Combination switch�
Turn signals
�
Windshield wipers
�
High beam
51
52
51
3
Cruise control lever
255
4
Multifunction steering
wheel
26,
138
5
Instrument cluster
24,
134
6
Lever for voice control
system*, see separate op-
erating instructions
7
Starter switch
34
8
Front Parktronic* warning
indicator
262
Item
Page
9
Overhead control panel
29
a
Glove box
272
b
Cup holder
275
c
Center console
27, 28
d
Hood lock release
308
e
Horn
f
Steering wheel adjustment
stalk
40
g
Parking brake pedal
49
h
Door control panel
30
j
Parking brake release
49
k
Exterior lamp switch
50,
124
l
Exterior rear view mirror
adjustment
41
m
Headlamp washer switch*
178
Page 28 of 498
26 At a glanceMultifunction steering wheel
Item
Page
1
Multifunction display
137
Operating control
system
138
2
Selecting the submenu or
setting the volume:
Press buttonæup / to increaseçdown / to decrease
3
Telephone*:
Press buttonsto take a call
to dial a call
163
163
tto end a call
to reject an incom-
ing call
163
Item
Page
4
Menu systems:
Press buttonèfor next menuÿfor previous menu
5
Moving within a menu:
Press buttonjfor next displaykfor previous display
Page 44 of 498

42 Getting startedAdjustingThe buttons are located above the exterior
lamp switch.
1Adjustment button
2Passenger-side exterior rear view
mirror button
3Driver’s side exterior rear view mirror
button
�
Switch on ignition (
�page 34).
�
Press button3 for the driver’s side
exterior rear view mirror or button2
for the passenger-side exterior rear
view mirror.
�
Push adjustment button1 up, down,
left, or right, according to the desired
setting.
For more information, see “Rear view mir-
rors” (
�page 178).
!If an exterior rear view mirror was
forcibly pushed forward (hit from the
rear) or forcibly pushed rearward (hit
from the front), reposition it by
applying firm pressure until it snaps
into place. The mirror housing is now
properly positioned and you can adjust
the mirror normally.
iThe memory function (
�page 121) lets
you store the setting for the exterior
rear view mirrors together with the set-
tings for the steering wheel and seat
position.
iAt low ambient temperatures, the
exterior rear view mirrors will be
heated automatically.
Page 98 of 498

96 Controls in detailLocking and unlockingFactory setting
Global unlocking�
Press buttonŒ.
All turn signal lamps flash once. The
locking knobs in the doors move up.
The anti-theft alarm system is
disarmed
The vehicle will lock again automatically
and reactivate the anti-theft alarm system
within approximately 40 seconds of
unlocking if:
�
neither door nor trunk is opened
�
the SmartKey is not inserted in the
starter switch
�
the central locking switch is not
activatedGlobal locking
�
Press button‹.
All turn signal lamps flash three times.
The locking knobs in the doors move
down. The anti-theft alarm system is
armed.
Selective setting
If you frequently travel alone, you may wish
to reprogram the SmartKey so that
pressingŒ only unlocks the driver’s
door and the fuel filler flap.
�
Press and hold buttonsŒ and‹
simultaneously for about five seconds
until battery check lamp5 flashes
twice.The SmartKey will then function as follows:
Unlocking driver’s door and fuel filler
flap
�
Press buttonΠonce.
All turn signal lamps flash once. The
locking knob in the driver’s door moves
up. The anti-theft alarm system is
disarmed
Global unlocking
�
Press buttonΠtwice.
All turn signal lamps flash once. The
locking knobs in the doors move up.
The anti-theft alarm system is
disarmed
Page 99 of 498

97 Controls in detail
Locking and unlocking
Global locking�
Press button‹.
All turn signal lamps flash three times.
The locking knobs in the doors move
down. The anti-theft alarm system is
armed.
Restoring to factory setting
�
Press and hold buttonsŒ and‹
simultaneously for about six seconds
until battery check lamp5 flashes
twice.Checking the batteries
�
Press button‹ orŒ.
Battery check lamp5 comes on
briefly to indicate that the SmartKey
batteries are in order.
!If you can no longer lock or unlock the
vehicle with the SmartKey, then the
batteries in the SmartKey are dis-
charged, the SmartKey is malfunction-
ing or the vehicle battery is drained.�
Check the batteries in the
SmartKey (
�page 97) and replace
them if necessary (
�page 402).
�
Use the mechanical key to unlock
the driver’s door (
�page 397) and
the trunk (
�page 398).
�
Have the vehicle battery and the
battery connections checked
(�page 420).
�
Use the mechanical key to lock the
driver’s door (
�page 398).
If the SmartKey is malfunctioning,
contact an authorized Mercedes-Benz
Center.
iIf battery check lamp5 does not
come on briefly during check, then the
SmartKey batteries are discharged.
Replace the batteries (
�page 402).
You can obtain the required batteries
at any authorized Mercedes-Benz
Center.
iIf the batteries are checked within
signal range of the vehicle, pressing
the‹ orŒ button will lock or
unlock the vehicle accordingly.
Page 101 of 498

99 Controls in detail
Locking and unlocking
SmartKey with KEYLESS-GO*
Vehicles equipped with KEYLESS-GO come
with two SmartKeys with KEYLESS-GO,
each with remote control and a removable
mechanical key. The locking tabs for the
mechanical key portion of the two
SmartKeys are a different color to help dis-
tinguish each SmartKey unit.
The KEYLESS-GO function is integrated
into the SmartKey. On these vehicles, the
validity of the SmartKey with KEYLESS-GO
is checked every time you pull a door
handle.
If the SmartKey with KEYLESS-GO is valid,
your vehicle unlocks�
the doors
�
the trunk lid
�
the fuel filler flap
SmartKey with remote controls1‹ Lock button
2Š Opening button for trunk lid
3Mechanical key locking tab
4ΠUnlock button
5Battery check lamp
6Â Panic button (
�page 83)
For more information on using the
SmartKey buttons, see “SmartKey”
(
�page 94) iWhen the passenger outside door han-
dle is pulled, the vehicle is centrally un-
locked.
Warning!
G
When leaving the vehicle, always take the
SmartKey with KEYLESS-GO* with you, and
lock the vehicle. Do not leave children unat-
tended in the vehicle, or with access to an
unlocked vehicle. Unsupervised use of vehi-
cle equipment may cause an accident
and/or serious personal injury.!To prevent possible malfunction, avoid
exposing the SmartKey with
KEYLESS-GO to high levels of electro-
magnetic radiation.iYou can also open and close the power
windows (
�page 249) and power
tilt/sliding sunroof* (
�page 253) us-
ing the SmartKey.
Page 104 of 498

102 Controls in detailLocking and unlockingSelective setting
If you frequently travel alone, you may wish
to reprogram the SmartKey with
K E Y L E S S - G O s o w h e n y o u , p u l l t h e d r i v e r ’ s
door handle only the driver’s door and the
fuel filler flap unlocks.�
Press and hold buttonsŒ and‹
simultaneously for about five seconds
until battery check lamp5 flashes
twice.
The SmartKey with KEYLESS-GO will then
function as follows:
Unlocking driver’s door and fuel filler
flap
�
Pull the driver’s door handle.
All turn signal lamps flash once. The
locking knob in the driver’s door moves
up. The anti-theft alarm system is
disarmedGlobal unlocking
�
Pull the door handle on the passenger
side.
All turn signal lamps flash once. The
locking knobs in the doors move up.
The anti-theft alarm system is
disarmed
Global locking
�
Press lock button at door handle or
trunk lid.
All turn signal lamps flash three times.
The locking knobs in the doors move
down. The anti-theft alarm system is
armed.Restoring to factory setting
�
Press and hold buttonsŒ and‹
simultaneously for about six seconds
until battery check lamp5 flashes
twice.
iYou can also lock the vehicle using the
lock button at trunk lid (
�page 103).
!If you can no longer lock or unlock the
vehicle with the SmartKey with
KEYLESS-GO, then the batteries in the
SmartKey are discharged, the
SmartKey with KEYLESS-GO is mal-
functioning or the vehicle battery is
drained.�
Check the batteries in the
SmartKey (
�page 103) and re-
place them if necessary
(
�page 402).
�
Use the mechanical key to unlock
the driver’s door (
�page 397) and
the trunk (
�page 398).
Page 108 of 498
106 Controls in detailLocking and unlocking
Opening the trunk
Opening the trunk from outside
(vehicles without KEYLESS-GO*)
A minimum height clearance of 5.71 ft
(1.74 m) is required to open the trunk lid.
The handle is located in the rear license
plate recess.
1Handle
�
Pull on handle1.
The trunk lid unlocks and begins to
open.
The trunk can also be opened using
buttonŠ on the SmartKey or from its
inside in an emergency, see “Trunk lid
emergency release” (
�page 109).
iIf you open a door, the side windows on
that side of the vehicle will lower slight-
ly. The windows close again when you
close the door.
iThe vehicle must be unlocked.!The trunk lid swings open upwards au-
tomatically. Always make sure there is
sufficient overhead clearance.


A minimum height clearance of 5.71 ft
(1.74 m) is required to open the tr")