Page 788 of 969

(d)
A78525
1
2
A86248
1
2
3
Air Cleaner
CaseAir Cleaner
Inlet No. 1
(b)
(d)
(e)
(b)
- STARTING & CHARGINGSTARTER ASSY (3MZ-FE)
19-7
2339 Author�: Date�:
2005 LEXUS ES330 REPAIR MANUAL (")
A78528
(d)
(d)
A78525
1
2
A86248
1
2
3
Air Cleaner
CaseAir Cleaner
Inlet No. 1
(b)
(d)
(e)
(b)
- STARTING & CHARGINGSTARTER ASSY (3MZ-FE)
19-7
2339 Author�: Date�:
2005 LEXUS ES330 REPAIR MANUAL (RM1124U)
(d) Remove the 2 bolts, then remove the starter.
9. INSTALL STARTER ASSY
Torque:
37 NVm (380 kgfVcm, 26 ftVlbf) for bolt
9.8 NVm (100 kgfVcm, 7 ftVlbf) for nut
10. INSTALL AIR CLEANER INLET NO.1
Torque: 5.0 NVm (51 kgfVcm, 44 in.Vlbf)
11. INSTALL AIR CLEANER BRACKET
(a) Install the air cleaner bracket with the 2 bolts. Using sev-
eral steps, tighten the bolts uniformly in the sequence
shown in the illustration.
Torque: 7.5 NVm (76 kgfVcm, 66 in.Vlbf)
12. INSTALL AIR CLEANER ASSY
(a) Install the air cleaner case to the air cleaner inlet No. 1 as
shown in the illustration.
(b) Install the wire harness to the 2 wire harness clamps.
(c) Using several steps, tighten the 3 bolts uniformly in the
sequence shown in the illustration.
Torque: 5.0 NVm (51 kgfVcm, 44 in.Vlbf)
(d) Connect the vacuum hose.
(e) Connect the VSV connector.
(f) Install the air cleaner filter element.
(g) Install the air cleaner cap, then tighten the air cleaner
hose clamp bolt.
(h) Tighten the 2 air cleaner cap bolts.
Torque: 5.0 NVm (51 kgfVcm, 44 in.Vlbf)
(i) Connect the 4 vacuum hoses.
(j) Connect the mass air flow meter connector.
Page 789 of 969
19-8
- STARTING & CHARGINGSTARTER ASSY (3MZ-FE)
2340 Author�: Date�:
2005 LEXUS ES330 REPAIR MANUAL (RM1124U)
13. INSTALL BATTERY TRAY
14. INSTALL BATTERY
Torque:
9.0 NVm (92 kgfVcm, 79 in.Vlbf) for bolt
3.5 NVm (36 kgfVcm, 31 in.Vlbf) for nut
5.4 NVm (55 kgfVcm, 48 in.Vlbf) for terminal
15. INSTALL AIR CLEANER INLET ASSY
Torque: 5.0 NVm (55 kgfVcm, 44 in.Vlbf)
16. CHECK CONNECTION OF VACUUM HOSE (See page 14-29)
17. INSTALL RADIATOR SIDE DEFLECTOR RH
18. SYSTEM INITIALIZATION (See page 19-15)
Page 795 of 969
A79720
A79729
A79719
A79718
19-14
- STARTING & CHARGINGSTARTER ASSY (3MZ-FE)
2346 Author�: Date�:
2005 LEXUS ES330 REPAIR MANUAL (RM1124U)
(b) Install the starter field frame with the 2 through bolts.
Torque: 6.0 NVm (61 kgfVcm, 53 in.Vlbf)
17. INSTALL STARTER MAGNETIC SWITCH ASSY
(a) Apply grease to the plunger and hook.
(b) Hook the plunger hook of the starter magnetic switch on
the drive lever.
(c) Install the plunger and return spring.
(d) Install the starter magnetic switch with the 2 screws.
Torque: 7.5 NVm (76 kgfVcm, 66 in.Vlbf)
(e) Connect the lead wire to terminal C with the nut.
Torque: 10 NVm (102 kgfVcm, 7 ftVlbf)
Page 800 of 969
190SK-01
A87596N´m (kgf´cm, ft´lbf) : Specified torqueGenerator
Connector
Generator Assy
V-ribbed Belt No. 1
18 (184, 13)
Plate Washer
9.8 (100, 7)
58 (591, 43)
8.4 (86, 74 in.Vlbf)
Wiring Harness Clamp Bracket
- STARTING & CHARGINGGENERATOR ASSY (3MZ-FE)
19-19
2351 Author�: Date�:
2005 LEXUS ES330 REPAIR MANUAL (RM1124U)
GENERATOR ASSY (3MZ-FE)
COMPONENTS
Page 801 of 969
A86392
Generator Pulley
Drive End Frame Assy
GeneratorGenerator Rotor AssyGenerator Washer
Generator Coil AssyTerminal Insulator
Generator
Brush Holder Assy
Generator
Rear End Cover
x4
� Non-reusable part
N´m (kgf´cm, ft´lbf) : Specified torque
5.8 (59, 51 in.Vlbf)
1.8 (18, 16 in.Vlbf)
4.6 (47, 41 in.Vlbf)
111 (1,125, 81)
x2x3 19-20
- STARTING & CHARGINGGENERATOR ASSY (3MZ-FE)
2352 Author�: Date�:
2005 LEXUS ES330 REPAIR MANUAL (RM1124U)
Page 803 of 969
A87593
B
A
A87594
B
AC 19-22
- STARTING & CHARGINGGENERATOR ASSY (3MZ-FE)
2354 Author�: Date�:
2005 LEXUS ES330 REPAIR MANUAL (RM1124U)
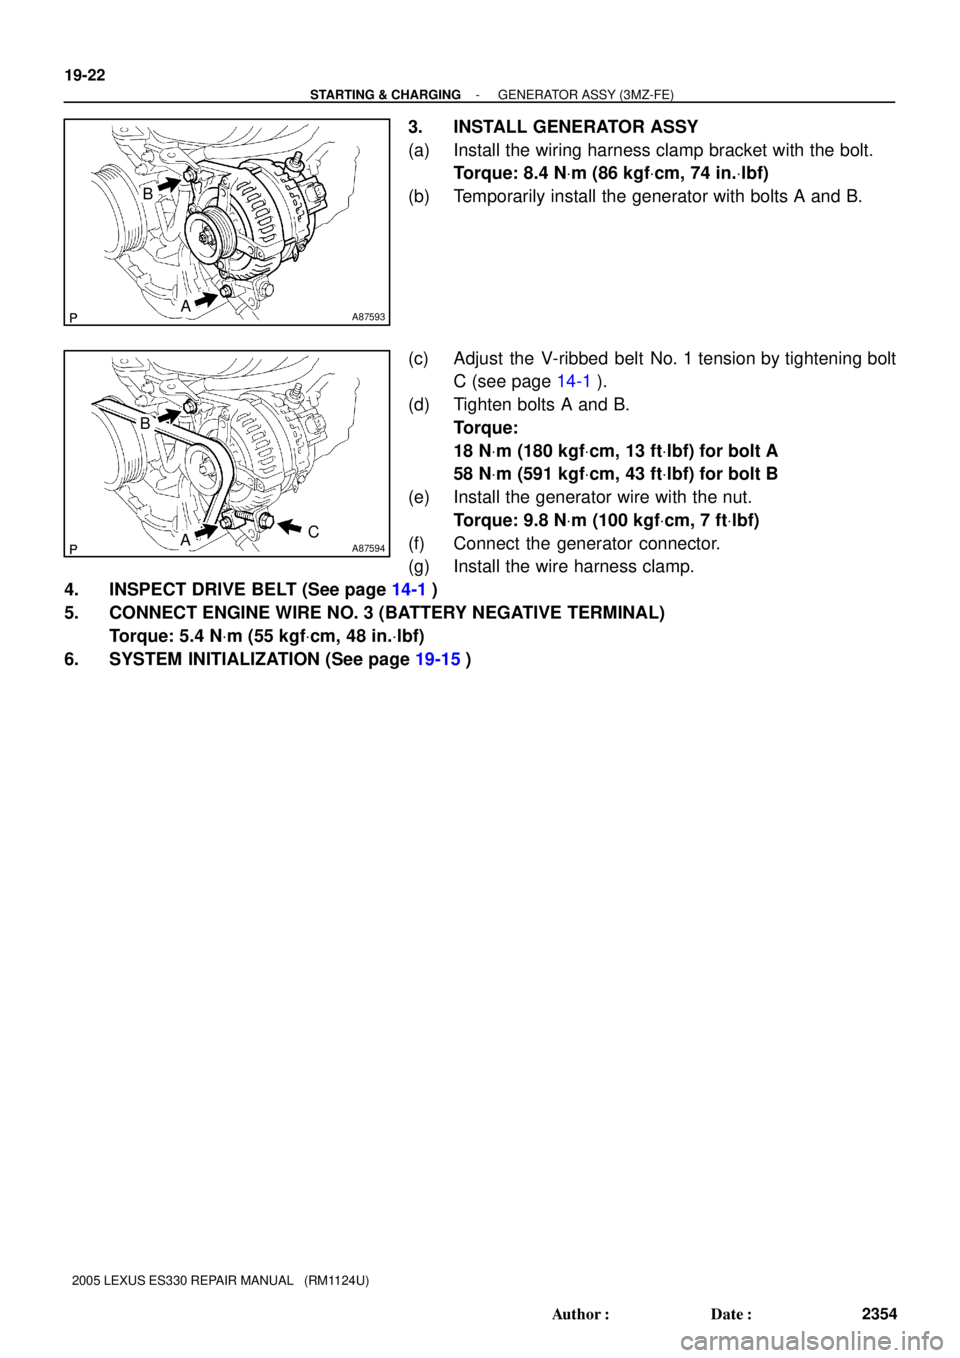
3. INSTALL GENERATOR ASSY
(a) Install the wiring harness clamp bracket with the bolt.
Torque: 8.4 NVm (86 kgfVcm, 74 in.Vlbf)
(b) Temporarily install the generator with bolts A and B.
(c) Adjust the V-ribbed belt No. 1 tension by tightening bolt
C (see page 14-1).
(d) Tighten bolts A and B.
Torque:
18 NVm (180 kgfVcm, 13 ftVlbf) for bolt A
58 NVm (591 kgfVcm, 43 ftVlbf) for bolt B
(e) Install the generator wire with the nut.
Torque: 9.8 NVm (100 kgfVcm, 7 ftVlbf)
(f) Connect the generator connector.
(g) Install the wire harness clamp.
4. INSPECT DRIVE BELT (See page 14-1)
5. CONNECT ENGINE WIRE NO. 3 (BATTERY NEGATIVE TERMINAL)
Torque: 5.4 NVm (55 kgfVcm, 48 in.Vlbf)
6. SYSTEM INITIALIZATION (See page 19-15)
Page 804 of 969
190SM-01
A81658
SST 1-A
SST 1-B
Turn
Hold
A81659
SST 2
Insert
SST 1
A81660
TurnSST1-A
A81661
SST 1-A
SST 1-B
Turn
Hold
- STARTING & CHARGINGGENERATOR ASSY (3MZ-FE)
19-23
2355 Author�: Date�:
2005 LEXUS ES330 REPAIR MANUAL (RM1124U)
OVERHAUL
1. REMOVE GENERATOR PULLEY
SST 09820-6301 1 (09820-06010, 09820-06020)
HINT:
SST 1-A and B09820 - 06010
SST 209820 - 06020
(a) Hold SST 1-A with a torque wrench, then tighten SST
1-B clockwise with the specified torque.
Torque: 39 NVm (400 kgfVcm, 29 ftVlbf)
NOTICE:
Check that SST is secured to the rotor shaft.
(b) Clamp SST 2 in a vise.
(c) Insert SST 1-A and B into SST 2, then attach the pulley
nut to SST 2.
(d) To loosen the pulley nut, turn SST 1-A in the direction
shown in the illustration.
NOTICE:
To prevent damage to the rotor shaft, do not loosen the
pulley nut more than a half turn.
(e) Remove the generator from SST 2.
(f) Turn SST 1-B, then remove SST 1-A and B.
(g) Remove the pulley nut, then remove the generator pulley.
Page 807 of 969
A75676
Diameter
A81670
Generator
PulleyGenerator Washer
A81671
Deep Socket
Wrench 21
A81148
A79315
Pin (f1.0 mm (0.039 in.))
19-26
- STARTING & CHARGINGGENERATOR ASSY (3MZ-FE)
2358 Author�: Date�:
2005 LEXUS ES330 REPAIR MANUAL (RM1124U)
(e) Inspect the diameter.
(1) Using vernier calipers, measure the slip ring diame-
ter.
Standard diameter:
14.2 to 14.4 mm (0.559 to 0.567 in.)
Minimum diameter: 14.0 mm (0.551 in.)
If the diameter is less than minimum, replace the generator ro-
tor.
7. INSTALL GENERATOR ROTOR ASSY
(a) Place the generator drive end frame on the generator
pulley.
(b) Install the generator rotor and generator washer.
8. INSTALL GENERATOR COIL ASSY
(a) Using a deep socket wrench 21 and press, press in the
generator coil carefully.
(b) Tighten the 4 bolts.
Torque: 5.8 NVm (59 kgfVcm, 51 in.Vlbf)
9. INSTALL GENERATOR BRUSH HOLDER ASSY
(a) While pushing the 2 brushes to inside the brush holder,
insert a pin (f1.0 mm (0.039 in.)) into the brush holder
hole.


 : Specified torqueGenerator
Connector
Generator Assy
V-ribbed Belt No. 1
18 (184, 13)
Plate Washer
9.8 (100, 7)
58 (591, 43)
8.4 (86, 74 in.Vlbf)
Wiring Harnes")