Page 824 of 969
2500O-02
F41643
- SUSPENSION CONTROL SYSTEMFRONT ACCELERATION SENSOR
25-1
2361 Author�: Date�:
2005 LEXUS ES330 REPAIR MANUAL (RM1124U)
FRONT ACCELERATION SENSOR
REPLACEMENT
1. REMOVE FRONT DOOR SCUFF PLATE RH (See page 71-1 1)
2. REMOVE INSTRUMENT PANEL UNDER COVER SUB-ASSY NO.1 (See page 71-1 1)
3. REMOVE INSTRUMENT PANEL SUB-ASSY LOWER (See page 71-1 1)
4. REMOVE ACCELERATION SENSOR ASSY
(a) Disconnect the acceleration sensor connector.
(b) Remove the nut and acceleration sensor from the instru-
ment panel reinforcement.
5. INSTALL ACCELERATION SENSOR ASSY
(a) Install the acceleration sensor with the nut.
Torque: 7.8 NVm (80 kgfVcm, 69 in.Vlbf)
(b) Connect the acceleration sensor connector.
Page 825 of 969
2500P-02
C91471
25-2
- SUSPENSION CONTROL SYSTEMREAR ACCELERATION SENSOR
2362 Author�: Date�:
2005 LEXUS ES330 REPAIR MANUAL (RM1124U)
REAR ACCELERATION SENSOR
REPLACEMENT
1. REMOVE REAR SEAT CUSHION ASSY (See page 72-39)
2. REMOVE REAR SEATBACK ASSY (See page 72-39)
3. REMOVE ROOF SIDE GARNISH INNER RH (See page 74-10)
4. REMOVE ACCELERATION SENSOR
(a) Disconnect the acceleration sensor connector.
(b) Remove the bolt and acceleration sensor from the side
pillar RH.
5. INSTALL ACCELERATION SENSOR
(a) Install the acceleration sensor with the bolt.
Torque: 7.8 NVm (80 kgfVcm, 69 in.Vlbf)
(b) Connect the acceleration sensor connector.
Page 826 of 969
2500Q-02
F41644
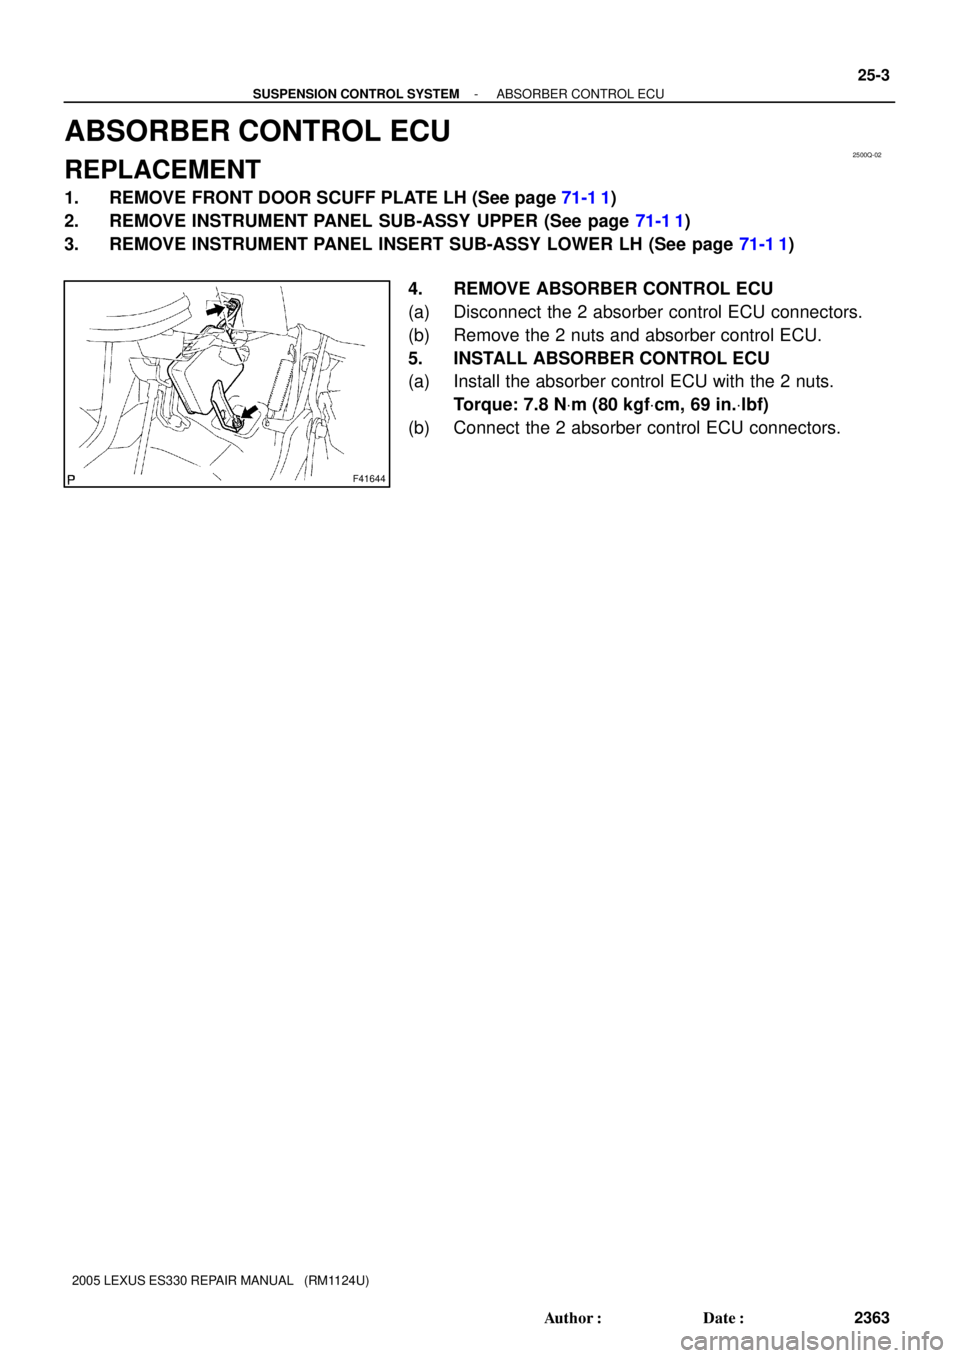
- SUSPENSION CONTROL SYSTEMABSORBER CONTROL ECU
25-3
2363 Author�: Date�:
2005 LEXUS ES330 REPAIR MANUAL (RM1124U)
ABSORBER CONTROL ECU
REPLACEMENT
1. REMOVE FRONT DOOR SCUFF PLATE LH (See page 71-1 1)
2. REMOVE INSTRUMENT PANEL SUB-ASSY UPPER (See page 71-1 1)
3. REMOVE INSTRUMENT PANEL INSERT SUB-ASSY LOWER LH (See page 71-1 1)
4. REMOVE ABSORBER CONTROL ECU
(a) Disconnect the 2 absorber control ECU connectors.
(b) Remove the 2 nuts and absorber control ECU.
5. INSTALL ABSORBER CONTROL ECU
(a) Install the absorber control ECU with the 2 nuts.
Torque: 7.8 NVm (80 kgfVcm, 69 in.Vlbf)
(b) Connect the 2 absorber control ECU connectors.
Page 851 of 969
REAR BUCKLE EASE OF USE IMPROVEMENT ± BO011-05 Revised November 9, 2005
Page 5 of 9
12. Install the rear seat center belt assembly RH.
A. Check the degree of tilt when the ELR begins to lock.
Check that the belt does NOT lock at less then 15� of tilt in any direction
but locks at over 45� of tilt when gently moving the installed retractor.
Unlock
Lock455
B. Install the retractor of the rear seat center belt assembly RH and torque the bolt.
Torque: 42 N�m (420 kgf�cm, 31 ft�lbf)
C. Check the ELR lock.
Check that the belt locks when pulled out quickly.
D. Check the fastening function for the child restraint system.
NOTE:
Check should be done with the assembly installed.
a. Check that the belt cannot be pulled out any more but can be rewound after
being pulled out.
b. Check that the belt can be pulled out and rewound after being fully rewound.
Repair
Procedure
(Continued)
Page 852 of 969
REAR BUCKLE EASE OF USE IMPROVEMENT ± BO011-05 Revised November 9, 2005
Page 6 of 9
E. Install the floor anchor of the rear seat center belt assembly RH with the bolt
facing the arrow mark on the plate toward the front of the vehicle.
Torque: 42 N�m (420 kgf�cm, 31 ft�lbf)
NOTE:
Ensure that the anchor does NOT run into any protrusions on the floor panel.
FrontProtrusion
Protrusion
F. Check the ELR lock.
Check that the belt locks when pulled out quickly.
13. Remove the rear seat center belt assembly LH.
Remove the bolt and remove the rear seat center belt assembly LH.
Repair
Procedure
(Continued)
Page 853 of 969
REAR BUCKLE EASE OF USE IMPROVEMENT ± BO011-05 Revised November 9, 2005
Page 7 of 9
14. Install the rear seat center belt assembly LH.
A. Check the degree of tilt when the ELR begins to lock.
Check that the belt does NOT lock at less then 15� of tilt in any direction
but locks at over 45� of tilt when gently moving the installed retractor.
Unlock
Lock455
B. Install the retractor of the rear seat center belt assembly LH and torque the bolt.
Torque: 42 N�m (420 kgf�cm, 31 ft�lbf)
C. Check the ELR lock.
Check that the belt locks when pulled out quickly.
D. Check the fastening function for the child restraint system.
NOTE:
Check should be done with the assembly installed.
a. Check that the belt cannot be pulled out any more but can be rewound after
being pulled out.
b. Check that the belt can be pulled out and rewound after being fully rewound.
Repair
Procedure
(Continued)
Page 854 of 969
REAR BUCKLE EASE OF USE IMPROVEMENT ± BO011-05 Revised November 9, 2005
Page 8 of 9
E. Install the floor anchor of the rear seat center belt assembly LH with the bolt
facing the arrow mark on the plate toward the front of the vehicle.
Torque: 42 N�m (420 kgf�cm, 31 ft�lbf)
NOTE:
Ensure that the anchor does NOT run into any protrusions on the floor panel.
FrontProtrusion
Protrusion
F. Check the ELR lock.
Check that the belt locks when pulled out quickly.
15. Install the package tray trim panel assembly.
A.Without Sun Shade:
Engage the 6 claws and 2 clips to install the package tray trim panel assembly.
: Claw
: Clip
Repair
Procedure
(Continued)
Page 881 of 969

PASSENGER AIRBAG INDICATOR LAMP ± EL002-05 February 22, 2005
Page 2 of 2
MODELPLANTDRIVETRAINPRODUCTION CHANGE EFFECTIVE VIN
ES 330Tsutsumi2WDJTHBA30G#50024130ES 330Kanto2WDJTHBA30G#55068000
TMK2WDJTJGA3#U#50046500
RX 330
TMK4WDJTJHA3#U#50076003RX 330
TMMC2WD2T2GA3#U#5C021700TMMC4WD2T2HA3#U#5C046800
PREVIOUS PART NUMBERCURRENT PART NUMBERPART NAMEQTY
89952±3301089952±33011
Occupant Detection Computer
1
89952±4801089952±48011Occupant Detection Computer1
SPECIAL SERVICE TOOLS (SSTs)PART NUMBERQUANTITY
Lexus Diagnostic Tester Kit*010012701
12 Megabyte Diagnostic Tester Program Card
with version 12.01a Software (or later)*01002593-0051
Occupant Seat Weight Set*
00002±09077±011
* Essential SSTs.
NOTE:
Additional Diagnostic Tester Kits, Program Cards, or other SSTs may be ordered by
calling SPX/OTC at 1-800-933-8335.
1. Unfasten passenger seat and rock the assembly back providing access to the
underside of the seat. For information to unfasten the passenger seat, refer to the
Technical Information System (TIS): 2004 ± 2005 model year ES 330 or RX 330
Repair Manual:
Seat: Front Seat Assembly LH: Overhaul.
2. Disconnect the negative terminal of the vehicle battery.
3. Disconnect electrical connectors from Occupant Detection ECU.
4. Remove and replace the Occupant Detection ECU.
5. Reinstall the seat assembly. For more information, refer to TIS: 2004 ± 2005 model
year ES 330 or RX 330 Repair Manual:
Seat: Front Seat Assembly LH: Overhaul.
Torque: 36.8 N�m (375 kgf�cm, 27 ft�lbf)
6. Reconnect the negative terminal of the vehicle battery.
7. Perform Zero Point Calibration and Sensitivity Check following prompts in the
Diagnostic tool found under the Occupant Detect menu item (refer to
TSIB No. EL007±03, ª
Occupancy Classification System Calibration
(DTC B1150 & B1650)
.º
8. Reinitialize systems affected by the disconnection of the vehicle battery.
Production
Change
Information
Parts
Information
Required
SSTs
Repair
Procedure