Page 1517 of 2870
ME(H4DOTC)-59
MECHANICAL
Timing Belt Assembly
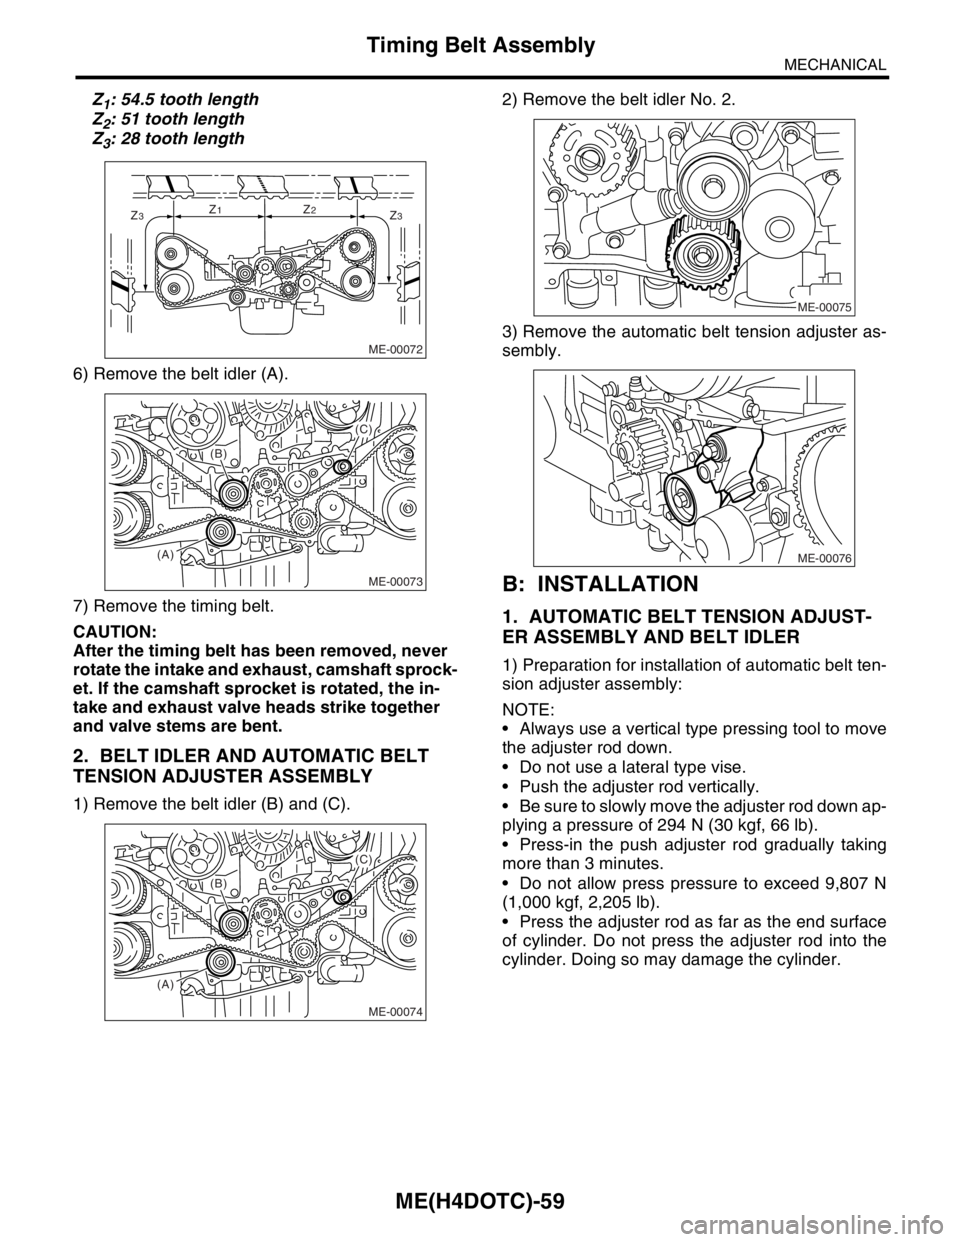
Z1: 54.5 tooth length
Z
2: 51 tooth length
Z
3: 28 tooth length
6) Remove the belt idler (A).
7) Remove the timing belt.
CAUTION:
After the timing belt has been removed, never
rotate the intake and exhaust, camshaft sprock-
et. If the camshaft sprocket is rotated, the in-
take and exhaust valve heads strike together
and valve stems are bent.
2. BELT IDLER AND AUTOMATIC BELT
TENSION ADJUSTER ASSEMBLY
1) Remove the belt idler (B) and (C).2) Remove the belt idler No. 2.
3) Remove the automatic belt tension adjuster as-
sembly.
B: INSTALLATION
1. AUTOMATIC BELT TENSION ADJUST-
ER ASSEMBLY AND BELT IDLER
1) Preparation for installation of automatic belt ten-
sion adjuster assembly:
NOTE:
Always use a vertical type pressing tool to move
the adjuster rod down.
Do not use a lateral type vise.
Push the adjuster rod vertically.
Be sure to slowly move the adjuster rod down ap-
plying a pressure of 294 N (30 kgf, 66 lb).
Press-in the push adjuster rod gradually taking
more than 3 minutes.
Do not allow press pressure to exceed 9,807 N
(1,000 kgf, 2,205 lb).
Press the adjuster rod as far as the end surface
of cylinder. Do not press the adjuster rod into the
cylinder. Doing so may damage the cylinder.
ME-00072
Z3Z1Z2Z3
ME-00073
(A)(B)
(C)
ME-00074
(A)(B)
(C)
ME-00075
ME-00076
Page 1518 of 2870
ME(H4DOTC)-60
MECHANICAL
Timing Belt Assembly
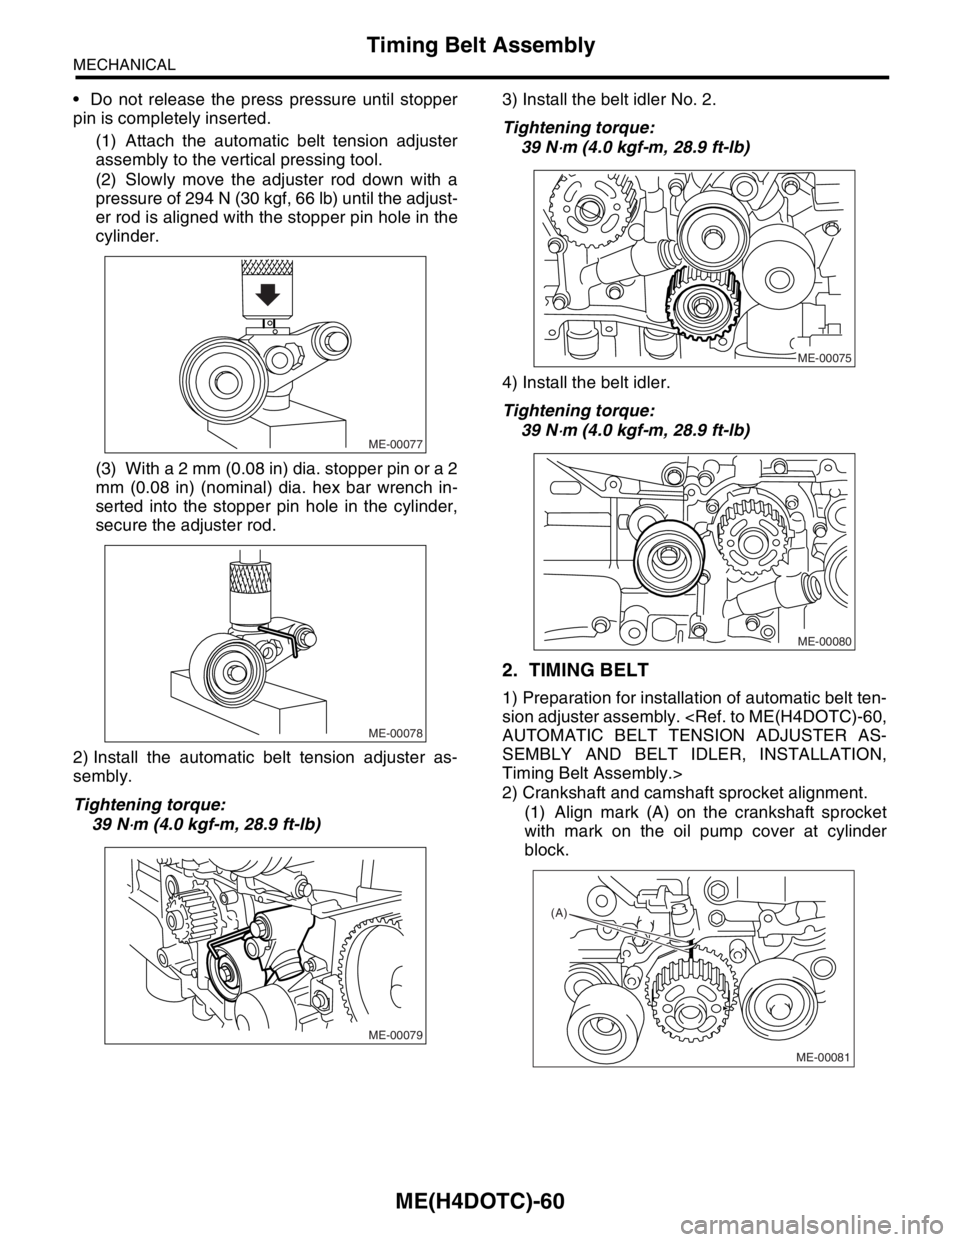
Do not release the press pressure until stopper
pin is completely inserted.
(1) Attach the automatic belt tension adjuster
assembly to the vertical pressing tool.
(2) Slowly move the adjuster rod down with a
pressure of 294 N (30 kgf, 66 lb) until the adjust-
er rod is aligned with the stopper pin hole in the
cylinder.
(3) With a 2 mm (0.08 in) dia. stopper pin or a 2
mm (0.08 in) (nominal) dia. hex bar wrench in-
serted into the stopper pin hole in the cylinder,
secure the adjuster rod.
2) Install the automatic belt tension adjuster as-
sembly.
Tightening torque:
39 N
⋅m (4.0 kgf-m, 28.9 ft-lb)3) Install the belt idler No. 2.
Tightening torque:
39 N
⋅m (4.0 kgf-m, 28.9 ft-lb)
4) Install the belt idler.
Tightening torque:
39 N
⋅m (4.0 kgf-m, 28.9 ft-lb)
2. TIMING BELT
1) Preparation for installation of automatic belt ten-
sion adjuster assembly.
AUTOMATIC BELT TENSION ADJUSTER AS-
SEMBLY AND BELT IDLER, INSTALLATION,
Timing Belt Assembly.>
2) Crankshaft and camshaft sprocket alignment.
(1) Align mark (A) on the crankshaft sprocket
with mark on the oil pump cover at cylinder
block.
ME-00077
ME-00078
ME-00079
ME-00075
ME-00080
(A)
ME-00081
Page 1519 of 2870
ME(H4DOTC)-61
MECHANICAL
Timing Belt Assembly
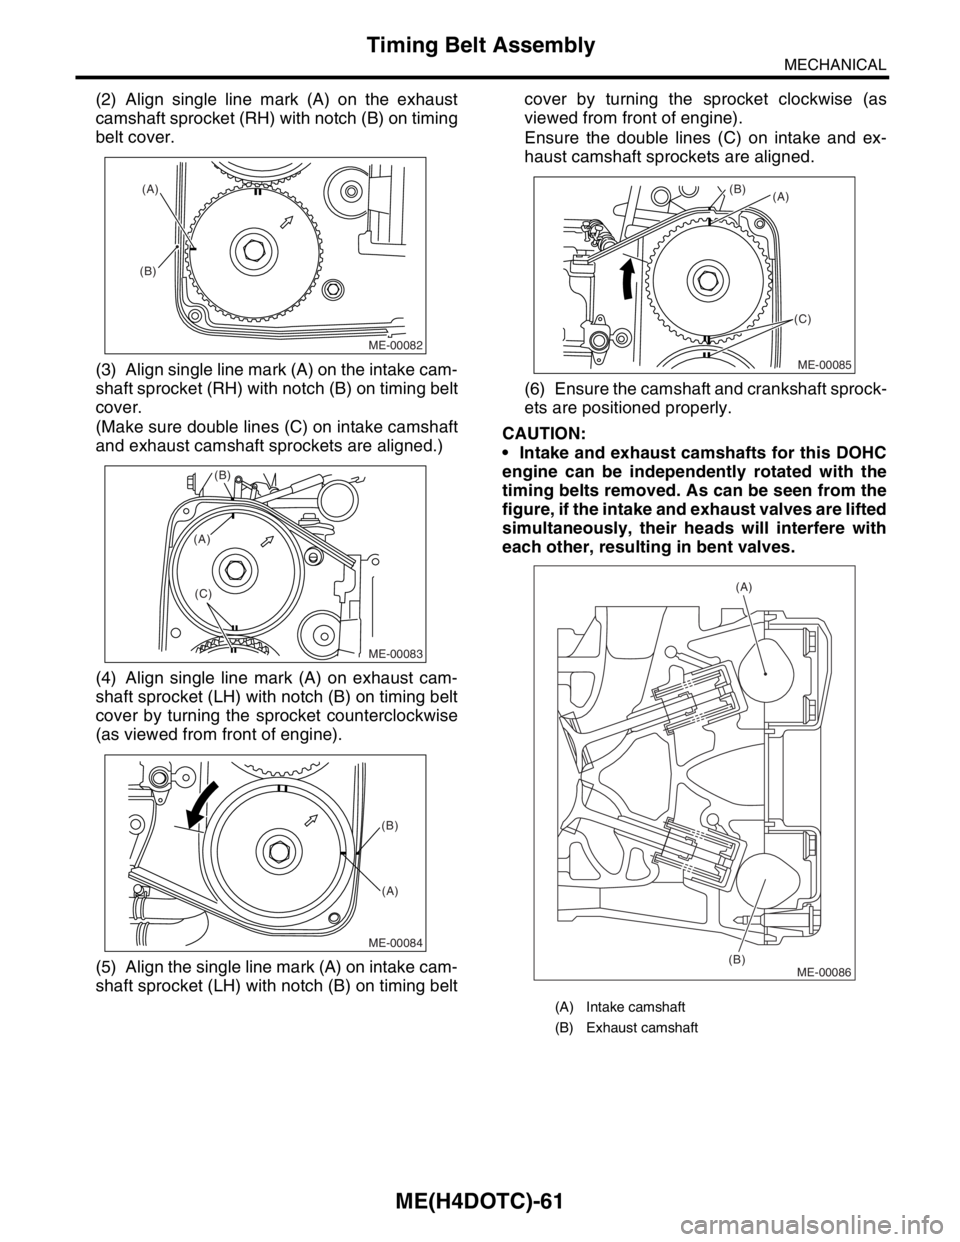
(2) Align single line mark (A) on the exhaust
camshaft sprocket (RH) with notch (B) on timing
belt cover.
(3) Align single line mark (A) on the intake cam-
shaft sprocket (RH) with notch (B) on timing belt
cover.
(Make sure double lines (C) on intake camshaft
and exhaust camshaft sprockets are aligned.)
(4) Align single line mark (A) on exhaust cam-
shaft sprocket (LH) with notch (B) on timing belt
cover by turning the sprocket counterclockwise
(as viewed from front of engine).
(5) Align the single line mark (A) on intake cam-
shaft sprocket (LH) with notch (B) on timing beltcover by turning the sprocket clockwise (as
viewed from front of engine).
Ensure the double lines (C) on intake and ex-
haust camshaft sprockets are aligned.
(6) Ensure the camshaft and crankshaft sprock-
ets are positioned properly.
CAUTION:
Intake and exhaust camshafts for this DOHC
engine can be independently rotated with the
timing belts removed. As can be seen from the
figure, if the intake and exhaust valves are lifted
simultaneously, their heads will interfere with
each other, resulting in bent valves.
ME-00082
(A)
(B)
ME-00083
(B)
(C)
(A)
ME-00084
(B)
(A)
(A) Intake camshaft
(B) Exhaust camshaft
ME-00085
(A) (B)
(C)
ME-00086
(A)
(B)
Page 1520 of 2870

ME(H4DOTC)-62
MECHANICAL
Timing Belt Assembly
When the timing belts are not installed, four
camshafts are held at the “zero-lift” position,
where all cams on camshafts do not push the
intake and exhaust valves down. (Under this
condition, all valves remain unlifted.)
When the camshafts are rotated to install the
timing belts, #2 intake and #4 exhaust cam of
camshafts (LH) are held to push their corre-
sponding valves down. (Under this condition,
these valves are held lifted.) Camshafts (RH)
are held so that their cams do not push valves
down.
Camshafts (LH) must be rotated from the “ze-
ro-lift” position to the position where the timing
belt is to be installed at as small an angle as
possible, in order to prevent mutual interfer-
ence of intake and exhaust valve heads.
Do not allow the camshafts to rotate in the di-
rection shown in the figure as this causes both
intake and exhaust valves to lift simultaneous-
ly, resulting in interference with their heads.
3) Installation of timing belt:
(A) Rotating direction
(B) Timing belt installation position
(C) Bad example
(D) Good example
(A) (A) (A) (A)
(D) (C)
(B)(B)
ME-00314
ME-00088
Page 1524 of 2870
ME(H4DOTC)-66
MECHANICAL
Cam Sprocket
16.Cam Sprocket
A: REMOVAL
1) Remove the V-belt.
REMOVAL, V-belt.>
2) Remove the crank pulley.
ME(H4DOTC)-55, REMOVAL, Crank Pulley.>
3) Remove the timing belt cover.
ME(H4DOTC)-57, REMOVAL, Timing Belt Cover.>
4) Remove the timing belt assembly.
ME(H4DOTC)-58, REMOVAL, Timing Belt Assem-
bly.>
5) Remove the camshaft position sensor. (2.0 L
model)
Camshaft Position Sensor.>
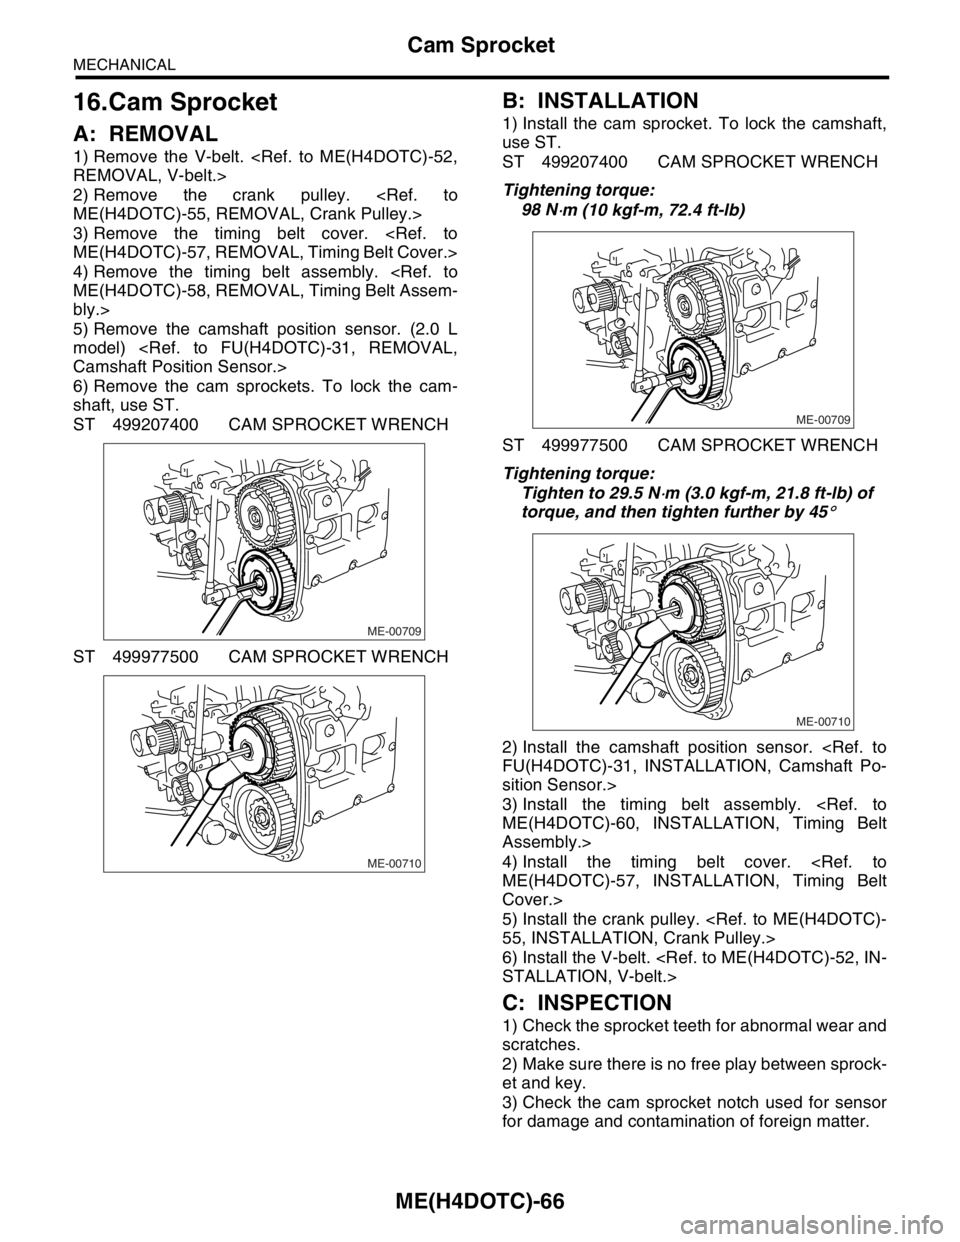
6) Remove the cam sprockets. To lock the cam-
shaft, use ST.
ST 499207400 CAM SPROCKET WRENCH
ST 499977500 CAM SPROCKET WRENCH
B: INSTALLATION
1) Install the cam sprocket. To lock the camshaft,
use ST.
ST 499207400 CAM SPROCKET WRENCH
Tightening torque:
98 N
⋅m (10 kgf-m, 72.4 ft-lb)
ST 499977500 CAM SPROCKET WRENCH
Tightening torque:
Tighten to 29.5 N
⋅m (3.0 kgf-m, 21.8 ft-lb) of
torque, and then tighten further by 45
°
2) Install the camshaft position sensor.
FU(H4DOTC)-31, INSTALLATION, Camshaft Po-
sition Sensor.>
3) Install the timing belt assembly.
ME(H4DOTC)-60, INSTALLATION, Timing Belt
Assembly.>
4) Install the timing belt cover.
ME(H4DOTC)-57, INSTALLATION, Timing Belt
Cover.>
5) Install the crank pulley.
55, INSTALLATION, Crank Pulley.>
6) Install the V-belt.
STALLATION, V-belt.>
C: INSPECTION
1) Check the sprocket teeth for abnormal wear and
scratches.
2) Make sure there is no free play between sprock-
et and key.
3) Check the cam sprocket notch used for sensor
for damage and contamination of foreign matter.
ME-00709
ME-00710
ME-00709
ME-00710
Page 1526 of 2870
ME(H4DOTC)-68
MECHANICAL
Camshaft
18.Camshaft
A: REMOVAL
1) Remove the V-belt.
INSTALLATION, V-belt.>
2) Remove the crank pulley.
55, REMOVAL, Crank Pulley.>
3) Remove the timing belt cover.
ME(H4DOTC)-57, REMOVAL, Timing Belt Cover.>
4) Remove the timing belt assembly.
ME(H4DOTC)-58, REMOVAL, Timing Belt Assem-
bly.>
5) Remove the cam sprocket.
ME(H4DOTC)-67, REMOVAL, Cam Sprocket.>
6) Remove the crank sprocket.
ME(H4DOTC)-68, REMOVAL, Crank Sprocket.>
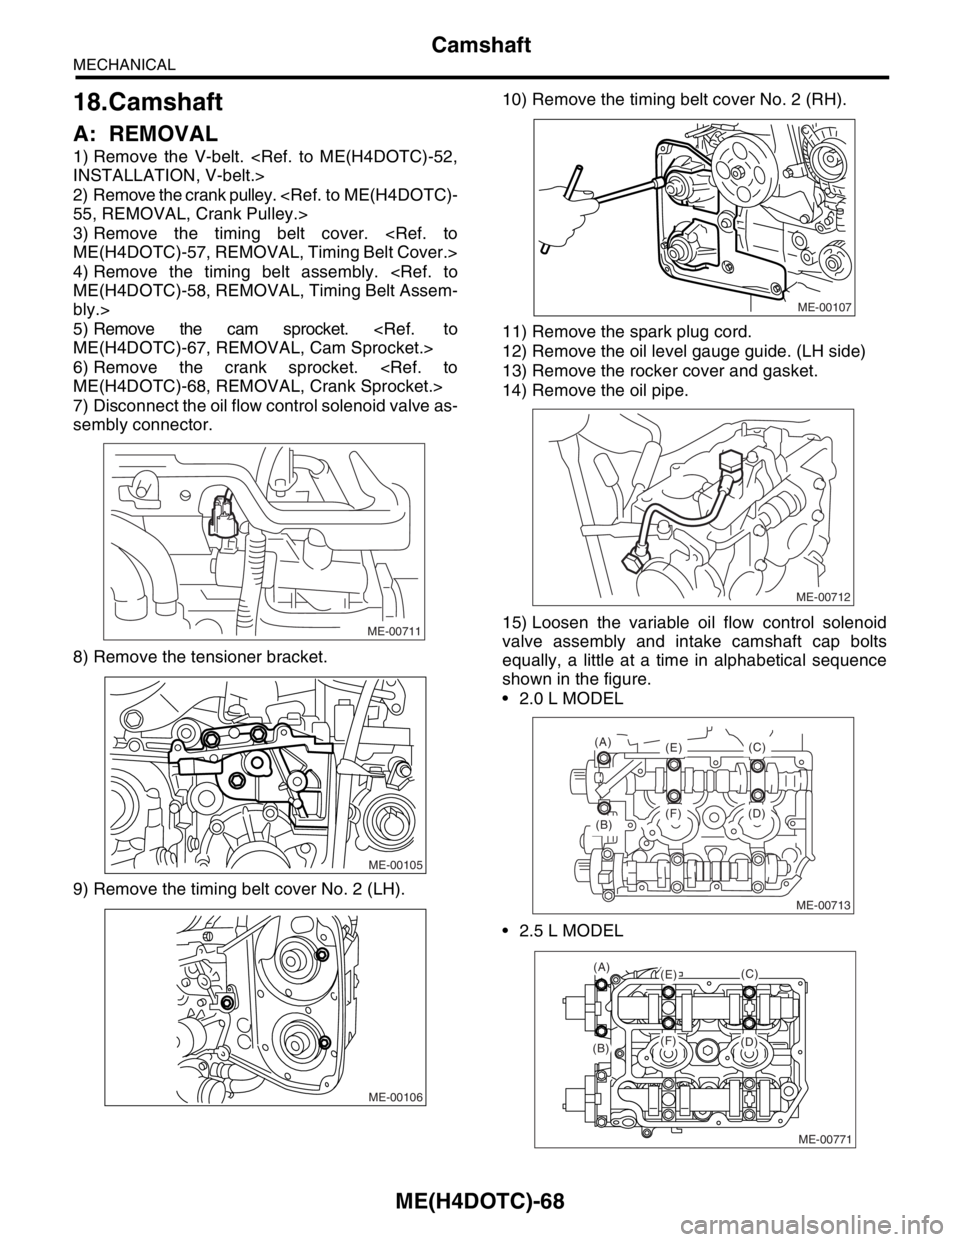
7) Disconnect the oil flow control solenoid valve as-
sembly connector.
8) Remove the tensioner bracket.
9) Remove the timing belt cover No. 2 (LH).10) Remove the timing belt cover No. 2 (RH).
11) Remove the spark plug cord.
12) Remove the oil level gauge guide. (LH side)
13) Remove the rocker cover and gasket.
14) Remove the oil pipe.
15) Loosen the variable oil flow control solenoid
valve assembly and intake camshaft cap bolts
equally, a little at a time in alphabetical sequence
shown in the figure.
2.0 L MODEL
2.5 L MODEL
ME-00711
ME-00105
ME-00106
ME-00107
ME-00712
ME-00713
(B)
(A)
(E)
(F) (D)(C)
ME-00771
(A)(E)
(F)(B)(D)
(C)
Page 1527 of 2870
ME(H4DOTC)-69
MECHANICAL
Camshaft
16) Remove the oil flow control solenoid valve as-
sembly, intake camshaft cap, and camshaft.
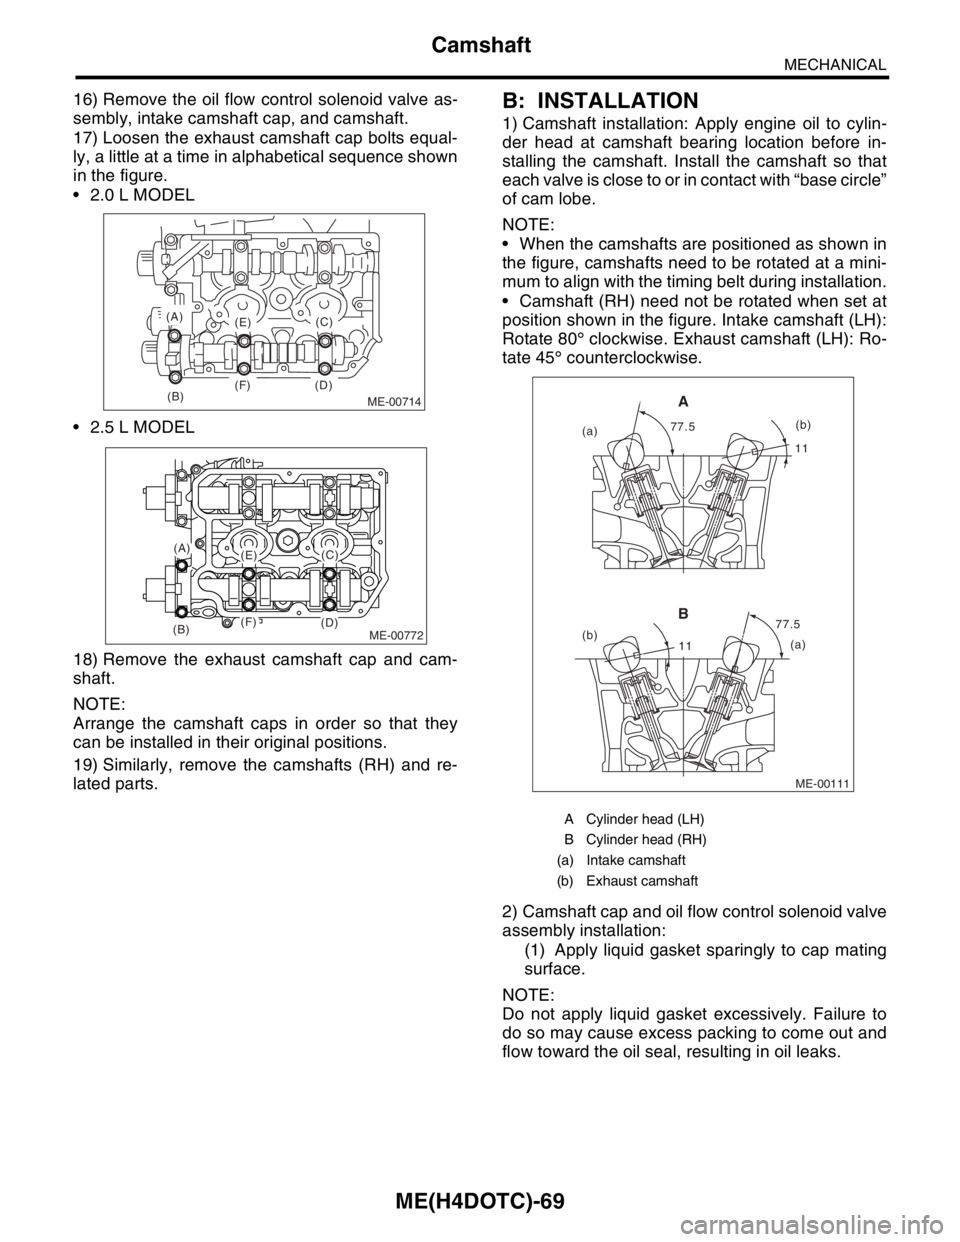
17) Loosen the exhaust camshaft cap bolts equal-
ly, a little at a time in alphabetical sequence shown
in the figure.
2.0 L MODEL
2.5 L MODEL
18) Remove the exhaust camshaft cap and cam-
shaft.
NOTE:
Arrange the camshaft caps in order so that they
can be installed in their original positions.
19) Similarly, remove the camshafts (RH) and re-
lated parts.B: INSTALLATION
1) Camshaft installation: Apply engine oil to cylin-
der head at camshaft bearing location before in-
stalling the camshaft. Install the camshaft so that
each valve is close to or in contact with “base circle”
of cam lobe.
NOTE:
When the camshafts are positioned as shown in
the figure, camshafts need to be rotated at a mini-
mum to align with the timing belt during installation.
Camshaft (RH) need not be rotated when set at
position shown in the figure. Intake camshaft (LH):
Rotate 80° clockwise. Exhaust camshaft (LH): Ro-
tate 45° counterclockwise.
2) Camshaft cap and oil flow control solenoid valve
assembly installation:
(1) Apply liquid gasket sparingly to cap mating
surface.
NOTE:
Do not apply liquid gasket excessively. Failure to
do so may cause excess packing to come out and
flow toward the oil seal, resulting in oil leaks.
ME-00714(B)
(A)
(E)
(F) (D)(C)
ME-00772
(A)(E)
(F)(B)(D)
(C)
A Cylinder head (LH)
B Cylinder head (RH)
(a) Intake camshaft
(b) Exhaust camshaft
ME-00111
1111
77.5 77.5
(a)
(b)
(a)(b)
A
B
Page 1528 of 2870
ME(H4DOTC)-70
MECHANICAL
Camshaft
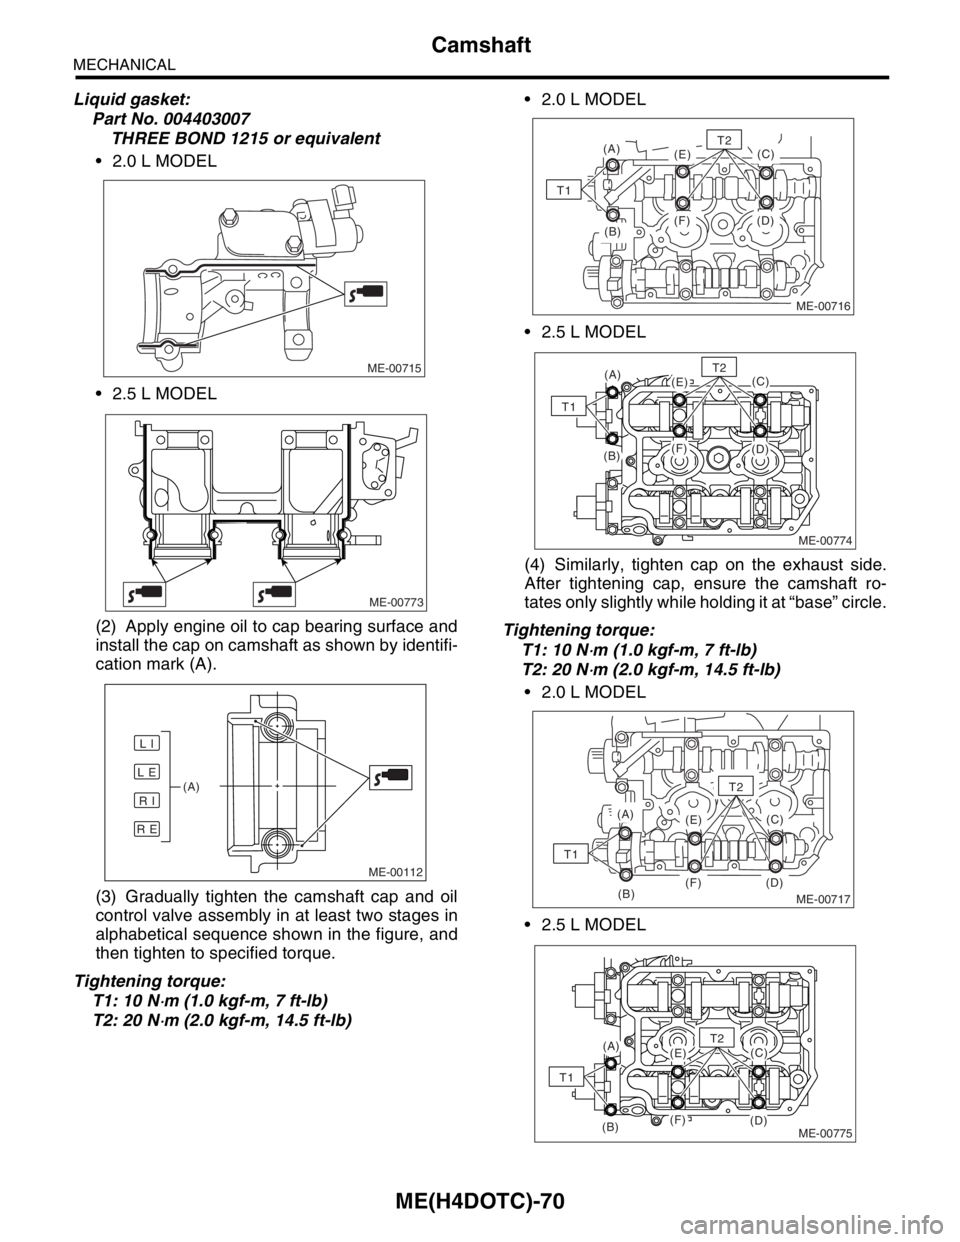
Liquid gasket:
Part No. 004403007
THREE BOND 1215 or equivalent
2.0 L MODEL
2.5 L MODEL
(2) Apply engine oil to cap bearing surface and
install the cap on camshaft as shown by identifi-
cation mark (A).
(3) Gradually tighten the camshaft cap and oil
control valve assembly in at least two stages in
alphabetical sequence shown in the figure, and
then tighten to specified torque.
Tightening torque:
T1: 10 N
⋅m (1.0 kgf-m, 7 ft-lb)
T2: 20 N
⋅m (2.0 kgf-m, 14.5 ft-lb) 2.0 L MODEL
2.5 L MODEL
(4) Similarly, tighten cap on the exhaust side.
After tightening cap, ensure the camshaft ro-
tates only slightly while holding it at “base” circle.
Tightening torque:
T1: 10 N
⋅m (1.0 kgf-m, 7 ft-lb)
T2: 20 N
⋅m (2.0 kgf-m, 14.5 ft-lb)
2.0 L MODEL
2.5 L MODEL
ME-00715
ME-00773
ME-00112
L E
R E
R I
L I
(A)
(B)
(A)
(E)
(F) (D)(C)
T1
ME-00716
T2
ME-00774
(A)(E)
(F)(B)(D)
(C)T2
T1
ME-00717(B)
(A)
(E)
(F) (D)(C)
T2
T1
ME-00775
(A)(E)
(F)(B)(D)
(C)T2
T1