Page 1028 of 2870

FUJI HEAVY INDUSTRIES LTD. G8080GE2
2004 FORESTER SERVICE MANUAL QUICK REFERENCE INDEX
ENGINE SECTION 1
This service manual has been prepared
to provide SUBARU service personnel
with the necessary information and data
for the correct maintenance and repair
of SUBARU vehicles.
This manual includes the procedures
for maintenance, disassembling, reas-
sembling, inspection and adjustment of
components and diagnostics for guid-
ance of experienced mechanics.
Please peruse and utilize this manual
fully to ensure complete repair work for
satisfying our customers by keeping
their vehicle in optimum condition.
When replacement of parts during
repair work is needed, be sure to use
SUBARU genuine parts.
All information, illustration and specifi-
cations contained in this manual are
based on the latest product information
available at the time of publication
approval.FUEL INJECTION (FUEL SYSTEM) FU(H4SO)
EMISSION CONTROL
(AUX. EMISSION CONTROL DEVICE)EC(H4SO)
INTAKE (INDUCTION) IN(H4SO)
MECHANICAL ME(H4SO)
EXHAUST EX(H4SO)
COOLING CO(H4SO)
LUBRICATION LU(H4SO)
SPEED CONTROL SYSTEM SP(H4SO)
IGNITION IG(H4SO)
STARTING/CHARGING SYSTEM SC(H4SO)
ENGINE (DIAGNOSTIC) EN(H4SO)
Page 1029 of 2870

LUBRICATION
LU(H4SO)
Page
1. General Description ....................................................................................2
2. Oil Pressure System ...................................................................................8
3. Engine Oil..................................................................................................10
4. Oil Pump ...................................................................................................12
5. Oil Pan and Strainer ..................................................................................16
6. Oil Pressure Switch ...................................................................................20
7. Engine Oil Cooler ......................................................................................21
8. Engine Oil Filter.........................................................................................23
9. Engine Lubrication System Trouble in General.........................................24
Page 1030 of 2870

LU(H4SO)-2
LUBRICATION
General Description
1. General Description
A: SPECIFICATION
Lubrication methodForced lubrication
Oil pumpPump type Trochoid type
Number of teethInner rotor 9
Outer rotor 10
Outer rotor diameter×thicknessNon-turbo model 78×7 mm (3.07×0.28 in)
Turbo model 78×10 mm (3.07×0.39 in)
Tip clearance between inner and outer rotorStandard 0.04 — 0.14 mm (0.0016 — 0.0055 in)
Limit 0.18 mm (0.0071 in)
Side clearance between inner rotor and pump
caseStandard 0.02 — 0.07 mm (0.0008 — 0.0028 in)
Limit 0.12 mm (0.0047 in)
Case clearance between outer rotor and pump
caseStandard 0.10 — 0.175 mm (0.0039 — 0.0069 in)
Limit 0.20 mm (0.0079 in)
Capacity at
80°C (176°F)Non-turbo
model
600 rpmDischarge
pressure98 kPa (1.0 kg/cm
2, 14 psi)
Discharge
quantity3.22 (3.4 US qt, 2.8 Imp qt)/min.
5,000 rpmDischarge
pressure294 kPa (3.0 kg/cm
2, 43 psi)
Discharge
quantity32.62 (34.4 US qt, 28.7 Imp qt)/min.
Turbo model
600 rpmDischarge
pressure98 kPa (1.0 kg/cm
2, 14 psi)
Discharge
quantity4.62 (4.9 US qt, 4.0 Imp qt)/min.
5,000 rpmDischarge
pressure294 kPa (3.0 kg/cm
2, 43 psi)
Discharge
quantity47.02 (49.7 US qt, 41.4 Imp qt)/min.
Relief valve operation pressureNon-turbo model
490 kPa (5.0 kg/cm
2, 71 psi)
Turbo model
588 kPa (6.0 kg/cm
2, 85 psi)
Oil filterTy p eFull-flow filter type
Filtration areaNon-turbo
760 cm
2 (118 sq in)
Tu r b o
800 cm
2 (124 sq in)
By-pass valve opening pressureNon-turbo
157 kPa (1.60 kg/cm
2, 22.8 psi)
Tu r b o
160 kPa (1.63 kg/cm
2, 23.2 psi)
Outer diameter×widthNon-turbo 80×70 mm (3.15×2.76 in)
Tu r b o 6 8×65 mm (2.68×2.56 in)
Oil filter to engine thread size M 20×1.5
Oil pressure
switchType Immersed contact point type
Working voltage — wattage 12 V — 3.4 W or less
Warning light activation pressure
14.7 kPa (0.15 kg/cm
2, 2.1 psi)
Proof pressure
More than 981 kPa (10 kg/cm
2, 142 psi)
Oil capacity (at replacement) 4.02 (4.2 US qt, 3.5 Imp qt)
Page 1037 of 2870

LU(H4SO)-9
LUBRICATION
Oil Pressure System
B: INSPECTION
Step Check Yes No
1 CHECK COMBINATION METER.
1) Turn the ignition switch to ON. (engine
OFF)
2) Check other warning lights.Does the warning lights illumi-
nate?Go to step 2.Repair or replace
the combination
meter.
4, INSPECTION,
Combination
Meter System.>
2 CHECK HARNESS CONNECTOR BETWEEN
COMBINATION METER AND OIL PRES-
SURE SWITCH.
1) Turn the ignition switch to OFF.
2) Disconnect the connector from oil pressure
switch.
3) Turn the ignition switch to ON.
4) Measure the voltage of harness between
the combination meter connector and chassis
ground.
Connector & terminal
(E11) No. 1 (+) — Chassis ground (
−):Is the voltage more than 10 V? Replace the oil
pressure switch.Go to step 3.
3 CHECK COMBINATION METER.
1) Turn the ignition switch to OFF.
2) Remove the combination meter.
3) Measure the resistance of combination
meter.
Te r m i n a l
No. B9 — No. A3:Is the resistance less than 10
Ω?Replace the har-
ness connector
between combina-
tion meter and oil
pressure switch.Repair or replace
the combination
meter and the oil
pressure switch
warning light bulb.
Page 1038 of 2870

LU(H4SO)-10
LUBRICATION
Engine Oil
3. Engine Oil
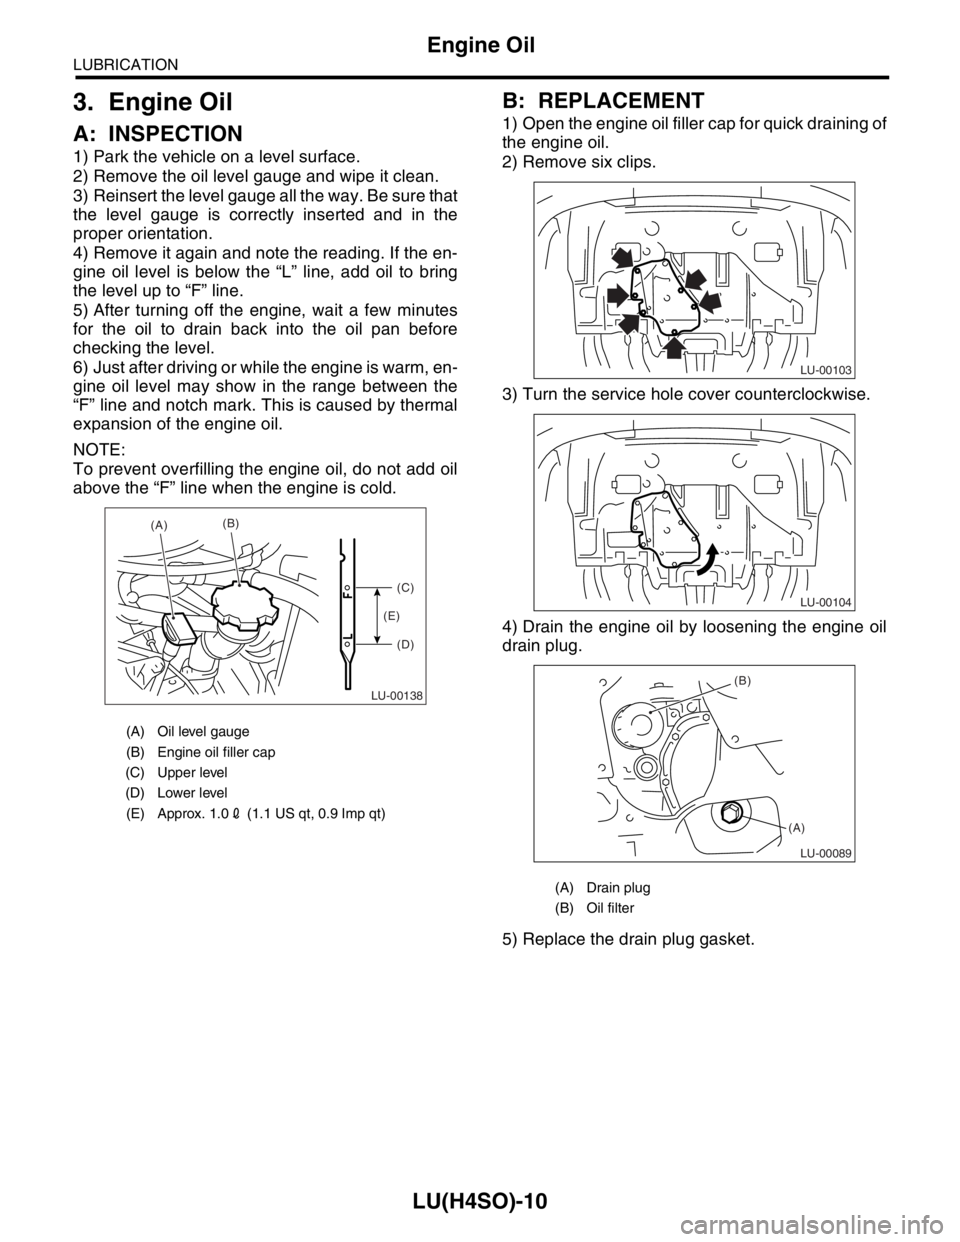
A: INSPECTION
1) Park the vehicle on a level surface.
2) Remove the oil level gauge and wipe it clean.
3) Reinsert the level gauge all the way. Be sure that
the level gauge is correctly inserted and in the
proper orientation.
4) Remove it again and note the reading. If the en-
gine oil level is below the “L” line, add oil to bring
the level up to “F” line.
5) After turning off the engine, wait a few minutes
for the oil to drain back into the oil pan before
checking the level.
6) Just after driving or while the engine is warm, en-
gine oil level may show in the range between the
“F” line and notch mark. This is caused by thermal
expansion of the engine oil.
NOTE:
To prevent overfilling the engine oil, do not add oil
above the “F” line when the engine is cold.
B: REPLACEMENT
1) Open the engine oil filler cap for quick draining of
the engine oil.
2) Remove six clips.
3) Turn the service hole cover counterclockwise.
4) Drain the engine oil by loosening the engine oil
drain plug.
5) Replace the drain plug gasket.
(A) Oil level gauge
(B) Engine oil filler cap
(C) Upper level
(D) Lower level
(E) Approx. 1.02 (1.1 US qt, 0.9 Imp qt)
LU-00138
(A)(B)
(C)
(D) (E)
(A) Drain plug
(B) Oil filter
LU-00103
LU-00104
LU-00089
(B)
(A)
Page 1039 of 2870

LU(H4SO)-11
LUBRICATION
Engine Oil
6) Tighten the engine oil drain plug after draining
engine oil.
Tightening torque:
44 N
⋅m (4.5 kgf-m, 32.5 ft-lb)
7) Install the service hole cover.
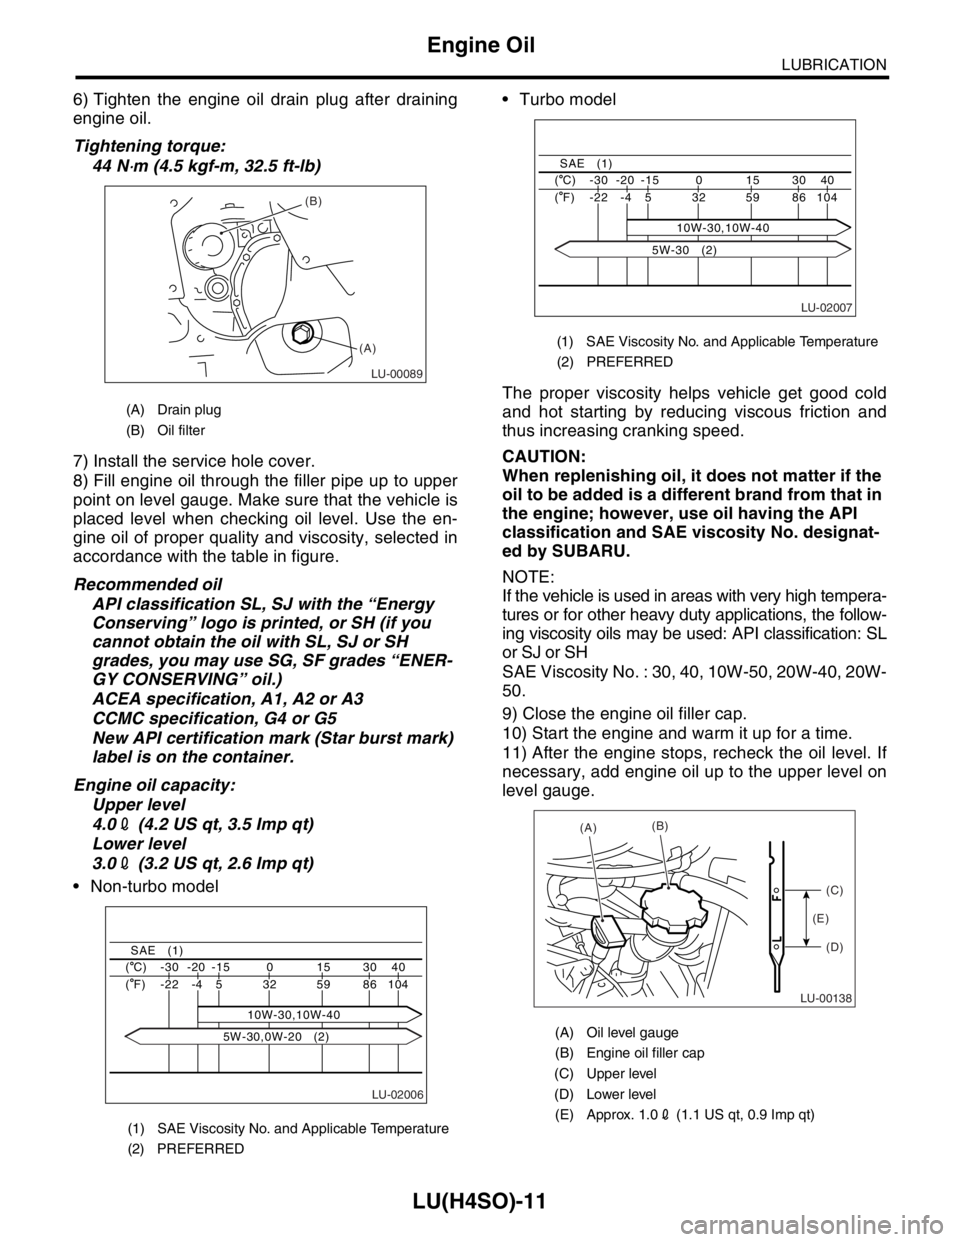
8) Fill engine oil through the filler pipe up to upper
point on level gauge. Make sure that the vehicle is
placed level when checking oil level. Use the en-
gine oil of proper quality and viscosity, selected in
accordance with the table in figure.
Recommended oil
API classification SL, SJ with the “Energy
Conserving” logo is printed, or SH (if you
cannot obtain the oil with SL, SJ or SH
grades, you may use SG, SF grades “ENER-
GY CONSERVING” oil.)
ACEA specification, A1, A2 or A3
CCMC specification, G4 or G5
New API certification mark (Star burst mark)
label is on the container.
Engine oil capacity:
Upper level
4.02 (4.2 US qt, 3.5 Imp qt)
Lower level
3.02 (3.2 US qt, 2.6 Imp qt)
Non-turbo model Turbo model
The proper viscosity helps vehicle get good cold
and hot starting by reducing viscous friction and
thus increasing cranking speed.
CAUTION:
When replenishing oil, it does not matter if the
oil to be added is a different brand from that in
the engine; however, use oil having the API
classification and SAE viscosity No. designat-
ed by SUBARU.
NOTE:
If the vehicle is used in areas with very high tempera-
tures or for other heavy duty applications, the follow-
ing viscosity oils may be used: API classification: SL
or SJ or SH
SAE Viscosity No. : 30, 40, 10W-50, 20W-40, 20W-
50.
9) Close the engine oil filler cap.
10) Start the engine and warm it up for a time.
11) After the engine stops, recheck the oil level. If
necessary, add engine oil up to the upper level on
level gauge.
(A) Drain plug
(B) Oil filter
(1) SAE Viscosity No. and Applicable Temperature
(2) PREFERRED
LU-00089
(B)
(A)
LU-02006
40 30 15 0 -15 -20 -30 ( C)
104 86 59 32
10W-30,10W-40 5 -4 -22 ( F)
SAE (1)
5W-30,0W-20 (2)
(1) SAE Viscosity No. and Applicable Temperature
(2) PREFERRED
(A) Oil level gauge
(B) Engine oil filler cap
(C) Upper level
(D) Lower level
(E) Approx. 1.02 (1.1 US qt, 0.9 Imp qt)
LU-02007
40 30 15 0 -15 -20 -30 ( C)
104 86 59 32 5 -4 -22 ( F)
SAE (1)
10W-30,10W-40
5W-30 (2)
LU-00138
(A)(B)
(C)
(D) (E)
Page 1041 of 2870

LU(H4SO)-13
LUBRICATION
Oil Pump
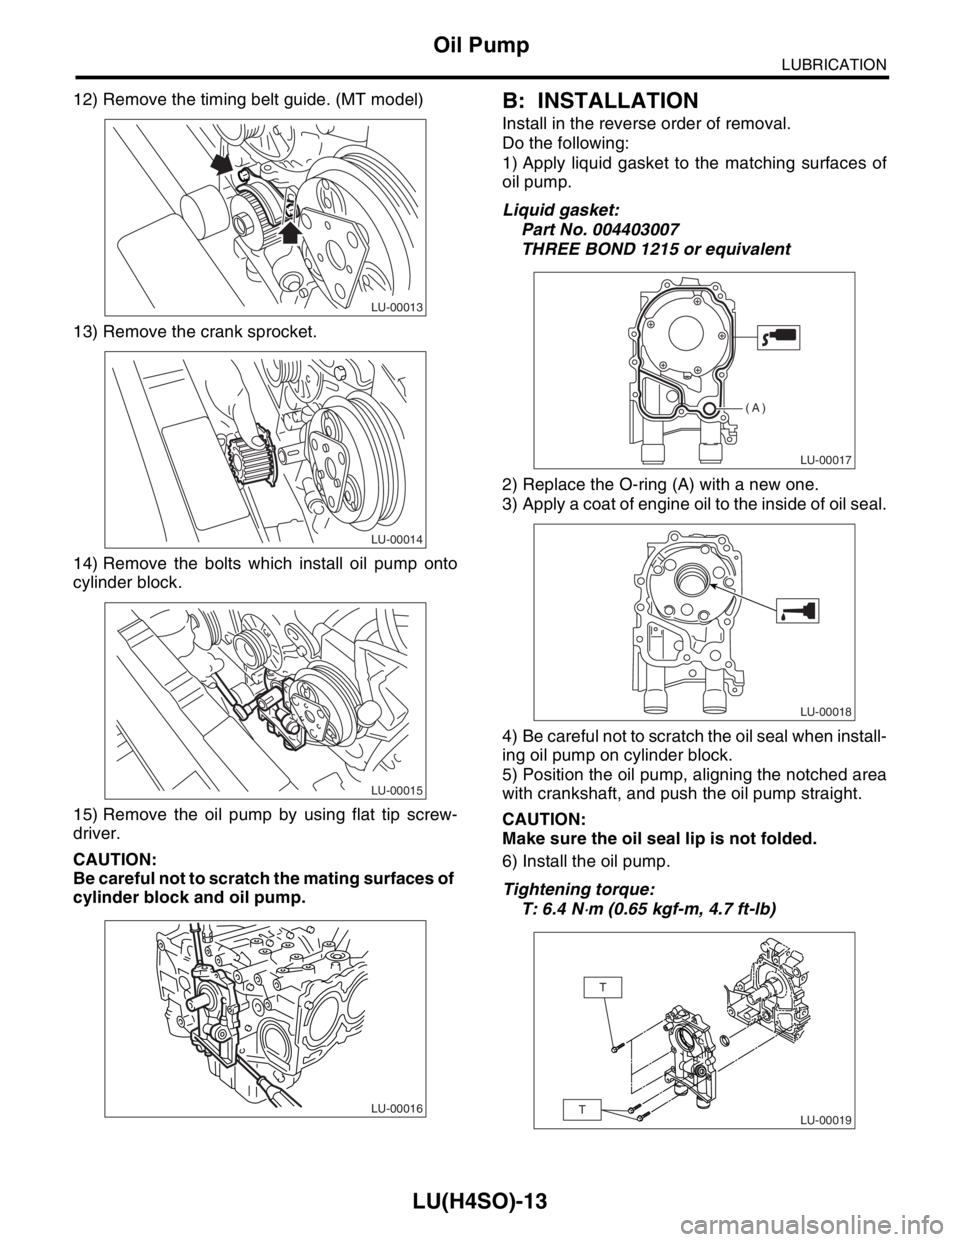
12) Remove the timing belt guide. (MT model)
13) Remove the crank sprocket.
14) Remove the bolts which install oil pump onto
cylinder block.
15) Remove the oil pump by using flat tip screw-
driver.
CAUTION:
Be careful not to scratch the mating surfaces of
cylinder block and oil pump.B: INSTALLATION
Install in the reverse order of removal.
Do the following:
1) Apply liquid gasket to the matching surfaces of
oil pump.
Liquid gasket:
Part No. 004403007
THREE BOND 1215 or equivalent
2) Replace the O-ring (A) with a new one.
3) Apply a coat of engine oil to the inside of oil seal.
4) Be careful not to scratch the oil seal when install-
ing oil pump on cylinder block.
5) Position the oil pump, aligning the notched area
with crankshaft, and push the oil pump straight.
CAUTION:
Make sure the oil seal lip is not folded.
6) Install the oil pump.
Tightening torque:
T: 6.4 N
⋅m (0.65 kgf-m, 4.7 ft-lb)
LU-00013
LU-00014
LU-00015
LU-00016
LU-00017
(A)
LU-00018
LU-00019
T
T
Page 1042 of 2870
LU(H4SO)-14
LUBRICATION
Oil Pump
C: DISASSEMBLY
Remove the screws which secure oil pump cover
and disassemble oil pump. Inscribe alignment
marks on the inner and outer rotors so that they can
be replaced in their original positions during reas-
sembly.
CAUTION:
Before disassembling the oil pump, remove the
relief valve.
D: ASSEMBLY
1) Install the front oil seal by using ST.
ST 499587100 OIL SEAL INSTALLER
NOTE:
Use a new oil seal.
2) Apply a coat of engine oil to the inner and outer
rotors.
3) Install the inner and outer rotors in their original
positions.
4) Install the oil relief valve and relief valve spring
and plug.
NOTE:
Use a new gasket.
5) Install the oil pump cover.
Tightening torque:
T1: 5 N
⋅m (0.5 kgf-m, 3.6 ft-lb)
T2: 44 N
⋅m (4.5 kgf-m, 32.5 ft-lb)
(A) Oil seal
(B) Pump case
(C) Inner rotor
(D) Outer rotor
(E) Pump cover
(F) Relief valve
(G) Relief valve spring
(H) Plug
(I) Gasket
LU-00020
(E)
(D)
(C)
(B)
(A)
(F)
(G)(I)
(H)
LU-00021
ST
LU-00022
T1
T2