Page 930 of 2870
ME(H4SO)-59
MECHANICAL
Camshaft
16) Remove the plug from rear side of camshaft.
CAUTION:
Do not remove the oil seal unless necessary.
Do not scratch the journal surface when re-
moving oil seal.
B: INSTALLATION
1) Apply a coat of engine oil to the camshaft jour-
nals, and then install the camshaft.
2) Install the camshaft cap.
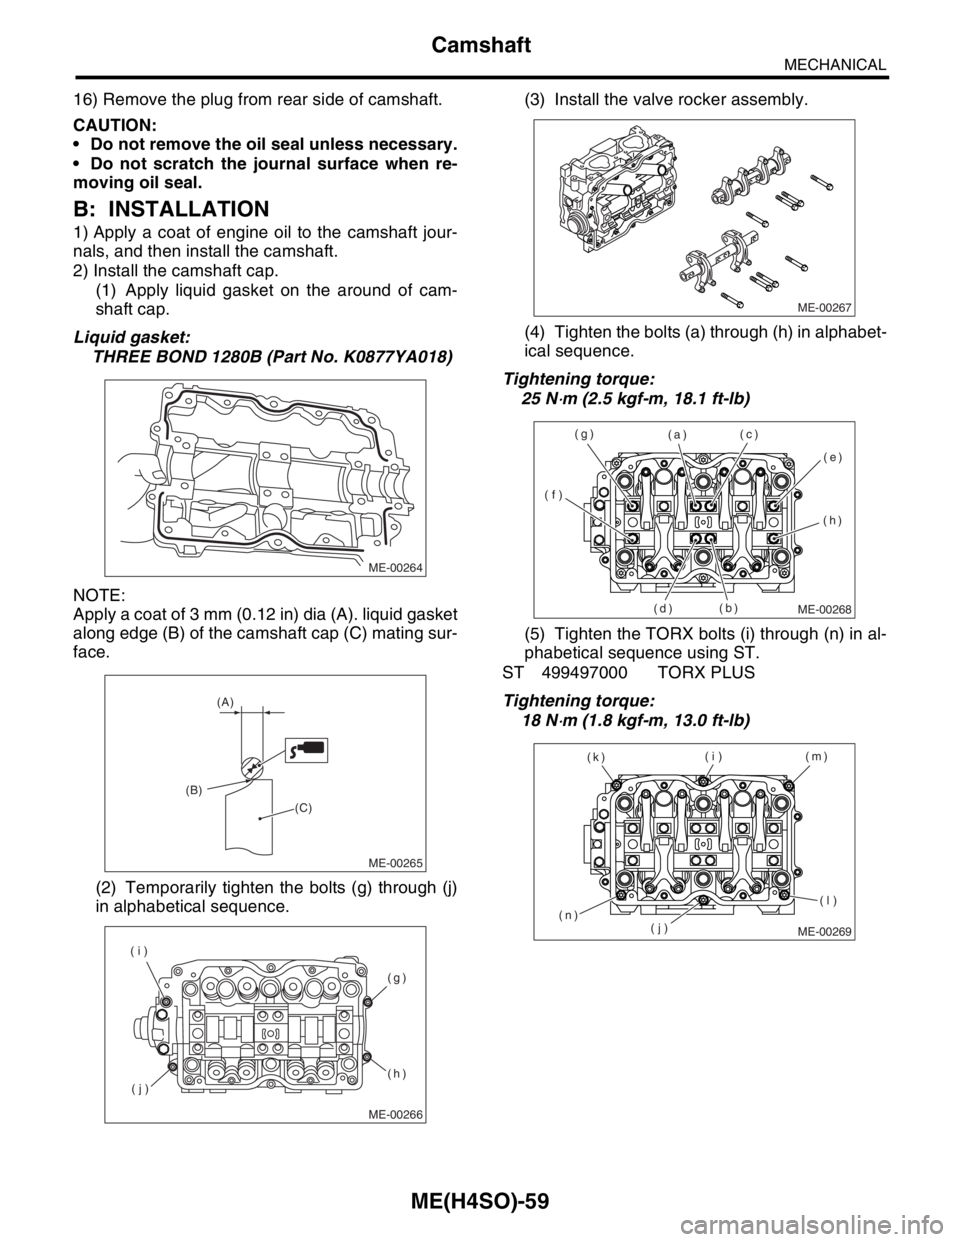
(1) Apply liquid gasket on the around of cam-
shaft cap.
Liquid gasket:
THREE BOND 1280B (Part No. K0877YA018)
NOTE:
Apply a coat of 3 mm (0.12 in) dia (A). liquid gasket
along edge (B) of the camshaft cap (C) mating sur-
face.
(2) Temporarily tighten the bolts (g) through (j)
in alphabetical sequence.(3) Install the valve rocker assembly.
(4) Tighten the bolts (a) through (h) in alphabet-
ical sequence.
Tightening torque:
25 N
⋅m (2.5 kgf-m, 18.1 ft-lb)
(5) Tighten the TORX bolts (i) through (n) in al-
phabetical sequence using ST.
ST 499497000 TORX PLUS
Tightening torque:
18 N
⋅m (1.8 kgf-m, 13.0 ft-lb)
ME-00264
ME-00265
(A)
(B)
(C)
ME-00266
(g)
(h)
(j) (i)
ME-00267
ME-00268
(a)
(b)(c)
(d)(e)
(f)(g)
(h)
ME-00269
(i)
(j)(m)
(n)(k)
(l)
Page 933 of 2870
ME(H4SO)-62
MECHANICAL
Cylinder Head
20.Cylinder Head
A: REMOVAL
1) Remove the V-belt.
MOVAL, V-belt.>
2) Remove the crank pulley.
45, REMOVAL, Crank Pulley.>
3) Remove the timing belt cover.
ME(H4SO)-47, REMOVAL, Timing Belt Cover.>
4) Remove the timing belt.
REMOVAL, Timing Belt.>
5) Remove the cam sprocket.
53, REMOVAL, Cam Sprocket.>
6) Remove the intake manifold.
14, REMOVAL, Intake Manifold.>
7) Remove the bolt which installs A/C compressor
bracket on cylinder head.
8) Remove the valve rocker assembly.
ME(H4SO)-56, REMOVAL, Valve Rocker Assem-
bly.>
9) Remove the camshaft.
REMOVAL, Camshaft.>
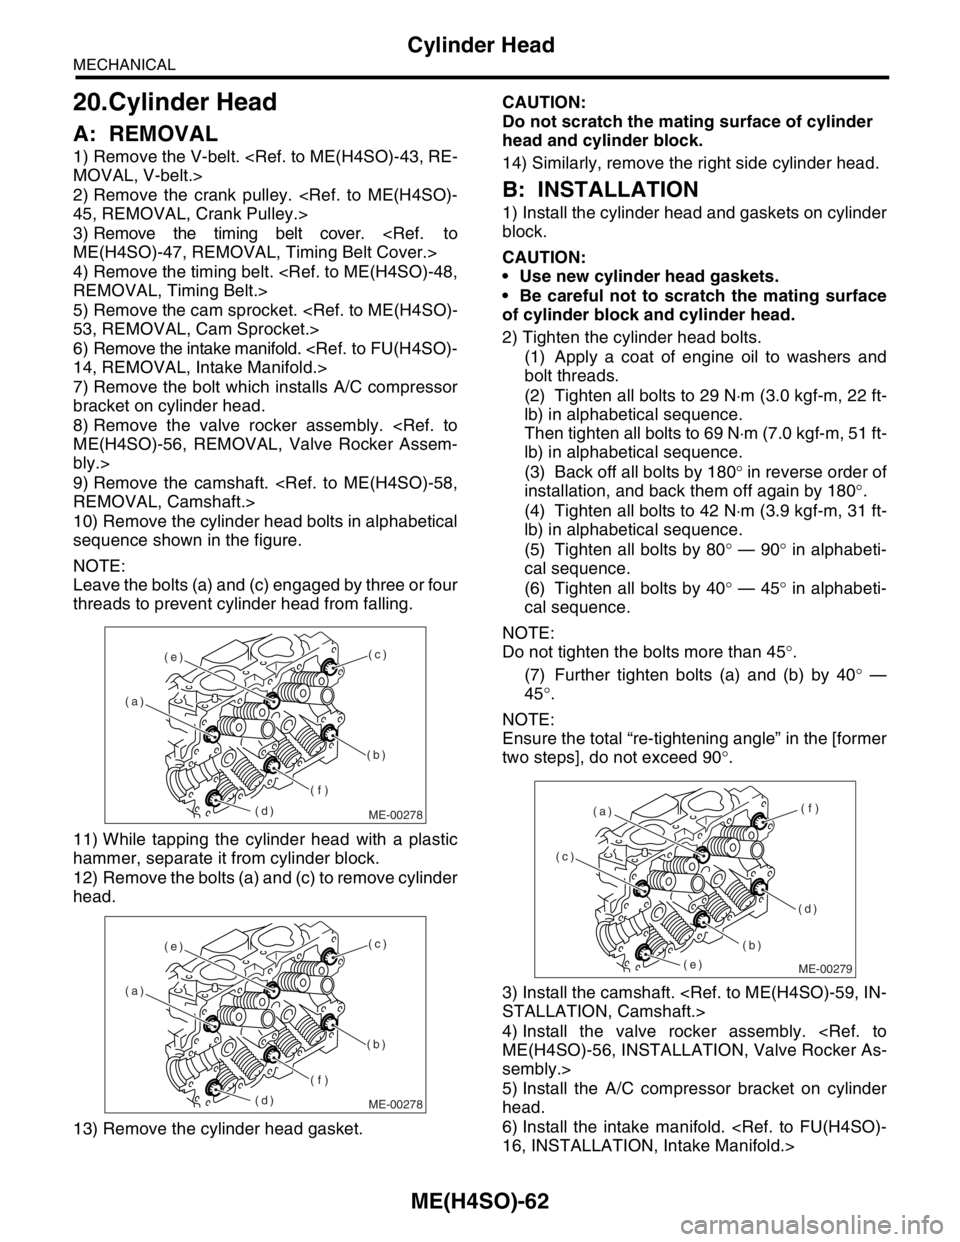
10) Remove the cylinder head bolts in alphabetical
sequence shown in the figure.
NOTE:
Leave the bolts (a) and (c) engaged by three or four
threads to prevent cylinder head from falling.
11) While tapping the cylinder head with a plastic
hammer, separate it from cylinder block.
12) Remove the bolts (a) and (c) to remove cylinder
head.
13) Remove the cylinder head gasket.CAUTION:
Do not scratch the mating surface of cylinder
head and cylinder block.
14) Similarly, remove the right side cylinder head.
B: INSTALLATION
1) Install the cylinder head and gaskets on cylinder
block.
CAUTION:
Use new cylinder head gaskets.
Be careful not to scratch the mating surface
of cylinder block and cylinder head.
2) Tighten the cylinder head bolts.
(1) Apply a coat of engine oil to washers and
bolt threads.
(2) Tighten all bolts to 29 N⋅m (3.0 kgf-m, 22 ft-
lb) in alphabetical sequence.
Then tighten all bolts to 69 N⋅m (7.0 kgf-m, 51 ft-
lb) in alphabetical sequence.
(3) Back off all bolts by 180° in reverse order of
installation, and back them off again by 180°.
(4) Tighten all bolts to 42 N⋅m (3.9 kgf-m, 31 ft-
lb) in alphabetical sequence.
(5) Tighten all bolts by 80° — 90° in alphabeti-
cal sequence.
(6) Tighten all bolts by 40° — 45° in alphabeti-
cal sequence.
NOTE:
Do not tighten the bolts more than 45°.
(7) Further tighten bolts (a) and (b) by 40° —
45°.
NOTE:
Ensure the total “re-tightening angle” in the [former
two steps], do not exceed 90°.
3) Install the camshaft.
STALLATION, Camshaft.>
4) Install the valve rocker assembly.
ME(H4SO)-56, INSTALLATION, Valve Rocker As-
sembly.>
5) Install the A/C compressor bracket on cylinder
head.
6) Install the intake manifold.
16, INSTALLATION, Intake Manifold.>
ME-00278
(c)
(b)
(f)
(d) (a)(e)
ME-00278
(c)
(b)
(f)
(d) (a)(e)
ME-00279
(c)
(b)(f)
(d) (a)
(e)
Page 935 of 2870
ME(H4SO)-64
MECHANICAL
Cylinder Head
D: ASSEMBLY
1) Installation of valve spring and valve
(1) Place the cylinder head on ST.
ST 498267800 CYLINDER HEAD TABLE
(2) Coat the stem of each valve with engine oil
and insert valve into valve guide.
NOTE:
When inserting the valve into valve guide, use spe-
cial care not to damage the oil seal lip.
(3) Install the valve spring and retainer.
NOTE:
Be sure to install the valve springs with their close-
coiled end facing the seat on the cylinder head.(4) Set the ST on valve spring.
ST 499718000 VALVE SPRING REMOVER
(1) Valve (6) Retainer (11) Plug
(2) Valve guide (7) Retainer key (12) Camshaft cap
(3) Valve spring seat (8) Spark plug gasket (13) Valve rocker ASSY
(4) Oil seal (9) Camshaft
(5) Valve spring (10) Oil seal
ME-00281 (10)(9)(6) (1)
(2)(3)
(4)(5)
(7)(8)
(11)
(13) (12)
ME-00280
ST
Page 936 of 2870
ME(H4SO)-65
MECHANICAL
Cylinder Head
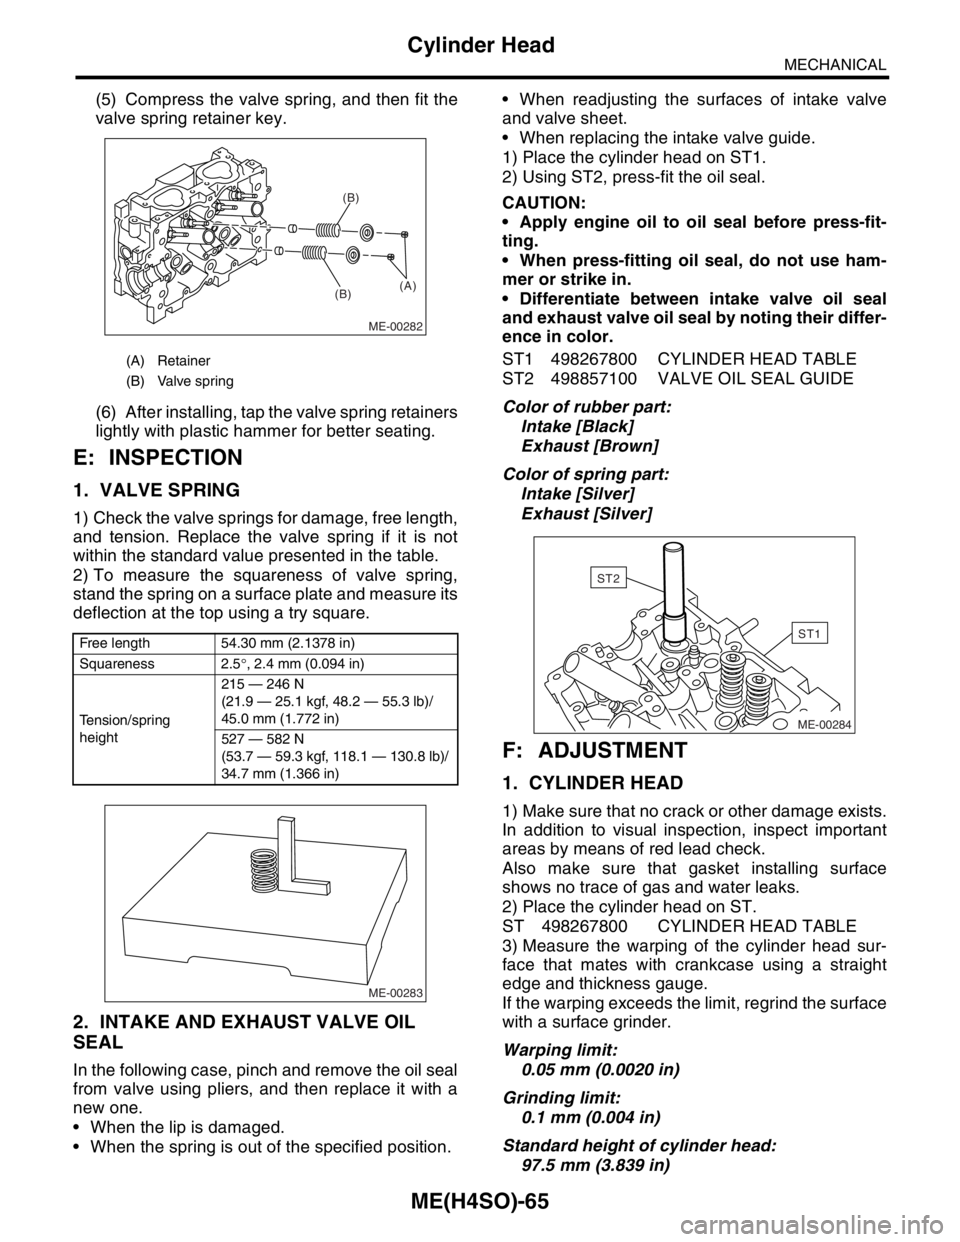
(5) Compress the valve spring, and then fit the
valve spring retainer key.
(6) After installing, tap the valve spring retainers
lightly with plastic hammer for better seating.
E: INSPECTION
1. VALVE SPRING
1) Check the valve springs for damage, free length,
and tension. Replace the valve spring if it is not
within the standard value presented in the table.
2) To measure the squareness of valve spring,
stand the spring on a surface plate and measure its
deflection at the top using a try square.
2. INTAKE AND EXHAUST VALVE OIL
SEAL
In the following case, pinch and remove the oil seal
from valve using pliers, and then replace it with a
new one.
When the lip is damaged.
When the spring is out of the specified position. When readjusting the surfaces of intake valve
and valve sheet.
When replacing the intake valve guide.
1) Place the cylinder head on ST1.
2) Using ST2, press-fit the oil seal.
CAUTION:
Apply engine oil to oil seal before press-fit-
ting.
When press-fitting oil seal, do not use ham-
mer or strike in.
Differentiate between intake valve oil seal
and exhaust valve oil seal by noting their differ-
ence in color.
ST1 498267800 CYLINDER HEAD TABLE
ST2 498857100 VALVE OIL SEAL GUIDE
Color of rubber part:
Intake [Black]
Exhaust [Brown]
Color of spring part:
Intake [Silver]
Exhaust [Silver]
F: ADJUSTMENT
1. CYLINDER HEAD
1) Make sure that no crack or other damage exists.
In addition to visual inspection, inspect important
areas by means of red lead check.
Also make sure that gasket installing surface
shows no trace of gas and water leaks.
2) Place the cylinder head on ST.
ST 498267800 CYLINDER HEAD TABLE
3) Measure the warping of the cylinder head sur-
face that mates with crankcase using a straight
edge and thickness gauge.
If the warping exceeds the limit, regrind the surface
with a surface grinder.
Warping limit:
0.05 mm (0.0020 in)
Grinding limit:
0.1 mm (0.004 in)
Standard height of cylinder head:
97.5 mm (3.839 in)
(A) Retainer
(B) Valve spring
Free length 54.30 mm (2.1378 in)
Squareness 2.5°, 2.4 mm (0.094 in)
Tension/spring
height215 — 246 N
(21.9 — 25.1 kgf, 48.2 — 55.3 lb)/
45.0 mm (1.772 in)
527 — 582 N
(53.7 — 59.3 kgf, 118.1 — 130.8 lb)/
34.7 mm (1.366 in)
ME-00282
(B)(B)
(A)
ME-00283
ME-00284
ST1
ST2
Page 938 of 2870
ME(H4SO)-67
MECHANICAL
Cylinder Head
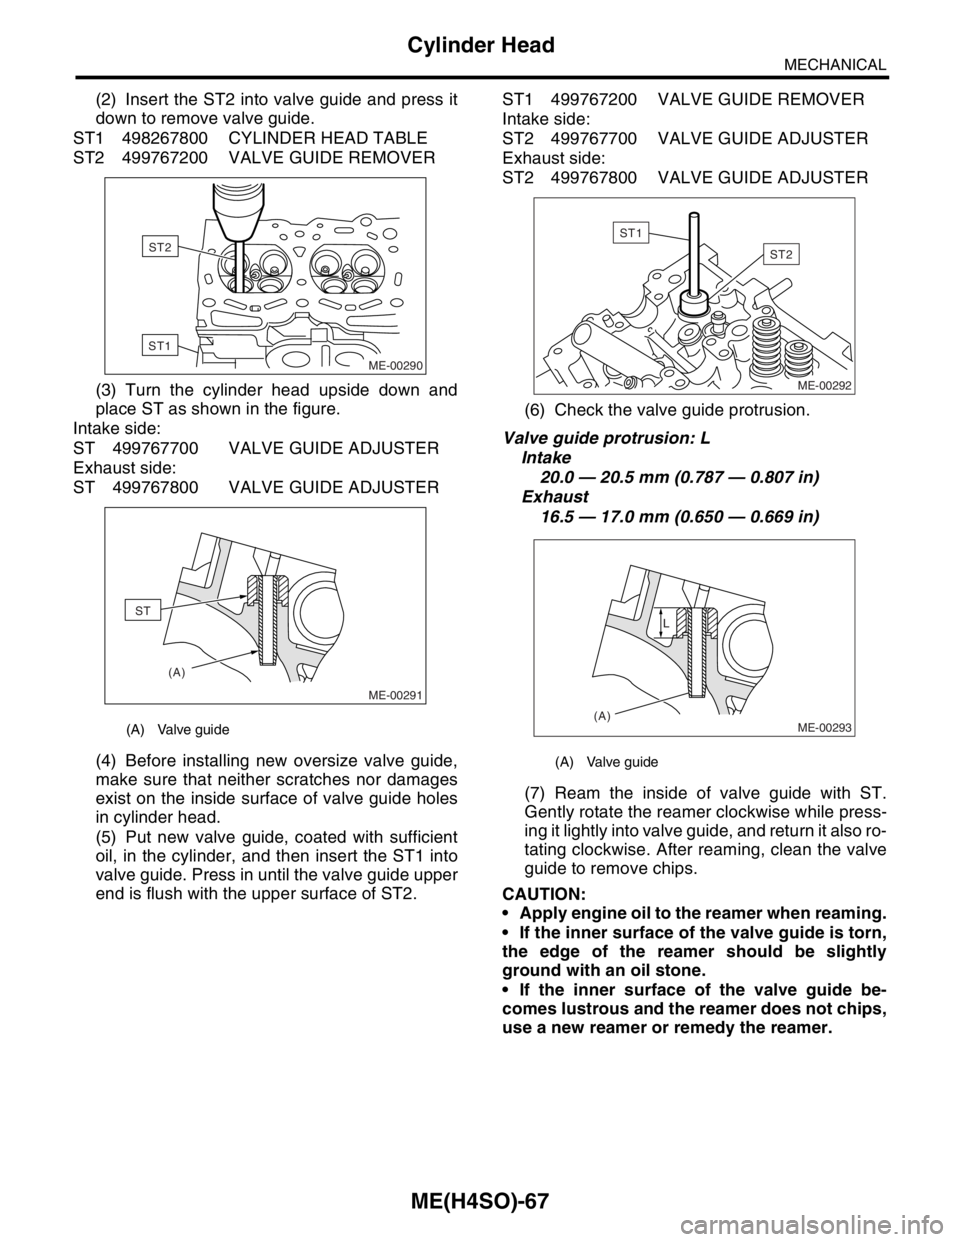
(2) Insert the ST2 into valve guide and press it
down to remove valve guide.
ST1 498267800 CYLINDER HEAD TABLE
ST2 499767200 VALVE GUIDE REMOVER
(3) Turn the cylinder head upside down and
place ST as shown in the figure.
Intake side:
ST 499767700 VALVE GUIDE ADJUSTER
Exhaust side:
ST 499767800 VALVE GUIDE ADJUSTER
(4) Before installing new oversize valve guide,
make sure that neither scratches nor damages
exist on the inside surface of valve guide holes
in cylinder head.
(5) Put new valve guide, coated with sufficient
oil, in the cylinder, and then insert the ST1 into
valve guide. Press in until the valve guide upper
end is flush with the upper surface of ST2.ST1 499767200 VALVE GUIDE REMOVER
Intake side:
ST2 499767700 VALVE GUIDE ADJUSTER
Exhaust side:
ST2 499767800 VALVE GUIDE ADJUSTER
(6) Check the valve guide protrusion.
Valve guide protrusion: L
Intake
20.0 — 20.5 mm (0.787 — 0.807 in)
Exhaust
16.5 — 17.0 mm (0.650 — 0.669 in)
(7) Ream the inside of valve guide with ST.
Gently rotate the reamer clockwise while press-
ing it lightly into valve guide, and return it also ro-
tating clockwise. After reaming, clean the valve
guide to remove chips.
CAUTION:
Apply engine oil to the reamer when reaming.
If the inner surface of the valve guide is torn,
the edge of the reamer should be slightly
ground with an oil stone.
If the inner surface of the valve guide be-
comes lustrous and the reamer does not chips,
use a new reamer or remedy the reamer.
(A) Valve guide
ME-00290
ST2
ST1
(A)
ME-00291
ST
(A) Valve guide
ST2
ME-00292
ST1
ME-00293(A)L
Page 940 of 2870
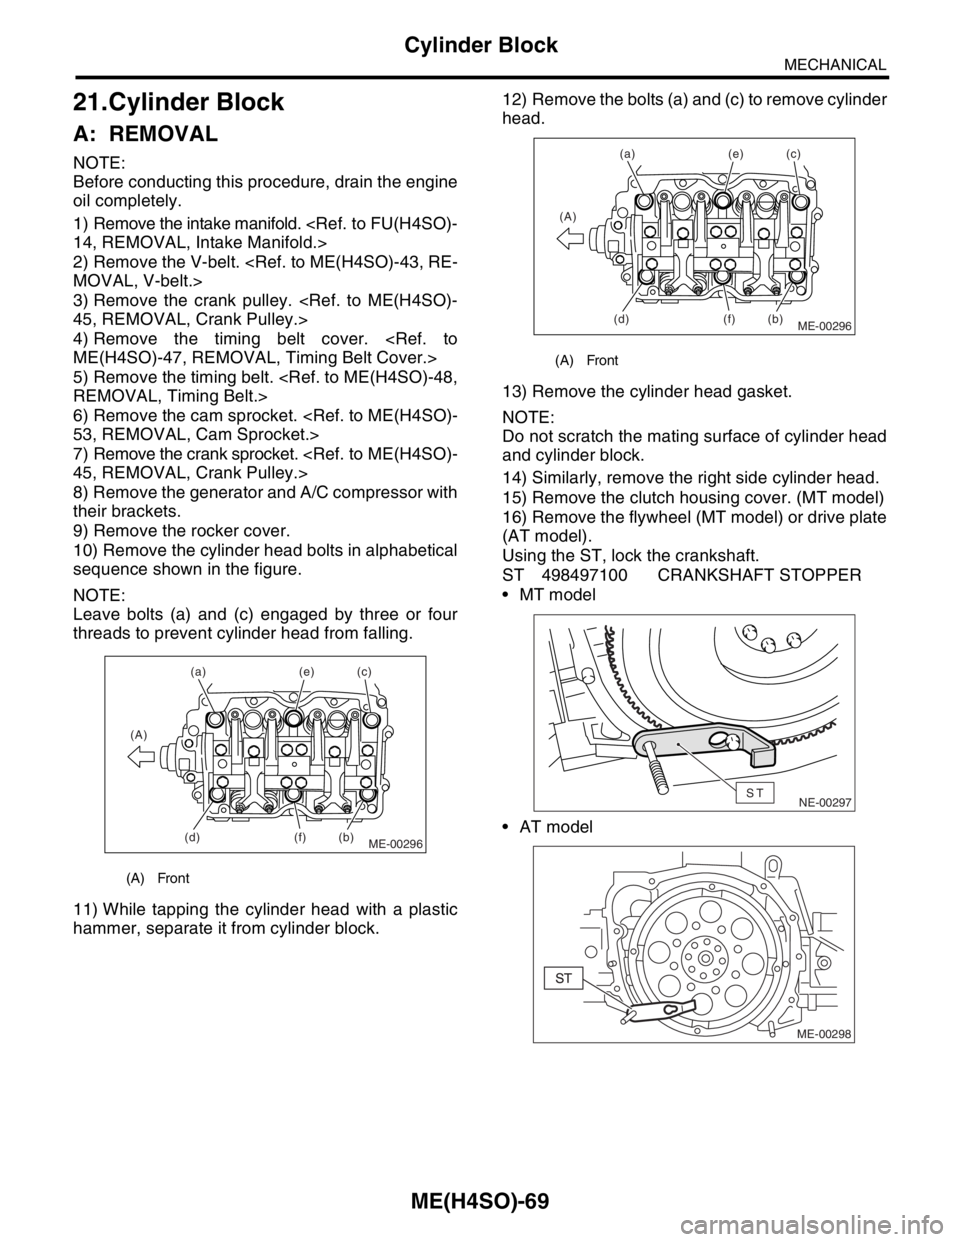
ME(H4SO)-69
MECHANICAL
Cylinder Block
21.Cylinder Block
A: REMOVAL
NOTE:
Before conducting this procedure, drain the engine
oil completely.
1) Remove the intake manifold.
14, REMOVAL, Intake Manifold.>
2) Remove the V-belt.
MOVAL, V-belt.>
3) Remove the crank pulley.
45, REMOVAL, Crank Pulley.>
4) Remove the timing belt cover.
ME(H4SO)-47, REMOVAL, Timing Belt Cover.>
5) Remove the timing belt.
REMOVAL, Timing Belt.>
6) Remove the cam sprocket.
53, REMOVAL, Cam Sprocket.>
7) Remove the crank sprocket.
45, REMOVAL, Crank Pulley.>
8) Remove the generator and A/C compressor with
their brackets.
9) Remove the rocker cover.
10) Remove the cylinder head bolts in alphabetical
sequence shown in the figure.
NOTE:
Leave bolts (a) and (c) engaged by three or four
threads to prevent cylinder head from falling.
11) While tapping the cylinder head with a plastic
hammer, separate it from cylinder block.12) Remove the bolts (a) and (c) to remove cylinder
head.
13) Remove the cylinder head gasket.
NOTE:
Do not scratch the mating surface of cylinder head
and cylinder block.
14) Similarly, remove the right side cylinder head.
15) Remove the clutch housing cover. (MT model)
16) Remove the flywheel (MT model) or drive plate
(AT model).
Using the ST, lock the crankshaft.
ST 498497100 CRANKSHAFT STOPPER
MT model
AT model
(A) Front
ME-00296
(a)
(b)(c) (e)
(f) (A)
(d)
(A) Front
ME-00296
(a)
(b)(c) (e)
(f) (A)
(d)
NE-00297ST
ME-00298
Page 944 of 2870
ME(H4SO)-73
MECHANICAL
Cylinder Block
B: INSTALLATION
NOTE:
Remove oil in the mating surface of bearing and
cylinder block before installation. Also apply a coat
of engine oil to crankshaft pins.
1) Position the crankshaft on #2 and #4 cylinder
block.
2) Apply liquid gasket to the mating surface of #1
and #3 cylinder block, and position it on #2 and #4
cylinder block.
Liquid gasket:
THREE BOND 1215 (Part No. 004403007) or
equivalentNOTE:
Do not allow liquid gasket to jut into O-ring grooves,
oil passages, bearing grooves, etc.
3) Apply engine oil to washers and bolt threads.
(1) Crankshaft bearing (3) Cylinder block (4) Rear oil seal
(2) Crankshaft
ME-00144
( 1 )
( 1 )
( 2 )
( 3 )
( 3 )
( 4 )
ME-00145
Page 947 of 2870
ME(H4SO)-76
MECHANICAL
Cylinder Block
2.5 L model
CAUTION:
Ensure ring gaps do not face the same direc-
tion.
Ensure ring gaps are not within the piston
skirt area.
15) Install snap ring.
Install snap rings in the piston holes located oppo-
site service holes in cylinder block, when position-
ing all pistons in the corresponding cylinders.
NOTE:
Use new snap rings.
CAUTION:
Piston front mark faces towards the front of the
engine.
2.0 L model 2.5 L model
(A) Front side
ME-00415
5SH
(G)
ME-00306
#4 #3
#2 #1
(A)
ME-00387
B0SH
(A) Front mark
ME-00404
5SH
(A)