2004 NISSAN TERRANO belt
[x] Cancel search: beltPage 1288 of 1833
IInstall driver air bag module to steering wheel to check fit or
alignment with the wheel.
I Check steering wheel for excessive free play.
I Install front passenger air bag module to instrument panel to
check fit or alignment with the instrument panel.
I Install front side air bag module to seatback to check fit and
alignment with the seat.
3) Spiral cable
I Check spiral cable for dents, cracks, or deformities.
I Check connectors and protective tape for damage.
I Check steering wheel for noise, binding or heavy operation.
4) Main harness, body harness, side air bag module sub-harness
I Check connectors for poor connections, damage, and terminals
for deformities.
I Check harnesses for binding, chafing or cut.
5) Front seat belt pre-tensioner
I Check harness cover and connectors for damage, terminals for
deformities, and harness for binding.
I Check belts for damage and anchors for loose mounting.
I Check retractor for smooth operation.
I Perform self-diagnosis for seat belt pre-tensioner using ªAIR
BAGº warning lamp or CONSULT-II.
Refer to ªSRS Operation Checkº for details. (RS-38)
6) Side air bag (satellite) sensor
I Check side air bag (satellite) sensor (including bracket portion)
for dents, cracks or deformities.
I Check connectors for damage, and terminals for deformities.
CAUTION:
Replace previously used special bolts and ground bolt with
new ones.
Diagnosis Sensor Unit
REMOVAL AND INSTALLATION
CAUTION:
I Before servicing SRS, turn the ignition switch off, discon-
nect both battery cables and wait at least 3 minutes.
I The special bolts are coated with bonding agent while the
other bolt is for ground. Do not use old bolts after removal;
replace with new ones.
I Check diagnosis sensor unit for proper installation.
I Check diagnosis sensor unit to ensure it is free of
deformities, dents, cracks or rust. If they show any visible
signs of damage, replace them with new ones.
I Check diagnosis sensor unit brackets to ensure they are
free of deformities or rust.
I Replace diagnosis sensor unit if it has been dropped or
sustained an impact.
I After replacement of diagnosis sensor unit, perform self-
diagnosis for SRS. Refer to ªSRS Operation Checkº for
details. (RS-38)
1. Disconnect driver, front passenger and front side air bag mod- ule connectors. Also, disconnect front seat belt pre-tensioner
connector.
2. Remove console box. Refer to BT-22, ªINSTRUMENT PANEL ASSEMBLYº.
3. Disconnect diagnosis sensor unit connector.
4. Remove ground bolt and also remove special bolts using the TAMPER RESISTANT TORX (Size T50), from diagnosis sen-
sor unit.
Then remove the diagnosis sensor unit.
SUPPLEMENTAL RESTRAINT SYSTEM (SRS)
Maintenance Items (Cont'd)
RS-13
http://vnx.su/
Page 1289 of 1833
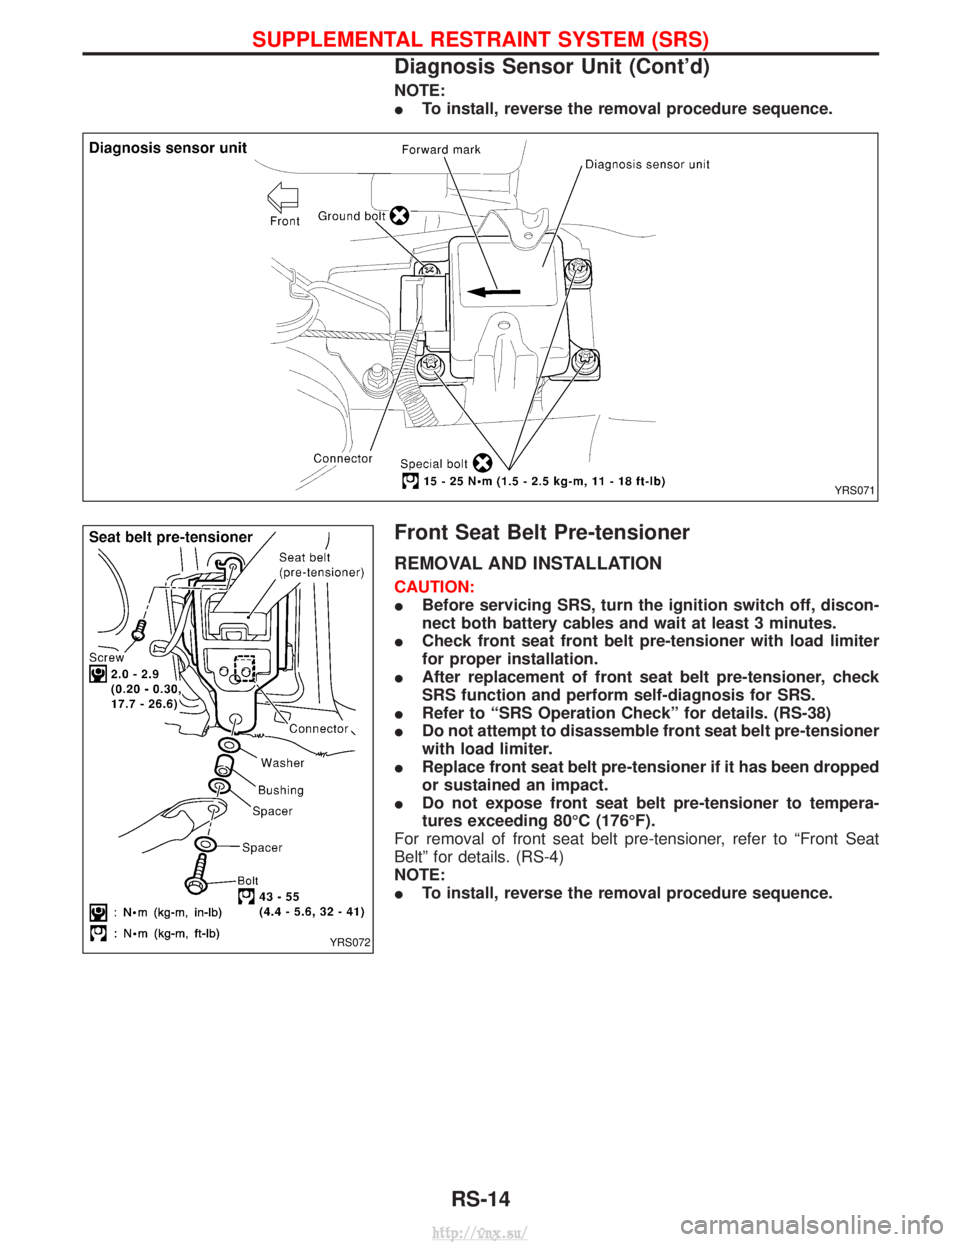
NOTE:
ITo install, reverse the removal procedure sequence.
Front Seat Belt Pre-tensioner
REMOVAL AND INSTALLATION
CAUTION:
IBefore servicing SRS, turn the ignition switch off, discon-
nect both battery cables and wait at least 3 minutes.
I Check front seat front belt pre-tensioner with load limiter
for proper installation.
I After replacement of front seat belt pre-tensioner, check
SRS function and perform self-diagnosis for SRS.
I Refer to ªSRS Operation Checkº for details. (RS-38)
I Do not attempt to disassemble front seat belt pre-tensioner
with load limiter.
I Replace front seat belt pre-tensioner if it has been dropped
or sustained an impact.
I Do not expose front seat belt pre-tensioner to tempera-
tures exceeding 80ÉC (176ÉF).
For removal of front seat belt pre-tensioner, refer to ªFront Seat
Beltº for details. (RS-4)
NOTE:
I To install, reverse the removal procedure sequence.
YRS071
YRS072
SUPPLEMENTAL RESTRAINT SYSTEM (SRS)
Diagnosis Sensor Unit (Cont'd)
RS-14
http://vnx.su/
Page 1290 of 1833
Side Air Bag (Satellite) Sensor
REMOVAL AND INSTALLATION
CAUTION:
IBefore servicing SRS, turn the ignition switch off, discon-
nect both battery cables and wait at least 3 minutes.
I Do not use old bolts coated with bonding agent after
removal; replace with new ones.
I Check side air bag (satellite) sensor for proper installation.
I Check side air bag (satellite) sensor to ensure they are free
of deformities, dents, cracks or rust. If it shows any visible
signs of damage, replace it with new one.
I After replacement of side air bag (satellite) sensor, check
SRS function and perform self-diagnosis for SRS. Refer to
ªSRS Operation Checkº for details. (RS-38)
I Do not attempt to disassemble side air bag (satellite) sen-
sor.
I Replace side air bag (satellite) sensor if it has been
dropped or sustained an impact.
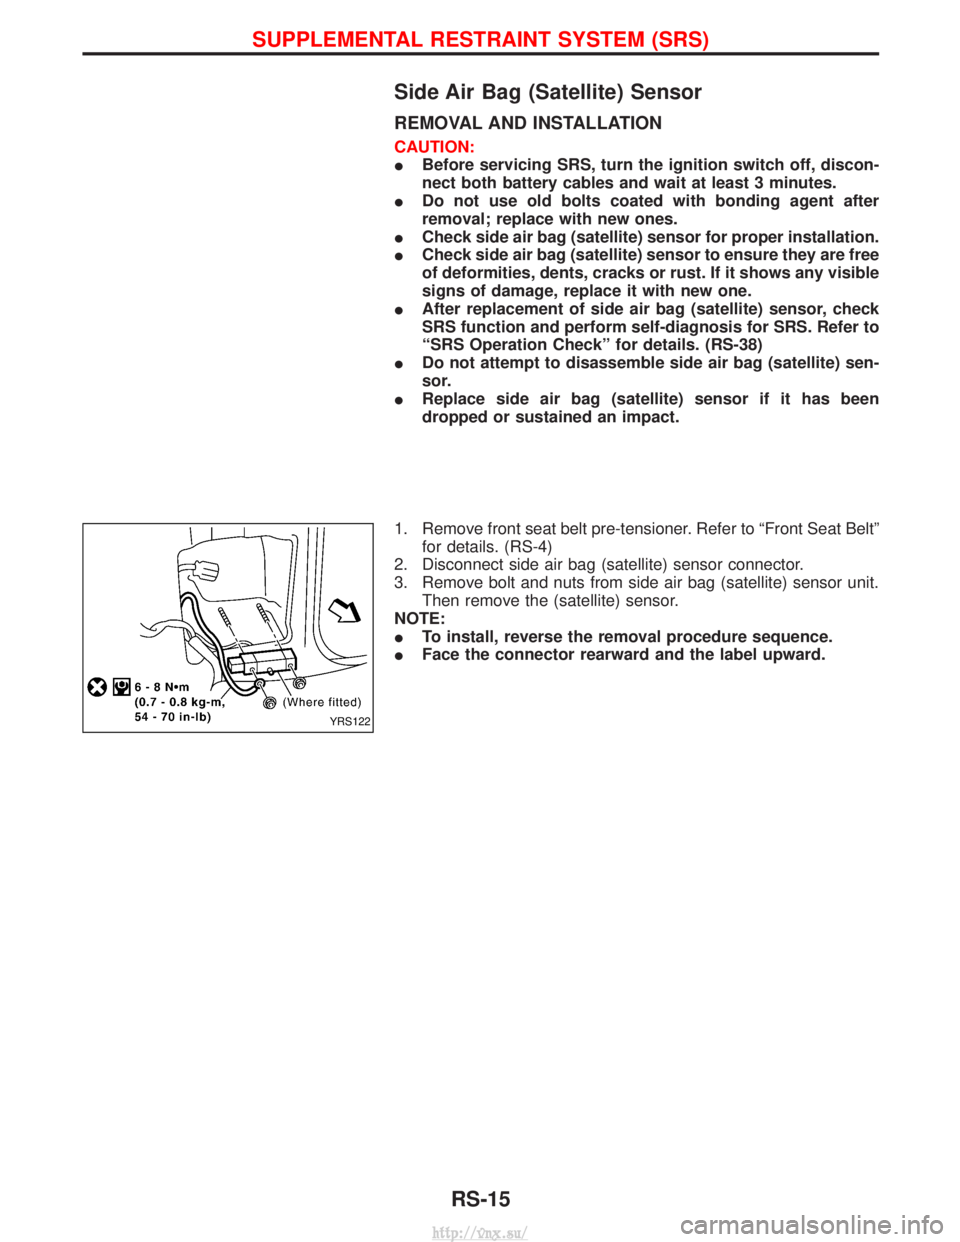
1. Remove front seat belt pre-tensioner. Refer to ªFront Seat Beltº for details. (RS-4)
2. Disconnect side air bag (satellite) sensor connector.
3. Remove bolt and nuts from side air bag (satellite) sensor unit. Then remove the (satellite) sensor.
NOTE:
I To install, reverse the removal procedure sequence.
I Face the connector rearward and the label upward.
YRS122
SUPPLEMENTAL RESTRAINT SYSTEM (SRS)
RS-15
http://vnx.su/
Page 1297 of 1833
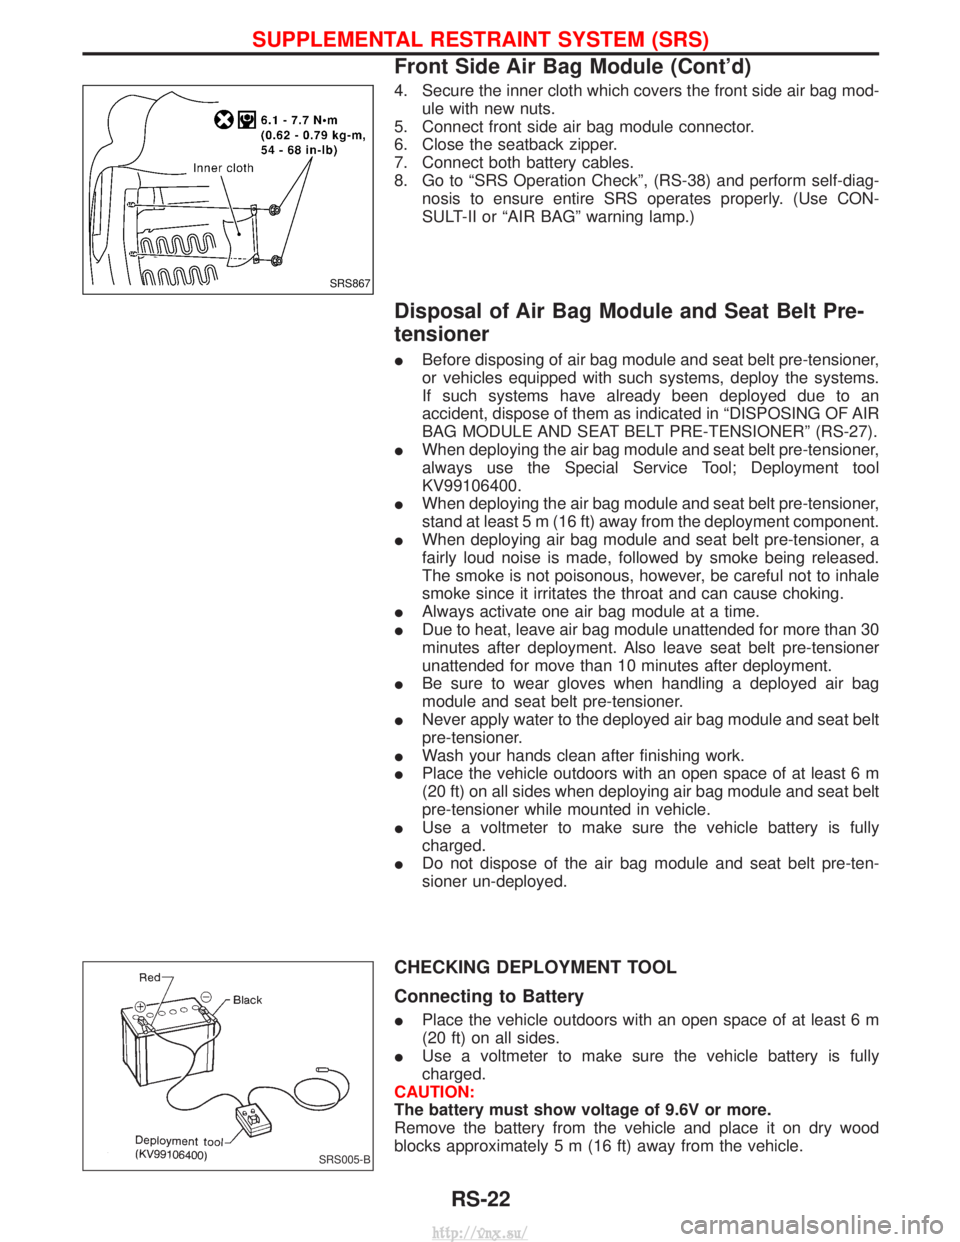
4. Secure the inner cloth which covers the front side air bag mod-ule with new nuts.
5. Connect front side air bag module connector.
6. Close the seatback zipper.
7. Connect both battery cables.
8. Go to ªSRS Operation Checkº, (RS-38) and perform self-diag- nosis to ensure entire SRS operates properly. (Use CON-
SULT-II or ªAIR BAGº warning lamp.)
Disposal of Air Bag Module and Seat Belt Pre-
tensioner
IBefore disposing of air bag module and seat belt pre-tensioner,
or vehicles equipped with such systems, deploy the systems.
If such systems have already been deployed due to an
accident, dispose of them as indicated in ªDISPOSING OF AIR
BAG MODULE AND SEAT BELT PRE-TENSIONERº (RS-27).
I When deploying the air bag module and seat belt pre-tensioner,
always use the Special Service Tool; Deployment tool
KV99106400.
I When deploying the air bag module and seat belt pre-tensioner,
stand at least 5 m (16 ft) away from the deployment component.
I When deploying air bag module and seat belt pre-tensioner, a
fairly loud noise is made, followed by smoke being released.
The smoke is not poisonous, however, be careful not to inhale
smoke since it irritates the throat and can cause choking.
I Always activate one air bag module at a time.
I Due to heat, leave air bag module unattended for more than 30
minutes after deployment. Also leave seat belt pre-tensioner
unattended for move than 10 minutes after deployment.
I Be sure to wear gloves when handling a deployed air bag
module and seat belt pre-tensioner.
I Never apply water to the deployed air bag module and seat belt
pre-tensioner.
I Wash your hands clean after finishing work.
I Place the vehicle outdoors with an open space of at least 6 m
(20 ft) on all sides when deploying air bag module and seat belt
pre-tensioner while mounted in vehicle.
I Use a voltmeter to make sure the vehicle battery is fully
charged.
I Do not dispose of the air bag module and seat belt pre-ten-
sioner un-deployed.
CHECKING DEPLOYMENT TOOL
Connecting to Battery
IPlace the vehicle outdoors with an open space of at least 6 m
(20 ft) on all sides.
I Use a voltmeter to make sure the vehicle battery is fully
charged.
CAUTION:
The battery must show voltage of 9.6V or more.
Remove the battery from the vehicle and place it on dry wood
blocks approximately 5 m (16 ft) away from the vehicle.
SRS867
SRS005-B
SUPPLEMENTAL RESTRAINT SYSTEM (SRS)
Front Side Air Bag Module (Cont'd)
RS-22
http://vnx.su/
Page 1298 of 1833
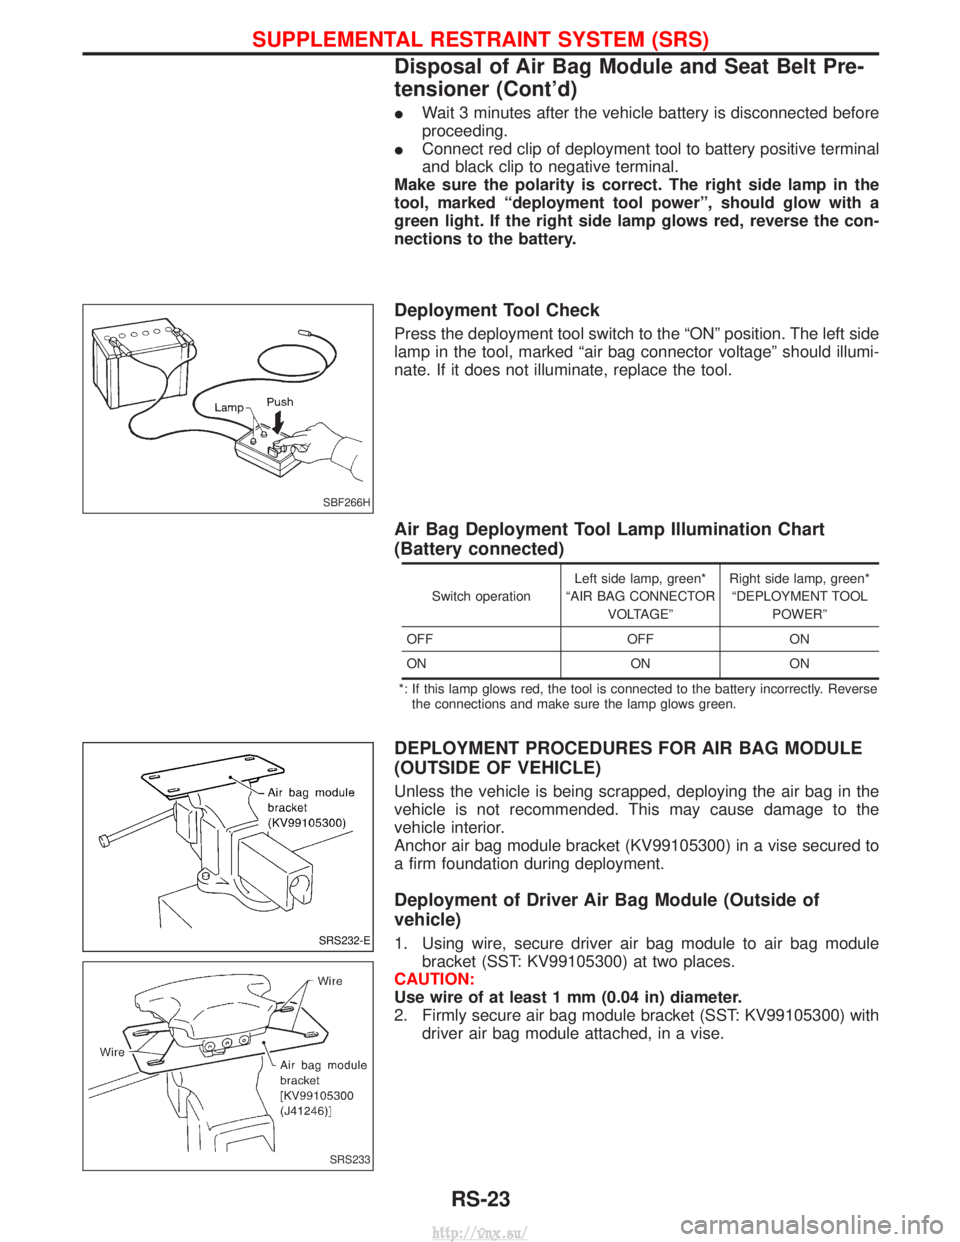
IWait 3 minutes after the vehicle battery is disconnected before
proceeding.
I Connect red clip of deployment tool to battery positive terminal
and black clip to negative terminal.
Make sure the polarity is correct. The right side lamp in the
tool, marked ªdeployment tool powerº, should glow with a
green light. If the right side lamp glows red, reverse the con-
nections to the battery.
Deployment Tool Check
Press the deployment tool switch to the ªONº position. The left side
lamp in the tool, marked ªair bag connector voltageº should illumi-
nate. If it does not illuminate, replace the tool.
Air Bag Deployment Tool Lamp Illumination Chart
(Battery connected)
Switch operation Left side lamp, green*
ªAIR BAG CONNECTOR VOLTAGEº Right side lamp, green*
ªDEPLOYMENT TOOL POWERº
OFF OFFON
ON ON ON
*: If this lamp glows red, the tool is connected to the battery incorrectly. Reverse the connections and make sure the lamp glows green.
DEPLOYMENT PROCEDURES FOR AIR BAG MODULE
(OUTSIDE OF VEHICLE)
Unless the vehicle is being scrapped, deploying the air bag in the
vehicle is not recommended. This may cause damage to the
vehicle interior.
Anchor air bag module bracket (KV99105300) in a vise secured to
a firm foundation during deployment.
Deployment of Driver Air Bag Module (Outside of
vehicle)
1. Using wire, secure driver air bag module to air bag module bracket (SST: KV99105300) at two places.
CAUTION:
Use wire of at least 1 mm (0.04 in) diameter.
2. Firmly secure air bag module bracket (SST: KV99105300) with driver air bag module attached, in a vise.
SBF266H
SRS232-E
SRS233
SUPPLEMENTAL RESTRAINT SYSTEM (SRS)
Disposal of Air Bag Module and Seat Belt Pre-
tensioner (Cont'd)
RS-23
http://vnx.su/
Page 1299 of 1833
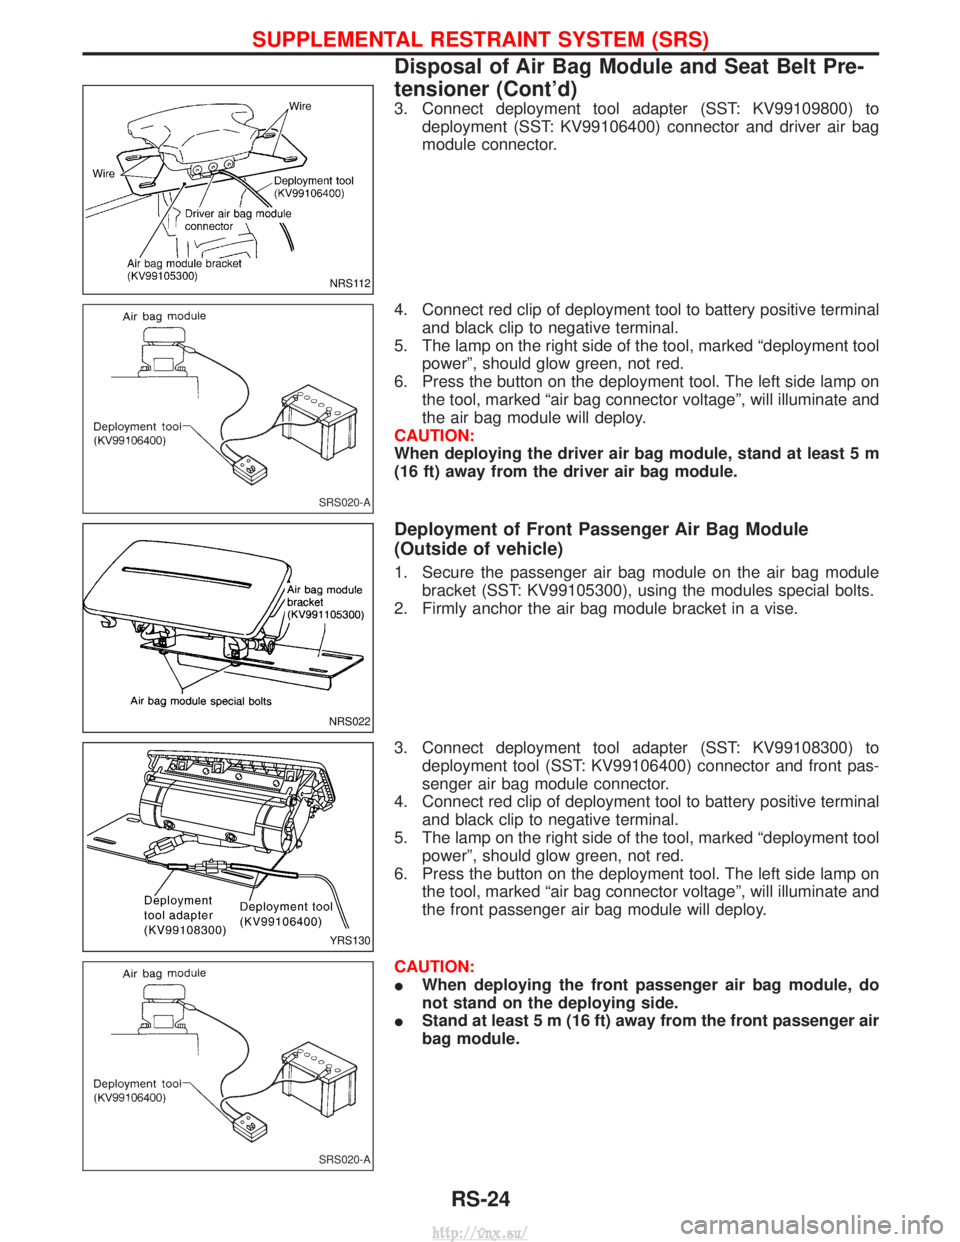
3. Connect deployment tool adapter (SST: KV99109800) todeployment (SST: KV99106400) connector and driver air bag
module connector.
4. Connect red clip of deployment tool to battery positive terminal and black clip to negative terminal.
5. The lamp on the right side of the tool, marked ªdeployment tool powerº, should glow green, not red.
6. Press the button on the deployment tool. The left side lamp on the tool, marked ªair bag connector voltageº, will illuminate and
the air bag module will deploy.
CAUTION:
When deploying the driver air bag module, stand at least 5 m
(16 ft) away from the driver air bag module.
Deployment of Front Passenger Air Bag Module
(Outside of vehicle)
1. Secure the passenger air bag module on the air bag module bracket (SST: KV99105300), using the modules special bolts.
2. Firmly anchor the air bag module bracket in a vise.
3. Connect deployment tool adapter (SST: KV99108300) to deployment tool (SST: KV99106400) connector and front pas-
senger air bag module connector.
4. Connect red clip of deployment tool to battery positive terminal and black clip to negative terminal.
5. The lamp on the right side of the tool, marked ªdeployment tool powerº, should glow green, not red.
6. Press the button on the deployment tool. The left side lamp on the tool, marked ªair bag connector voltageº, will illuminate and
the front passenger air bag module will deploy.
CAUTION:
I When deploying the front passenger air bag module, do
not stand on the deploying side.
I Stand at least 5 m (16 ft) away from the front passenger air
bag module.
NRS112
SRS020-A
NRS022
YRS130
SRS020-A
SUPPLEMENTAL RESTRAINT SYSTEM (SRS)
Disposal of Air Bag Module and Seat Belt Pre-
tensioner (Cont'd)
RS-24
http://vnx.su/
Page 1300 of 1833
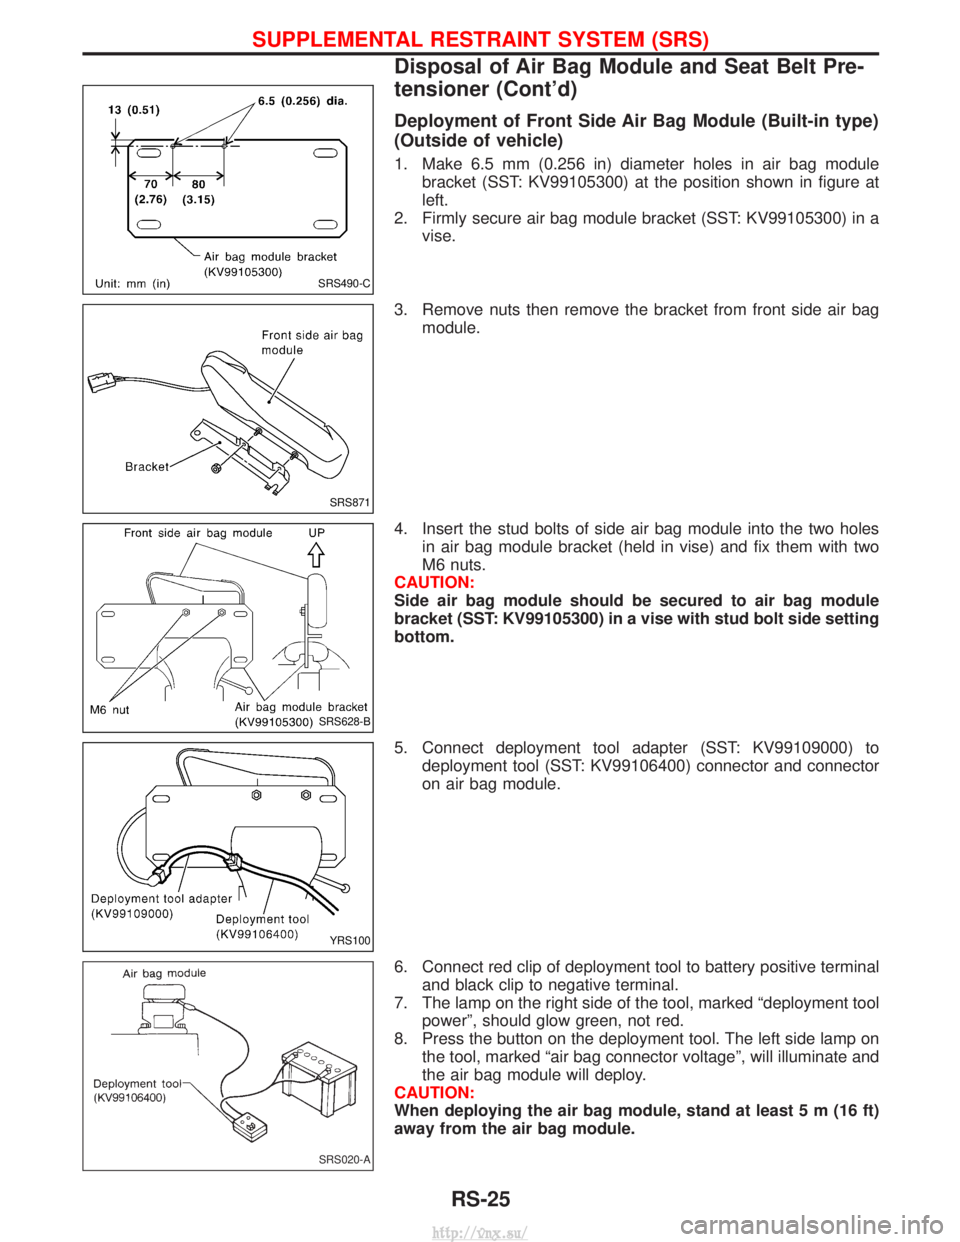
Deployment of Front Side Air Bag Module (Built-in type)
(Outside of vehicle)
1. Make 6.5 mm (0.256 in) diameter holes in air bag modulebracket (SST: KV99105300) at the position shown in figure at
left.
2. Firmly secure air bag module bracket (SST: KV99105300) in a vise.
3. Remove nuts then remove the bracket from front side air bag module.
4. Insert the stud bolts of side air bag module into the two holes in air bag module bracket (held in vise) and fix them with two
M6 nuts.
CAUTION:
Side air bag module should be secured to air bag module
bracket (SST: KV99105300) in a vise with stud bolt side setting
bottom.
5. Connect deployment tool adapter (SST: KV99109000) to deployment tool (SST: KV99106400) connector and connector
on air bag module.
6. Connect red clip of deployment tool to battery positive terminal and black clip to negative terminal.
7. The lamp on the right side of the tool, marked ªdeployment tool powerº, should glow green, not red.
8. Press the button on the deployment tool. The left side lamp on the tool, marked ªair bag connector voltageº, will illuminate and
the air bag module will deploy.
CAUTION:
When deploying the air bag module, stand at least 5 m (16 ft)
away from the air bag module.
SRS490-C
SRS871
SRS628-B
YRS100
SRS020-A
SUPPLEMENTAL RESTRAINT SYSTEM (SRS)
Disposal of Air Bag Module and Seat Belt Pre-
tensioner (Cont'd)
RS-25
http://vnx.su/
Page 1301 of 1833
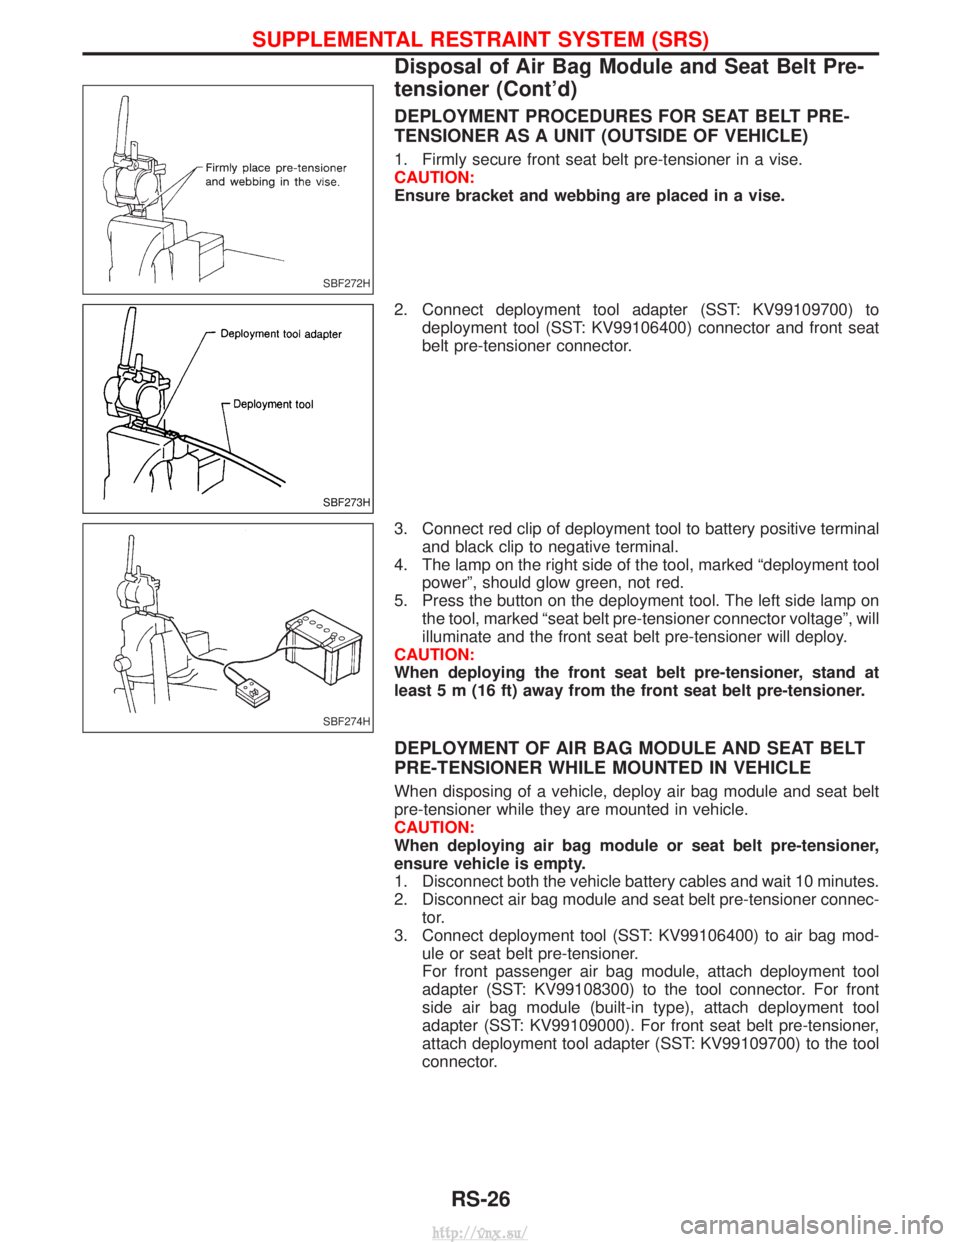
DEPLOYMENT PROCEDURES FOR SEAT BELT PRE-
TENSIONER AS A UNIT (OUTSIDE OF VEHICLE)
1. Firmly secure front seat belt pre-tensioner in a vise.
CAUTION:
Ensure bracket and webbing are placed in a vise.
2. Connect deployment tool adapter (SST: KV99109700) todeployment tool (SST: KV99106400) connector and front seat
belt pre-tensioner connector.
3. Connect red clip of deployment tool to battery positive terminal and black clip to negative terminal.
4. The lamp on the right side of the tool, marked ªdeployment tool powerº, should glow green, not red.
5. Press the button on the deployment tool. The left side lamp on the tool, marked ªseat belt pre-tensioner connector voltageº, will
illuminate and the front seat belt pre-tensioner will deploy.
CAUTION:
When deploying the front seat belt pre-tensioner, stand at
least 5 m (16 ft) away from the front seat belt pre-tensioner.
DEPLOYMENT OF AIR BAG MODULE AND SEAT BELT
PRE-TENSIONER WHILE MOUNTED IN VEHICLE
When disposing of a vehicle, deploy air bag module and seat belt
pre-tensioner while they are mounted in vehicle.
CAUTION:
When deploying air bag module or seat belt pre-tensioner,
ensure vehicle is empty.
1. Disconnect both the vehicle battery cables and wait 10 minutes.
2. Disconnect air bag module and seat belt pre-tensioner connec- tor.
3. Connect deployment tool (SST: KV99106400) to air bag mod- ule or seat belt pre-tensioner.
For front passenger air bag module, attach deployment tool
adapter (SST: KV99108300) to the tool connector. For front
side air bag module (built-in type), attach deployment tool
adapter (SST: KV99109000). For front seat belt pre-tensioner,
attach deployment tool adapter (SST: KV99109700) to the tool
connector.
SBF272H
SBF273H
SBF274H
SUPPLEMENTAL RESTRAINT SYSTEM (SRS)
Disposal of Air Bag Module and Seat Belt Pre-
tensioner (Cont'd)
RS-26
http://vnx.su/