Page 35 of 227

26 At a glanceQuick reference COMAND�
Press H or h.
Move the cross-hairs horizontally and
adjust the balance.
or
�
Press g or G.
Move the cross-hairs vertically and
adjust the fader.
�
Press E or the
Back
soft key.
or
�
Wait until the display changes.
The new setting is saved.Different bass and treble settings are
possible for the following operating
modes:
�
Radio operation (FM and AM band)
�
Tape operation
�
CD operation (single CD)
�
CD changer* operation
�
MP3-CD operation
�
DVD operation
�
Navigation operation
The Bass/Treble settings for navigation
announcements are described at “Audio
settings for the navigation
announcements” (
�page 117).When you adjust Bass or Treble, the
system will automatically save the settings
for the current operating mode.
Activating the Bass or Treble menu
In radio, tape, CD, CDC*, MP3-CD or DVD
operation:
�
Press the Bass or Treble soft key.
The Bass or Treble menu will appear.
You can now make bass or treble
settings (
�page 27).
iUse F and f to move the
cross-hairs diagonally.
Bass and Treble
Page 49 of 227

40 AudioTape operation�
Do not expose the tapes to direct
sunlight or high temperatures.
�
Do not leave tapes near magnetic fields
or magnets.
�
Ensure that the tape is adequately
tightened before you insert it into the
tape slot.
�
Do not touch the tape with your fingers.
�
Do not insert a tape if its label is not
stuck on properly.
�
Press A.
The Audio menu will appear
(�page 30).
�
Press the
Tape
soft key.
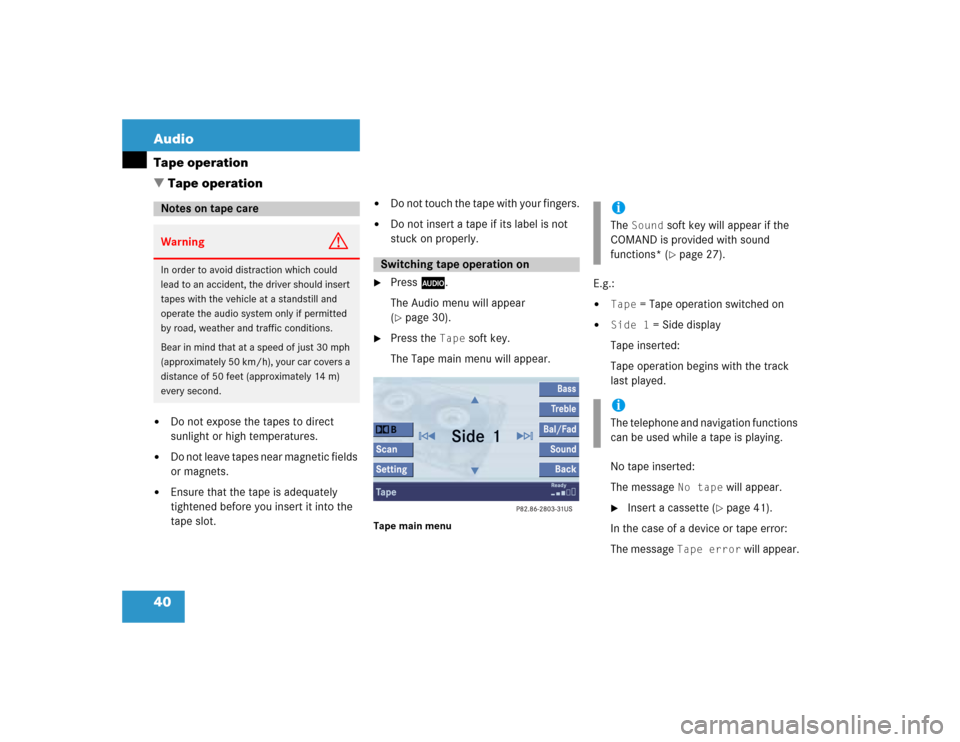
The Tape main menu will appear.
Tape main menu
E.g.:�
Tape
= Tape operation switched on
�
Side 1
= Side display
Tape inserted:
Tape operation begins with the track
last played.
No tape inserted:
The message
No tape
will appear.
�
Insert a cassette (
�page 41).
In the case of a device or tape error:
The message
Tape error
will appear.
Notes on tape careWarning
G
In order to avoid distraction which could
lead to an accident, the driver should insert
tapes with the vehicle at a standstill and
operate the audio system only if permitted
by road, weather and traffic conditions.
Bear in mind that at a speed of just 30 mph
(approximately 50 km/h), your car covers a
distance of 50 feet (approximately 14 m)
every second.
Switching tape operation on
iThe
Sound
soft key will appear if the
COMAND is provided with sound
functions* (�page 27).
iThe telephone and navigation functions
can be used while a tape is playing.
� Tape operation
Page 121 of 227
112 NavigationImportant notesIf your vehicle has been transported (e.g.
by a car, train or ferry) the system may
make navigation announcements which do
not correspond to the vehicle’s position.
The system needs to redetermine its
position.
Determining the location after the
vehicle has been transported
The system will need some time to
determine its location after the car has
been transported. The time required for
the system to do so varies from case to
case.
�
Switch the COMAND on.
�
Activate the Navigation main menu
(�page 114).
The navigation DVD needs to be in the
navigation computer (
�page 111).
�
Drive and press c.
The display will change to the map
display.
Drive until the position or the road
indicated correspond to the real
circumstances. The system is now
correctly adjusted.
Route guidance after the vehicle has
been transported
Page 122 of 227
113 Navigation
Important notes
The following applies if you interrupt your
trip and continue later on:�
Trip is continued within 2 hours:
The system will automatically resume
route guidance.
�
Trip is continued after more than
2 hours: �
Press E and confirm
Continue
Route Guidance
in the
Navigation main menu
(
�page 114).
Trip interruption during route
guidanceiTrip interruption means the vehicle is
parked and COMAND is switched off.
Trip continuation means the vehicle is
moving and COMAND is switched on
again.
Page 125 of 227
116 NavigationNavigation main menuThe COMAND calculates the route as
Fastest route.
Including or avoiding traffic routes�
In the Navigation main menu
(�page 114), press the
Mode
soft key.
The Mode
menu will appear.Selectable traffic routes
�
Freeways
:
The system calculates the route with/
without freeways.
�
Ferry/Auto-Train
:
The system calculates the route with/
without ferry connections or railfreight.
�
Toll Roads
:
The system calculates the route with/
without toll roads.
�
Tunnels
:
The system calculates the route with/
without tunnels.
�
Use g or G to select a traffic route.
�
Press E.
Switches the option on or off. You can
switch on more than one option.
�
Press the
Back
soft key to confirm.
The setting is saved. The Navigation
main menu will appear.
Setting the route mode
Option
Symbol
On
Q
Off
q
Page 128 of 227
119 Navigation
Navigation main menu
�
Press the
Memory
soft key.
A window appears with the
message
Position Saved as
MemPt
.
The system saves the current position
as a destination in the
Last
Destinations
memory
(
�page 150).
iSuch destinations are marked in
the
Last Destinations
memory
with _.
For permanent storage you can save
the destination in the regular
Destination memory (
�page 151).
Page 131 of 227

122 NavigationDestination inputAccepting the displayed destination �
In the Destination Entry menu, press
E longer than 2 seconds.
or
�
Select the ( symbol. Press H, h,
g, G to do so.
�
Press E.
Entering another destination address
�
Press h, H, g and G to select
the characters. After each selection,
press E.
Press F and f to select characters
diagonally.
or
�
Press one of the number keys 2 to
9 as often as needed.
�
Press the
Delete
soft key if
necessary.
The character last entered or the
character last accepted by the system
is deleted.
iYou can only select admissible
characters. The character selected
appears magnified. If your input is
unambiguous, the system will
complete it.iFor quicker input, COMAND offers
available characters from the character
set based on your selections and the
names of the cities stored on the
navigation DVD. The character
selected appears magnified. The
system will accept the entry if the input
matches the name of a city stored on
the navigation DVD.
Page 132 of 227

123 Navigation
Destination input
�
Press E longer than 2 seconds to
confirm.
or
�
Select the ( symbol. Press H, h,
g, G to do so.
�
Press E.
The city list will appear. You can now
accept the city entered or select
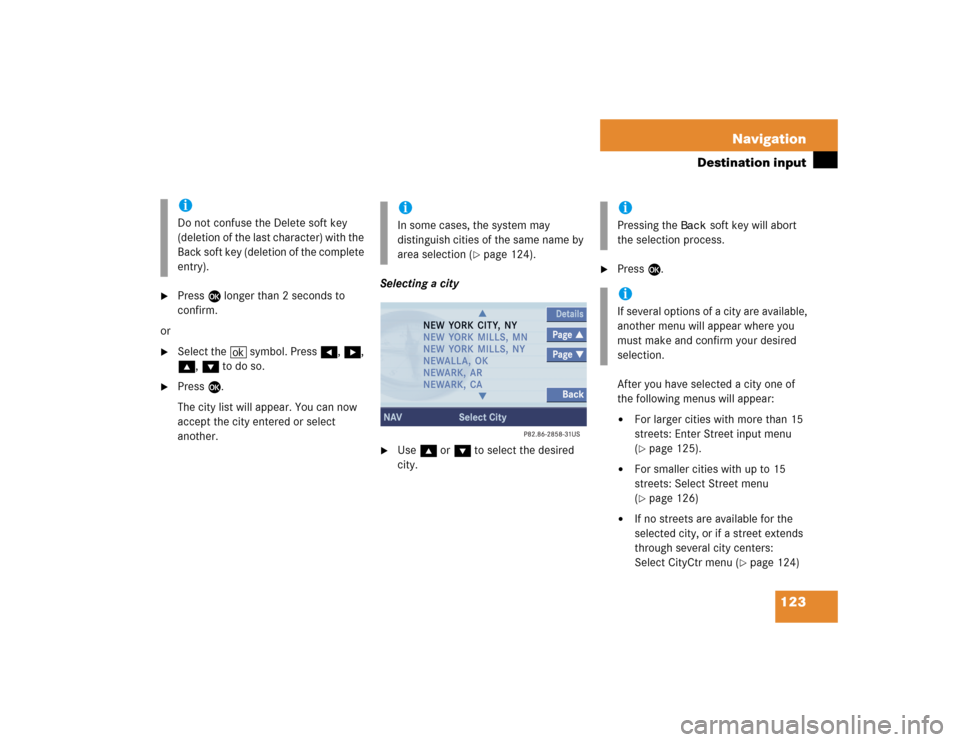
another.Selecting a city
�
Use g or G to select the desired
city.
�
Press E.
After you have selected a city one of
the following menus will appear: �
For larger cities with more than 15
streets: Enter Street input menu
(�page 125).
�
For smaller cities with up to 15
streets: Select Street menu
(�page 126)
�
If no streets are available for the
selected city, or if a street extends
through several city centers:
Select CityCtr menu (
�page 124)
iDo not confuse the Delete soft key
(deletion of the last character) with the
Back soft key (deletion of the complete
entry).
iIn some cases, the system may
distinguish cities of the same name by
area selection (
�page 124).
iPressing the
Back
soft key will abort
the selection process.
iIf several options of a city are available,
another menu will appear where you
must make and confirm your desired
selection.