Page 257 of 296

Maintenance20
7
1
2
3
4
5
6
7
8
9
DRIVE BELTSDrive belts should be checked peri-
odically for proper tension and
adjusted if necessary. At the same
time, belts should be examined for
cracks, wear, fraying or other evi-
dence of deterioration and replaced
if necessary.
Belt routing should also be checked
to be sure there is no interference
between the belts and other parts of
the engine. After a belt is replaced,
the new belt should be adjusted
again after two or three weeks to
eliminate slack resulting from initial
stretching after use.
Checking the compressor
drive beltWhen the air conditioning is being
used regularly, the compressor drive
belt tension should be checked at
least once a month.
To check the drive belt tension, turn
the engnie off, press down on the
belt halfway between the engine
crankshaft and compressor pulleys.
Pressing with your finger, you should
not be able to deflect this belt any-
more than 8.5 mm. If you have the
instruments to check it, with a force
of 98N (22 lb.), the deflection should
be 8.0 mm (approx. 0.315 inches). If
the belt is too loose, have it adjusted
by an authorized Kia Dealer.
2GHN722
Opirus CAN 7-1.qxd 7/8/03 2:25 PM Page 20
Page 258 of 296

721
Maintenance
1
2
3
4
5
6
7
8
9
POWER STEERING Checking the power steering
fluid level With the vehicle on level ground,
check the fluid level in the power
steering reservoir periodically. The
fluid should be between MAX and
MIN marks on the level gauge
attached to the cap.
Before adding power steering fluid,
thoroughly clean the area around the
reservoir cap to prevent power steer-
ing fluid contamination.
If the level is low, add fluid to the
MAX level.In the event the power steering sys-
tem requires frequent addition of
fluid, the vehicle should be inspected
by an Authorized Kia Dealer.
✽ ✽
NOTICE• To avoid damage to the power
steering pump, do not operate the
vehicle for prolonged periods with
a low power steering fluid level.
• Never start the engine when the reservoir tank is empty.
• When adding fluid, be careful that dirt does not get into the tank.
• Too little fluid can make the steer- ing wheel heavier or strange noise
can be generated.
• The use of the non-specified fluid could reduce the effectiveness of
the power steering wheel and
cause damage to it.Use only the specified power steer-
ing fluid. (Refer to "RecommendedLubricants" later in this section.)
Power steering hoseCheck the connections for oil leaks,
severe damage and the twists in the
power steering hose before driving.
1GHA421
Opirus CAN 7-1.qxd 7/8/03 2:25 PM Page 21
Page 259 of 296

Maintenance22
7
1
2
3
4
5
6
7
8
9
STEERING WHEELPark the vehicle on level ground,
start the car and place the tire
wheels in the straight-ahead posi-
tion. Turn the steering wheel to the
left and right with a little force and
check the free play until you get a
feel for resistance against the tire
wheels movement.
Standard value: 30 mm (1.2 in) or
less✽ ✽
NOTICEIf the measured value exceeds the
standard value, have the system
checked by an authorized Kia deal-
er.
AUTOMATIC TRANSAXLEChecking the automatic
transaxle fluid level The automatic transaxle fluid level
should be checked regularly.
The volume of the transaxle fluid
changes with temperature. Although
it is best to check the level after hav-
ing driven the vehicle for at least 30
minutes, the level can be checked
after warming the fluid using the fol-
lowing procedure. 1. Park the vehicle on level ground
and firmly apply the parking brake.
2. Allow the engine to idle for about 2 minutes.
3. Depress the brake pedal and move the shift lever slowly through
all ranges then set it in P (Park).
4. With the engine still idling, pull out the dipstick, wipe it clean and rein-
sert it fully.
5. Pull out the dipstick again and check the fluid level.
1.2 in (30 mm)2GHN5100
1GHA5004
30 mm (1.2 in)
Opirus CAN 7-1.qxd 7/8/03 2:25 PM Page 22
Page 260 of 296

723
Maintenance
1
2
3
4
5
6
7
8
9
If the fluid has been warmed to nor-
mal operating temperature of approx-
imately 70~80° C (158~176°F), the
fluid level should be within “HOT”
range.✽ ✽ NOTICE“COLD” scale is for reference only
and should NOT be used to deter-
mine transaxle fluid level.
✽ ✽NOTICENew automatic transaxle fluid
should be red. The red dye is added
so the assembly plant can identify it
as automatic transaxle fluid and dis-
tinguish it from engine oil or
antifreeze. The red dye, which is not
an indicator of fluid quality, is not
permanent. As the vehicle is driven,
the automatic transaxle fluid will
begin to look darker. The color may
eventually appear light brown.
Therefore, have an Authorized Kia
dealer change the automatic
transaxle fluid according to the
Scheduled Maintenance at the
beginning of this section.
CAUTION
Low fluid level causes
transaxle slippage. Overfillingcan cause foaming, loss offluid and transaxle malfunc-tion.
The use of a non-specified fluid could result in transaxlemalfunction and failure.
WARNING
- Parking brake
To avoid sudden movement of
the vehicle, apply parking brake
and depress the brake pedal
before moving the shift lever.
1GHA413
Opirus CAN 7-1.qxd 7/8/03 2:25 PM Page 23
Page 261 of 296

Maintenance24
7
1
2
3
4
5
6
7
8
9
Changing the automatic
transaxle fluid 1. Raise and suitably support the
vehicle. 2. Remove the drain plug located at
the bottom of the transaxle pan.
3. After the oil has drained complete- ly, install a new washer on the
plug, reinstall the drain plug, and
tighten to 290~340 kgcm (21~24
lbin, 29~33 Nm).
4. Lower the vehicle.
5. Remove the automatic transaxle dipstick located near the center of
the engine compartment bulkhead
and, using a funnel, add approxi-
mately 2 liters (2 US quarts) of
automatic transaxle fluid.
Use only the specified automatictransaxle fluid. (Refer to"Recommended Lubricants" later inthis section.)
✽ ✽ NOTICEDo NOT overfill the automatic
transaxle reservoir. Doing so can
cause a seal “blow out”, loss of fluid,
and damage to the transaxle. If you
overfill the reservoir, you must drain
the excess prior to driving the vehi-
cle. The transaxle will hold 2.5 liters
(2.5 US qt.) when completely empty.
However, it is likely that there will
be fluid left in the transaxle after
draining, especially if the front of
the vehicle was raised to remove the
drain plug. 6. Check the fluid level. If necessary,
add a small amount of fluid and
check the level again. Continue
this process until the level reads
within “HOT” range.
7. Replace the dipstick and properly dispose of the used transaxle fluid.
WARNING
- Lifting your
vehicle
If you raise your vehicle, always
ensure that it is supported at all
four jacking or lift points for the
vehicle. Only if this level of sup-
port is provided can you ensure
that the vehicle will remain sta-
ble and not fall off the jack
stands or other supports. If you
do not provide such support,
the vehicle may fall off the jack
stands, or other supports, caus-
ing serious injury or death.
Opirus CAN 7-1.qxd 7/8/03 2:25 PM Page 24
Page 262 of 296

725
Maintenance
1
2
3
4
5
6
7
8
9
LUBRICANTS AND FLUIDS Checking the washer fluid
level The reservoir is translucent so that
you can check the level with a quick
visual inspection.
Check the fluid level in the washer
fluid reservoir and add fluid if neces-
sary. Plain water may be used if
washer fluid is not available.
However, use washer solvent with
antifreeze characteristics in cold cli-
mates to prevent freezing.
Body lubrication All moving points of the body, such
as door hinges, hood hinges, and
locks, should be lubricated each time
the engine oil is changed. Use a non-
freezing lubricant on locks during
cold weather.
Make sure the engine hood second-
ary latch keeps the hood from open-
ing when the primary latch is
released.
1GHA421A
WARNING
Do not use radiator coolant orantifreeze in the washer fluid
reservoir.
Radiator coolant can severely obscure visibility when
sprayed on the windshield
and may cause loss of vehicle
control or damage to paint
and body trim.
Opirus CAN 7-1.qxd 7/8/03 2:25 PM Page 25
Page 263 of 296
Maintenance26
7
1
2
3
4
5
6
7
8
9
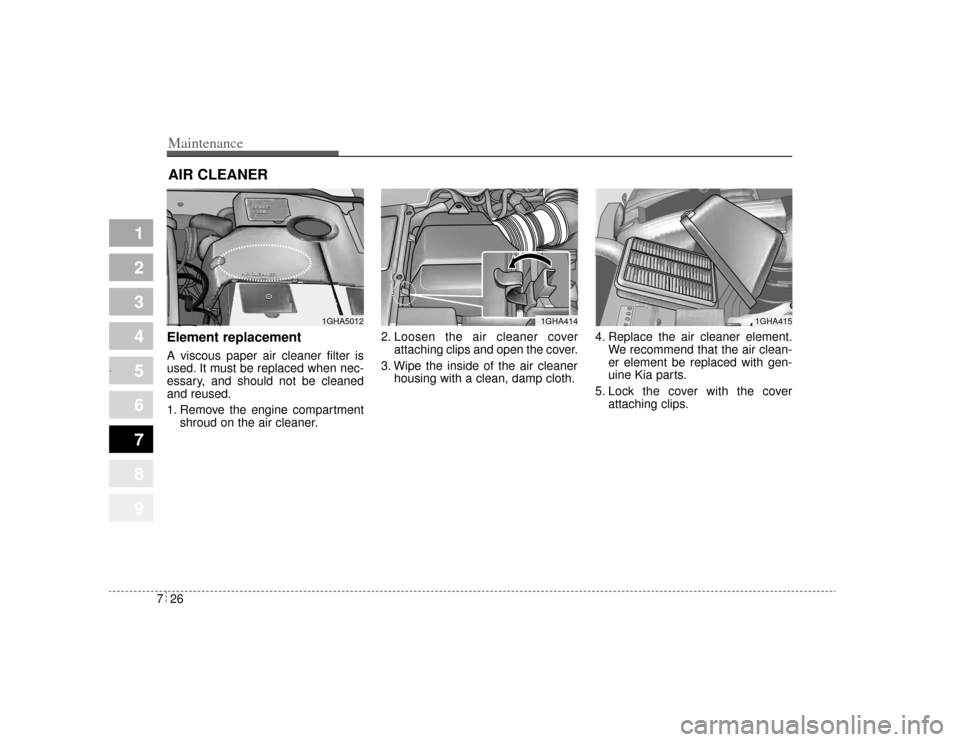
AIR CLEANER Element replacement A viscous paper air cleaner filter is
used. It must be replaced when nec-
essary, and should not be cleaned
and reused.
1. Remove the engine compartment
shroud on the air cleaner. 2. Loosen the air cleaner cover
attaching clips and open the cover.
3. Wipe the inside of the air cleaner housing with a clean, damp cloth. 4. Replace the air cleaner element.
We recommend that the air clean-
er element be replaced with gen-
uine Kia parts.
5. Lock the cover with the cover attaching clips.
1GHA5012
1GHA414
1GHA415
Opirus CAN 7-1.qxd 7/8/03 2:25 PM Page 26
Page 264 of 296

727
Maintenance
1
2
3
4
5
6
7
8
9
Replace the element according to
the Scheduled Maintenance Section.If the vehicle is operated in extreme-ly dusty or sandy areas, replace theelement more often than the usualrecommended intervals. (Refer toMaintenance Schedule in this sec-tion.)
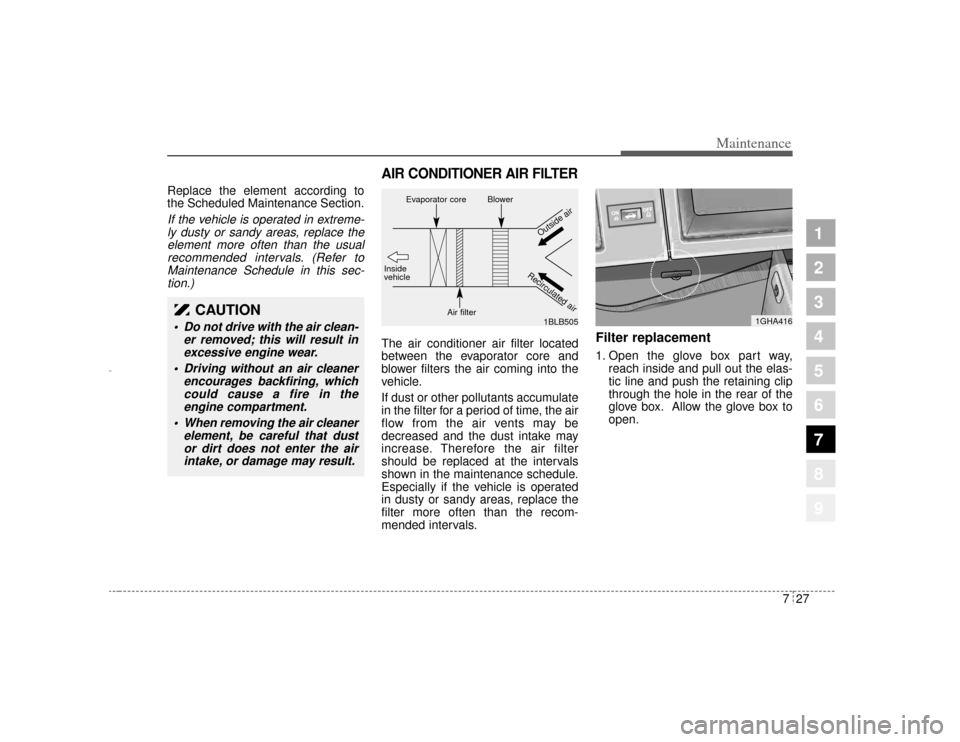
AIR CONDITIONER AIR FILTERThe air conditioner air filter located
between the evaporator core and
blower filters the air coming into the
vehicle.
If dust or other pollutants accumulate
in the filter for a period of time, the air
flow from the air vents may be
decreased and the dust intake may
increase. Therefore the air filter
should be replaced at the intervals
shown in the maintenance schedule.
Especially if the vehicle is operated
in dusty or sandy areas, replace the
filter more often than the recom-
mended intervals.
Filter replacement1. Open the glove box part way, reach inside and pull out the elas-
tic line and push the retaining clip
through the hole in the rear of the
glove box. Allow the glove box to
open.
CAUTION
Do not drive with the air clean-er removed; this will result inexcessive engine wear.
Driving without an air cleaner encourages backfiring, whichcould cause a fire in theengine compartment.
When removing the air cleaner element, be careful that dustor dirt does not enter the airintake, or damage may result.
1GHA416
1BLB505
Evaporator core
BlowerOutside air
Recirculated air
Air filter
Inside
vehicle
Opirus CAN 7-1.qxd 7/8/03 2:25 PM Page 27