Page 3702 of 4264
7A2-22 TRANSMISSION CONTROL SYSTEM (AW30 –40LE) (V6 3.5L)
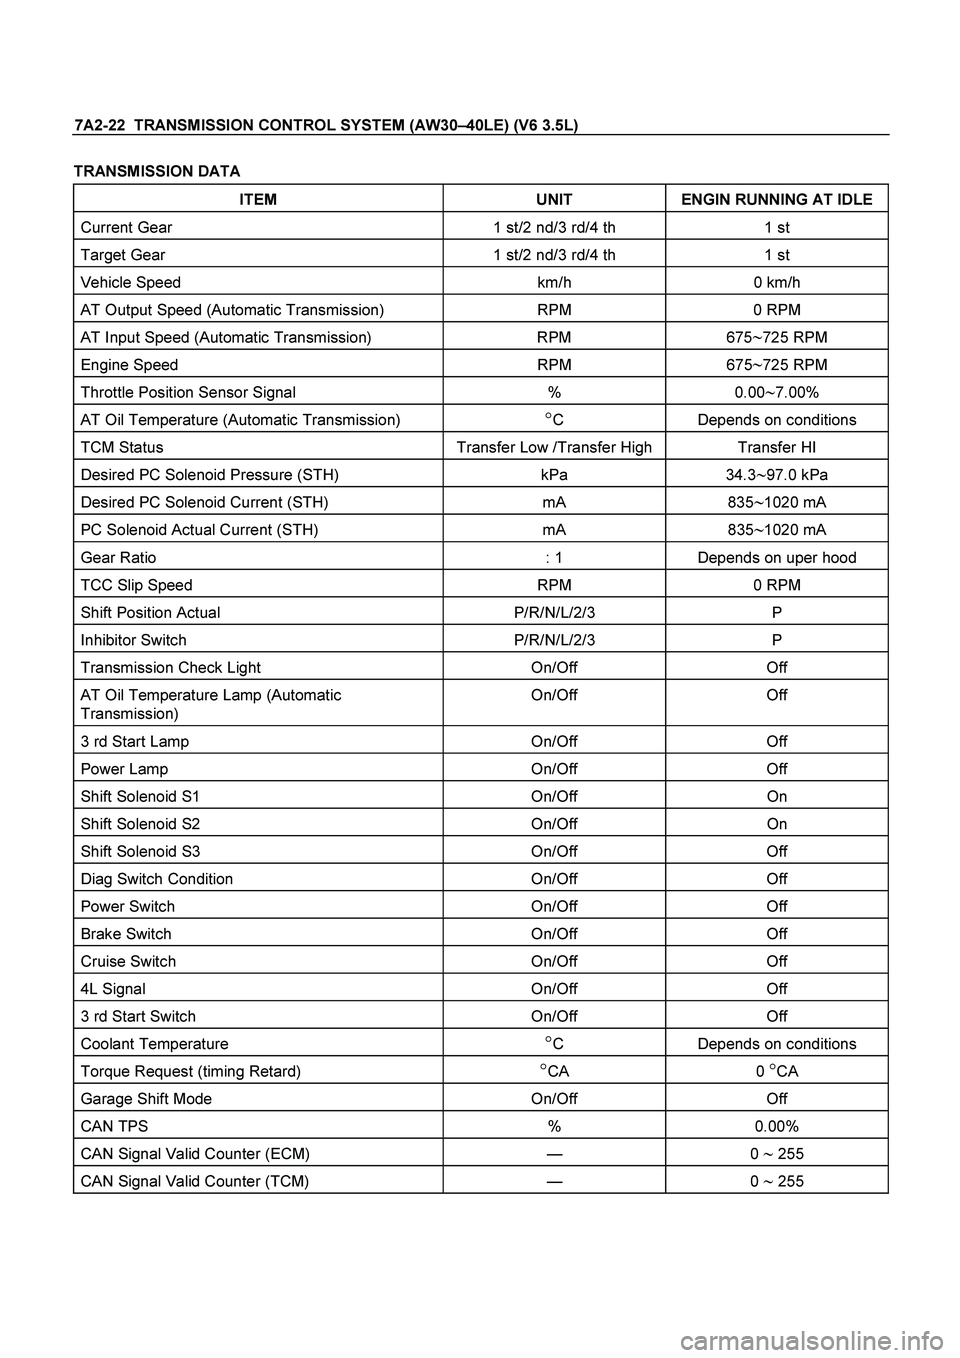
TRANSMISSION DATA
ITEM UNIT ENGIN RUNNING AT IDLE
Current Gear 1 st/2 nd/3 rd/4 th 1 st
Target Gear 1 st/2 nd/3 rd/4 th 1 st
Vehicle Speed km/h 0 km/h
AT Output Speed (Automatic Transmission) RPM 0 RPM
AT Input Speed (Automatic Transmission) RPM 675�725 RPM
Engine Speed RPM 675�725 RPM
Throttle Position Sensor Signal % 0.00�7.00%
AT Oil Temperature (Automatic Transmission) �C Depends on conditions
TCM Status Transfer Low /Transfer High Transfer HI
Desired PC Solenoid Pressure (STH) kPa 34.3�97.0 kPa
Desired PC Solenoid Current (STH) mA 835�1020 mA
PC Solenoid Actual Current (STH) mA 835�1020 mA
Gear Ratio : 1 Depends on uper hood
TCC Slip Speed RPM 0 RPM
Shift Position Actual P/R/N/L/2/3 P
Inhibitor Switch P/R/N/L/2/3 P
Transmission Check Light On/Off Off
AT Oil Temperature Lamp (Automatic
Transmission) On/Off Off
3 rd Start Lamp On/Off Off
Power Lamp On/Off Off
Shift Solenoid S1 On/Off On
Shift Solenoid S2 On/Off On
Shift Solenoid S3 On/Off Off
Diag Switch Condition On/Off Off
Power Switch On/Off Off
Brake Switch On/Off Off
Cruise Switch On/Off Off
4L Signal On/Off Off
3 rd Start Switch On/Off Off
Coolant Temperature �C Depends on conditions
Torque Request (timing Retard) �CA 0 �CA
Garage Shift Mode On/Off Off
CAN TPS % 0.00%
CAN Signal Valid Counter (ECM)
— 0 � 255
CAN Signal Valid Counter (TCM) — 0 � 255
Page 3708 of 4264
7A2-28 TRANSMISSION CONTROL SYSTEM (AW30 –40LE) (V6 3.5L)
2.Demand of Data
1.
Connect Tech-2 to the vehicle. When activated by
turning on the power of Tech-2, push the "Enter"
switch.
2.
Turn on the ignition switch (without starting the
engine)
3.
In the main menu of Diagnostic Tester, push "F1:
Service Programming System (SPS)".
4.
Push "F0: Request Info" of Tech-2.
5.
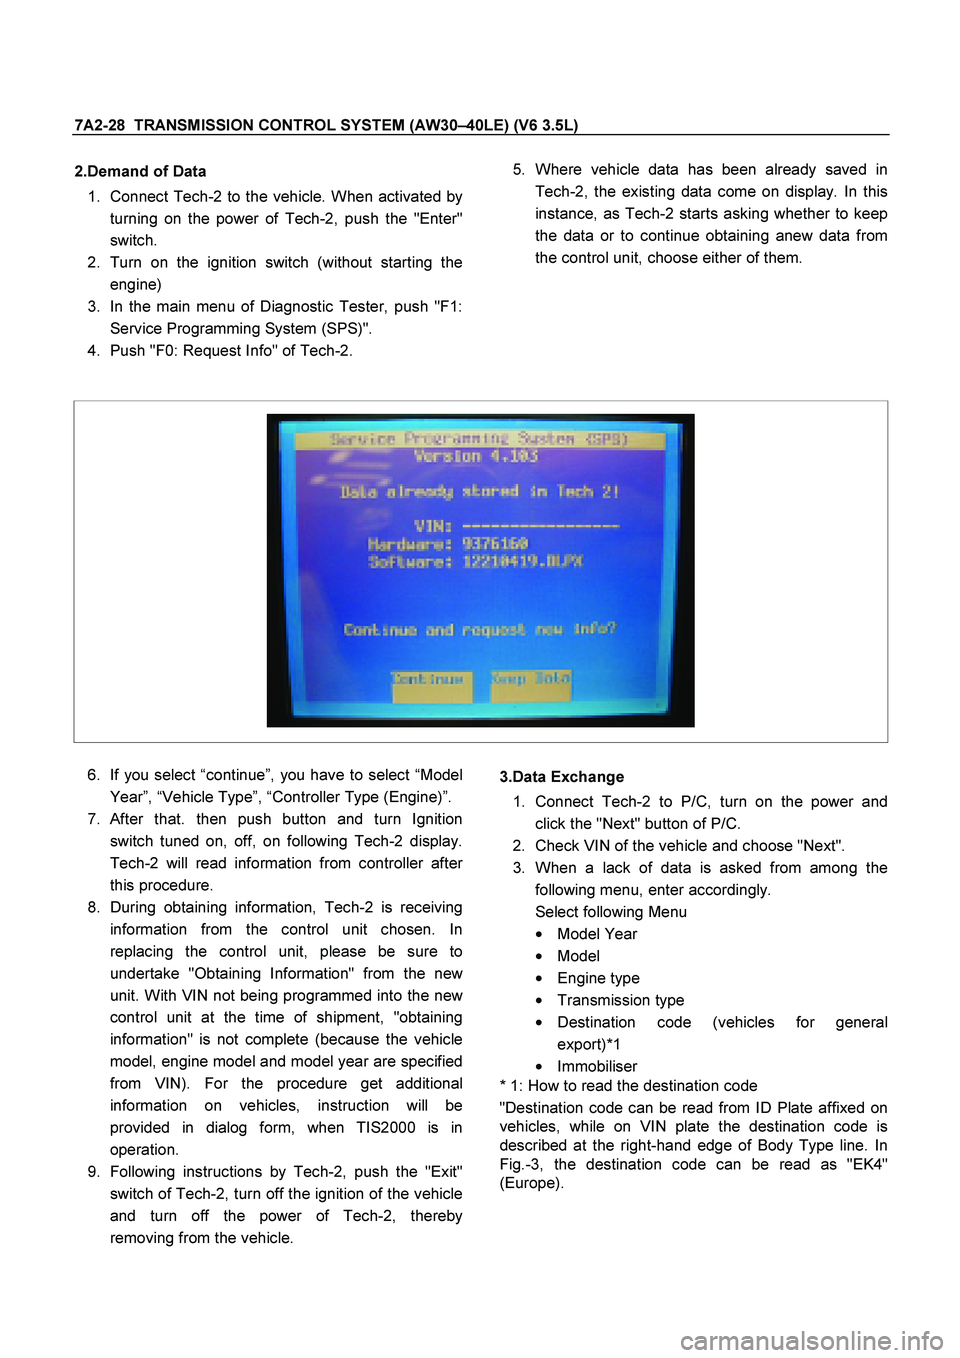
Where vehicle data has been already saved in
Tech-2, the existing data come on display. In this
instance, as Tech-2 starts asking whether to keep
the data or to continue obtaining anew data from
the control unit, choose either of them.
6.
If you select “continue ”, you have to select “Model
Year ”, “Vehicle Type ”, “Controller Type (Engine) ”.
7.
After that. then push button and turn Ignition
switch tuned on, off, on following Tech-2 display.
Tech-2 will read information from controller afte
r
this procedure.
8.
During obtaining information, Tech-2 is receiving
information from the control unit chosen. In
replacing the control unit, please be sure to
undertake "Obtaining Information" from the new
unit. With VIN not being programmed into the new
control unit at the time of shipment, "obtaining
information" is not complete (because the vehicle
model, engine model and model year are specified
from VIN). For the procedure get additional
information on vehicles, instruction will be
provided in dialog form, when TIS2000 is in
operation.
9.
Following instructions by Tech-2, push the "Exit"
switch of Tech-2, turn off the ignition of the vehicle
and turn off the power of Tech-2, thereby
removing from the vehicle.
3.Data Exchange
1.
Connect Tech-2 to P/C, turn on the power and
click the "Next" button of P/C.
2.
Check VIN of the vehicle and choose "Next".
3.
When a lack of data is asked from among the
following menu, enter accordingly.
Select following Menu
�
Model Year
�
Model
�
Engine type
�
Transmission type
�
Destination code (vehicles for general
export)*1
�
Immobiliser
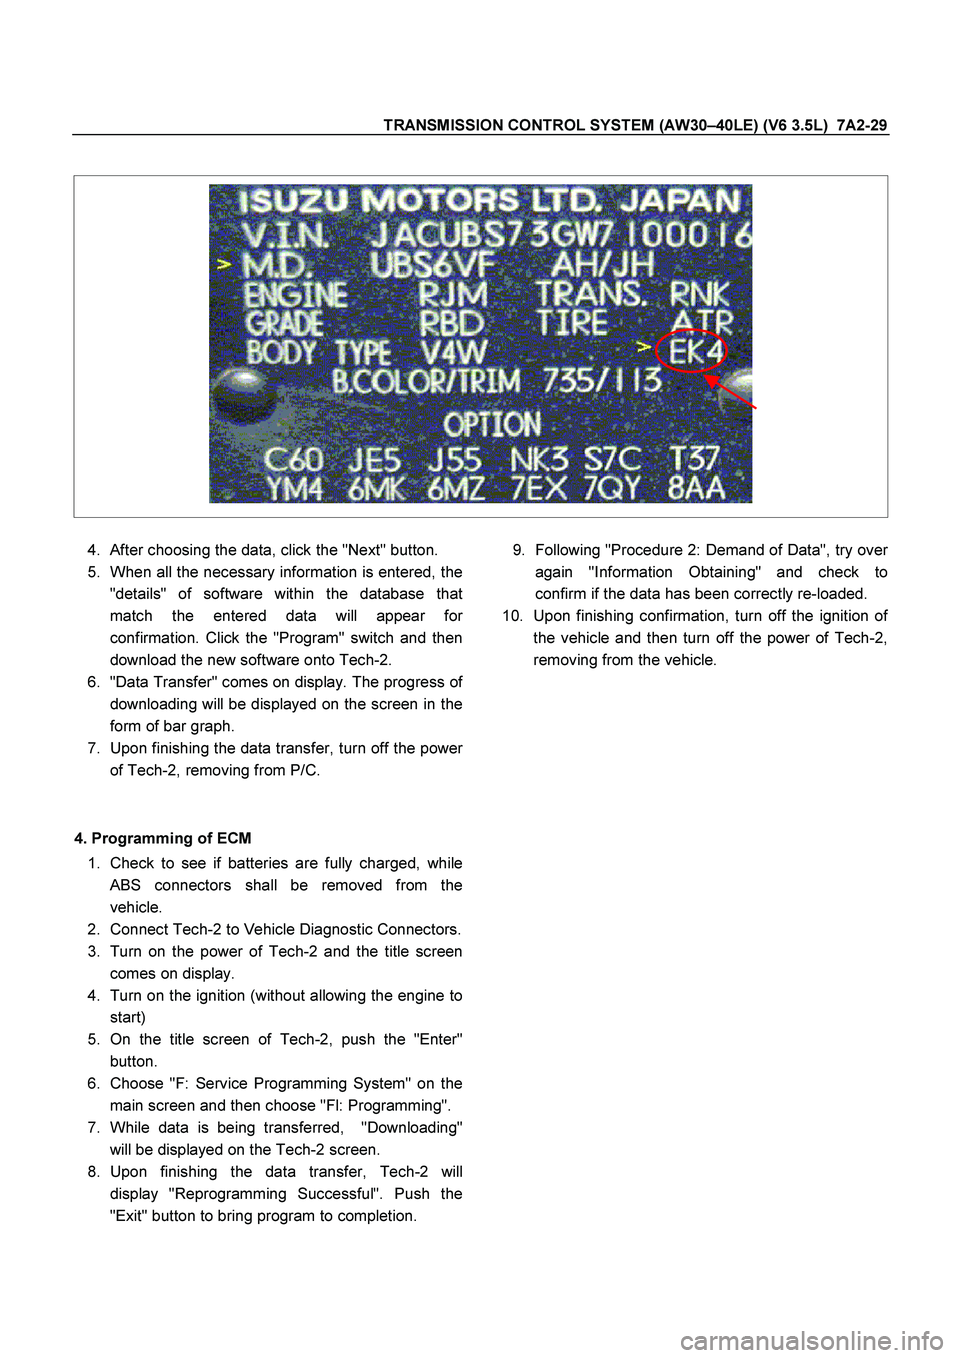
* 1: How to read the destination code
"Destination code can be read from ID Plate affixed on
vehicles, while on VIN plate the destination code is
described at the right-hand edge of Body Type line. In
Fig.-3, the destination code can be read as "EK4"
(Europe).
Page 3709 of 4264
TRANSMISSION CONTROL SYSTEM (AW30 –40LE) (V6 3.5L) 7A2-29
4.
After choosing the data, click the "Next" button.
5.
When all the necessary information is entered, the
"details" of software within the database that
match the entered data will appear fo
r
confirmation. Click the "Program" switch and then
download the new software onto Tech-2.
6. "Data Transfer" comes on display. The progress o
f
downloading will be displayed on the screen in the
form of bar graph.
7.
Upon finishing the data transfer, turn off the powe
r
of Tech-2, removing from P/C.
4. Programming of ECM 1.
Check to see if batteries are fully charged, while
ABS connectors shall be removed from the
vehicle.
2.
Connect Tech-2 to Vehicle Diagnostic Connectors.
3.
Turn on the power of Tech-2 and the title screen
comes on display.
4.
Turn on the ignition (without allowing the engine to
start)
5.
On the title screen of Tech-2, push the "Enter"
button.
6.
Choose "F: Service Programming System" on the
main screen and then choose "Fl: Programming".
7.
While data is being transferred, "Downloading"
will be displayed on the Tech-2 screen.
8.
Upon finishing the data transfer, Tech-2 will
display "Reprogramming Successful". Push the
"Exit" button to bring program to completion.
9.
Following "Procedure 2: Demand of Data", try ove
r
again "Information Obtaining" and check to
confirm if the data has been correctly re-loaded.
10. Upon finishing confirmation, turn off the ignition o
f
the vehicle and then turn off the power of Tech-2,
removing from the vehicle.
Page 3711 of 4264
TRANSMISSION CONTROL SYSTEM (AW30 –40LE) (V6 3.5L) 7A2-31
16 – Terminal Data Link Connector (DLC)
OBD standardizes Data Link Connector (DLC)
configurations. The DLC, formerly referred to as the
ALDL, will be a 16 –terminal connector found on the
lower right side of the driver's side instrument panel. All
manufacturers must conform to this 16 –terminal
standard.
060R300015
810RT022
PIN 1 – uart
PIN 2 – J1850 Bus + L line on 2–wire systems, or single wire (ECM)
PIN 3 – (Not used)
PIN 4 – Chassis ground pin
PIN 5 – Chassis ground pin
PIN 6 – ECM diagnostic enable
PIN 7 – KW2000
PIN 8 – (Not used)
PIN 9 – Primary UART
PIN 10 – (Not used)
PIN 11 – TCM diagnostic enable
PIN 12 – ABS diagnostic or CCM diagnostic enable
PIN 13 – SIR diagnostic enable
PIN 14 – (Not used)
PIN 15 – (Not used)
PIN 16 – Battery power from vehicle unswitched (4 AMP MAX.)
Page 3719 of 4264
TRANSMISSION CONTROL SYSTEM (AW30–40LE) (V6 3.5L) 7A2-39
DTC P0705 (FLASHING CODE 17) Transmission Range Sensor Circuit
Malfunction
RTW37ALF000501
Circuit Description
The neutral start switch gives the signals related to the
selector lever position (PRND32L) to the Transmission
Control Module (TCM). The neutral start switch turns on
when the select lever is shifted to the P, R, N, D, 3, 2 o
r
L range. The neutral start switch, which is connected to
the starter switch circuit, is available only when the
select lever is in the P or N range (Engine run).
The neutral start switch is connected to the
transmission manual shaft and installed in the
transmission case.
Condition for setting the DTC
The TCM detects following "Condition 1" for 30 sec
continuously.
The TCM detects following "Condition 2" for 10 sec
continuously.
Condition 1("Open"):
When the TCM detects no signal of range senso
r
more than 2.0 sec at following conditions.
Page 3721 of 4264
TRANSMISSION CONTROL SYSTEM (AW30–40LE) (V6 3.5L) 7A2-41
DTC P0705 (FLASHING CODE 17) Transmission Range Sensor Circuit
Malfunction
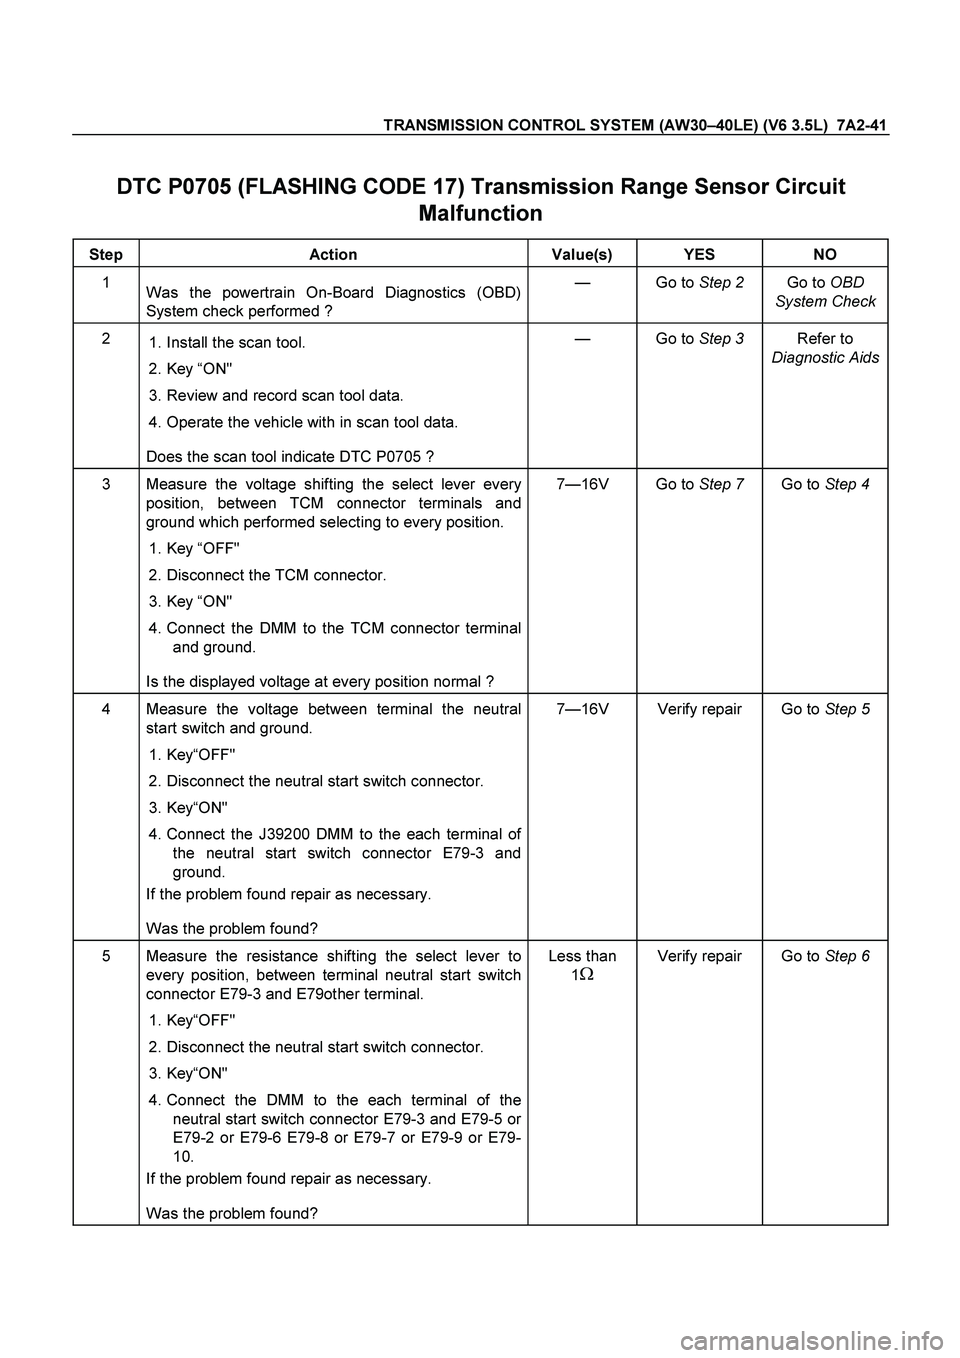
Step Action Value(s) YES NO
1
Was the powertrain On-Board Diagnostics (OBD)
System check performed ? — Go to Step 2 Go to OBD
System Check
2
1. Install the scan tool.
2. Key “ON"
3. Review and record scan tool data.
4. Operate the vehicle with in scan tool data.
Does the scan tool indicate DTC P0705 ? — Go to Step 3 Refer to
Diagnostic Aids
3 Measure the voltage shifting the select lever every
position, between TCM connector terminals and
ground which performed selecting to every position.
1. Key “OFF"
2. Disconnect the TCM connector.
3. Key “ON"
4. Connect the DMM to the TCM connector terminal
and ground.
Is the displayed voltage at every position normal ? 7—16V Go to Step 7 Go to Step 4
4 Measure the voltage between terminal the neutral
start switch and ground.
1. Key“OFF"
2. Disconnect the neutral start switch connector.
3. Key“ON"
4. Connect the J39200 DMM to the each terminal of
the neutral start switch connector E79-3 and
ground.
If the problem found repair as necessary.
Was the problem found? 7—16V Verify repair Go to Step 5
5 Measure the resistance shifting the select lever to
every position, between terminal neutral start switch
connector E79-3 and E79other terminal.
1. Key“OFF"
2. Disconnect the neutral start switch connector.
3. Key“ON"
4. Connect the DMM to the each terminal of the
neutral start switch connector E79-3 and E79-5 or
E79-2 or E79-6 E79-8 or E79-7 or E79-9 or E79-
10.
If the problem found repair as necessary.
Was the problem found? Less than
1
��
Verify repair Go to Step 6
Page 3722 of 4264
7A2-42 TRANSMISSION CONTROL SYSTEM (AW30–40LE) (V6 3.5L)
Step Action Value(s) YES NO
6 Check the wire between terminal C-95 and E-79 for
open.
1. Connect the J39200 DMM to the each terminal of
the TCM connector and neutral start switch.
If the problem found repair as necessary.
Was the problem found? ��Verify repair —
7 Replace the TCM.
IMPORTANT; The replacement TCM must be
programmed. (Refer to SPS for procedure.)
Is the action complete? — Verify repair —
Page 3748 of 4264
7A2-68 TRANSMISSION CONTROL SYSTEM (AW30–40LE) (V6 3.5L)
Engine REV is 7000 rpm.
Coolant tempreature is 80�
C.
No detect DTC P0712, 0713.
No detect DTC P0560.
Conditions For Clearing The DTC
The DTC can be cleared from the TCM history by
using a scan tool.
The DTC will be cleared from history when the
vehicle has achieved 40 warm-up cycles without a
failure reported.
After more than 1 second has elapsed after the
ignition key has been turned “ON", short between
No.11 and No.4 (ground) of DLC (Data Link
Connector). Then, after 1 second, but within 6
seconds, discontinue shorting.
Diagnostic Aids
Inspect the wiring for poor electrical connection at
the TCM. Look for possible bent, backed out,
deformed or damaged terminals. Check for weak
terminal tension as well. Also check for a chafed wire
that could short to bare metal or other wiring. Inspect
for a broken wire inside the insulation.
When diagnosing for a possible intermittent short o
r
open condition, move the wiring harness while
observing test equipment for a change.
Inspect the wiring for EMI (Erectro-Magnetic
Interference). Check that all wires are properly
routed away from coil, and generator. Also check fo
r
improperly installed electrical options. When this test
is performed, turn “OFF" on electronic autoparts
switches to improperly for a noise preventing.