Page 3198 of 4264

7B1-34 MANUAL TRANSMISSION
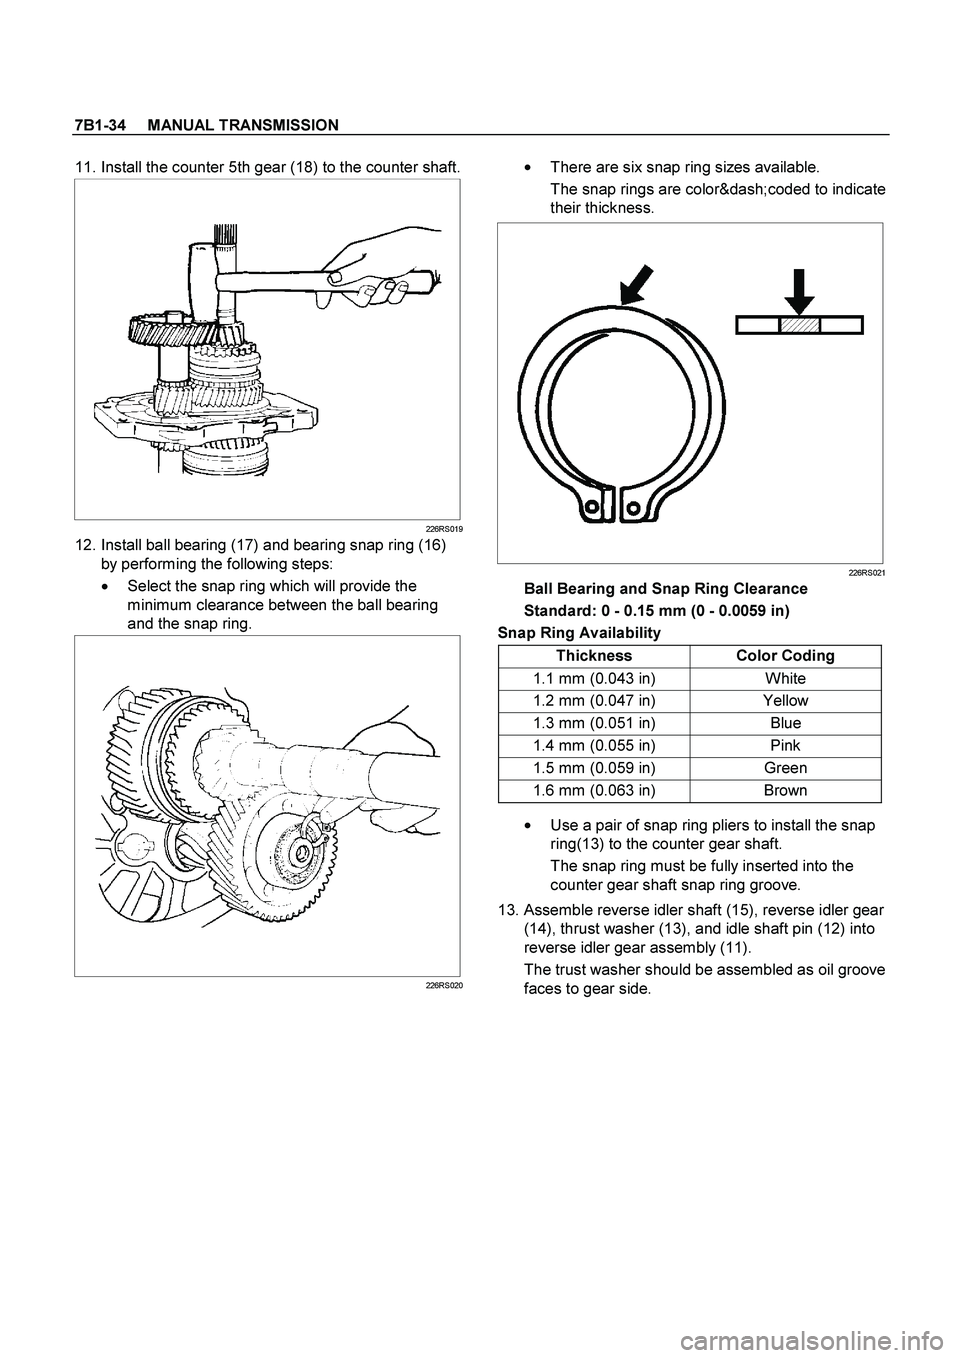
11. Install the counter 5th gear (18) to the counter shaft.
226RS019
12. Install ball bearing (17) and bearing snap ring (16)
by performing the following steps:
�
Select the snap ring which will provide the
minimum clearance between the ball bearing
and the snap ring.
226RS020
�
There are six snap ring sizes available.
The snap rings are color‐coded to indicate
their thickness.
226RS021
Ball Bearing and Snap Ring Clearance
Standard: 0 - 0.15 mm (0 - 0.0059 in)
Snap Ring Availability
Thickness Color Coding
1.1 mm (0.043 in) White
1.2 mm (0.047 in) Yellow
1.3 mm (0.051 in) Blue
1.4 mm (0.055 in) Pink
1.5 mm (0.059 in) Green
1.6 mm (0.063 in) Brown
�
Use a pair of snap ring pliers to install the snap
ring(13) to the counter gear shaft.
The snap ring must be fully inserted into the
counter gear shaft snap ring groove.
13. Assemble reverse idler shaft (15), reverse idler gear
(14), thrust washer (13), and idle shaft pin (12) into
reverse idler gear assembly (11).
The trust washer should be assembled as oil groove
faces to gear side.
Page 3199 of 4264

MANUAL TRANSMISSION 7B1-35
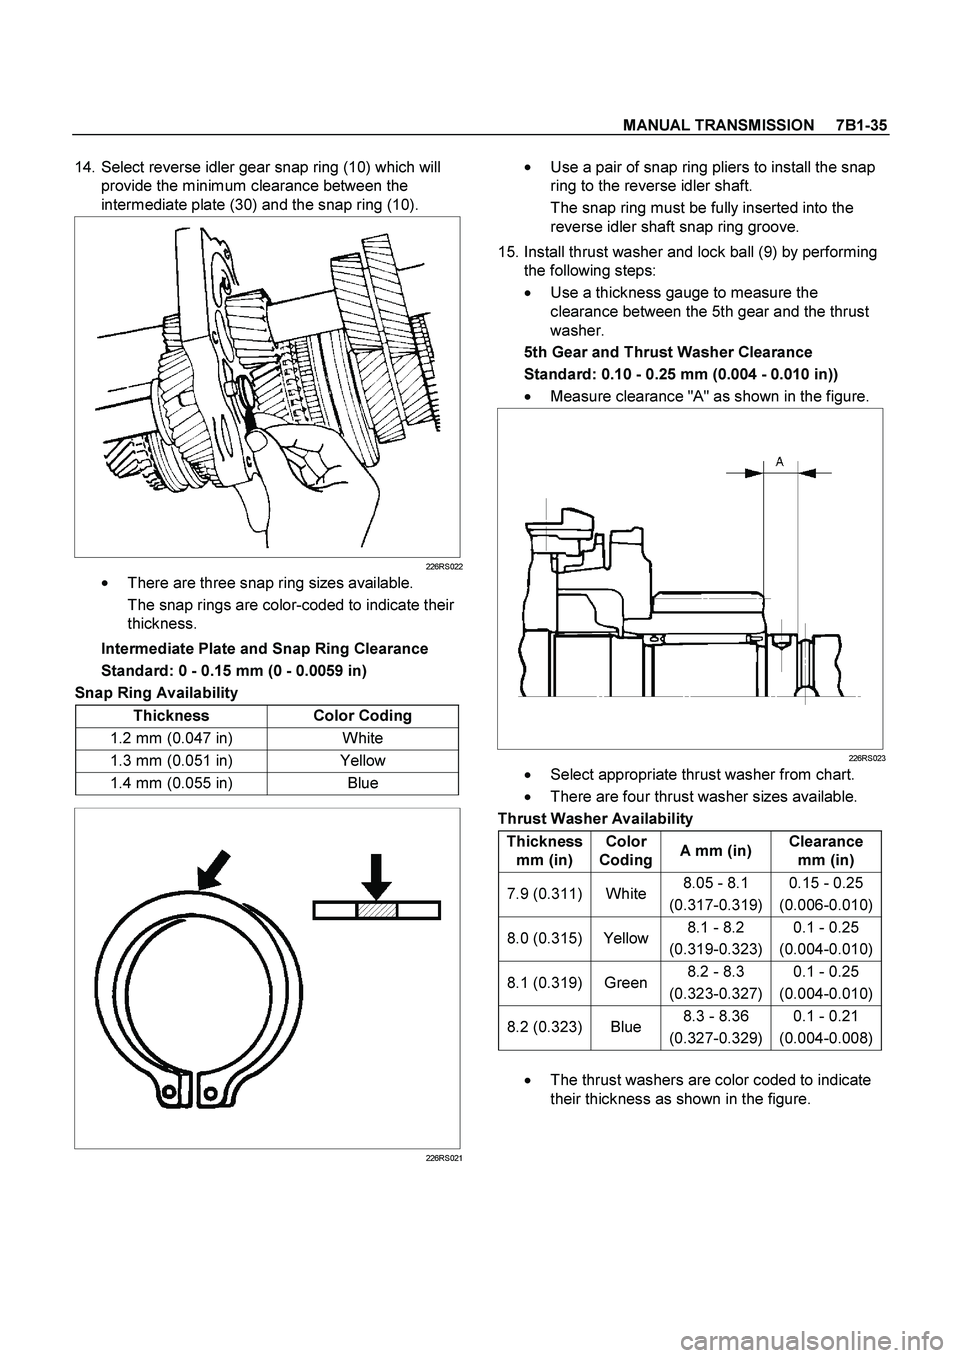
14. Select reverse idler gear snap ring (10) which will
provide the minimum clearance between the
intermediate plate (30) and the snap ring (10).
226RS022
�
There are three snap ring sizes available.
The snap rings are color-coded to indicate their
thickness.
Intermediate Plate and Snap Ring Clearance
Standard: 0 - 0.15 mm (0 - 0.0059 in)
Snap Ring Availability
Thickness Color Coding
1.2 mm (0.047 in) White
1.3 mm (0.051 in) Yellow
1.4 mm (0.055 in) Blue
226RS021
�
Use a pair of snap ring pliers to install the snap
ring to the reverse idler shaft.
The snap ring must be fully inserted into the
reverse idler shaft snap ring groove.
15. Install thrust washer and lock ball (9) by performing
the following steps:
�
Use a thickness gauge to measure the
clearance between the 5th gear and the thrust
washer.
5th Gear and Thrust Washer Clearance
Standard: 0.10 - 0.25 mm (0.004 - 0.010 in))
� Measure clearance "A" as shown in the figure.
226RS023
�
Select appropriate thrust washer from chart.
�
There are four thrust washer sizes available.
Thrust Washer Availability
Thickness
mm (in) Color
CodingA mm (in) Clearance
mm (in)
7.9 (0.311) White 8.05 - 8.1
(0.317-0.319) 0.15 - 0.25
(0.006-0.010)
8.0 (0.315) Yellow8.1 - 8.2
(0.319-0.323) 0.1 - 0.25
(0.004-0.010)
8.1 (0.319) Green8.2 - 8.3
(0.323-0.327) 0.1 - 0.25
(0.004-0.010)
8.2 (0.323) Blue 8.3 - 8.36
(0.327-0.329) 0.1 - 0.21
(0.004-0.008)
�
The thrust washers are color coded to indicate
their thickness as shown in the figure.
Page 3210 of 4264
7B1-46 MANUAL TRANSMISSION
266RS049
7. Install the synchronizer assembly (20) to the
mainshaft (26).
The clutch hub face with the heavy boss must be
facing the 2nd gear side.
226RS048
8. Install clutch hub snap ring(19) by performing the
following steps:
� Select the snap ring which will provide the
minimum clearance between the 1st-2nd clutch
hub and the snap ring.
226RS050
�
There are three snap ring sizes available.
� The snap rings are color coded to indicate their
thickness as shown in the figure.
226RS021
Clutch Hub and Snap Ring Clearance
Standard: 0 - 0.1 mm (0 - 0.004 in)
Snap Ring Availability
Thickness Color Coding
1.80 mm (0.071 in) White
1.85 mm (0.073 in) Yellow
1.90 mm (0.075 in) Blue
�
Use a pair of snap ring pliers to install the snap
ring (19) to the mainshaft (26).
The snap ring must be fully inserted into the
mainshaft snap ring groove.
Page 3213 of 4264
MANUAL TRANSMISSION 7B1-49
226RS021
Clutch Hub and Snap Ring Clearance
Standard: 0 - 0.1 mm (0 - 0.004 in)
Snap Ring Availability
Thickness Color Coding
1.80 mm (0.071 in) White
1.85 mm (0.073 in) Yellow
1.90 mm (0.075 in) Blue
�
Use a pair of snap ring pliers to install the snap
ring to the mainshaft.
The snap ring must be fully inserted into the
mainshaft snap ring groove.
16. Install top block ring (5).
Apply grease to the needle bearing (4) inner and
outer circumferences and install needle bearing (4)
in the top gear shaft (2).
17. Use a bench press to install the top gear shaft ball
bearing (3) to the top gear shaft (2).
226RS059
The snap ring groove of the ball bearing (3) must be
facing the transmission front side.
18. Use a pair of snap ring pliers to install the top gear
shaft snap ring (1) to the top gear shaft (2).
Page 3255 of 4264

MANUAL TRANSMISSION 7B1-91
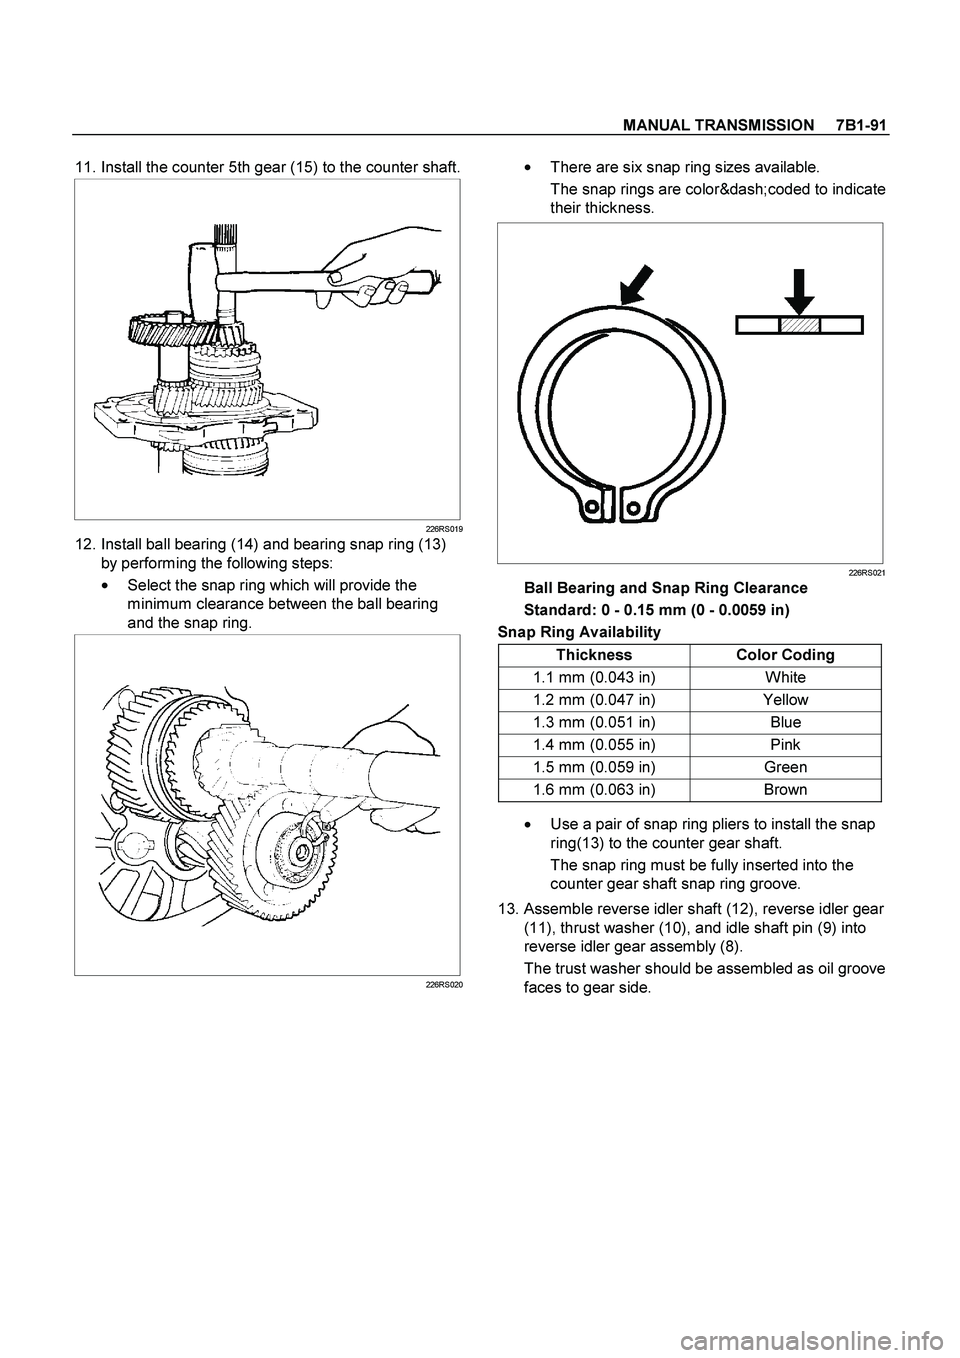
11. Install the counter 5th gear (15) to the counter shaft.
226RS019
12. Install ball bearing (14) and bearing snap ring (13)
by performing the following steps:
�
Select the snap ring which will provide the
minimum clearance between the ball bearing
and the snap ring.
226RS020
�
There are six snap ring sizes available.
The snap rings are color‐coded to indicate
their thickness.
226RS021
Ball Bearing and Snap Ring Clearance
Standard: 0 - 0.15 mm (0 - 0.0059 in)
Snap Ring Availability
Thickness Color Coding
1.1 mm (0.043 in) White
1.2 mm (0.047 in) Yellow
1.3 mm (0.051 in) Blue
1.4 mm (0.055 in) Pink
1.5 mm (0.059 in) Green
1.6 mm (0.063 in) Brown
�
Use a pair of snap ring pliers to install the snap
ring(13) to the counter gear shaft.
The snap ring must be fully inserted into the
counter gear shaft snap ring groove.
13. Assemble reverse idler shaft (12), reverse idler gear
(11), thrust washer (10), and idle shaft pin (9) into
reverse idler gear assembly (8).
The trust washer should be assembled as oil groove
faces to gear side.
Page 3256 of 4264

7B1-92 MANUAL TRANSMISSION
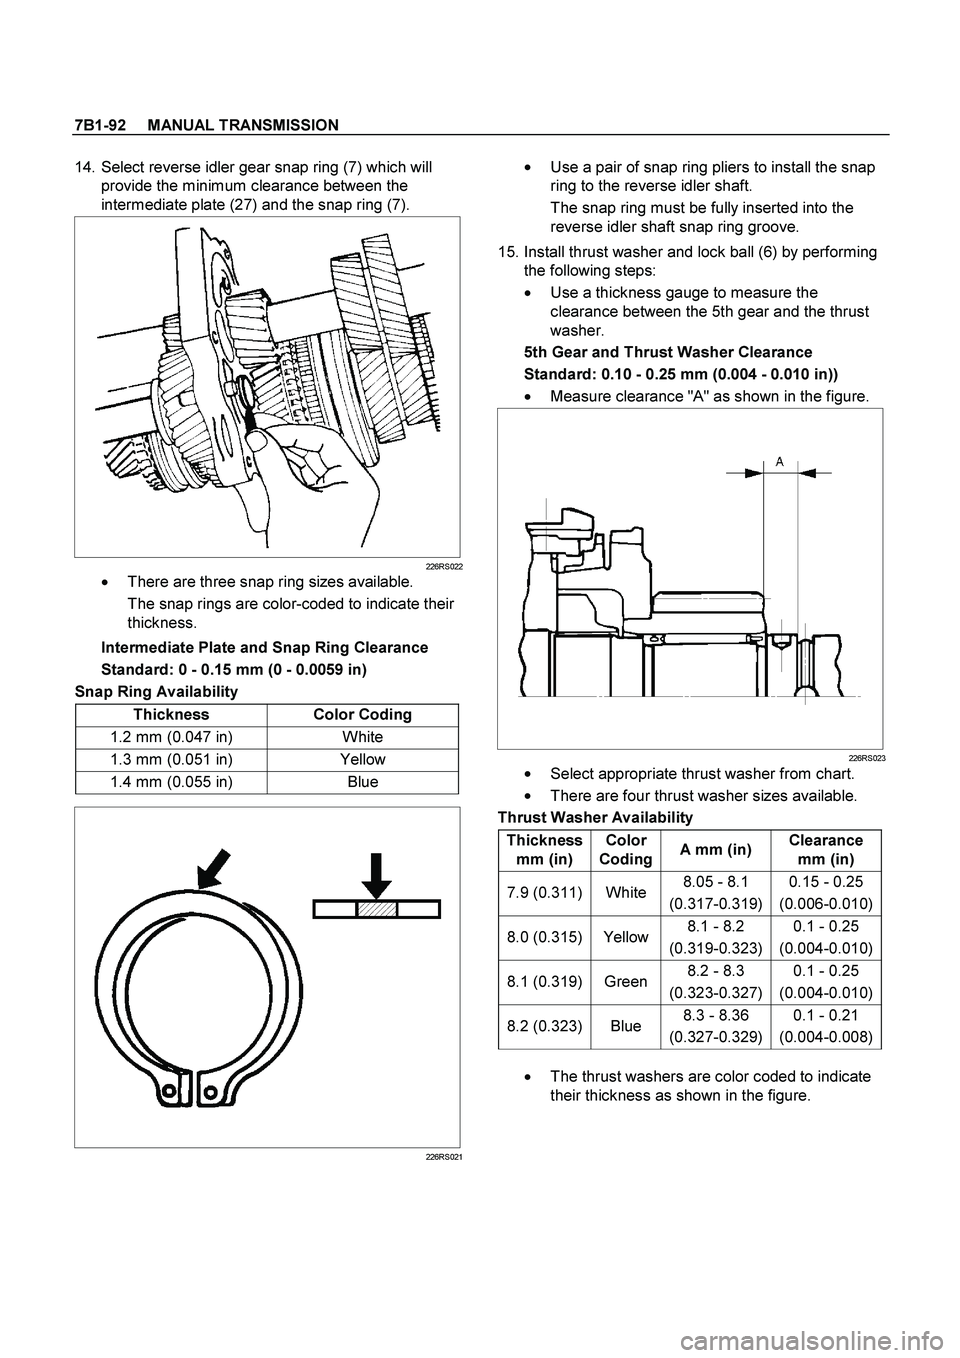
14. Select reverse idler gear snap ring (7) which will
provide the minimum clearance between the
intermediate plate (27) and the snap ring (7).
226RS022
�
There are three snap ring sizes available.
The snap rings are color-coded to indicate their
thickness.
Intermediate Plate and Snap Ring Clearance
Standard: 0 - 0.15 mm (0 - 0.0059 in)
Snap Ring Availability
Thickness Color Coding
1.2 mm (0.047 in) White
1.3 mm (0.051 in) Yellow
1.4 mm (0.055 in) Blue
226RS021
�
Use a pair of snap ring pliers to install the snap
ring to the reverse idler shaft.
The snap ring must be fully inserted into the
reverse idler shaft snap ring groove.
15. Install thrust washer and lock ball (6) by performing
the following steps:
�
Use a thickness gauge to measure the
clearance between the 5th gear and the thrust
washer.
5th Gear and Thrust Washer Clearance
Standard: 0.10 - 0.25 mm (0.004 - 0.010 in))
� Measure clearance "A" as shown in the figure.
226RS023
�
Select appropriate thrust washer from chart.
�
There are four thrust washer sizes available.
Thrust Washer Availability
Thickness
mm (in) Color
CodingA mm (in) Clearance
mm (in)
7.9 (0.311) White 8.05 - 8.1
(0.317-0.319) 0.15 - 0.25
(0.006-0.010)
8.0 (0.315) Yellow8.1 - 8.2
(0.319-0.323) 0.1 - 0.25
(0.004-0.010)
8.1 (0.319) Green8.2 - 8.3
(0.323-0.327) 0.1 - 0.25
(0.004-0.010)
8.2 (0.323) Blue 8.3 - 8.36
(0.327-0.329) 0.1 - 0.21
(0.004-0.008)
�
The thrust washers are color coded to indicate
their thickness as shown in the figure.
Page 3267 of 4264
MANUAL TRANSMISSION 7B1-103
266RS049
7. Install the synchronizer assembly (20) to the
mainshaft (26).
The clutch hub face (with the heavy boss) must be
facing the 2nd gear side.
226RS048
8. Install clutch hub snap ring(19) by performing the
following steps:
�
Select the snap ring which will provide the
minimum clearance between the 1st-2nd clutch
hub and the snap ring.
226RS050
� There are three snap ring sizes available.
� The snap rings are color coded to indicate their
thickness as shown in the figure.
226RS021
Clutch Hub and Snap Ring Clearance
Standard: 0 - 0.1 mm (0 - 0.004 in)
Snap Ring Availability
Thickness Color Coding
1.80 mm (0.071 in) White
1.85 mm (0.073 in) Yellow
1.90 mm (0.075 in) Blue
� Use a pair of snap ring pliers to install the snap
ring (19) to the mainshaft (26).
The snap ring must be fully inserted into the
mainshaft snap ring groove.
Page 3270 of 4264
7B1-106 MANUAL TRANSMISSION
226RS021
Clutch Hub and Snap Ring Clearance
Standard: 0 - 0.1 mm (0 - 0.004 in)
Snap Ring Availability
Thickness Color Coding
1.80 mm (0.071 in) White
1.85 mm (0.073 in) Yellow
1.90 mm (0.075 in) Blue
�
Use a pair of snap ring pliers to install the snap
ring to the mainshaft.
The snap ring must be fully inserted into the
mainshaft snap ring groove.
16. Install top block ring (5).
Apply grease to the needle bearing (4) inner and
outer circumferences and install needle bearing (4)
in the top gear shaft (2).
17. Use a bench press to install the top gear shaft ball
bearing (3) to the top gear shaft (2).
226RS059
The snap ring groove of the ball bearing (3) must be
facing the transmission front side.
18. Use a pair of snap ring pliers to install the top gear
shaft snap ring (1) to the top gear shaft (2).