2004 ISUZU TF SERIES Throttle Position Sensor
[x] Cancel search: Throttle Position SensorPage 1750 of 4264
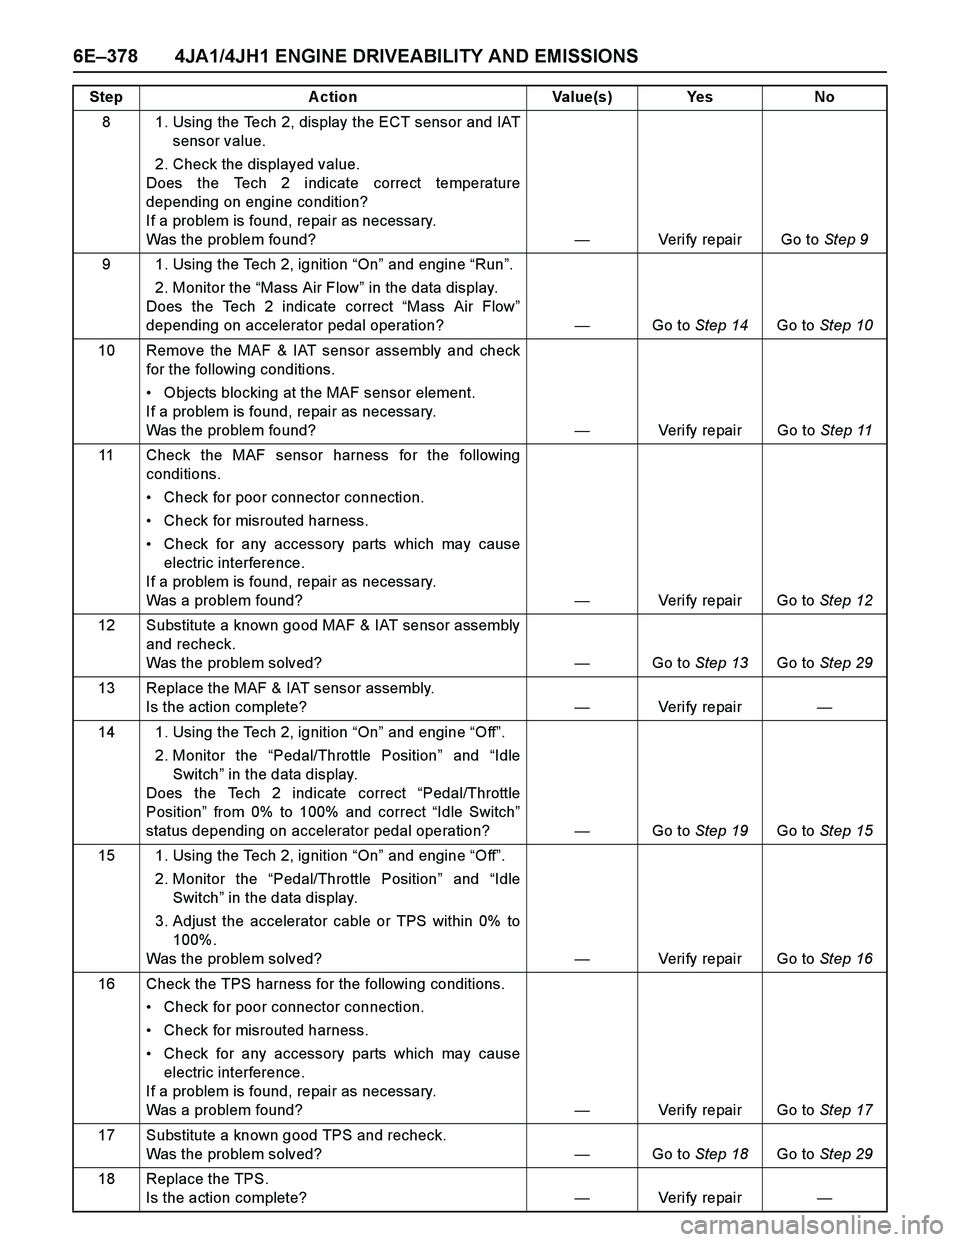
6E–378 4JA1/4JH1 ENGINE DRIVEABILITY AND EMISSIONS
8 1. Using the Tech 2, display the ECT sensor and IAT
sensor value.
2. Check the displayed value.
Does the Tech 2 indicate correct temperature
depending on engine condition?
If a problem is found, repair as necessary.
Was the problem found?—Verify repair Go to Step 9
9 1. Using the Tech 2, ignition “On” and engine “Run”.
2. Monitor the “Mass Air Flow” in the data display.
Does the Tech 2 indicate correct “Mass Air Flow”
depending on accelerator pedal operation? —Go to Step 14Go to Step 10
10 Remove the MAF & IAT sensor assembly and check
for the following conditions.
Objects blocking at the MAF sensor element.
If a problem is found, repair as necessary.
Was the problem found?—Verify repair Go to Step 11
11 Check the MAF sensor harness for the following
conditions.
Check for poor connector connection.
Check for misrouted harness.
Check for any accessory parts which may cause
electric interference.
If a problem is found, repair as necessary.
Was a problem found? —Verify repair Go to Step 12
12 Substitute a known good MAF & IAT sensor assembly
and recheck.
Was the problem solved?—Go to Step 13Go to Step 29
13 Replace the MAF & IAT sensor assembly.
Is the action complete?—Veri fy repai r—
14 1. Using the Tech 2, ignition “On” and engine “Off”.
2. Monitor the “Pedal/Throttle Position” and “Idle
Switch” in the data display.
Does the Tech 2 indicate correct “Pedal/Throttle
Position” from 0% to 100% and correct “Idle Switch”
status depending on accelerator pedal operation?—Go to Step 19Go to Step 15
15 1. Using the Tech 2, ignition “On” and engine “Off”.
2. Monitor the “Pedal/Throttle Position” and “Idle
Switch” in the data display.
3. Adjust the accelerator cable or TPS within 0% to
100%.
Was the problem solved?—Verify repair Go to Step 16
16 Check the TPS harness for the following conditions.
Check for poor connector connection.
Check for misrouted harness.
Check for any accessory parts which may cause
electric interference.
If a problem is found, repair as necessary.
Was a problem found? —Verify repair Go to Step 17
17 Substitute a known good TPS and recheck.
Was the problem solved?—Go to Step 18Go to Step 29
18 Replace the TPS.
Is the action complete?—Veri fy repai r— Step Action Value(s) Yes No
Page 1756 of 4264
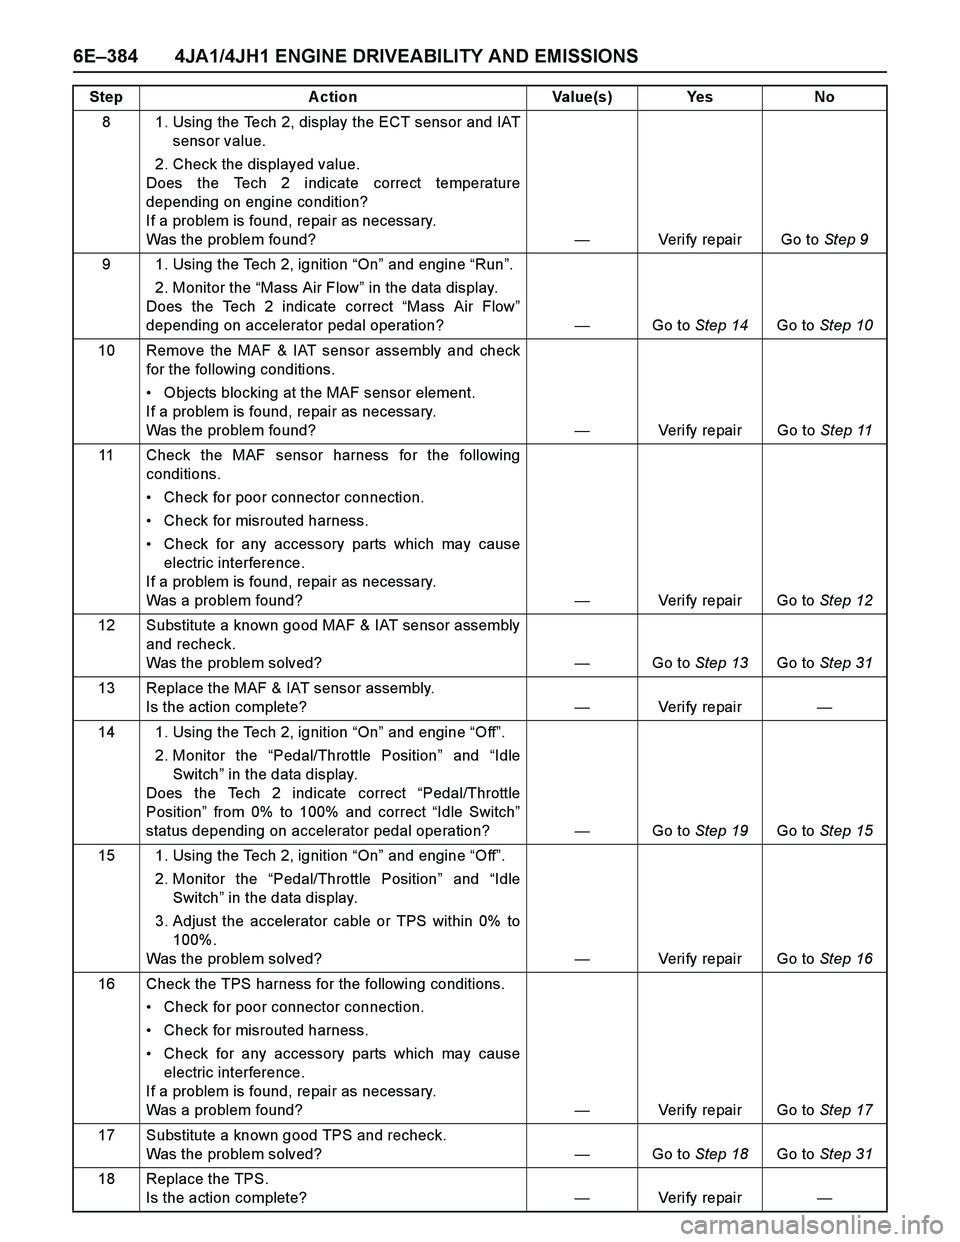
6E–384 4JA1/4JH1 ENGINE DRIVEABILITY AND EMISSIONS
8 1. Using the Tech 2, display the ECT sensor and IAT
sensor value.
2. Check the displayed value.
Does the Tech 2 indicate correct temperature
depending on engine condition?
If a problem is found, repair as necessary.
Was the problem found?—Verify repair Go to Step 9
9 1. Using the Tech 2, ignition “On” and engine “Run”.
2. Monitor the “Mass Air Flow” in the data display.
Does the Tech 2 indicate correct “Mass Air Flow”
depending on accelerator pedal operation? —Go to Step 14Go to Step 10
10 Remove the MAF & IAT sensor assembly and check
for the following conditions.
Objects blocking at the MAF sensor element.
If a problem is found, repair as necessary.
Was the problem found?—Verify repair Go to Step 11
11 Check the MAF sensor harness for the following
conditions.
Check for poor connector connection.
Check for misrouted harness.
Check for any accessory parts which may cause
electric interference.
If a problem is found, repair as necessary.
Was a problem found? —Verify repair Go to Step 12
12 Substitute a known good MAF & IAT sensor assembly
and recheck.
Was the problem solved?—Go to Step 13Go to Step 31
13 Replace the MAF & IAT sensor assembly.
Is the action complete?—Veri fy repai r—
14 1. Using the Tech 2, ignition “On” and engine “Off”.
2. Monitor the “Pedal/Throttle Position” and “Idle
Switch” in the data display.
Does the Tech 2 indicate correct “Pedal/Throttle
Position” from 0% to 100% and correct “Idle Switch”
status depending on accelerator pedal operation?—Go to Step 19Go to Step 15
15 1. Using the Tech 2, ignition “On” and engine “Off”.
2. Monitor the “Pedal/Throttle Position” and “Idle
Switch” in the data display.
3. Adjust the accelerator cable or TPS within 0% to
100%.
Was the problem solved?—Verify repair Go to Step 16
16 Check the TPS harness for the following conditions.
Check for poor connector connection.
Check for misrouted harness.
Check for any accessory parts which may cause
electric interference.
If a problem is found, repair as necessary.
Was a problem found? —Verify repair Go to Step 17
17 Substitute a known good TPS and recheck.
Was the problem solved?—Go to Step 18Go to Step 31
18 Replace the TPS.
Is the action complete?—Veri fy repai r— Step Action Value(s) Yes No
Page 1763 of 4264
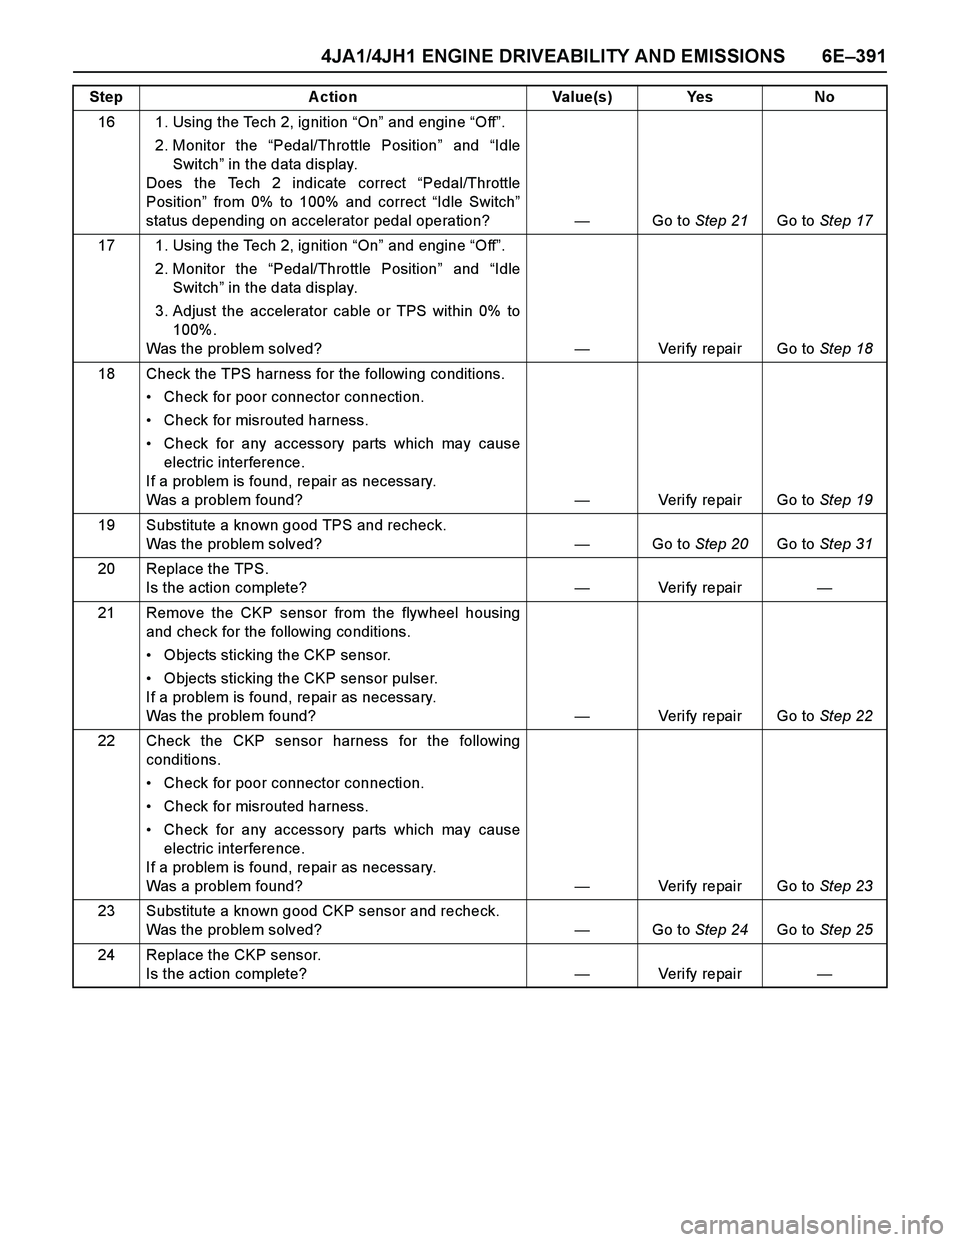
4JA1/4JH1 ENGINE DRIVEABILITY AND EMISSIONS 6E–391
16 1. Using the Tech 2, ignition “On” and engine “Off”.
2. Monitor the “Pedal/Throttle Position” and “Idle
Switch” in the data display.
Does the Tech 2 indicate correct “Pedal/Throttle
Position” from 0% to 100% and correct “Idle Switch”
status depending on accelerator pedal operation?—Go to Step 21Go to Step 17
17 1. Using the Tech 2, ignition “On” and engine “Off”.
2. Monitor the “Pedal/Throttle Position” and “Idle
Switch” in the data display.
3. Adjust the accelerator cable or TPS within 0% to
100%.
Was the problem solved?—Verify repair Go to Step 18
18 Check the TPS harness for the following conditions.
Check for poor connector connection.
Check for misrouted harness.
Check for any accessory parts which may cause
electric interference.
If a problem is found, repair as necessary.
Was a problem found? —Verify repair Go to Step 19
19 Substitute a known good TPS and recheck.
Was the problem solved?—Go to Step 20Go to Step 31
20 Replace the TPS.
Is the action complete?—Veri fy repai r—
21 Remove the CKP sensor from the flywheel housing
and check for the following conditions.
Objects sticking the CKP sensor.
Objects sticking the CKP sensor pulser.
If a problem is found, repair as necessary.
Was the problem found? —Verify repair Go to Step 22
22 Check the CKP sensor harness for the following
conditions.
Check for poor connector connection.
Check for misrouted harness.
Check for any accessory parts which may cause
electric interference.
If a problem is found, repair as necessary.
Was a problem found? —Verify repair Go to Step 23
23 Substitute a known good CKP sensor and recheck.
Was the problem solved?—Go to Step 24Go to Step 25
24 Replace the CKP sensor.
Is the action complete?—Veri fy repai r— Step Action Value(s) Yes No
Page 1769 of 4264
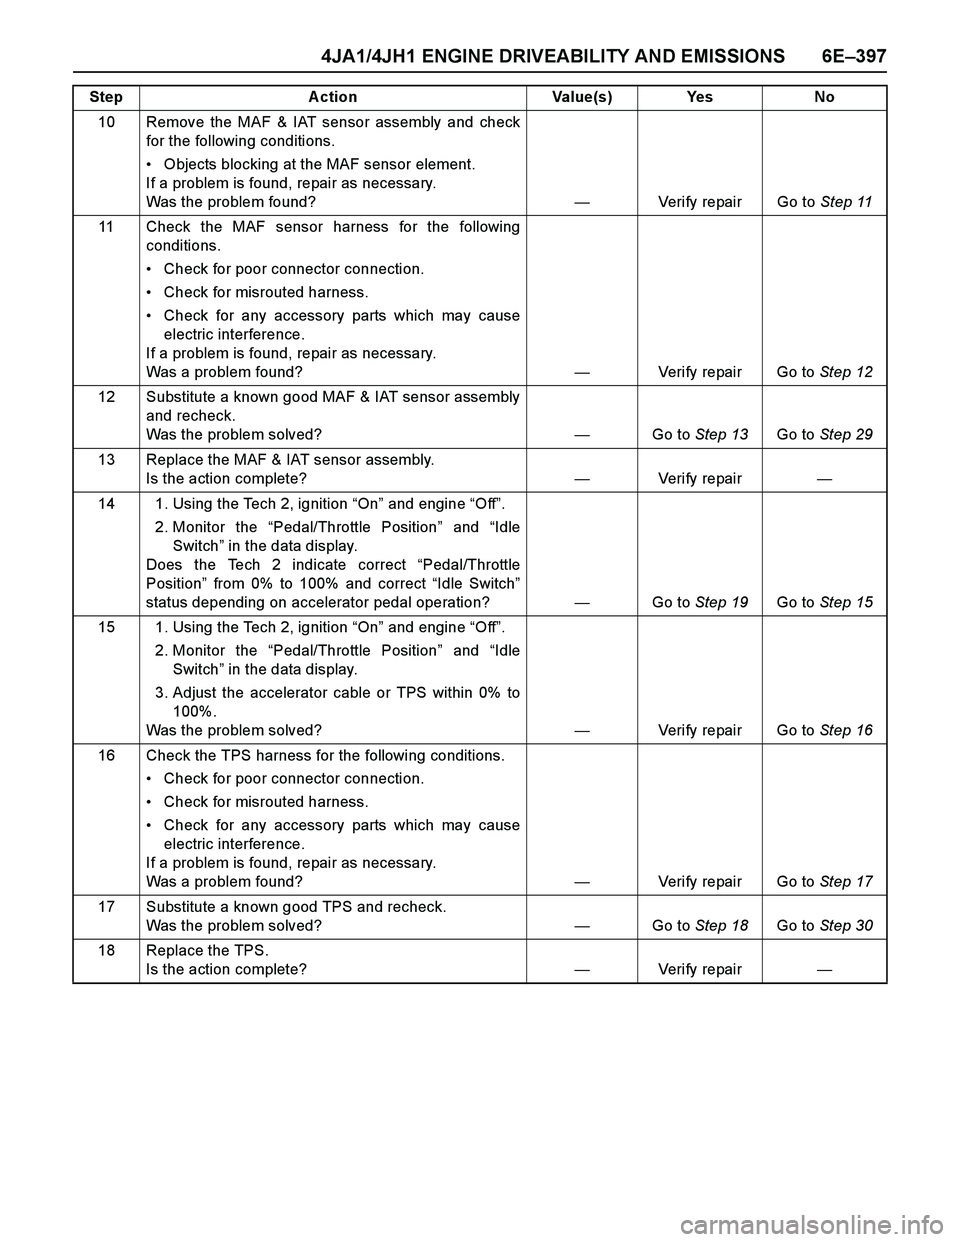
4JA1/4JH1 ENGINE DRIVEABILITY AND EMISSIONS 6E–397
10 Remove the MAF & IAT sensor assembly and check
for the following conditions.
Objects blocking at the MAF sensor element.
If a problem is found, repair as necessary.
Was the problem found?—Verify repair Go to Step 11
11 Check the MAF sensor harness for the following
conditions.
Check for poor connector connection.
Check for misrouted harness.
Check for any accessory parts which may cause
electric interference.
If a problem is found, repair as necessary.
Was a problem found? —Verify repair Go to Step 12
12 Substitute a known good MAF & IAT sensor assembly
and recheck.
Was the problem solved?—Go to Step 13Go to Step 29
13 Replace the MAF & IAT sensor assembly.
Is the action complete?—Veri fy repai r—
14 1. Using the Tech 2, ignition “On” and engine “Off”.
2. Monitor the “Pedal/Throttle Position” and “Idle
Switch” in the data display.
Does the Tech 2 indicate correct “Pedal/Throttle
Position” from 0% to 100% and correct “Idle Switch”
status depending on accelerator pedal operation?—Go to Step 19Go to Step 15
15 1. Using the Tech 2, ignition “On” and engine “Off”.
2. Monitor the “Pedal/Throttle Position” and “Idle
Switch” in the data display.
3. Adjust the accelerator cable or TPS within 0% to
100%.
Was the problem solved?—Verify repair Go to Step 16
16 Check the TPS harness for the following conditions.
Check for poor connector connection.
Check for misrouted harness.
Check for any accessory parts which may cause
electric interference.
If a problem is found, repair as necessary.
Was a problem found? —Verify repair Go to Step 17
17 Substitute a known good TPS and recheck.
Was the problem solved?—Go to Step 18Go to Step 30
18 Replace the TPS.
Is the action complete?—Veri fy repai r— Step Action Value(s) Yes No
Page 1775 of 4264
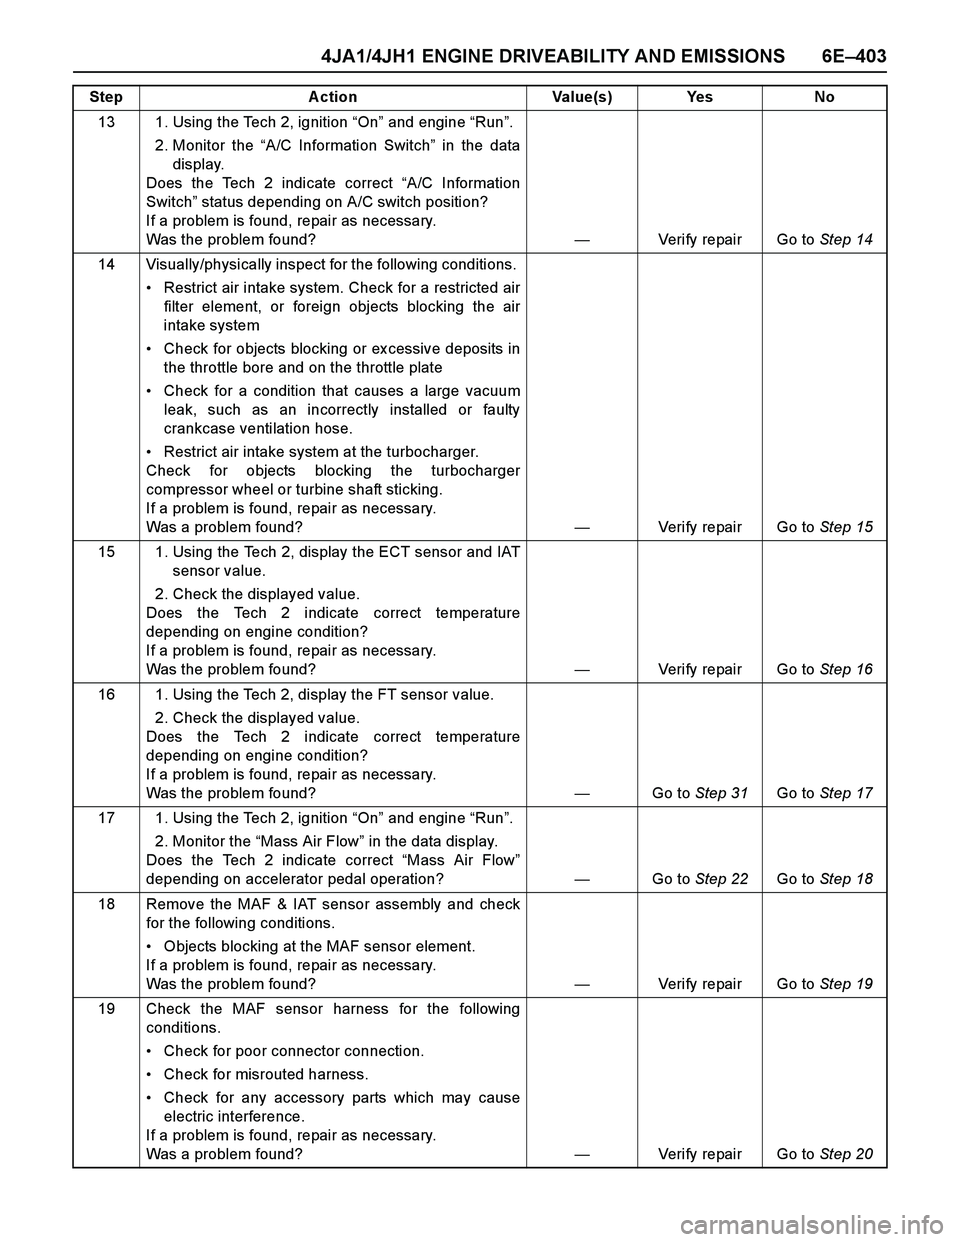
4JA1/4JH1 ENGINE DRIVEABILITY AND EMISSIONS 6E–403
13 1. Using the Tech 2, ignition “On” and engine “Run”.
2. Monitor the “A/C Information Switch” in the data
display.
Does the Tech 2 indicate correct “A/C Information
Switch” status depending on A/C switch position?
If a problem is found, repair as necessary.
Was the problem found?—Verify repair Go to Step 14
14 Visually/physically inspect for the following conditions.
Restrict air intake system. Check for a restricted air
filter element, or foreign objects blocking the air
intake system
Check for objects blocking or ex cessive deposits in
the throttle bore and on the throttle plate
Check for a condition that causes a large vacuum
leak, such as an incorrectly installed or faulty
crankcase ventilation hose.
Restrict air intake system at the turbocharger.
Check for objects blocking the turbocharger
compressor wheel or turbine shaft sticking.
If a problem is found, repair as necessary.
Was a problem found?—Verify repair Go to Step 15
15 1. Using the Tech 2, display the ECT sensor and IAT
sensor value.
2. Check the displayed value.
Does the Tech 2 indicate correct temperature
depending on engine condition?
If a problem is found, repair as necessary.
Was the problem found?—Verify repair Go to Step 16
16 1. Using the Tech 2, display the FT sensor value.
2. Check the displayed value.
Does the Tech 2 indicate correct temperature
depending on engine condition?
If a problem is found, repair as necessary.
Was the problem found?—Go to Step 31Go to Step 17
17 1. Using the Tech 2, ignition “On” and engine “Run”.
2. Monitor the “Mass Air Flow” in the data display.
Does the Tech 2 indicate correct “Mass Air Flow”
depending on accelerator pedal operation? —Go to Step 22Go to Step 18
18 Remove the MAF & IAT sensor assembly and check
for the following conditions.
Objects blocking at the MAF sensor element.
If a problem is found, repair as necessary.
Was the problem found?—Verify repair Go to Step 19
19 Check the MAF sensor harness for the following
conditions.
Check for poor connector connection.
Check for misrouted harness.
Check for any accessory parts which may cause
electric interference.
If a problem is found, repair as necessary.
Was a problem found? —Verify repair Go to Step 20 Step Action Value(s) Yes No
Page 1776 of 4264
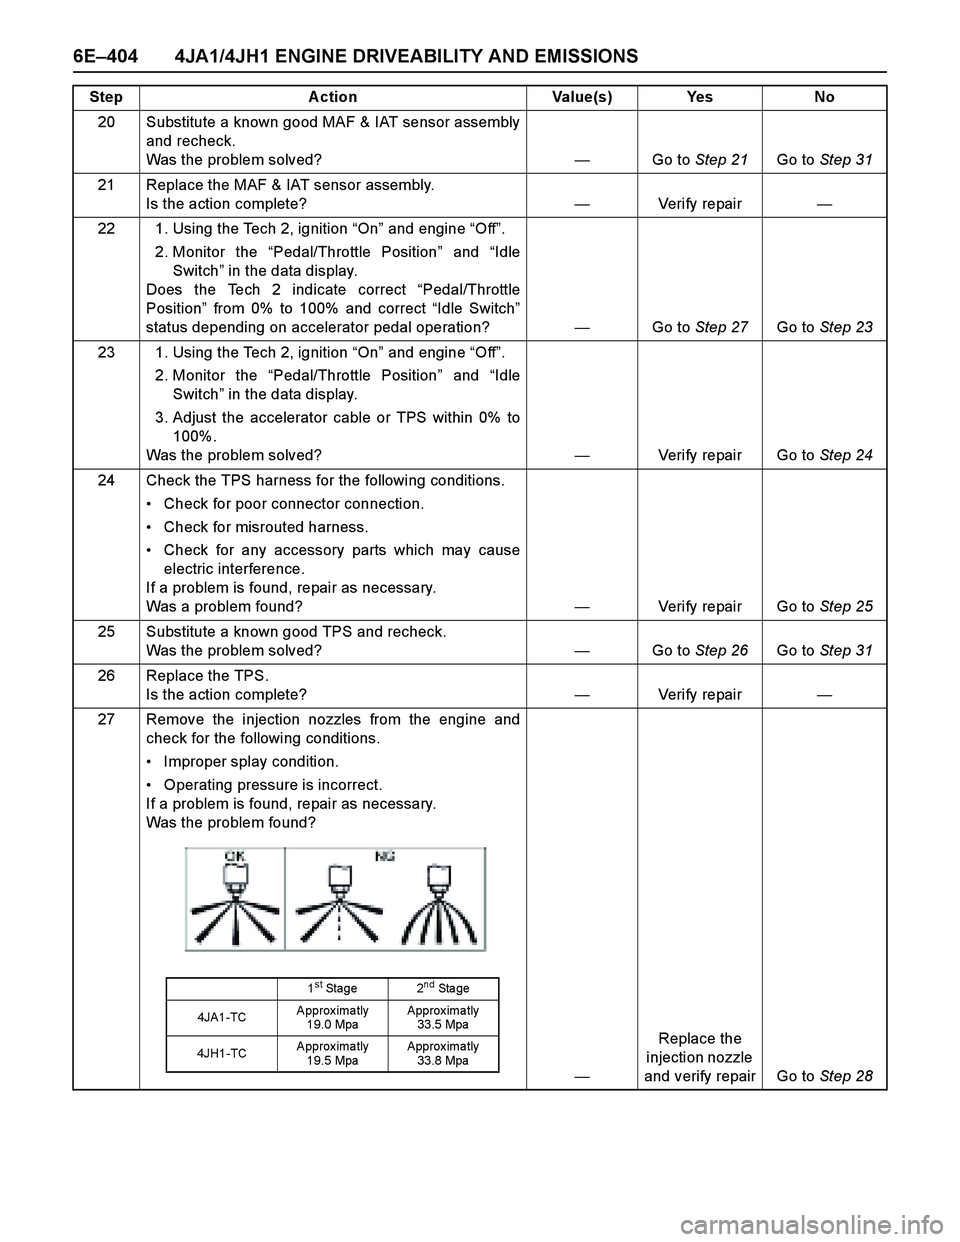
6E–404 4JA1/4JH1 ENGINE DRIVEABILITY AND EMISSIONS
20 Substitute a known good MAF & IAT sensor assembly
and recheck.
Was the problem solved?—Go to Step 21Go to Step 31
21 Replace the MAF & IAT sensor assembly.
Is the action complete?—Veri fy repai r—
22 1. Using the Tech 2, ignition “On” and engine “Off”.
2. Monitor the “Pedal/Throttle Position” and “Idle
Switch” in the data display.
Does the Tech 2 indicate correct “Pedal/Throttle
Position” from 0% to 100% and correct “Idle Switch”
status depending on accelerator pedal operation?—Go to Step 27Go to Step 23
23 1. Using the Tech 2, ignition “On” and engine “Off”.
2. Monitor the “Pedal/Throttle Position” and “Idle
Switch” in the data display.
3. Adjust the accelerator cable or TPS within 0% to
100%.
Was the problem solved?—Verify repair Go to Step 24
24 Check the TPS harness for the following conditions.
Check for poor connector connection.
Check for misrouted harness.
Check for any accessory parts which may cause
electric interference.
If a problem is found, repair as necessary.
Was a problem found? —Verify repair Go to Step 25
25 Substitute a known good TPS and recheck.
Was the problem solved?—Go to Step 26Go to Step 31
26 Replace the TPS.
Is the action complete?—Veri fy repai r—
27 Remove the injection nozzles from the engine and
check for the following conditions.
Improper splay condition.
Operating pressure is incorrect.
If a problem is found, repair as necessary.
Was the problem found?
—Replace the
injection nozzle
and verify repair Go to Step 28 Step Action Value(s) Yes No
1st Stage 2nd Sta ge
4JA1-TCApproximatly
19.0 MpaApprox ima tly
33.5 Mpa
4JH1-TCApproximatly
19.5 MpaApprox ima tly
33.8 Mpa
Page 1792 of 4264
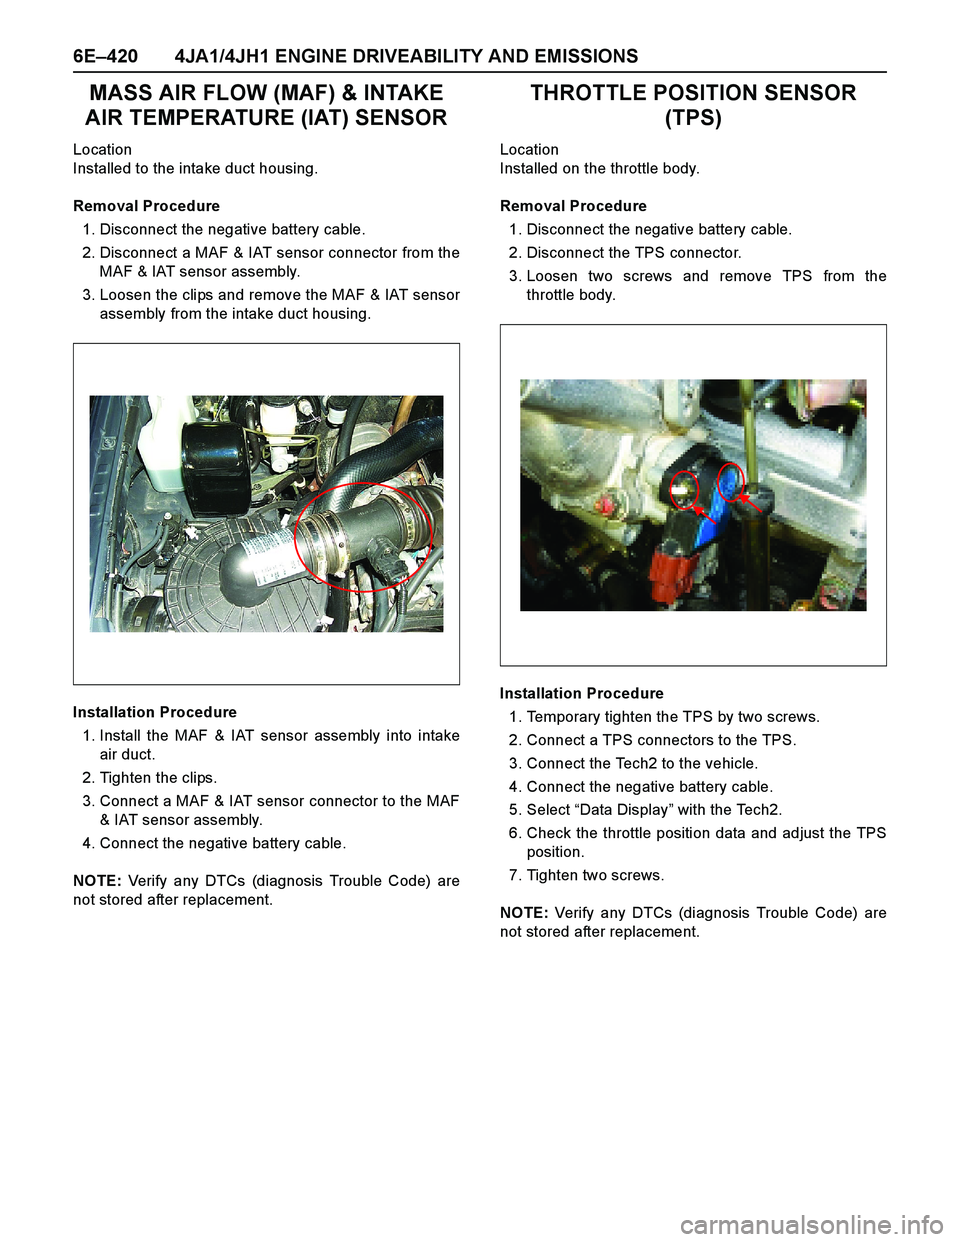
6E–420 4JA1/4JH1 ENGINE DRIVEABILITY AND EMISSIONS
MASS AIR FLOW (MAF) & INTAKE
AIR TEMPERATURE (IAT) SENSOR
Location
Installed to the intake duct housing.
Removal Procedure
1. Disconnect the negative battery cable.
2. Disconnect a MAF & IAT sensor connector from the
MAF & IAT sensor assembly.
3. Loosen the clips and remove the MAF & IAT sensor
assembly from the intake duct housing.
Installation Procedure
1. Install the MAF & IAT sensor assembly into intake
air duct.
2. Tighten the clips.
3. Connect a MAF & IAT sensor connector to the MAF
& IAT sensor assembly.
4. Connect the negative battery cable.
NOTE: Verify any DTCs (diagnosis Trouble Code) are
not stored after replacement.
THROTTLE POSITION SENSOR
(TPS)
Location
Installed on the throttle body.
Removal Procedure
1. Disconnect the negative battery cable.
2. Disconnect the TPS connector.
3. Loosen two screws and remove TPS from the
throttle body.
Installation Procedure
1. Temporary tighten the TPS by two screws.
2. Connect a TPS connectors to the TPS.
3. Connect the Tech2 to the vehicle.
4. Connect the negative battery cable.
5. Select “Data Display” with the Tech2.
6. Check the throttle position data and adjust the TPS
position.
7. Tighten two screws.
NOTE: Verify any DTCs (diagnosis Trouble Code) are
not stored after replacement.
Page 1830 of 4264
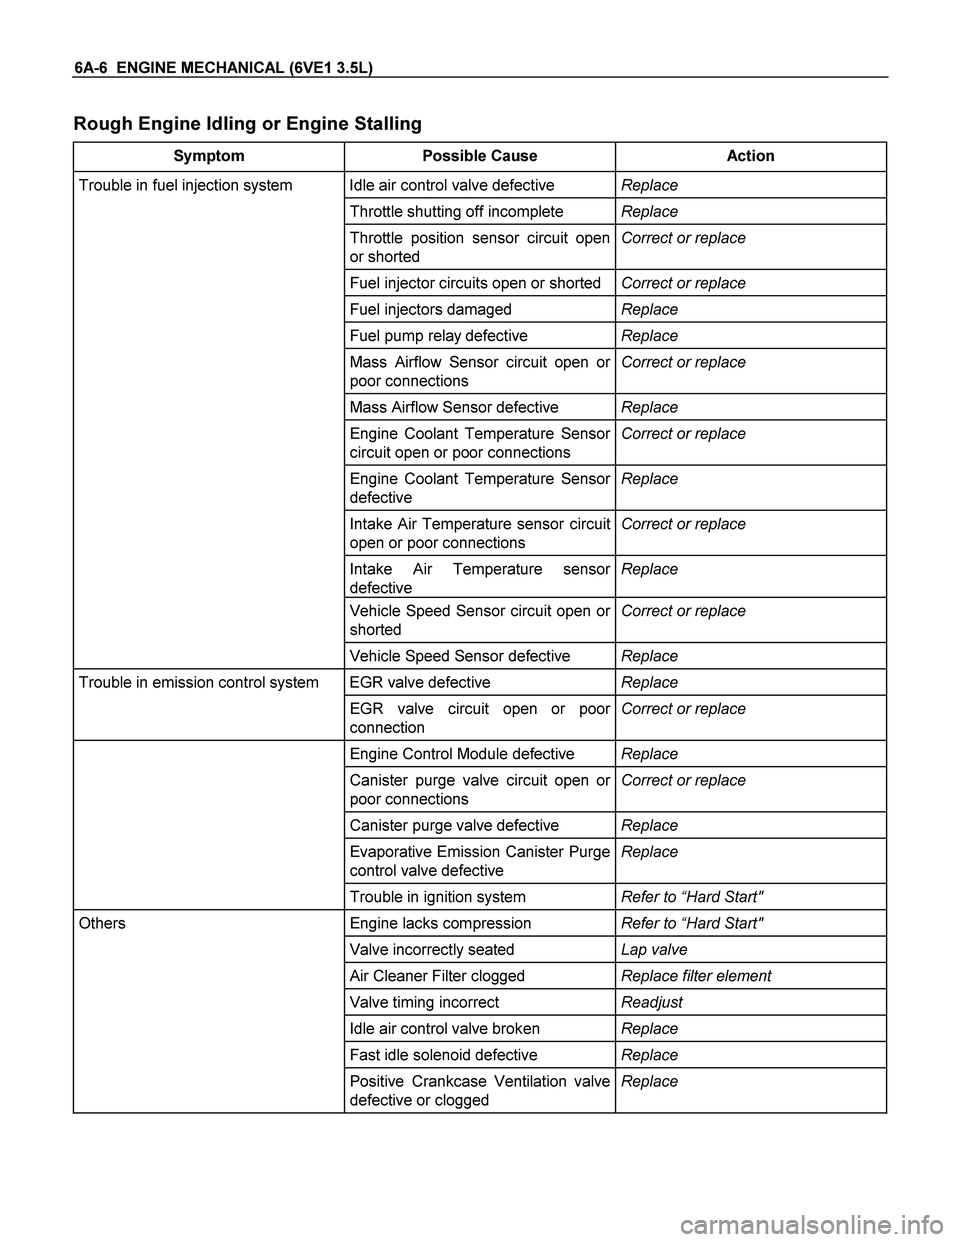
6A-6 ENGINE MECHANICAL (6VE1 3.5L)
Rough Engine Idling or Engine Stalling
Symptom Possible Cause Action
Trouble in fuel injection system Idle air control valve defective Replace
Throttle shutting off incomplete Replace
Throttle position sensor circuit open
or shorted Correct or replace
Fuel injector circuits open or shortedCorrect or replace
Fuel injectors damaged Replace
Fuel pump relay defective Replace
Mass Airflow Sensor circuit open or
poor connections Correct or replace
Mass Airflow Sensor defective Replace
Engine Coolant Temperature Sensor
circuit open or poor connections Correct or replace
Engine Coolant Temperature Sensor
defective Replace
Intake Air Temperature sensor circuit
open or poor connections Correct or replace
Intake Air Temperature sensor
defective Replace
Vehicle Speed Sensor circuit open or
shorted Correct or replace
Vehicle Speed Sensor defective Replace
Trouble in emission control system EGR valve defective Replace
EGR valve circuit open or poor
connection Correct or replace
Engine Control Module defective Replace
Canister purge valve circuit open or
poor connections Correct or replace
Canister purge valve defective Replace
Evaporative Emission Canister Purge
control valve defective Replace
Trouble in ignition system Refer to “Hard Start"
Others Engine lacks compression Refer to “Hard Start"
Valve incorrectly seated Lap valve
Air Cleaner Filter clogged Replace filter element
Valve timing incorrect Readjust
Idle air control valve broken Replace
Fast idle solenoid defective Replace
Positive Crankcase Ventilation valve
defective or clogged Replace