Page 3233 of 4264
MANUAL TRANSMISSION 7B1-69
NOTE: Be sure not to insert the remover between the
wedge collar and the clutch.
220RW063
220RW064
220RW019
Legend
(1) Pressure Plate Assembly
(2) Release Bearing
(3) Wedge Collar
24. Remove transmission retaining nuts and bolts(17).
Remove transmission assembly (18) from the
vehicle.
Installation
1. Apply a thin coat of molybdenum disulfide grease to
the top gear shaft spline.
2. Slowly operate the transmission jack until the front
of transmission is aligned with the rear of the
engine.
The slope of the engine and the transmission must
be the same.
3. Align the top gear shaft with the clutch driven plate
spline.
Page 3236 of 4264
7B1-72 MANUAL TRANSMISSION
RTW37BLF000201
5. Apply a force of about 113N (26 Ib) to the tip of the
shift fork in the direction of the transmission to
engage the clutch pressure plate and release
bearing. (6VE1 only)
NOTE: A clicking sound is heard when the release
bearing and the tip of the diaphragm spring engage
each other.
Check to see if they are securely engaged by pushing
the tip of the shift fork toward the engine while applying
a force of about 25 N (5.5 lb). If the shift fork will not
move, then they are securely engaged.
220RS006
Page 3241 of 4264

MANUAL TRANSMISSION 7B1-77
Disassembly
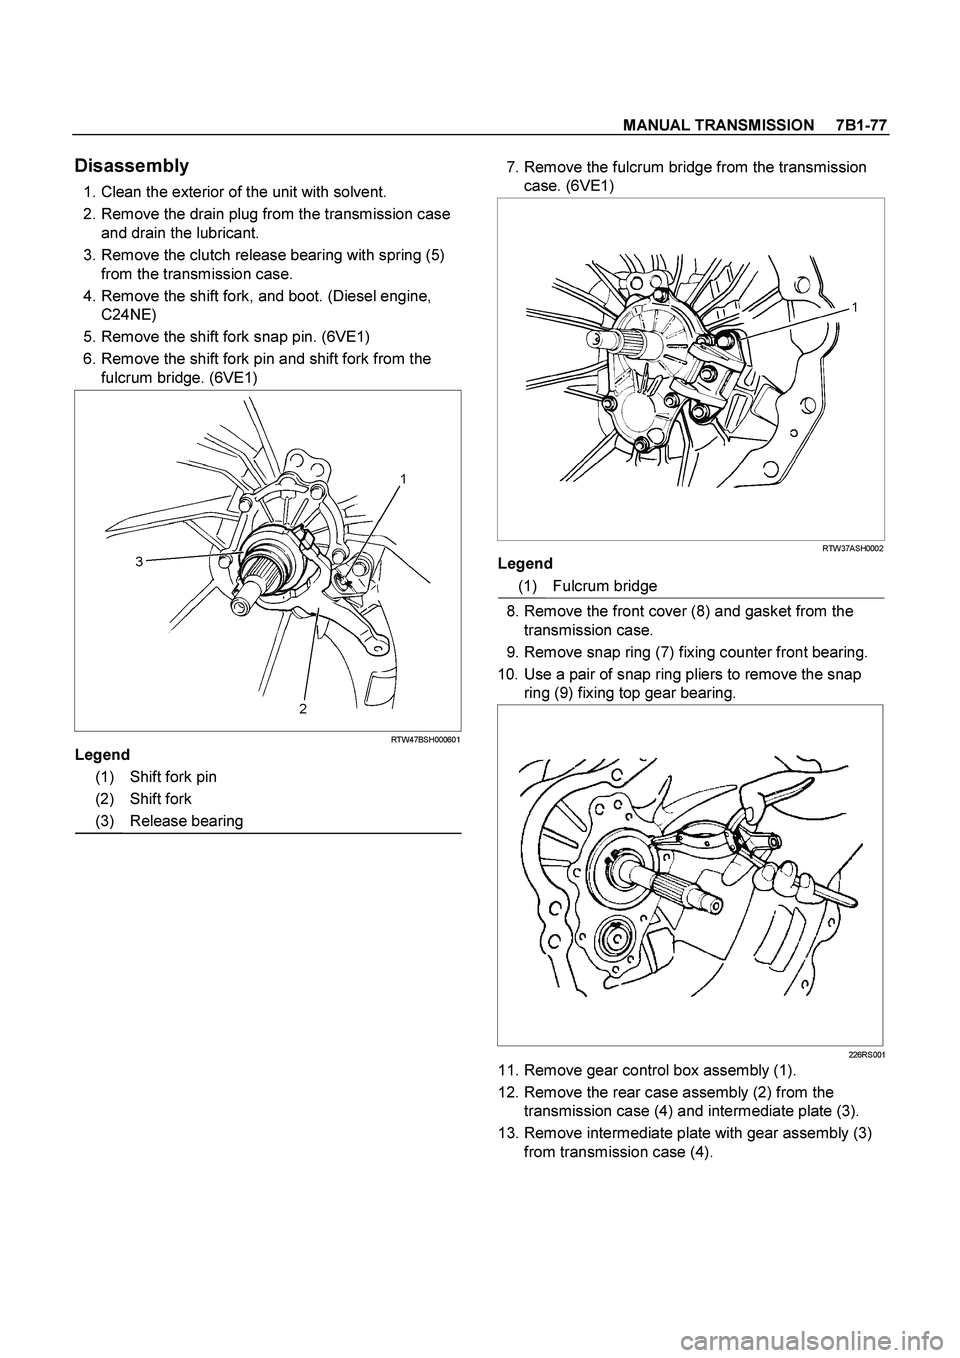
1. Clean the exterior of the unit with solvent.
2. Remove the drain plug from the transmission case
and drain the lubricant.
3. Remove the clutch release bearing with spring (5)
from the transmission case.
4. Remove the shift fork, and boot. (Diesel engine,
C24NE)
5. Remove the shift fork snap pin. (6VE1)
6. Remove the shift fork pin and shift fork from the
fulcrum bridge. (6VE1)
RTW47BSH000601
Legend
(1) Shift fork pin
(2) Shift fork
(3) Release bearing
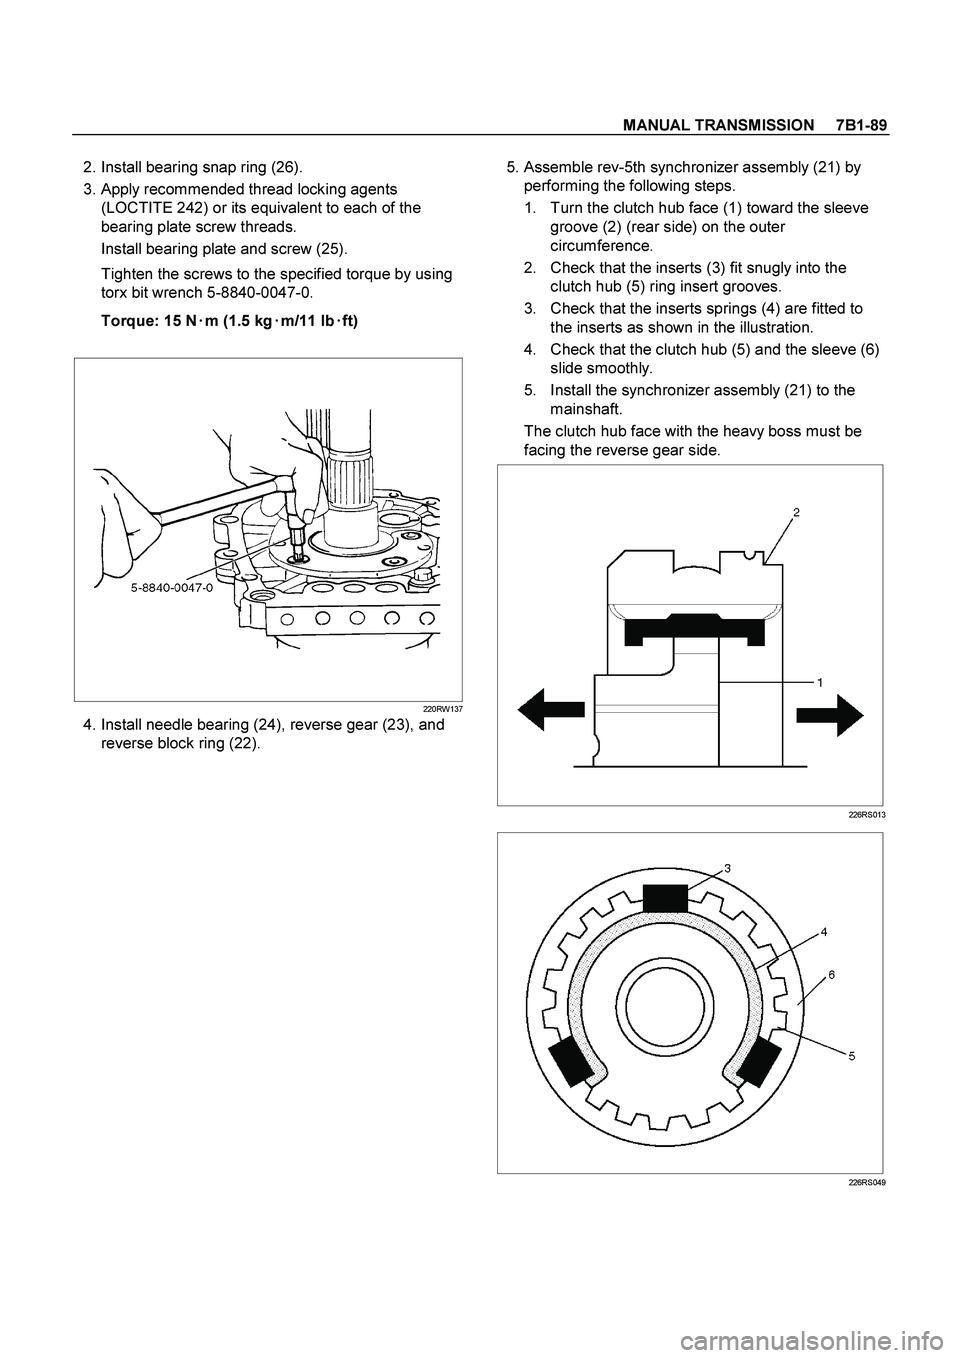
7. Remove the fulcrum bridge from the transmission
case. (6VE1)
RTW37ASH0002
Legend
(1) Fulcrum bridge
8. Remove the front cover (8) and gasket from the
transmission case.
9. Remove snap ring (7) fixing counter front bearing.
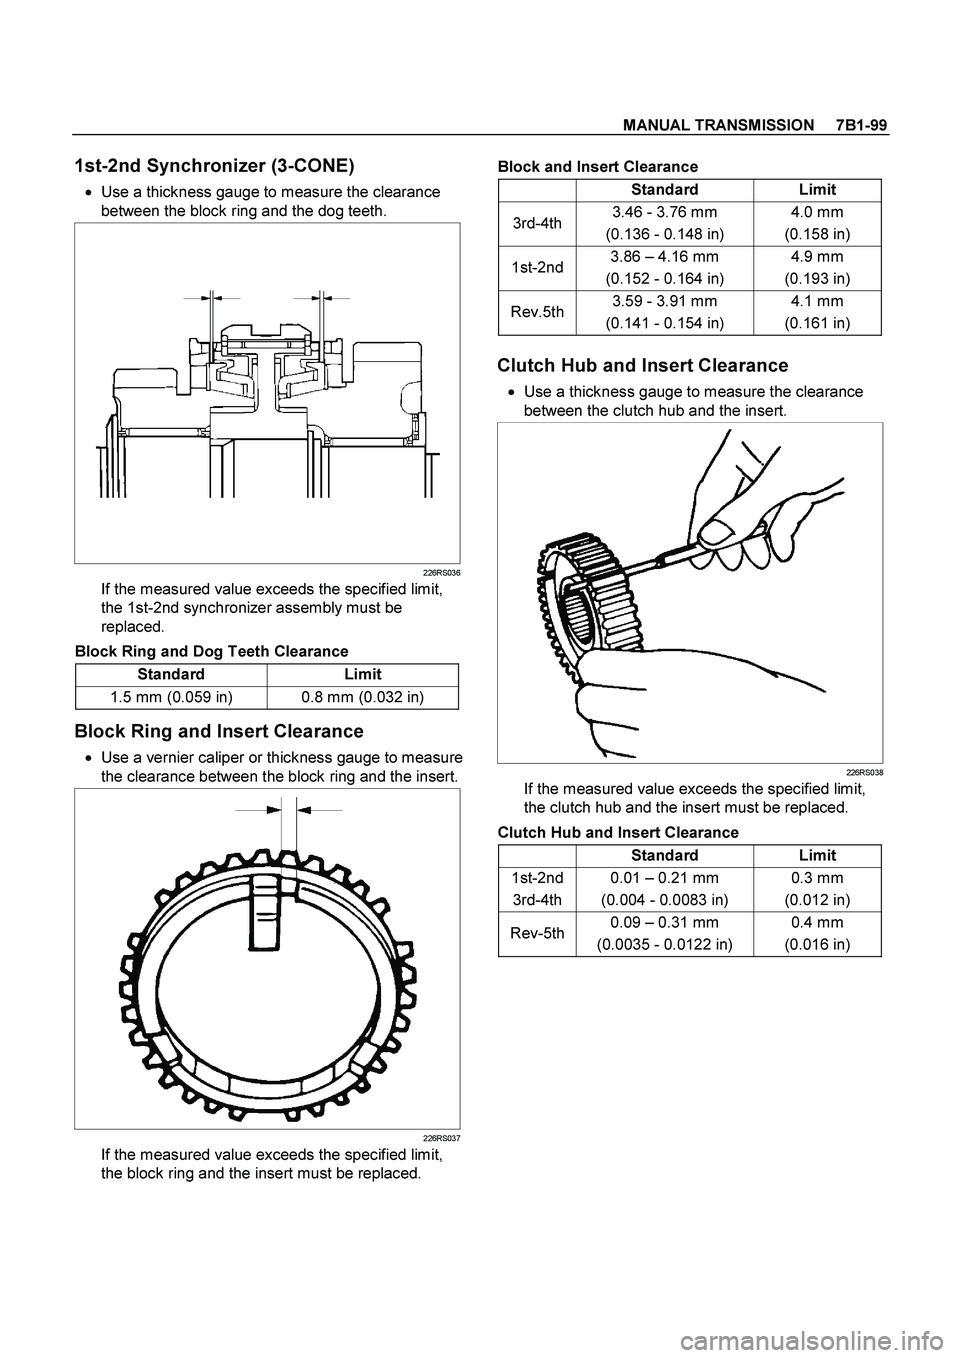
10. Use a pair of snap ring pliers to remove the snap
ring (9) fixing top gear bearing.
226RS001
11. Remove gear control box assembly (1).
12. Remove the rear case assembly (2) from the
transmission case (4) and intermediate plate (3).
13. Remove intermediate plate with gear assembly (3)
from transmission case (4).
Page 3253 of 4264

MANUAL TRANSMISSION 7B1-89
2. Install bearing snap ring (26).
3. Apply recommended thread locking agents
(LOCTITE 242) or its equivalent to each of the
bearing plate screw threads.
Install bearing plate and screw (25).
Tighten the screws to the specified torque by using
torx bit wrench 5-8840-0047-0.
Torque: 15 N�
�� �m (1.5 kg�
�� �m/11 lb�
�� �ft)
220RW137
4. Install needle bearing (24), reverse gear (23), and
reverse block ring (22). 5. Assemble rev-5th synchronizer assembly (21) by
performing the following steps.
1. Turn the clutch hub face (1) toward the sleeve
groove (2) (rear side) on the outer
circumference.
2. Check that the inserts (3) fit snugly into the
clutch hub (5) ring insert grooves.
3. Check that the inserts springs (4) are fitted to
the inserts as shown in the illustration.
4. Check that the clutch hub (5) and the sleeve (6)
slide smoothly.
5. Install the synchronizer assembly (21) to the
mainshaft.
The clutch hub face with the heavy boss must be
facing the reverse gear side.
226RS013
226RS049
Page 3259 of 4264
MANUAL TRANSMISSION 7B1-95
Legend
(1) Top Gear Shaft Snap Ring (16) 1st Outside Ring
(2) Top Gear Shaft (17) 1st Block Ring
(3) Ball Bearing (18) Needle Bearing
(4) Needle Bearing (19) Clutch Hub Snap Ring
(5) Top Block Ring (20) 1st-2nd Synchronizer Assembly
(6) Mainshaft Snap Ring (21) 2nd Block Ring
(7) 3rd-4th Synchronizer Assembly (22) 2nd Outside Ring
(8) 3rd Block Ring (23) 2nd Inside Ring
(9) 3rd Gear (24) 2nd Gear
(10) Needle Bearing (25) Needle Bearing
(11) Needle Bearing Collar (26) Mainshaft
(12) Mainshaft Ball Bearing (27) Bearing Snap Ring
(13) 1st Gear Thrust Bearing (28) Front Roller Bearing
(14) 1st Gear (29) Center Roller Bearing
(15) 1st Inside Ring (30) Counter Gear Shaft
Page 3260 of 4264
7B1-96 MANUAL TRANSMISSION
Disassembly
1. Use a pair of snap ring pliers to remove the top gear
shaft snap ring(1).
2. Remove top gear shaft(2) with ball bearing(3).
3. Use a bench press and the bearing remover 5-8840-
0015-0 to remove the ball bearing(3).
226RW216
4. Remove needle bearing (4) and top block ring (5),
mainshaft snap ring.
5. Use a pair of snap ring pliers to remove the
mainshaft snap ring (6).
226RS008
6. Use a bench press and the bearing remover 5-8840-
0015-0 to remove the 3rd-4th synchronizer
assembly (7) as a set.
Disassemble the synchronizer assembly.
226RW217
Legend
(1) Springs
(2) Sleeve
(3) Clutch Hub
(4) Inserts
7. Remove 3rd block ring (8), 3rd gear (9), and needle
bearing (10).
8. Use a bench press and the bearing remover 5-8840-
0015-0 to remove the 1st gear(14) together with the
mainshaft ball bearing(12), 1st gear thrust bearing
(13), and needle bearing collar (11).
226RW218
Page 3261 of 4264
MANUAL TRANSMISSION 7B1-97
9.Disassemble 1st inside ring (15), 1st outside ring (16),
and 1st block ring (17).
10.Remove needle bearing (18).
11.Use a pair of snap ring pliers to remove the clutch
hub snap ring (19).
226RS031
12.Use bench press and the bearing remover 5-8840-
0015-0 to remove the 2nd gear (24) together with
1st-2nd synchronizer assembly (20), 2nd block ring
(21), 2nd outside ring (22), and inside ring (23).
Disassemble the synchronizer assembly.
226RW220
Legend
(1) Springs
(2) Sleeve
(3) Clutch Hub
(4) Inserts
13. Remove needle bearing (25) from mainshaft (26).
14. Remove bearing snap ring (27).
15. Remove the front roller bearing (28) by performing
the following steps.
�
Remove the ring, outer race and bearing
assembly by using a bench press and remover
5-8840-0015-0.
� Remove the inner race by using a bench press
and remover 5-8840-0015-0.
226RW219
16. Remove center roller bearing (29) from counter gear
shaft (30).
Page 3263 of 4264

MANUAL TRANSMISSION 7B1-99
1st-2nd Synchronizer (3-CONE)
� Use a thickness gauge to measure the clearance
between the block ring and the dog teeth.
226RS036
If the measured value exceeds the specified limit,
the 1st-2nd synchronizer assembly must be
replaced.
Block Ring and Dog Teeth Clearance
Standard Limit
1.5 mm (0.059 in) 0.8 mm (0.032 in)
Block Ring and Insert Clearance
�
Use a vernier caliper or thickness gauge to measure
the clearance between the block ring and the insert.
226RS037
If the measured value exceeds the specified limit,
the block ring and the insert must be replaced.
Block and Insert Clearance
Standard Limit
3rd-4th 3.46 - 3.76 mm
(0.136 - 0.148 in) 4.0 mm
(0.158 in)
1st-2nd3.86 – 4.16 mm
(0.152 - 0.164 in) 4.9 mm
(0.193 in)
Rev.5th3.59 - 3.91 mm
(0.141 - 0.154 in) 4.1 mm
(0.161 in)
Clutch Hub and Insert Clearance
�
Use a thickness gauge to measure the clearance
between the clutch hub and the insert.
226RS038
If the measured value exceeds the specified limit,
the clutch hub and the insert must be replaced.
Clutch Hub and Insert Clearance
Standard Limit
1st-2nd
3rd-4th 0.01 – 0.21 mm
(0.004 - 0.0083 in) 0.3 mm
(0.012 in)
Rev-5th0.09 – 0.31 mm
(0.0035 - 0.0122 in) 0.4 mm
(0.016 in)