Page 1912 of 4264
6A-88 ENGINE MECHANICAL (6VE1 3.5L)
Disassembly
1. Remove cylinder head assembly.
2. Remove cylinder head gasket.
3. Remove crankcase with oil pan.
4. Remove oil pipe and O-ring.
5. Remove oil strainer and O-ring.
6. Remove oil pump assembly.
7. Remove crankcase side bolts.
8. Remove oil gallery.
9. Remove piston and connecting rod assembly.
10. Remove flywheel.
11. Remove rear oil seal retainer assembly.
12. Remove main bearing cap.
13. Remove crankshaft.
14. Remove cylinder block.
Inspection and Repair
1. Remove the cylinder head gasket and any other
material adhering to the upper surface of the
cylinder block. Be very careful not to allow any
material to accidentally drop into the cylinder block.
Be very careful not to scratch the cylinder block.
2. Carefully remove the oil pump, rear oil seal
retainer, and crankcase assembly installation
surface seal.
3. Wipe the cylinder block clean.
4. Visually inspect the cylinder block. If necessary,
use a flaw detector to perform a dye penetrate and
hydraulic (or air pressure) test. If cracking or othe
r
damage is discovered, the cylinder block must
either be repaired or replaced.
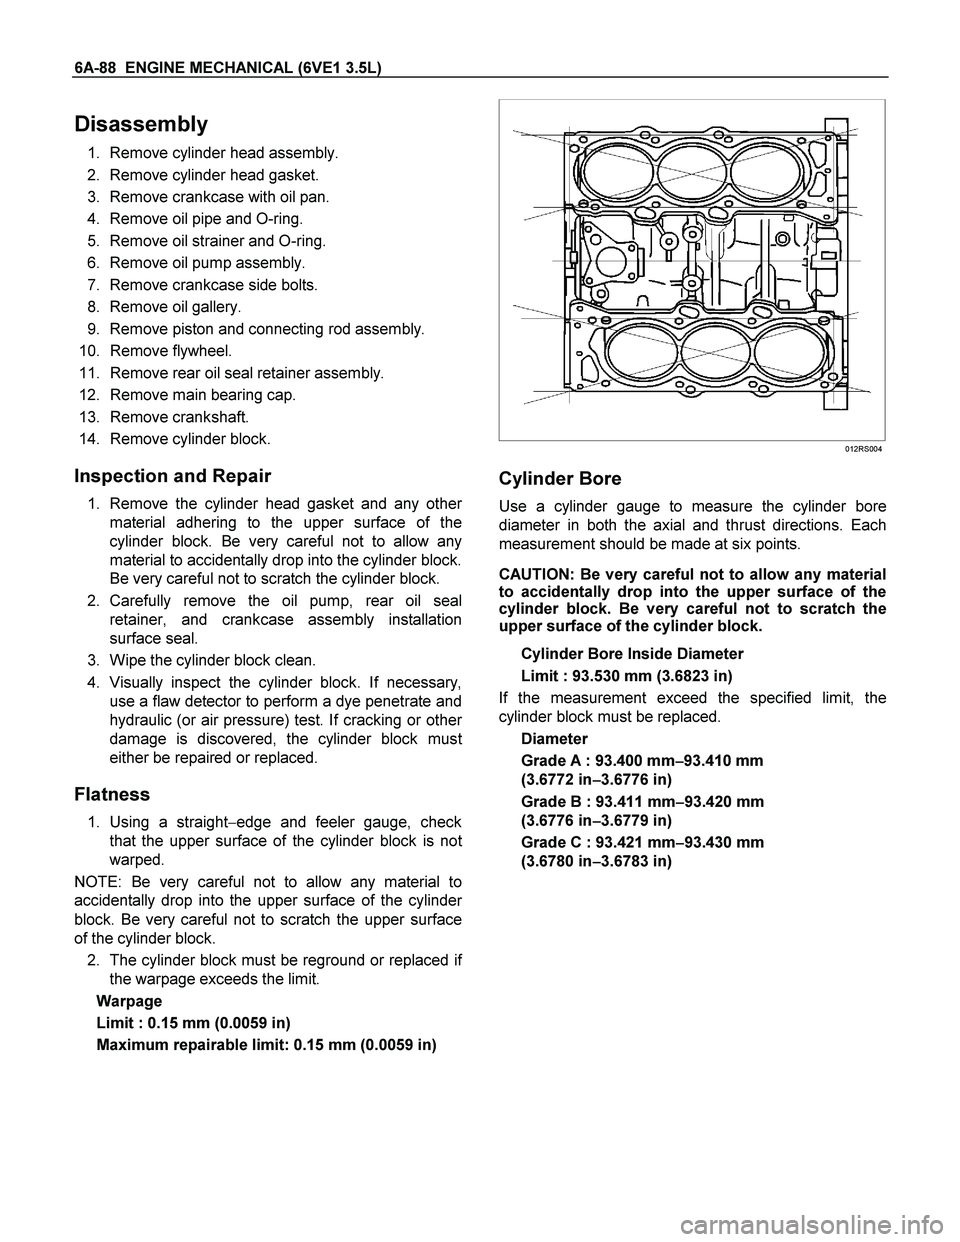
Flatness
1. Using a straight�edge and feeler gauge, check
that the upper surface of the cylinder block is no
t
warped.
NOTE: Be very careful not to allow any material to
accidentally drop into the upper surface of the cylinde
r
block. Be very careful not to scratch the upper surface
of the cylinder block.
2. The cylinder block must be reground or replaced i
f
the warpage exceeds the limit.
Warpage
Limit : 0.15 mm (0.0059 in)
Maximum repairable limit: 0.15 mm (0.0059 in)
012RS004
Cylinder Bore
Use a cylinder gauge to measure the cylinder bore
diameter in both the axial and thrust directions. Each
measurement should be made at six points.
CAUTION: Be very careful not to allow any material
to accidentally drop into the upper surface of the
cylinder block. Be very careful not to scratch the
upper surface of the cylinder block.
Cylinder Bore Inside Diameter
Limit : 93.530 mm (3.6823 in)
If the measurement exceed the specified limit, the
cylinder block must be replaced.
Diameter
Grade A : 93.400 mm�
�� �93.410 mm
(3.6772 in�
�� �3.6776 in)
Grade B : 93.411 mm�
�� �93.420 mm
(3.6776 in�
�� �3.6779 in)
Grade C : 93.421 mm�
�� �93.430 mm
(3.6780 in�
�� �3.6783 in)
Page 1913 of 4264
ENGINE MECHANICAL (6VE1 3.5L) 6A-89
012RS005
NOTE: For information on piston diameter, please refer
to the section "Inspection of the Piston and Connecting
Rod Assembly" in this manual.
� The "Grade" mark (1) is stamped at the
position illustrated.
012RS006
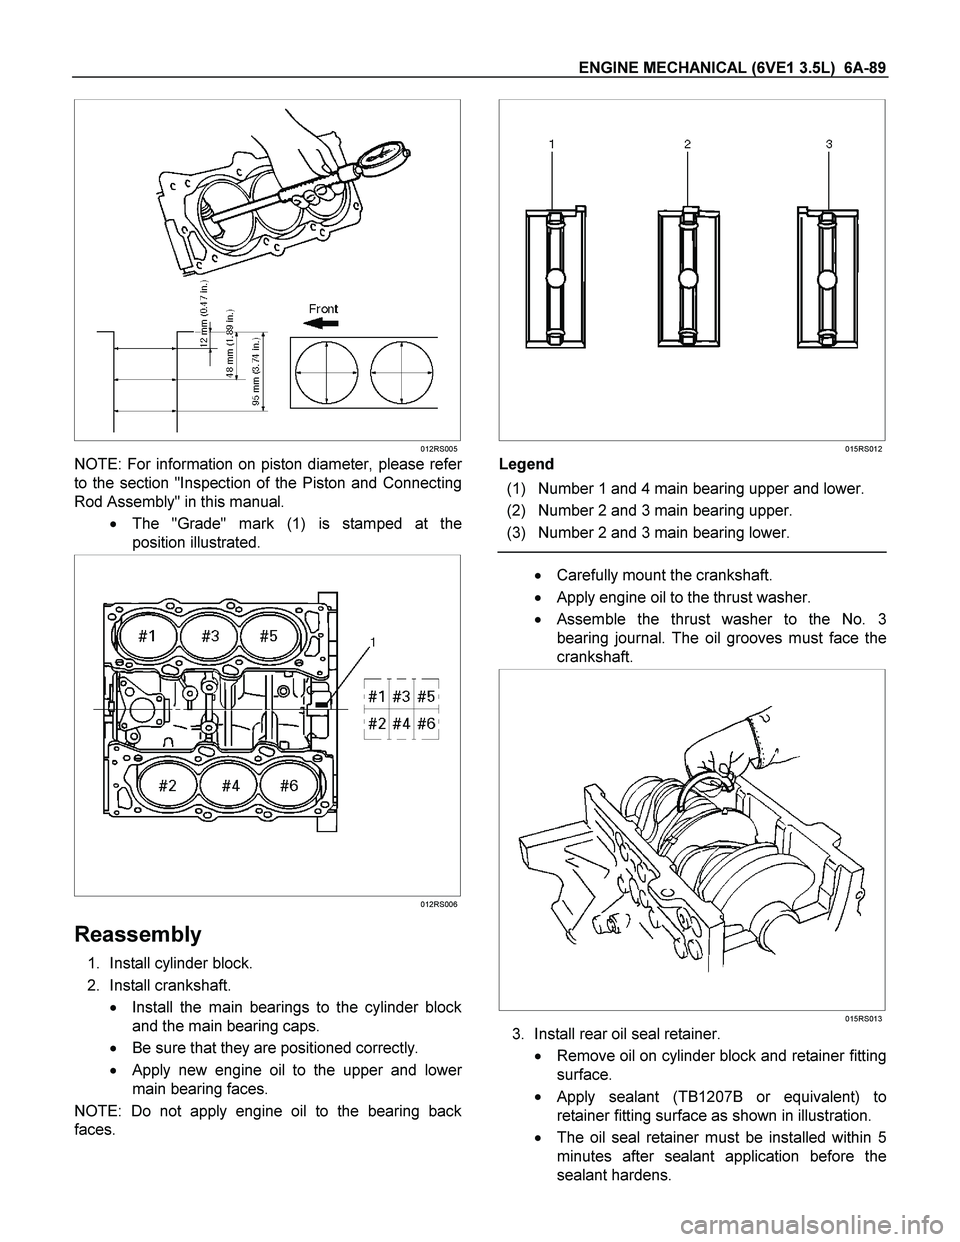
Reassembly
1. Install cylinder block.
2. Install crankshaft.
� Install the main bearings to the cylinder block
and the main bearing caps.
� Be sure that they are positioned correctly.
�
Apply new engine oil to the upper and lower
main bearing faces.
NOTE: Do not apply engine oil to the bearing back
faces.
015RS012
Legend
(1) Number 1 and 4 main bearing upper and lower.
(2) Number 2 and 3 main bearing upper.
(3) Number 2 and 3 main bearing lower.
� Carefully mount the crankshaft.
� Apply engine oil to the thrust washer.
� Assemble the thrust washer to the No. 3
bearing journal. The oil grooves must face the
crankshaft.
015RS013
3. Install rear oil seal retainer.
� Remove oil on cylinder block and retainer fitting
surface.
�
Apply sealant (TB1207B or equivalent) to
retainer fitting surface as shown in illustration.
� The oil seal retainer must be installed within 5
minutes after sealant application before the
sealant hardens.
Page 1914 of 4264
6A-90 ENGINE MECHANICAL (6VE1 3.5L)
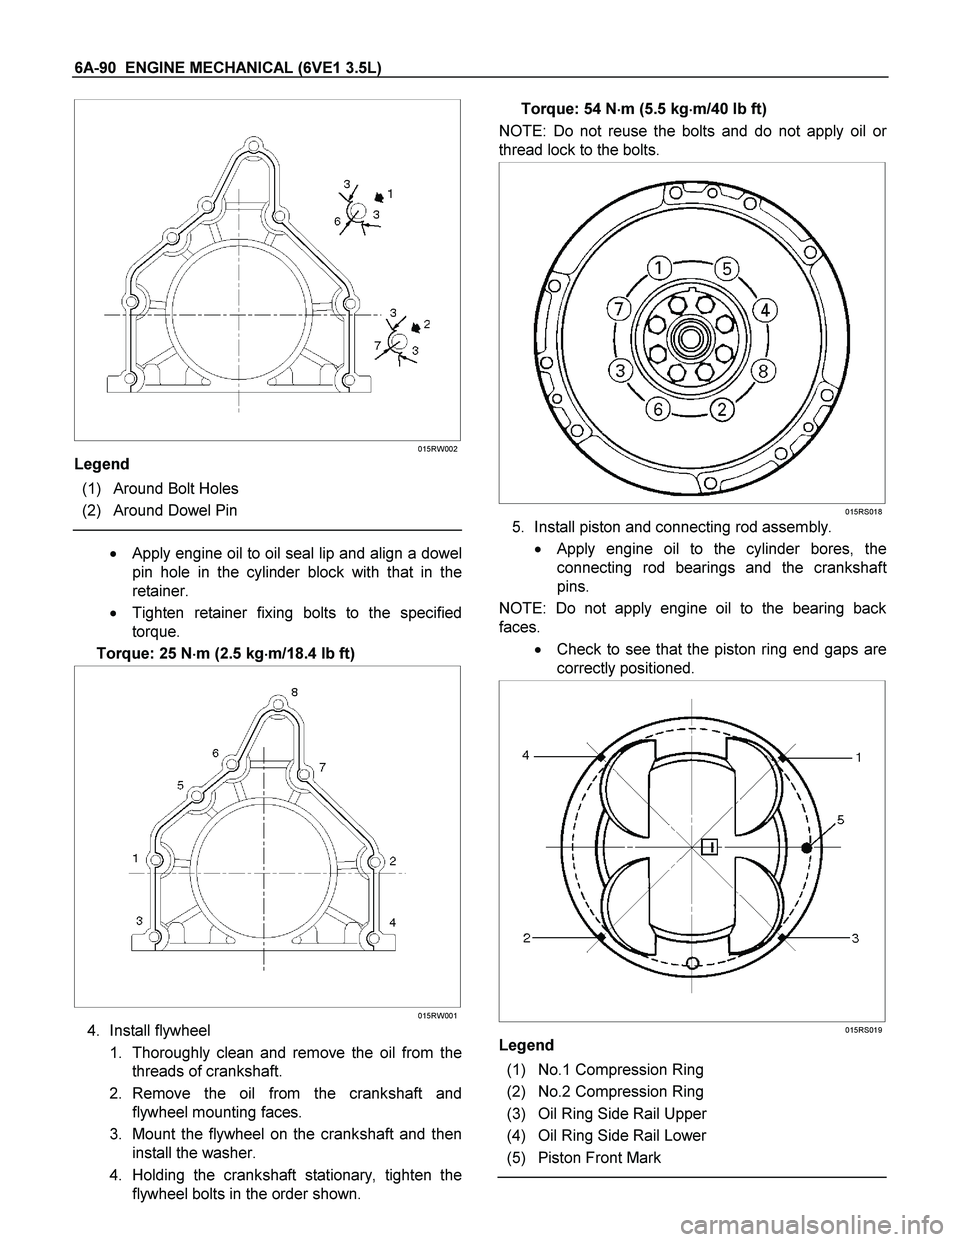
015RW002
Legend
(1) Around Bolt Holes
(2) Around Dowel Pin
� Apply engine oil to oil seal lip and align a dowel
pin hole in the cylinder block with that in the
retainer.
� Tighten retainer fixing bolts to the specified
torque.
Torque: 25 N�
�� �m (2.5 kg�
�� �m/18.4 lb ft)
015RW001
4. Install flywheel
1. Thoroughly clean and remove the oil from the
threads of crankshaft.
2. Remove the oil from the crankshaft and
flywheel mounting faces.
3. Mount the flywheel on the crankshaft and then
install the washer.
4. Holding the crankshaft stationary, tighten the
flywheel bolts in the order shown. Torque: 54 N�
�� �m (5.5 kg�
�� �m/40 lb ft)
NOTE: Do not reuse the bolts and do not apply oil o
r
thread lock to the bolts.
015RS018
5. Install piston and connecting rod assembly.
� Apply engine oil to the cylinder bores, the
connecting rod bearings and the crankshaf
t
pins.
NOTE: Do not apply engine oil to the bearing back
faces.
� Check to see that the piston ring end gaps are
correctly positioned.
015RS019
Legend
(1) No.1 Compression Ring
(2) No.2 Compression Ring
(3) Oil Ring Side Rail Upper
(4) Oil Ring Side Rail Lower
(5) Piston Front Mark
Page 1915 of 4264
ENGINE MECHANICAL (6VE1 3.5L) 6A-91
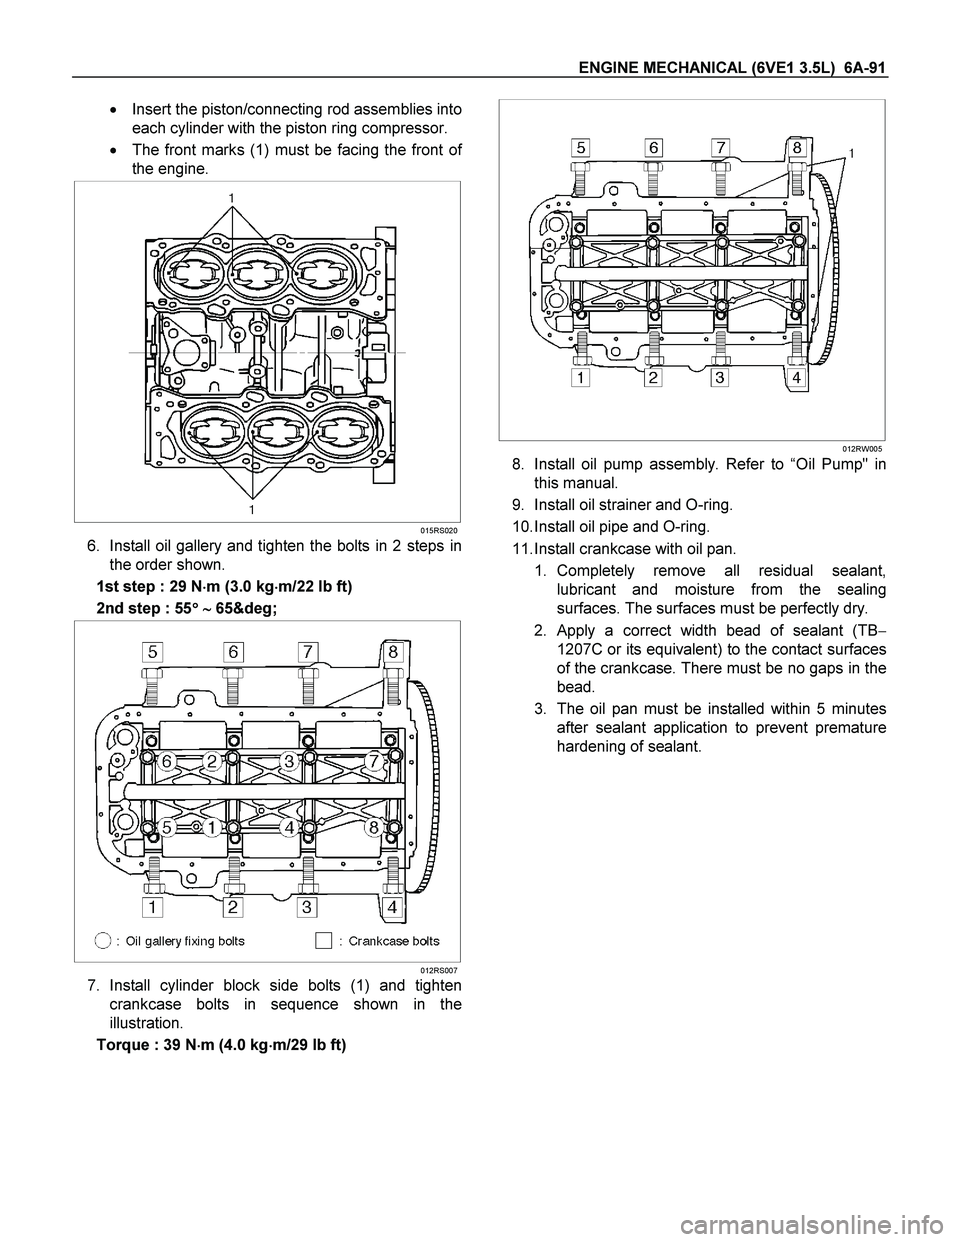
� Insert the piston/connecting rod assemblies into
each cylinder with the piston ring compressor.
� The front marks (1) must be facing the front o
f
the engine.
015RS020
6. Install oil gallery and tighten the bolts in 2 steps in
the order shown.
1st step : 29 N�
�� �m (3.0 kg�
�� �m/22 lb ft)
2nd step : 55�
�� � �
�� � 65°
012RS007
7. Install cylinder block side bolts (1) and tighten
crankcase bolts in sequence shown in the
illustration.
Torque : 39 N�
�� �m (4.0 kg�
�� �m/29 lb ft)
012RW005
8. Install oil pump assembly. Refer to “Oil Pump" in
this manual.
9. Install oil strainer and O-ring.
10. Install oil pipe and O-ring.
11. Install crankcase with oil pan.
1. Completely remove all residual sealant,
lubricant and moisture from the sealing
surfaces. The surfaces must be perfectly dry.
2. Apply a correct width bead of sealant (TB�
1207C or its equivalent) to the contact surfaces
of the crankcase. There must be no gaps in the
bead.
3. The oil pan must be installed within 5 minutes
after sealant application to prevent premature
hardening of sealant.
Page 1923 of 4264
ENGINE MECHANICAL (6VE1 3.5L) 6A-99
Special Tool
ILLUSTRATION PART NO.
PART NAME
ILLUSTRATION PART NO.
PART NAME
5-8840-0011-0
(J-21687-02)
Remover; tie rod end 5-8840-2445-0
(J-42985)
Installer; Camshaft
oil seal
5-8840-0203-0
(J-36390)
Wrench; Oil filter (79�) 5-8840-2545-0
(J-39206)
Installer; Pilot bearing
5-8840-2446-0
(J-8062)
Compressor;
Valve spring (1)
5-8840-2547-0
(J-42898)
Adapter; Compressor,
Valve spring (2) 5-8840-0133-0
(J-8614-01)
Holder; Crankshaft
5-8840-0623-0
(J-37281)
Remover; Oil controller 5-8840-2153-0
(J-37228)
Seal cutter
5-8840-0624-0
(J-38537)
Installer; Oil controller 5-8840-2286-0
(J-39201)
Installer; Real oil seal
5-8840-2005-0
(J-29107)
Universal pitman arm
remover 5-8840-2287-0
(J-39202)
Installer; Oil pump
oil seal
Page 1924 of 4264
6A-100 ENGINE MECHANICAL (6VE1 3.5L)
ILLUSTRATION PART NO.
PART NAME
9-8511-4209-0
(J-24239-1)
Cylinder head bolt wrench
5-8840-2442-0
(J-42899)
Replacer; Valve guide (1,2)
5-8840-2548-0
(J-42687)
Installer; Valve guide (1)
5-8840-2549-0
(J-37985-1)
Remover; Valve guide (2)
5-8840-2444-0
(J-42689)
Adjusting Tool; Valve
clearance
5-8840-2443-0
(J-42686)
Lever; Gear spring
5-8840-2447-1
(J-43041)
Holder; Universal
Page 1930 of 4264
6B-6 ENGINE COOLING (6VE1 3.5L)
Draining and Refilling Cooling
System
Before draining the cooling system, inspect the system
and perform any necessary service to ensure that it is
clean, does not leak and is in proper working order.
The engine coolant (EC) level should be between the
“ MIN" and “MAX" lines of reserve tank when the engine
is cold. If low, check for leakage and add EC up to the
“ MAX" line.
There should not be any excessive deposit of rust o
r
scales around the radiator cap or radiator filler hole, and
the EC should also be free from oil.
Replace the EC if excessively dirty.
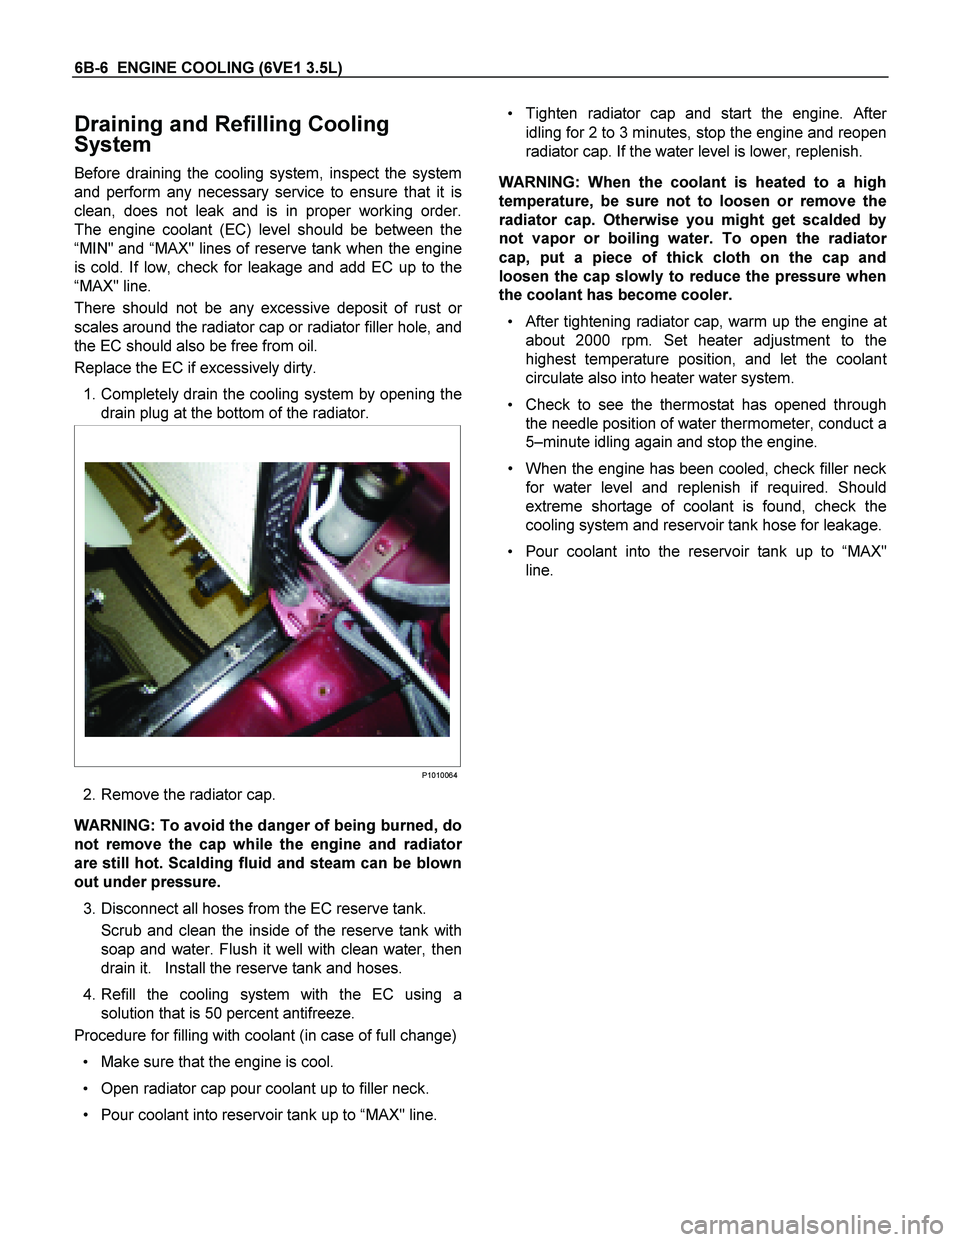
1. Completely drain the cooling system by opening the
drain plug at the bottom of the radiator.
P1010064
2. Remove the radiator cap.
WARNING: To avoid the danger of being burned, do
not remove the cap while the engine and radiato
r
are still hot. Scalding fluid and steam can be blown
out under pressure.
3. Disconnect all hoses from the EC reserve tank.
Scrub and clean the inside of the reserve tank with
soap and water. Flush it well with clean water, then
drain it. Install the reserve tank and hoses.
4. Refill the cooling system with the EC using a
solution that is 50 percent antifreeze.
Procedure for filling with coolant (in case of full change)
Make sure that the engine is cool.
Open radiator cap pour coolant up to filler neck.
Pour coolant into reservoir tank up to “MAX" line.
Tighten radiator cap and start the engine. Afte
r
idling for 2 to 3 minutes, stop the engine and reopen
radiator cap. If the water level is lower, replenish.
WARNING: When the coolant is heated to a high
temperature, be sure not to loosen or remove the
radiator cap. Otherwise you might get scalded by
not vapor or boiling water. To open the radiato
r
cap, put a piece of thick cloth on the cap and
loosen the cap slowly to reduce the pressure when
the coolant has become cooler.
After tightening radiator cap, warm up the engine at
about 2000 rpm. Set heater adjustment to the
highest temperature position, and let the coolan
t
circulate also into heater water system.
Check to see the thermostat has opened through
the needle position of water thermometer, conduct a
5 –minute idling again and stop the engine.
When the engine has been cooled, check filler neck
for water level and replenish if required. Should
extreme shortage of coolant is found, check the
cooling system and reservoir tank hose for leakage.
Pour coolant into the reservoir tank up to “MAX"
line.
Page 1931 of 4264
ENGINE COOLING (6VE1 3.5L) 6B-7
Water Pump
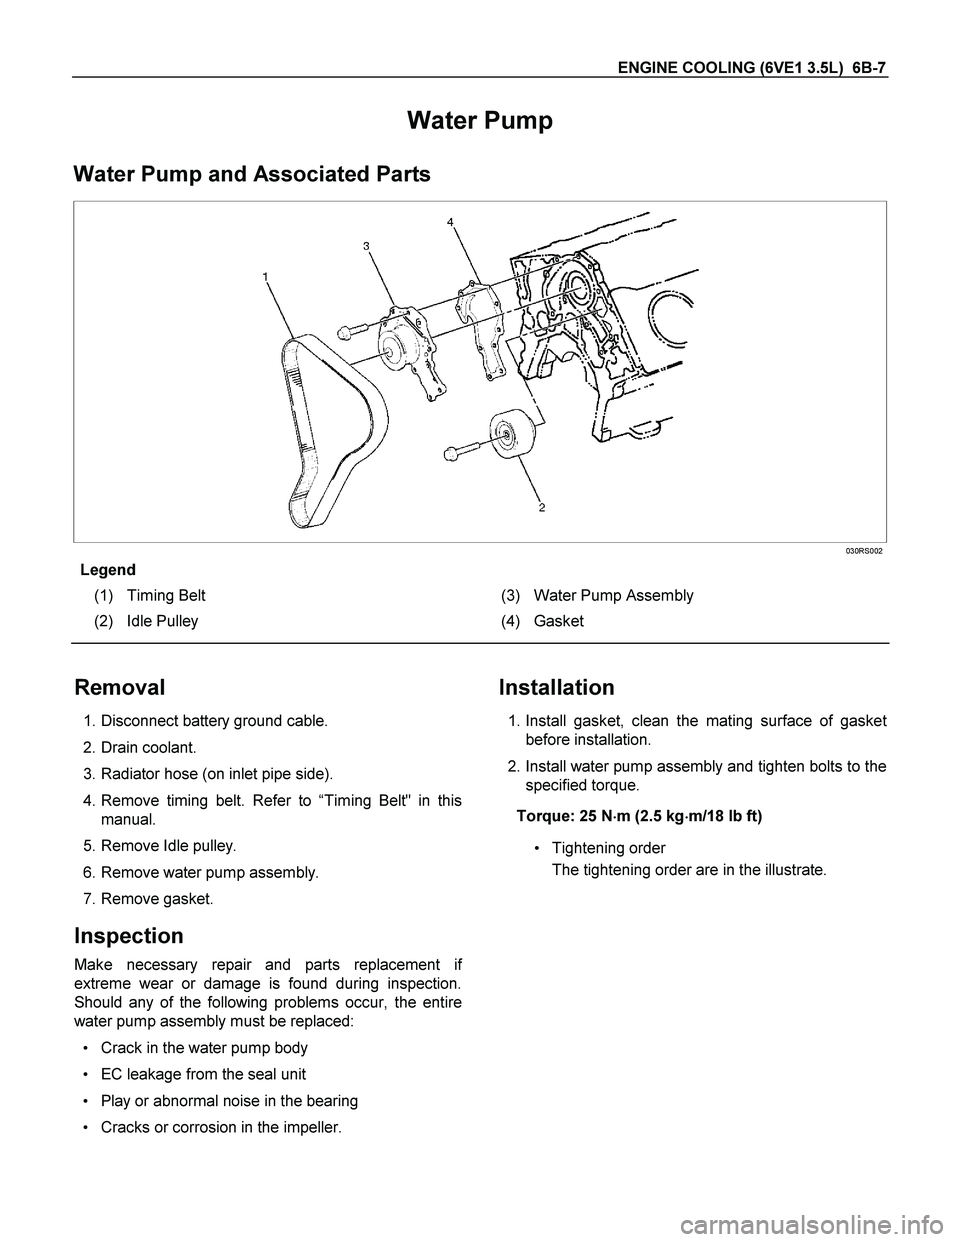
Water Pump and Associated Parts
030RS002
Legend
(1) Timing Belt (3) Water Pump Assembly
(2) Idle Pulley (4) Gasket
Removal
1. Disconnect battery ground cable.
2. Drain coolant.
3. Radiator hose (on inlet pipe side).
4. Remove timing belt. Refer to “Timing Belt" in this
manual.
5. Remove Idle pulley.
6. Remove water pump assembly.
7. Remove gasket.
Inspection
Make necessary repair and parts replacement if
extreme wear or damage is found during inspection.
Should any of the following problems occur, the entire
water pump assembly must be replaced:
Crack in the water pump body
EC leakage from the seal unit
Play or abnormal noise in the bearing
Cracks or corrosion in the impeller.
Installation
1. Install gasket, clean the mating surface of gasket
before installation.
2. Install water pump assembly and tighten bolts to the
specified torque.
Torque: 25 N�
�� �m (2.5 kg�
�� �m/18 lb ft)
Tightening order
The tightening order are in the illustrate.