Page 2355 of 4264

3.5L ENGINE DRIVEABILITY AND EMISSIONS 6E-359
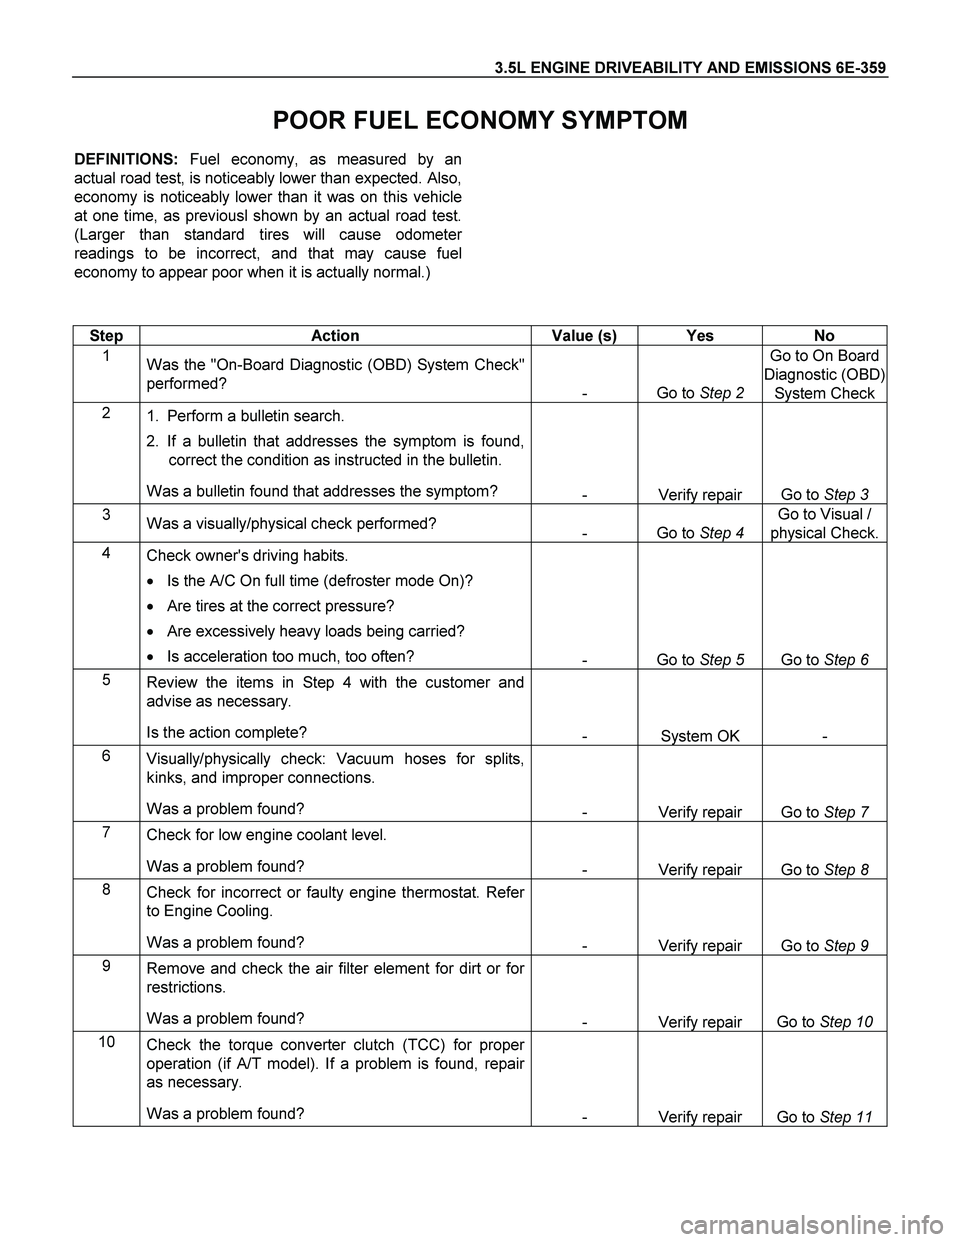
POOR FUEL ECONOMY SYMPTOM
DEFINITIONS: Fuel economy, as measured by an
actual road test, is noticeably lower than expected. Also,
economy is noticeably lower than it was on this vehicle
at one time, as previousl shown by an actual road test.
(Larger than standard tires will cause odomete
r
readings to be incorrect, and that may cause fuel
economy to appear poor when it is actually normal.)
Step Action Value (s) Yes No
1
Was the "On-Board Diagnostic (OBD) System Check"
performed?
- Go to Step 2 Go to On Board
Diagnostic (OBD)
System Check
2
1. Perform a bulletin search.
2. If a bulletin that addresses the symptom is found,
correct the condition as instructed in the bulletin.
Was a bulletin found that addresses the symptom?
- Verify repair Go to Step 3
3
Was a visually/physical check performed?
- Go to Step 4 Go to Visual /
physical Check.
4
Check owner's driving habits.
� Is the A/C On full time (defroster mode On)?
� Are tires at the correct pressure?
� Are excessively heavy loads being carried?
� Is acceleration too much, too often?
- Go to Step 5 Go to Step 6
5
Review the items in Step 4 with the customer and
advise as necessary.
Is the action complete?
- System OK -
6
Visually/physically check: Vacuum hoses for splits,
kinks, and improper connections.
Was a problem found?
- Verify repair Go to Step 7
7
Check for low engine coolant level.
Was a problem found?
- Verify repair Go to Step 8
8
Check for incorrect or faulty engine thermostat. Refer
to Engine Cooling.
Was a problem found?
- Verify repair Go to Step 9
9
Remove and check the air filter element for dirt or for
restrictions.
Was a problem found?
- Verify repair Go to Step 10
10
Check the torque converter clutch (TCC) for proper
operation (if A/T model). If a problem is found, repair
as necessary.
Was a problem found?
- Verify repair Go to Step 11
Page 2414 of 4264

6-8 ENGINE DIAGNOSIS (C24SE)
Condition Possible cause Correction
Engine overheating Level of Engine Coolant too low Replenish
Thermo switch or fan motor
defective Replace
Thermostat defective Replace
Engine Coolant pump defective Correct or replace
Radiator clogged Clean or replace
Radiator filter cap defective Replace
Level of oil in engine crankcase
too low or wrong oil in engine Change or replenish
Resistance in exhaust system
increased Clean exhaust system or replace
defective parts
Throttle Position Sensor
adjustment incorrect Adjust Wide Open Throttle switch
setting
Throttle Position Sensor circuit
open or shorted Correct or replace
Cylinder head gasket damaged Replace
Cooling Fan clutch defective Replace
Fan belt slipping Adjust tension of V-belt or replace
V-belt
Engine overcooling Thermostat defective Replace (Use a thermostat set to
open at 92�C (197.6�F))
Engine lacks compression - Refer to Hard Start
Others Tire inflation pressure abnormal Adjust to recommend pressures
Brake drag Adjust
Clutch slipping Adjust or replace
Level of oil in engine crankcase
too high Correct level of engine oil
Engine Noisy
Abnormal engine noise often consists of various
noises originating in rotating parts, sliding parts and
other moving parts of the engine. It is, therefore,
advisable to locate the source of noise systematically.
Condition Possible cause Correction
Noise from crank journals or from
crank bearings
(Faulty crank journals and crank
bearings usually make dull noise
that becomes more evident when
accelerating) Oil clearance increased due to
worn crank journals or crank
bearings Replace crank bearings and
crankshaft or regrind crankshaft
and install the over size bearing
Crankshaft out of round Replace crank bearings and
crankshaft or regrind crankshaft
and install the over size bearing
Crank bearing seized Replace crank bearings and
crankshaft or regrind crankshaft
and install the over size bearing
Page 2416 of 4264

6-10 ENGINE DIAGNOSIS (C24SE)
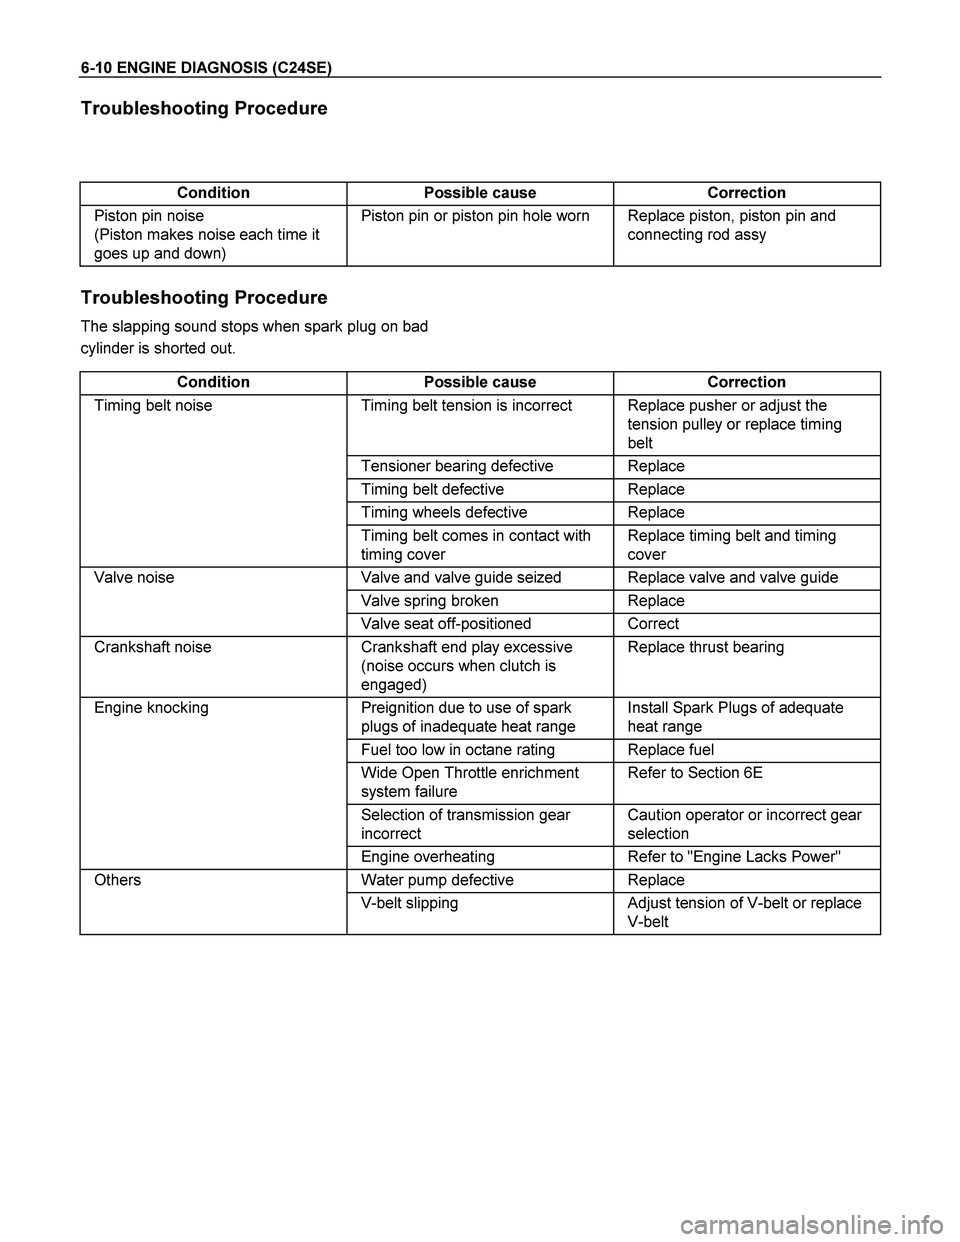
Troubleshooting Procedure
Condition Possible cause Correction
Piston pin noise
(Piston makes noise each time it
goes up and down) Piston pin or piston pin hole worn Replace piston, piston pin and
connecting rod assy
Troubleshooting Procedure
The slapping sound stops when spark plug on bad
cylinder is shorted out.
Condition Possible cause Correction
Timing belt noise Timing belt tension is incorrect Replace pusher or adjust the
tension pulley or replace timing
belt
Tensioner bearing defective Replace
Timing belt defective Replace
Timing wheels defective Replace
Timing belt comes in contact with
timing cover Replace timing belt and timing
cover
Valve noise Valve and valve guide seized Replace valve and valve guide
Valve spring broken Replace
Valve seat off-positioned Correct
Crankshaft noise Crankshaft end play excessive
(noise occurs when clutch is
engaged) Replace thrust bearing
Engine knocking Preignition due to use of spark
plugs of inadequate heat range Install Spark Plugs of adequate
heat range
Fuel too low in octane rating Replace fuel
Wide Open Throttle enrichment
system failure Refer to Section 6E
Selection of transmission gear
incorrect Caution operator or incorrect gear
selection
Engine overheating Refer to "Engine Lacks Power"
Others Water pump defective Replace
V-belt slipping Adjust tension of V-belt or replace
V-belt
Page 2419 of 4264

ENGINE DIAGNOSIS (C24SE) 6-13
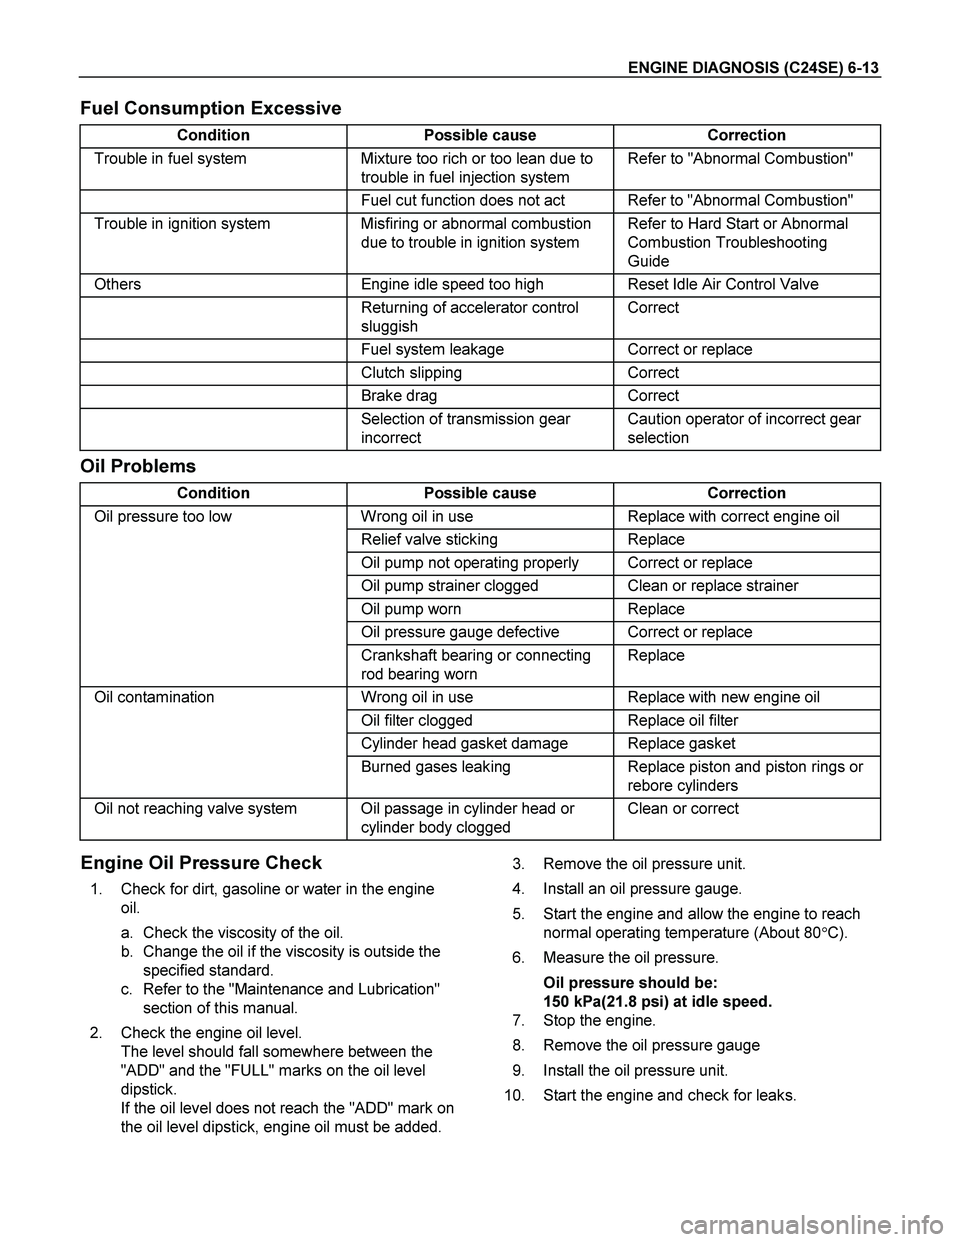
Fuel Consumption Excessive
Condition Possible cause Correction
Trouble in fuel system Mixture too rich or too lean due to
trouble in fuel injection system Refer to "Abnormal Combustion"
Fuel cut function does not act Refer to "Abnormal Combustion"
Trouble in ignition system Misfiring or abnormal combustion
due to trouble in ignition system Refer to Hard Start or Abnormal
Combustion Troubleshooting
Guide
Others Engine idle speed too high Reset Idle Air Control Valve
Returning of accelerator control
sluggish Correct
Fuel system leakage Correct or replace
Clutch slipping Correct
Brake drag Correct
Selection of transmission gear
incorrect Caution operator of incorrect gear
selection
Oil Problems
Condition Possible cause Correction
Oil pressure too low Wrong oil in use Replace with correct engine oil
Relief valve sticking Replace
Oil pump not operating properly Correct or replace
Oil pump strainer clogged Clean or replace strainer
Oil pump worn Replace
Oil pressure gauge defective Correct or replace
Crankshaft bearing or connecting
rod bearing worn Replace
Oil contamination Wrong oil in use Replace with new engine oil
Oil filter clogged Replace oil filter
Cylinder head gasket damage Replace gasket
Burned gases leaking Replace piston and piston rings or
rebore cylinders
Oil not reaching valve system Oil passage in cylinder head or
cylinder body clogged Clean or correct
Engine Oil Pressure Check
1. Check for dirt, gasoline or water in the engine
oil.
a. Check the viscosity of the oil.
b. Change the oil if the viscosity is outside the
specified standard.
c. Refer to the "Maintenance and Lubrication"
section of this manual.
2. Check the engine oil level.
The level should fall somewhere between the
"ADD" and the "FULL" marks on the oil level
dipstick.
If the oil level does not reach the "ADD" mark on
the oil level dipstick, engine oil must be added. 3. Remove the oil pressure unit.
4. Install an oil pressure gauge.
5. Start the engine and allow the engine to reach
normal operating temperature (About 80�C).
6. Measure the oil pressure.
Oil pressure should be:
150 kPa(21.8 psi) at idle speed.
7. Stop the engine.
8. Remove the oil pressure gauge
9. Install the oil pressure unit.
10. Start the engine and check for leaks.
Page 2438 of 4264
6A-18 ENGINE MECHANICAL (C24SE)
OPERATIONS ON ENGINE AGGREGATES
Engine Damping Blocks (Engine Without
Transmission)
Removal
1. Remove bonnet.
2. Remove radiator.
3. Remove air inlet hose.
4. Remove power steering pump drive belt and power
steering pump from engine.
5. Remove all cable connections, hoses and lines from
engine.
6. Remove accelerator cable from inlet pipe.
7. Remove exhaust pipe from manifold.
8. Remove lower nine bolts and transmission from engine
block.
9. Remove clutch slave cylinder and allow to hang free.
10. Remove starter from engine block.
11. Remove upper bolts of left and right engine mounting
from damping blocks.
12. Raise engine slightly.
13. Remove lower bolts of left and right damping blocks.
14. Remove damping blocks.
Page 2439 of 4264
ENGINE MECHANICAL (C24SE) 6A-19
Attach engine to cable, support transmission with car jack and
remove upper transmission fastening bolt.
Press off engine from transmission and lift out of engine
compartment.
Installation
Lower engine into engine compartment and insert guide
bushings on cylinder block into transmission.
Tighten (Torque)
Transmission to cylinder block (M10) -45 N�
m (4.6 kgf�
m)
Transmission to cylinder block (M12) -60 N�m (6.1 kgf�m)
Installation
1. Install engine to vehicle and transmission.
2. Install clutch slave cylinder.
Tighten (Torque)
Transmission to engine block bolts - 76 N�m (7.6 kgf�m)
RTW46ASH000401
3. Install left engine damping block to sidemember.
4. Install left and right engine damping blocks to engine
brackets.
Tighten (Torque)
Engine damper block to sidememebr - 50 N�
m (5.1 kgf�
m)
Engine damper block to engine bracket - 85 N�
m (8.6 kgf�
m)
5. Install exhaust pipe to manifold.
Page 2466 of 4264
6A-46 ENGINE MECHANICAL (C24SE)
Inspection
Check contact pattern (I
) on valve seat and in cylinder head.
Clean
Valves, valve guides, cylinder head.
Flywheel
Removal
1. Remove transmission and clutch.
2. Remove flywheel while locking with 5-88400-446-0.
Torque - Angle Method
Flywheel to crankshaft - 65 Nm/6.5 kgf�
m.+30�
to 45�
Important!
Use new bolts.
Do not apply grease to the thread.
Installation
1. Install clutch and transmission.
Component Parts
Flywheel and Ring gear. (Manual Transmission)
Page 2468 of 4264

6A-48 ENGINE MECHANICAL (C24SE)
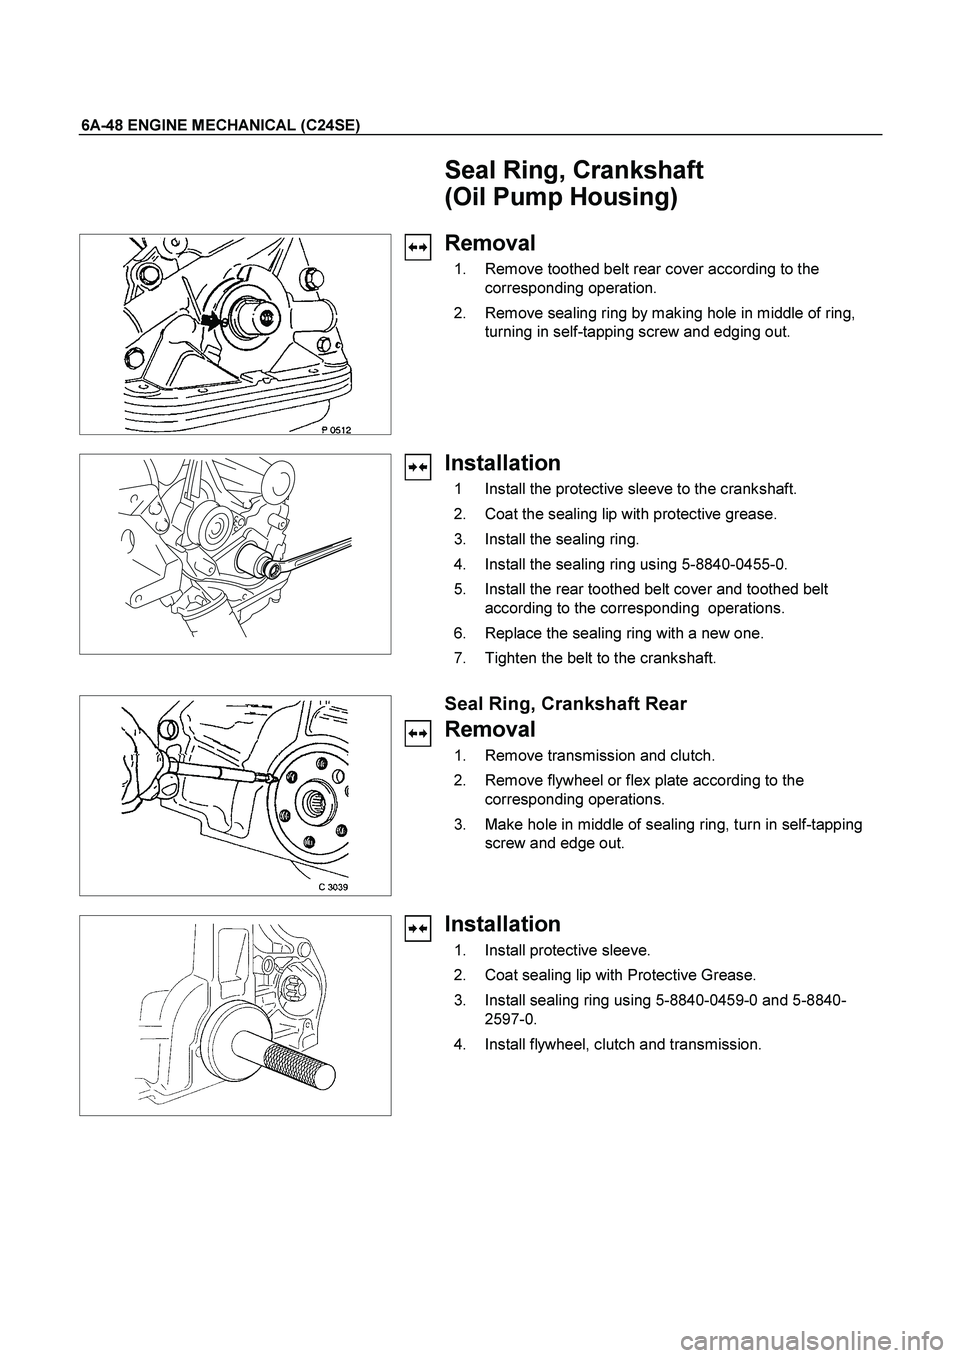
Seal Ring, Crankshaft
(Oil Pump Housing)
Removal
1. Remove toothed belt rear cover according to the
corresponding operation.
2. Remove sealing ring by making hole in middle of ring,
turning in self-tapping screw and edging out.
Installation
1 Install the protective sleeve to the crankshaft.
2. Coat the sealing lip with protective grease.
3. Install the sealing ring.
4. Install the sealing ring using 5-8840-0455-0.
5. Install the rear toothed belt cover and toothed belt
according to the corresponding operations.
6. Replace the sealing ring with a new one.
7. Tighten the belt to the crankshaft.
Seal Ring, Crankshaft Rear
Removal
1. Remove transmission and clutch.
2. Remove flywheel or flex plate according to the
corresponding operations.
3. Make hole in middle of sealing ring, turn in self-tapping
screw and edge out.
Installation
1. Install protective sleeve.
2. Coat sealing lip with Protective Grease.
3. Install sealing ring using 5-8840-0459-0 and 5-8840-
2597-0.
4. Install flywheel, clutch and transmission.