Page 519 of 4264
CAB 10-11
2. Check Arm Screw
3. Lower Hinge Bolt
Position a wood block under the door for protection and
support the door assembly with hands at removal or
installation.
Important Operations – Installation
3. Lower Hinge Bolt; Hinge to Door
Torque N�
m (kgf�
m/lb�
ft)
34 (3.5/25)
2. Check Arm Screw; Check Arm to Body
Torque N�m (kgf�m/lb�ft)
24 (2.4/17)
Page 520 of 4264
10-12 CAB
DISASSEMBLY
This illustration is based on RHD model
RTW4A0LF000701
Disassembly Steps
� 1. Switch bezel/Window regulator handle
� 2. Power window switch
� 3. Bezel
� 4. Door mirror cover
� 5. Door trim panel
� 6. Tweeter (Required Option)
� 7. Door mirror assembly
� 8. Outer waste seal
� 9. Bracket
� 10. Speaker assembly
� 11. Waterproof sheet
� 12. Inside lever
� 13. Window glass
�
14. Window regulator/Power window
regulator
� 15. Glass run
� 16. Glass run rear channel / Glass ran rear
channel with Door lock control or Anti
theft (EC)
� 17. Door lock assembly/Door lock assembly
with super lock
� 18. Outside handle protector (EUROPE)
� 19. Outside handle
� 20. Door lock cylinder protector (EUROPE)
� 21. Door lock cylinder / Door lock cylinder
with door lock switch (EC)
22. Door harness assembly
23. Anti rattler
Page 522 of 4264
10-14 CAB
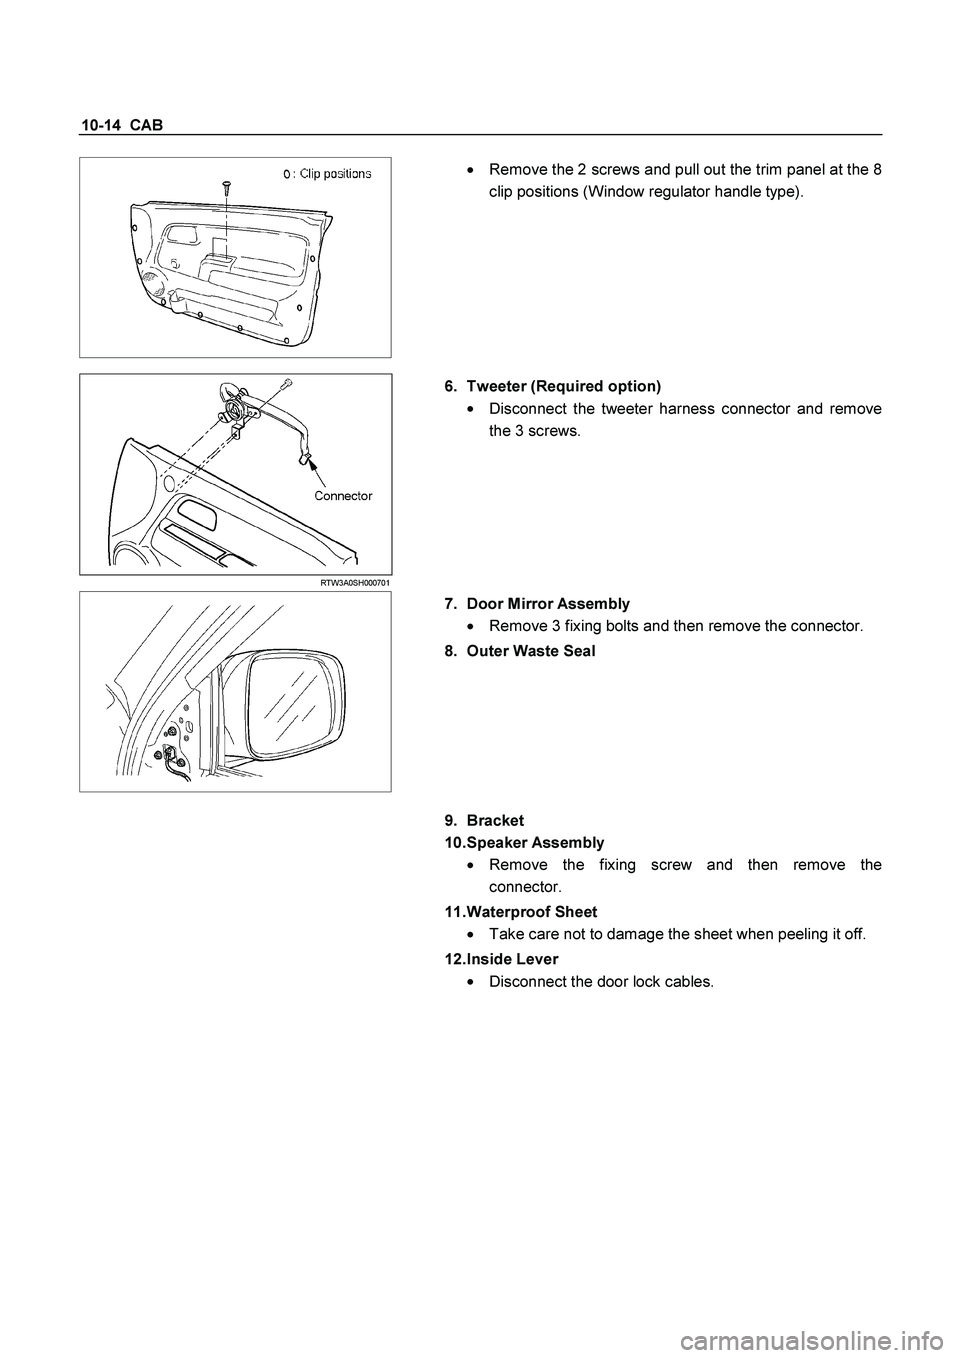
� Remove the 2 screws and pull out the trim panel at the 8
clip positions (Window regulator handle type).
RTW3A0SH000701
6. Tweeter (Required option)
�
Disconnect the tweeter harness connector and remove
the 3 screws.
7. Door Mirror Assembly
�
Remove 3 fixing bolts and then remove the connector.
8. Outer Waste Seal
9. Bracket
10. Speaker Assembly
�
Remove the fixing screw and then remove the
connector.
11. Waterproof Sheet
�
Take care not to damage the sheet when peeling it off.
12. Inside Lever
�
Disconnect the door lock cables.
Page 523 of 4264
CAB 10-15
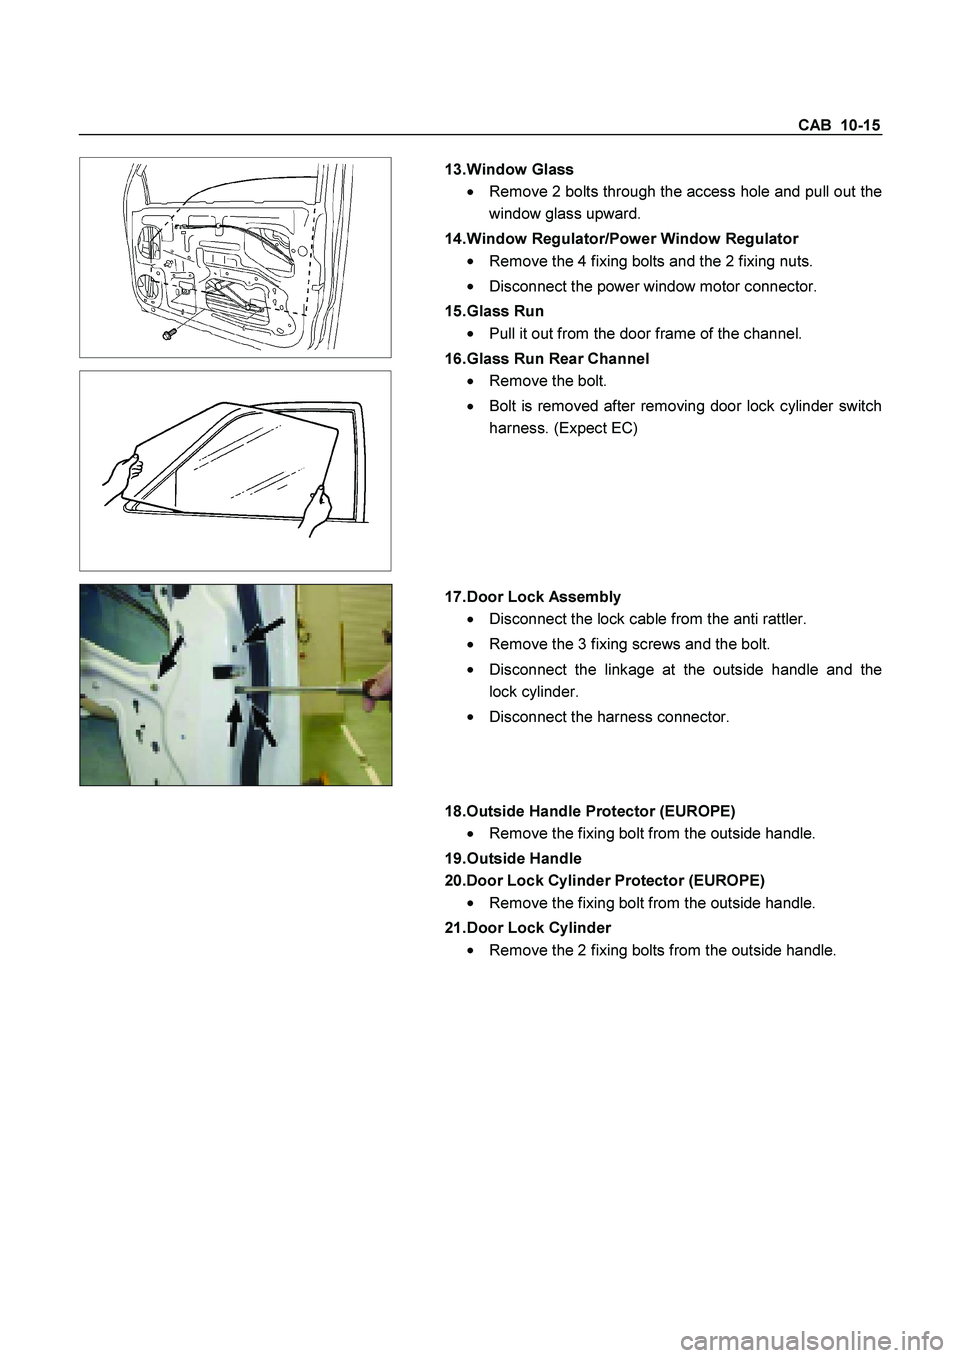
13. Window Glass
� Remove 2 bolts through the access hole and pull out the
window glass upward.
14. Window Regulator/Power Window Regulator
�
Remove the 4 fixing bolts and the 2 fixing nuts.
�
Disconnect the power window motor connector.
15. Glass Run
�
Pull it out from the door frame of the channel.
16. Glass Run Rear Channel
�
Remove the bolt.
�
Bolt is removed after removing door lock cylinder switch
harness. (Expect EC)
17. Door Lock Assembly
�
Disconnect the lock cable from the anti rattler.
� Remove the 3 fixing screws and the bolt.
�
Disconnect the linkage at the outside handle and the
lock cylinder.
�
Disconnect the harness connector.
18.Outside Handle Protector (EUROPE)
� Remove the fixing bolt from the outside handle.
19. Outside Handle
20.Door Lock Cylinder Protector (EUROPE)
�
Remove the fixing bolt from the outside handle.
21. Door Lock Cylinder
�
Remove the 2 fixing bolts from the outside handle.
Page 524 of 4264
10-16 CAB
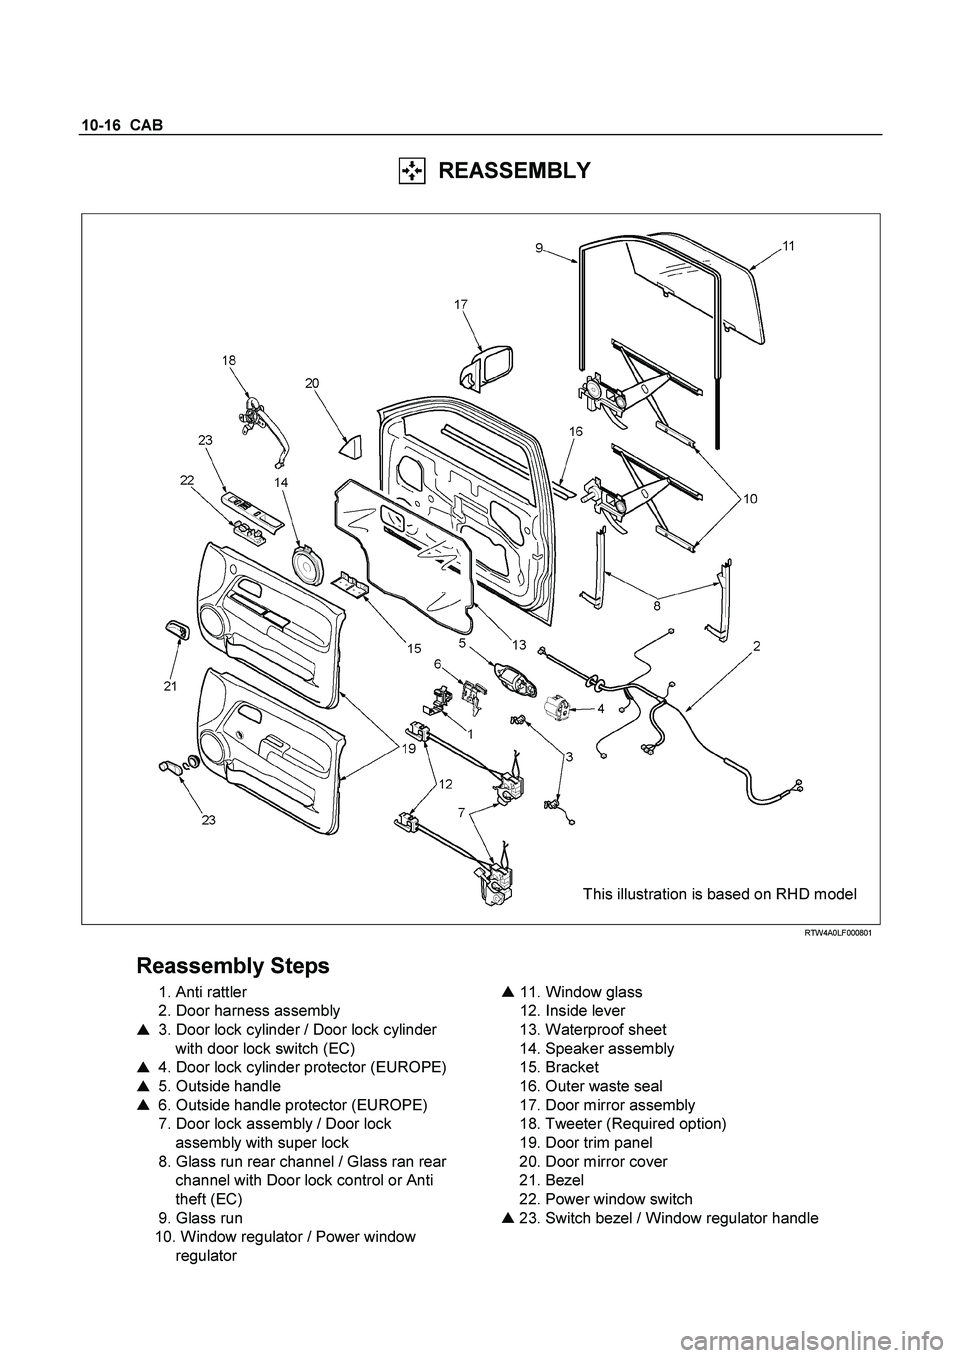
REASSEMBLY
This illustration is based on RHD model
RTW4A0LF000801
Reassembly Steps
1. Anti rattler
2. Door harness assembly
� 3. Door lock cylinder / Door lock cylinder
with door lock switch (EC)
� 4. Door lock cylinder protector (EUROPE)
� 5. Outside handle
� 6. Outside handle protector (EUROPE)
7. Door lock assembly / Door lock
assembly with super lock
8. Glass run rear channel / Glass ran rear channel with Door lock control or Anti
theft (EC)
9. Glass run
10. Window regulator / Power window
regulator
�
11. Window glass
12. Inside lever
13. Waterproof sheet
14. Speaker assembly
15. Bracket
16. Outer waste seal
17. Door mirror assembly
18. Tweeter (Required option)
19. Door trim panel
20. Door mirror cover
21. Bezel
22. Power window switch
� 23. Switch bezel / Window regulator handle
Page 525 of 4264
CAB 10-17
Important Operations
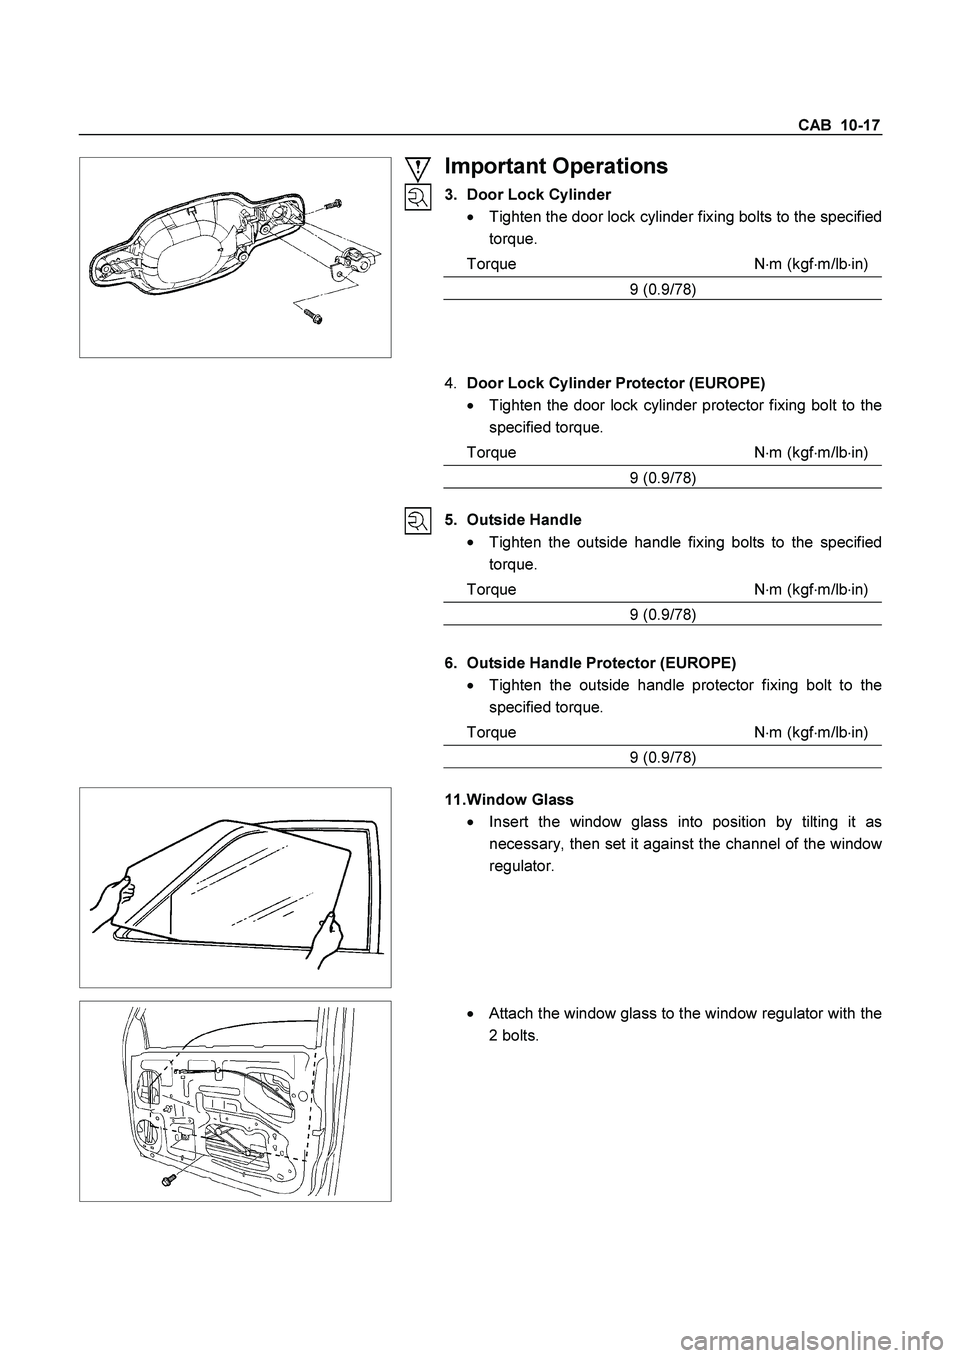
3. Door Lock Cylinder
�
Tighten the door lock cylinder fixing bolts to the specified
torque.
Torque N�
m (kgf�
m/lb�
in)
9 (0.9/78)
4. Door Lock Cylinder Protector (EUROPE)
�
Tighten the door lock cylinder protector fixing bolt to the
specified torque.
Torque N�m (kgf�m/lb�in)
9 (0.9/78)
5. Outside Handle
�
Tighten the outside handle fixing bolts to the specified
torque.
Torque N�
m (kgf�
m/lb�
in)
9 (0.9/78)
6. Outside Handle Protector (EUROPE)
� Tighten the outside handle protector fixing bolt to the
specified torque.
Torque N�
m (kgf�
m/lb�
in)
9 (0.9/78)
11. Window Glass
�
Insert the window glass into position by tilting it as
necessary, then set it against the channel of the windo
w
regulator.
�
Attach the window glass to the window regulator with the
2 bolts.
Page 529 of 4264
CAB 10-21
3. Lower Hinge Bolt
Position a wood block under the door for protection and
support the door assembly with hands at removal or
installation.
Important Operations – Installation
3. Lower Hinge Bolt; Hinge to Door
Torque N�
m (kgf�
m/lb�
ft)
34 (3.5/25)
2. Check Arm Screw; Check Arm to Body
Torque N�
m (kgf�
m/lb�
ft)
24 (2.4/17)
Page 530 of 4264
10-22 CAB
DISASSEMBLY
RTW3A0LF000601
Disassembly Steps
� 1. Switch bezel/Window regulator handle
� 2. Power window switch
� 3. Bezel
� 4. Door trim panel
� 5. Bracket
� 6. Speaker assembly
� 7. Waterproof sheet
� 8. Inside lever
� 9. Outer waste seal
�
10. Window regulator/Power window
regulator
� 11. Glass run rear channel
� 12. Door lock assembly
� 13. Glass run
� 14. Window glass
� 15. Outside handle
16. Door harness assembly
17. Anti rattler