Page 532 of 4264
10-24 CAB
5. Bracket
6. Speaker assembly
�
Remove the fixing bolt and then remove the connector.
7. Waterproof Sheet
�
Take care not to damage the sheet when peeling it off.
8. Inside Lever
�
Disconnect the door lock cables.
9. Outer Waste Seal
10. Window Regulator/Power Window Regulator
�
Remove the 2 bolts fixing the window glass through the
access hole.
� Move the window glass upward and hold it with adhesive
tape.
�
Remove the 5 bolts fixing the window regulator.
�
Disconnect the power window motor connector.
11. Glass Run Rear Channel
� Remove the bolt.
12. Door Lock Assembly
�
Disconnect the lock cable from the anti rattler.
�
Remove the 3 fixing screws and the bolt.
�
Disconnect the linkage and harness connector.
13. Glass Run
�
Remove the adhesive tape and move the window glass
downward.
�
Pull it out from the door frame of the channel.
14. Window Glass
� Pull out the window glass upward.
15. Outside Handle
�
Remove the 2 fixing bolts.
Page 533 of 4264
CAB 10-25
REASSEMBLY
RTW3A0LF000701
Reassembly Steps
1. Anti rattler
2. Door harness assembly
� 3. Outside handle
4. Window glass
5. Glass run
6. Door lock assembly
7. Glass run rear channel
8. Window regulator/Power window regulator
9. Outer waste seal
10. Inside lever
11. Waterproof sheet
12. Speaker assembly
13. Bracket
14. Door trim panel
15. Bezel
16. Power window switch
� 17. Switch bezel/Window regulator handle
Page 660 of 4264

8A-2 ELECTRICAL-BODY AND CHASSIS
PAGE
Fuse and Slow Blow Fuse Location (Relay and Fuse Box) .................................... 8A- 31
Fuse Location ............................................................................................................. 8A- 33
Diode Location ........................................................................................................... 8A- 34
Fuse Block Circuit ...................................................................................................... 8A- 35
Fuse Block Circuit (C24SE) ....................................................................................... 8A- 35
Fuse Block Circuit (6VE1) ......................................................................................... 8A- 37
Fuse Block Circuit (4JA1-TC/4JH1-TC) - RHD ......................................................... 8A- 39
Fuse Block Circuit (4JA1-TC/4JH1-TC) – LHD ......................................................... 8A- 41
Fuse Block Circuit (4JH1-L) ...................................................................................... 8A- 43
Grounding Point ............................................................................................................. 8A- 45
Ground Point .............................................................................................................. 8A- 45
Ground Point Location .............................................................................................. 8A- 61
Main Cable harness Routing .......................................................................................... 8A- 63
C24SE / 6VE1 / 4JA1-L / 4JH1-TC .............................................................................. 8A- 63
Instrument Harness .................................................................................................... 8A- 71
System Repair .................................................................................................................8A- 73
Start and Charging ..................................................................................................... 8A- 73
Engine Control Module (ECM) ................................................................................... 8A- 89
Exhaust Gas Recalculation (EGR): 4JA1-L Only ...................................................... 8A- 109
Lighting ....................................................................................................................... 8A- 114
Front Fog Light ........................................................................................................... 8A- 136
Rear Fog Light ............................................................................................................ 8A- 144
Head Light Leveling ................................................................................................... 8A- 149
Illumination ................................................................................................................. 8A- 154
Hazard Warning Flasher, Turn Signal Light, Back Up Light,
Horn and Stop Light ................................................................................................. 8A- 161
Dome Light, Spot Light and Warning Buzzer .......................................................... 8A- 181
Windshield Wiper and Washer .................................................................................. 8A- 196
Transmission Control Module (TCM) ....................................................................... 8A- 214
Meter, Warning Light and Indicator Light ................................................................ 8A- 223
Heater and Air Conditioning ...................................................................................... 8A- 281
Power Door Lock ....................................................................................................... 8A- 293
Page 661 of 4264

ELECTRICAL-BODY AND CHASSIS 8A-3
PAGE
Power Window ........................................................................................................... 8A- 310
Audio, Clock and Cigarette Lighter .......................................................................... 8A- 329
Power Door Mirror ...................................................................................................... 8A- 337
Rear Defogger ............................................................................................................ 8A- 349
SRS-Air Bag ................................................................................................................ 8A- 358
Transfer Case Control Module .................................................................................. 8A- 361
Anti-Lock Brake System ............................................................................................ 8A- 373
Immobilizer ................................................................................................................. 8A- 376
Keyless Entry ............................................................................................................. 8A- 385
Anti Theft ....................................................................................................................8A- 400
Auto Cruise ................................................................................................................. 8A- 412
Trailer Hitch ................................................................................................................ 8A- 415
Connector List ................................................................................................................8A- 418
Page 765 of 4264

ELECTRICAL-BODY AND CHASSIS 8A-107
REMOVAL AND INSTALLATION
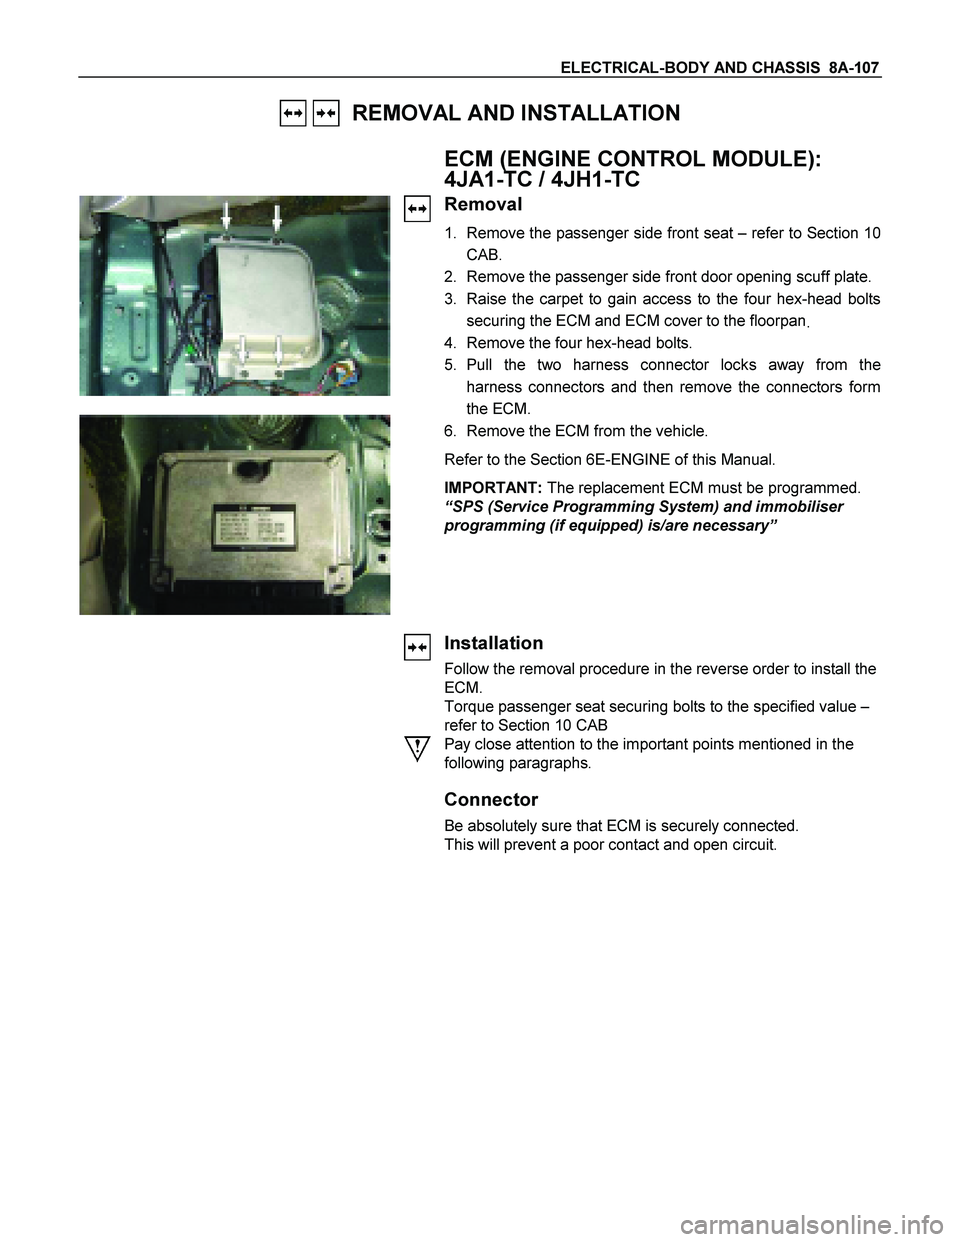
ECM (ENGINE CONTROL MODULE):
4JA1-TC / 4JH1-TC
Removal
1. Remove the passenger side front seat – refer to Section 10
CAB.
2. Remove the passenger side front door opening scuff plate.
3. Raise the carpet to gain access to the four hex-head bolts
securing the ECM and ECM cover to the floorpan
.
4. Remove the four hex-head bolts.
5. Pull the two harness connector locks away from the
harness connectors and then remove the connectors form
the ECM.
6. Remove the ECM from the vehicle.
Refer to the Section 6E-ENGINE of this Manual.
IMPORTANT: The replacement ECM must be programmed.
“SPS (Service Programming System) and immobiliser
programming (if equipped) is/are necessary”
Installation
Follow the removal procedure in the reverse order to install the
ECM.
Torque passenger seat securing bolts to the specified value –
refer to Section 10 CAB
Pay close attention to the important points mentioned in the
following paragraphs.
Connector
Be absolutely sure that ECM is securely connected.
This will prevent a poor contact and open circuit.
Page 851 of 4264
ELECTRICAL-BODY AND CHASSIS 8A-193
DOOR SWITCH
Removal
1. Disconnect the battery ground cable.
2. Loosen the screw
1.
3. Remove the door switch.
4. Disconnect the door switch connector
3.
Installation
Follow the removal procedure in the reverse order to install the
spot light.
Pay close attention to the important points mentioned in the
following paragraphs.
Connector
Be absolutely sure that the door switch connector is securely
connected.
This will prevent a poor contact and an open circuit.
SPOT LIGHT (MAP Light)
Removal
1. Grasp the spot light housing
1 with both hands.
Pull the housing straight down.
This will release the clip.
2. Disconnect the connector
2.
3. Turn socket
3 counterclockwise to remove it.
Page 951 of 4264
ELECTRICAL-BODY AND CHASSIS 8A-293
POWER DOOR LOCK
PARTS LOCATION (RHD)
RTW48AXF019201 & RTW48AXF019301
Page 960 of 4264
8A-302 ELECTRICAL-BODY AND CHASSIS
TROUBLESHOOTING
QUICK CHART FOR CHECK POINTS
Check Points
Fuse
C-14
(20A) Power
Window &
Door Lock
Switch Door
Lock
SwitchKey CYLN
Der switch Door Lock Actuator
Cable
Trouble Mode Driver’s
side Driver’s
side D/S P/S Passen
ger’s
side RR-RH RR-LHHarness
1. All the doors do not
lock and unlock
2. All the doors do not
get locked (or
unlocked)
3. Driver’s side door
does not get locked
(or unlocked)
4. FRT passenger’s side
door does not get
locked (or unlocked)
5. RR door-RH does not
get locked (or
unlocked)
6. RR door-LH does not
get locked (or
unlocked)
7. Door lock does not
operate when
operating from the
driver’s seat side