Page 3226 of 3371

REAR OIL SEAL
TF-101
C
E
F
G
H
I
J
K
L
MA
B
TF
Revision: August 20072004 QX56
REAR OIL SEALPFP:33140
Removal and InstallationEDS00316
REMOVAL
1. Partially drain the transfer fluid. Refer to MA-24, "Changing Transfer Fluid" .
2. Remove the rear propeller shaft. Refer to PR-8, "
Removal and Installation" .
3. Remove the dust cover from the rear case.
CAUTION:
Do not damage the rear case.
4. Remove the rear oil seal from the rear case, using Tool.
CAUTION:
Do not damage the rear case.
INSTALLATION
1. Install the oil seal until it is flush with the end face of the rear
case, using Tool.
CAUTION:
�Do not reuse oil seal.
�Apply petroleum jelly to oil seal.
2. Apply petroleum jelly to the circumference of the new dust cover.
Position the dust cover using the identification mark as shown.
CAUTION:
�Do not reuse dust cover.
�Position the identification mark at the position shown.
WDIA0127E
Tool number : ST33290001 (J-34286)
LDIA0139E
Tool number : ST30720000 (J-25405)
LDIA0140E
SDIA2208E
Page 3227 of 3371
TF-102
REAR OIL SEAL
Revision: August 20072004 QX56
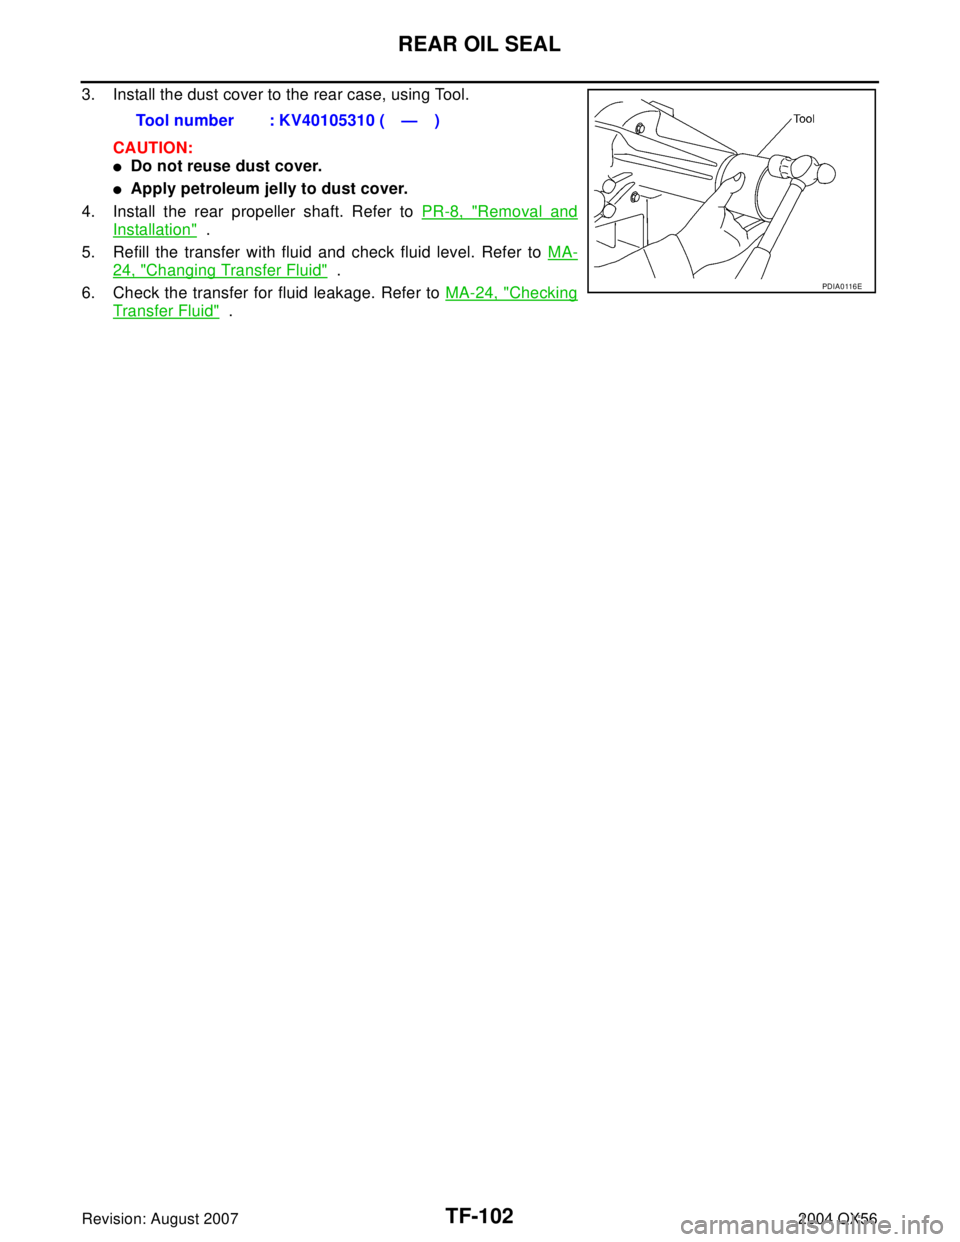
3. Install the dust cover to the rear case, using Tool.
CAUTION:
�Do not reuse dust cover.
�Apply petroleum jelly to dust cover.
4. Install the rear propeller shaft. Refer to PR-8, "
Removal and
Installation" .
5. Refill the transfer with fluid and check fluid level. Refer to MA-
24, "Changing Transfer Fluid" .
6. Check the transfer for fluid leakage. Refer to MA-24, "
Checking
Transfer Fluid" . Tool number : KV40105310 ( — )
PDIA0 116 E
Page 3228 of 3371
SIDE OIL SEAL
TF-103
C
E
F
G
H
I
J
K
L
MA
B
TF
Revision: August 20072004 QX56
SIDE OIL SEALPFP:33142
Removal and InstallationEDS00317
REMOVAL
1. Remove the front propeller shaft. Refer to PR-4, "Removal and Installation" .
2. Remove the companion flange. Refer to TF-99, "
Removal and Installation" .
3. Remove the transfer control device from the transfer assembly. Refer to TF-104, "
Removal and Installa-
tion" .
4. Remove the side oil seal.
CAUTION:
Do not damage shift cross.
INSTALLATION
1. Install the side oil seal until it is flush with the end face of case,
using Tool.
CAUTION:
�Do not reuse oil seal.
�Apply petroleum jelly to oil seal.
2. Install the transfer control device to the transfer assembly. Refer
to TF-104, "
Removal and Installation" .
3. Install the companion flange. Refer to TF-99, "
Removal and
Installation" .
4. Install the front propeller shaft. Refer to PR-4, "
Removal and Installation" .
SDIA2666E
Tool number : ST22360002 (J-25679-01)
SDIA2665E
Page 3247 of 3371
TF-122
CENTER CASE
Revision: August 20072004 QX56
MAINSHAFT REAR BEARING
1. Remove mainshaft rear bearing from center case, using Tool
MAIN OIL PUMP
1. Remove bolts as shown to detach main oil pump.
2. Remove outer gear, inner gear, and main oil pump cover from
main oil pump housing.
3. Remove seal ring from the main oil pump cover.Tool number : KV38100300 (J-25523)
SDIA2129E
SDIA2130E
SDIA2131E
SDIA2132E
Page 3252 of 3371
FRONT CASE
TF-127
C
E
F
G
H
I
J
K
L
MA
B
TF
Revision: August 20072004 QX56
PLANETARY CARRIER, SUN GEAR AND INTERNAL GEAR
1. Remove oil seal from the front case, using suitable tool.
CAUTION:
Be careful not to damage the front case and sun gear.
2. Remove the snap ring from the sun gear.
3. Remove the sun gear assembly from the front case, using Tool.
4. Remove snap ring from the planetary carrier assembly, using
suitable tool.
SDIA2143E
SDIA2144E
Tool number : ST35300000 ( — )
SDIA2145E
SDIA2146E
Page 3261 of 3371
TF-136
FRONT CASE
Revision: August 20072004 QX56
FRONT CASEPFP:33107
AssemblyEDS00193
PLANETARY CARRIER, SUN GEAR AND INTERNAL GEAR
1. Install new oil seal until it is seated flush with end face of the
front case, using Tool.
NOTE:
�Before installing, apply ATF or petroleum jelly to new oil seal
lip.
�Do not reuse oil seal.
2. Install internal gear with its groove facing snap ring into front
case. Then secure it with new snap ring.
NOTE:
Do not reuse snap ring.
3. Set mainshaft front bearing into front case and install, using
Tool.
4. Install new snap ring into front case.
NOTE:
Do not reuse snap ring.
5. Install shift cross to front case.Tool number : KV38100500 ( — )
SDIA2177E
WDIA0100E
Tool number : ST30720000 (J-25405)
SDIA2172E
SDIA2171E
Page 3262 of 3371

FRONT CASE
TF-137
C
E
F
G
H
I
J
K
L
MA
B
TF
Revision: August 20072004 QX56
6. Install oil new seal in front case, using Tool.
NOTE:
�Before installing, apply ATF or petroleum jelly to seal lip.
�Do not reuse oil seal.
7. Install the shift lever to the shift cross, and lock pin and tighten to
specified torque. Refer to TF-110, "
Transfer Components" .
8. Install the carrier bearing to the sun gear assembly, using Tool.
9. Install new snap ring to sun gear assembly, using suitable tool.
NOTE:
Do not reuse snap ring.
10. Apply ATF to the circumference of the new metal busing prior to
installing it to the sun gear assembly, using Tool.
NOTE:
Do not reuse old metal bushing.
11. Install the needle bearing to the sun gear assembly, using Tool.
NOTE:
�Before installing, apply ATF to needle bearing.
�Do not reuse old needle bearing.Tool number : ST22360002 (J25679-01)
SDIA2182E
To o l n u m b e r
A : ST30911000 ( — )
B : KV31103300 ( — )
SDIA2179E
SDIA2148E
Dimension A : 7.7 - 8.3 mm (0.303 - 0.327 in)
Tool number : ST35300000 ( — )
SDIA2187E
Dimension B : 62.5 - 63.1 mm (2.461 - 2.484 in)
Tool number : ST33220000 ( — )
SDIA2478E
Page 3263 of 3371
TF-138
FRONT CASE
Revision: August 20072004 QX56
12. Install the sun gear assembly to the planetary carrier assembly.
13. Install new snap ring to planetary carrier assembly.
NOTE:
Do not reuse snap ring.
14. Install front case to planetary carrier assembly, using Tool.
15. Install new snap ring to the sun gear assembly.
NOTE:
Do not reuse snap ring.
16. Apply ATF or petroleum jelly to the circumference of the new oil
seal, and install it to the front case using Tool.
NOTE:
Do not reuse oil seal.
SDIA2180E
SDIA2181E
Tool number : ST33200000 (J-26082)
SDIA2183E
SDIA2144E
Tool number
A : ST30720000 (J-25405)
B : ST33200000 (J-26082)
Dimension : 4.0 - 4.6 mm (0.157 - 0.181 mm)
SDIA2184E