Page 3763 of 4449
![INFINITI FX35 2004 Service Manual LU-10
[VQ35DE]
OIL FILTER
Revision: 2004 November 2004 FX35/FX45
OIL FILTERPFP:15208
Removal and InstallationABS004SW
REMOVAL
1. Remove front engine undercover with power tool.
2. Using oil filter wre](/manual-img/42/57021/w960_57021-3762.png "INFINITI FX35 2004 Service Manual LU-10
[VQ35DE]
OIL FILTER
Revision: 2004 November 2004 FX35/FX45
OIL FILTERPFP:15208
Removal and InstallationABS004SW
REMOVAL
1. Remove front engine undercover with power tool.
2. Using oil filter wre")
LU-10
[VQ35DE]
OIL FILTER
Revision: 2004 November 2004 FX35/FX45
OIL FILTERPFP:15208
Removal and InstallationABS004SW
REMOVAL
1. Remove front engine undercover with power tool.
2. Using oil filter wrench (SST), remove oil filter.
CAUTION:
�Oil filter is provided with a relief valve.
Use genuine NISSAN oil filter or equivalent.
�Be careful not to get burned when engine and engine oil
are hot.
�When removing, prepare a shop cloth to absorb any
engine oil leakage or spillage.
�Do not allow engine oil to adhere to drive belts.
�Completely wipe off any engine oil that adhere to engine
and vehicle.
INSTALLATION
1. Remove foreign materials adhering to oil filter installation surface.
2. Apply engine oil to the oil seal contact surface of new oil filter.
3. Screw oil filter manually until it touches the installation surface,
then tighten it by 2/3 turn. Or tighten to specification.
INSPECTION AFTER INSTALLATION
1. Start engine, and check there is no leak of engine oil.
2. Stop engine and wait for 10 minutes.
SBIA0454E
SBIA0455E
SMA010
Oil filter:
: 17.7 N·m (1.8 kg-m, 13 ft-lb)
SMA229B
Page 3766 of 4449
OIL FILTER BRACKET (AWD)
LU-13
[VQ35DE]
C
D
E
F
G
H
I
J
K
L
MA
LU
Revision: 2004 November 2004 FX35/FX45
2. Start engine, and check there is no leak of engine oil.
3. Stop engine and wait for 10 minutes.
4. Check the engine oil level again. Refer to LU-7, "
ENGINE OIL"
Page 3769 of 4449
LU-16
[VQ35DE]
OIL COOLER
Revision: 2004 November 2004 FX35/FX45
INSTALLATION
Note to the following, and install in the reverse order of removal.
2WD Model
Align cutout on oil cooler with protrusion on oil pan (upper).
AW D M od e l
Align cutout on oil cooler with protrusion on oil filter bracket.
INSPECTION AFTER INSTALLATION
1. Check the engine oil level and the engine coolant level and add engine oil and engine coolant. Refer to
LU-7, "
ENGINE OIL" and Refer to CO-11, "ENGINE COOLANT" .
2. Start engine, and check there is no leaks of engine oil or engine coolant.
3. Stop engine and wait for 10 minutes.
4. Check the engine oil level and the engine coolant level again. Refer to LU-7, "
ENGINE OIL" and Refer to
CO-11, "
ENGINE COOLANT" .
SBIA0459E
SBIA0460E
Page 3778 of 4449
![INFINITI FX35 2004 Service Manual ENGINE OIL
LU-25
[VK45DE]
C
D
E
F
G
H
I
J
K
L
MA
LU
Revision: 2004 November 2004 FX35/FX45
ENGINE OILPFP:KLA92
InspectionABS006J4
ENGINE OIL LEVEL
NOTE:
Before starting engine, put vehicle horizontall](/manual-img/42/57021/w960_57021-3777.png "INFINITI FX35 2004 Service Manual ENGINE OIL
LU-25
[VK45DE]
C
D
E
F
G
H
I
J
K
L
MA
LU
Revision: 2004 November 2004 FX35/FX45
ENGINE OILPFP:KLA92
InspectionABS006J4
ENGINE OIL LEVEL
NOTE:
Before starting engine, put vehicle horizontall")
ENGINE OIL
LU-25
[VK45DE]
C
D
E
F
G
H
I
J
K
L
MA
LU
Revision: 2004 November 2004 FX35/FX45
ENGINE OILPFP:KLA92
InspectionABS006J4
ENGINE OIL LEVEL
NOTE:
Before starting engine, put vehicle horizontally and check the engine oil level. If the engine is already started,
stop it and allow 15 minutes before checking.
1. Pull out oil level gauge and wipe it clean.
2. Insert oil level gauge and make sure the engine oil level is within
the range shown in the figure.
3. If it is out of range, adjust it.
ENGINE OIL APPEARANCE
�Check engine oil for white turbidity or heavy contamination.
�If engine oil becomes turbid and white, it is highly probable that it is contaminated with engine coolant.
Repair or replace damaged parts.
ENGINE OIL LEAKAGE
Check for oil leakage around the following area.
�Oil pan
�Oil pan drain plug
�Oil pressure switch
�Oil filter
�Oil cooler
�Intake valve timing control cover
�Intake valve timing control solenoid valve
�Front cover
�Chain tensioner cover
�Mating surface between cylinder block and cylinder head
�Mating surface between cylinder head and rocker cover
�Crankshaft oil seals (front and rear)
OIL PRESSURE CHECK
WARNING:
�Be careful not to burn yourself, as engine oil may be hot.
�Oil pressure check should be done in “Parking position”.
1. Check engine oil level. Refer to LU-25, "
ENGINE OIL LEVEL" .
2. Remove front engine undercover with power tool.
PBIC0801E
Page 3779 of 4449
![INFINITI FX35 2004 Service Manual LU-26
[VK45DE]
ENGINE OIL
Revision: 2004 November 2004 FX35/FX45
3. Disconnect oil pressure switch harness connector.
4. Remove oil pressure switch.
5. Install oil pressure gauge and hose (SST).
6. St](/manual-img/42/57021/w960_57021-3778.png "INFINITI FX35 2004 Service Manual LU-26
[VK45DE]
ENGINE OIL
Revision: 2004 November 2004 FX35/FX45
3. Disconnect oil pressure switch harness connector.
4. Remove oil pressure switch.
5. Install oil pressure gauge and hose (SST).
6. St")
LU-26
[VK45DE]
ENGINE OIL
Revision: 2004 November 2004 FX35/FX45
3. Disconnect oil pressure switch harness connector.
4. Remove oil pressure switch.
5. Install oil pressure gauge and hose (SST).
6. Start engine and warm it up to normal operating temperature.
7. Check oil pressure with engine running under no-load.
NOTE:
When engine oil temperature is low, engine oil pressure becomes high.
Engine oil pressure [Engine oil temperature at 80°C (176°F)]
If difference is extreme, check oil passage and oil pump for oil leaks.
8. After the inspections, install oil pressure switch as follows:
a. Remove old liquid gasket adhering to oil presser switch and engine.
b. Apply liquid gasket and tighten oil pressure switch to specification.
Use Genuine Thread Sealant or equivalent. Refer to GI-48, "
RECOMMENDED CHEMICAL PROD-
UCTS AND SEALANTS" .
Changing Engine OilABS006J5
WARNING:
�Be careful not to burn yourself, as engine oil may be hot.
�Prolonged and repeated contact with used engine oil may
cause skin cancer; try to avoid direct skin contact with
used engine oil. If skin contact is made, wash thoroughly
with soap or hand cleaner as soon as possible.
1. Remove front engine undercover with power tool.
2. Warm up engine, put vehicle horizontally and check for oil leak-
age from engine components. Refer to LU-25, "
ENGINE OIL
LEAKAGE" .
3. Stop engine and wait for 15 minutes.
4. Loosen oil filler cap, and then remove drain plug.
PBIC1524E
SLC926
Engine speed
rpm Approximate discharge pressure
kPa (kg/cm2 , psi)
Idle speed More than 98 (1.0, 14)
2,000 More than 294 (3.0, 43)
: 14.8 N·m (1.5 kg-m, 11 ft-lb)
PBIC0993E
Page 3783 of 4449
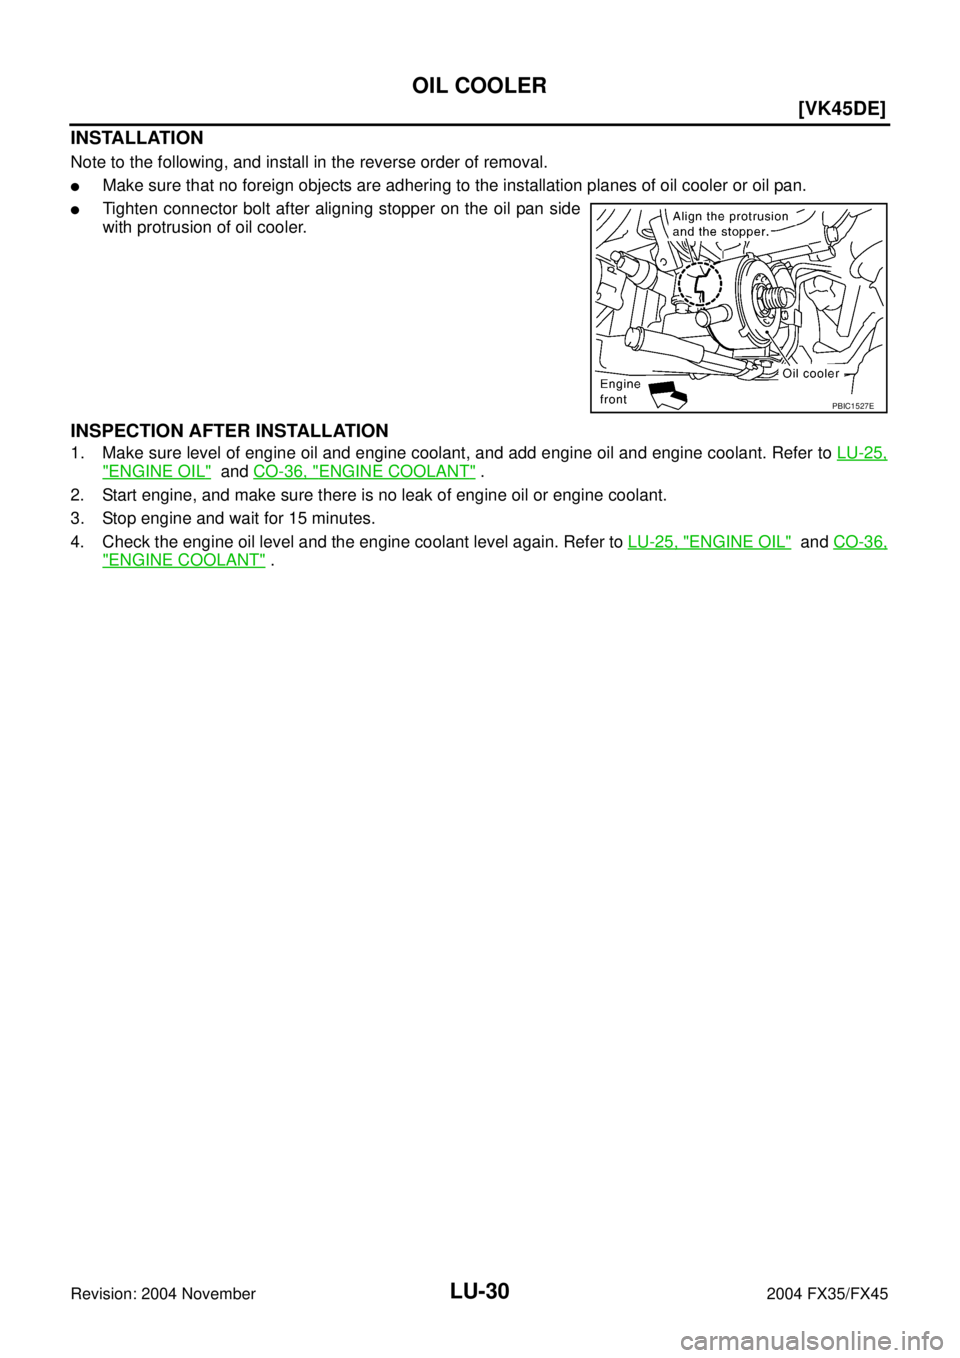
LU-30
[VK45DE]
OIL COOLER
Revision: 2004 November 2004 FX35/FX45
INSTALLATION
Note to the following, and install in the reverse order of removal.
�Make sure that no foreign objects are adhering to the installation planes of oil cooler or oil pan.
�Tighten connector bolt after aligning stopper on the oil pan side
with protrusion of oil cooler.
INSPECTION AFTER INSTALLATION
1. Make sure level of engine oil and engine coolant, and add engine oil and engine coolant. Refer to LU-25,
"ENGINE OIL" and CO-36, "ENGINE COOLANT" .
2. Start engine, and make sure there is no leak of engine oil or engine coolant.
3. Stop engine and wait for 15 minutes.
4. Check the engine oil level and the engine coolant level again. Refer to LU-25, "
ENGINE OIL" and CO-36,
"ENGINE COOLANT" .
PBIC1527E
Page 3806 of 4449
ENGINE MAINTENANCE (VQ35DE ENGINE)
MA-19
C
D
E
F
G
H
I
J
K
MA
B
MA
Revision: 2004 November 2004 FX35/FX45
INSTALLATION
1. Remove foreign materials adhering to oil filter installation surface.
2. Apply engine oil to the oil seal contact surface of new oil filter.
3. Screw oil filter manually until it touches the installation surface,
then tighten it by 2/3 turn. Or tighten to specification.
INSPECTION AFTER INSTALLATION
1. Start engine, and check there is no leak of engine oil.
2. Stop engine and wait for 10 minutes.
3. Check engine oil level and add engine oil. Refer to MA-17, "
Changing Engine Oil" .
Changing Spark Plugs (Platinum-Tipped Type)ALS000GN
REMOVAL
1. Remove engine cover with power tool. Refer to EM-19, "INTAKE MANIFOLD COLLECTOR" .
2. Remove ignition coil. Refer to EM-42, "
IGNITION COIL" .
3. Remove spark plug with spark plug wrench (commercial service
tool).
SBIA0455E
SMA010
Oil filter:
: 17.7 N·m (1.8 kg-m, 13 ft-lb)
SMA229B
SEM294A
Page 3817 of 4449

MA-30
CHASSIS AND BODY MAINTENANCE
Revision: 2004 November 2004 FX35/FX45
Changing A/T FluidALS000GC
1. Warm up ATF.
2. Stop engine.
3. Remove the tightening bolt for ATF level gauge.
4. Drain ATF from drain plug and refill with new ATF. Always refill same volume with drained fluid.
�To replace the ATF, pour in new fluid at the charging pipe with the engine idling and at the same time
drain the old fluid from the radiator cooler hose return side.
�When the color of the fluid coming out is about the same as the color of the new fluid, the replacement
is complete. The amount of new transmission fluid to use should be 30 to 50% increase of the stipu-
lated amount.
CAUTION:
�Use only Genuine NISSAN Matic J ATF. Do not mix with other fluid.
�Using automatic transmission fluid other than Genuine NISSAN Matic J ATF will cause deterio-
ration in driveability and automatic transmission durability, and may damage the automatic
transmission, which is not covered by the warranty.
�When filling ATF, take care not to splash heat generating parts such as exhaust with ATF.
�Do not reuse drain plug gasket.
5. Run engine at idle speed for 5 minutes.
6. Check fluid level and condition. Refer to MA-28, "
Checking A/T Fluid" . If fluid is still dirty, repeat step 2.
through 5.
7. Install the removed ATF level gauge in the fluid charging pipe.
Checking Transfer FluidALS000GD
Check for oil leakage and oil level.
CAUTION:
Never start engine while checking oil level.ATF: Genuine NISSAN Matic J ATF
Fluid capacity: 10.3 (10-7/8 US qt, 9-1/8 lmp qt)
Drain plug:
: 34 N·m (3.5 kg-m, 25 ft-lb)
Level gauge bolt:
: 5.1 N·m (0.52 kg-m, 45 in-lb)
Filler plug:
: 34.5 N·m (3.5 kg-m, 25 ft-lb)
SDIA2028E
![INFINITI FX35 2004 Service Manual OIL FILTER BRACKET (AWD)
LU-13
[VQ35DE]
C
D
E
F
G
H
I
J
K
L
MA
LU
Revision: 2004 November 2004 FX35/FX45
2. Start engine, and check there is no leak of engine oil.
3. Stop engine and wait for 10 minut](/manual-img/42/57021/w960_57021-3765.png "INFINITI FX35 2004 Service Manual OIL FILTER BRACKET (AWD)
LU-13
[VQ35DE]
C
D
E
F
G
H
I
J
K
L
MA
LU
Revision: 2004 November 2004 FX35/FX45
2. Start engine, and check there is no leak of engine oil.
3. Stop engine and wait for 10 minut")
![INFINITI FX35 2004 Service Manual LU-16
[VQ35DE]
OIL COOLER
Revision: 2004 November 2004 FX35/FX45
INSTALLATION
Note to the following, and install in the reverse order of removal.
2WD Model
Align cutout on oil cooler with protrusion o](/manual-img/42/57021/w960_57021-3768.png "INFINITI FX35 2004 Service Manual LU-16
[VQ35DE]
OIL COOLER
Revision: 2004 November 2004 FX35/FX45
INSTALLATION
Note to the following, and install in the reverse order of removal.
2WD Model
Align cutout on oil cooler with protrusion o")

MA-19
C
D
E
F
G
H
I
J
K
MA
B
MA
Revision: 2004 November 2004 FX35/FX45
INSTALLATION
1. Remove foreign materials adhering to oil filter installation surface.
2. Apply")