Page 4410 of 4449
FRONT WIPER AND WASHER SYSTEM
WW-19
C
D
E
F
G
H
I
J
L
MA
B
WW
Revision: 2004 November 2004 FX35/FX45
ACTIVE TEST
Operation Procedure
1. Touch “WIPER” on the “SELECT TEST ITEM” screen.
2. Touch “ACTIVE TEST” on “SELECT DIAG MODE” screen.
3. Touch items to be tested, and check operation.
4. During operation check, touching “STOP” deactivates operation.
Display Item List
CONSULT-II Functions (IPDM E/R)AKS007AE
CONSULT-II can display each diagnostic item using the following diagnostic test modes: work support, self-
diagnostic results, data monitor and active test through data reception and command transmission via the
IPDM E/R CAN communication line.
CONSULT-II OPERATION
CAUTION:
If CONSULT-II is used with no connection of CONSULT-II CONVERTER, malfunctions might be
detected in self-diagnosis depending on control unit which carry out CAN communication.
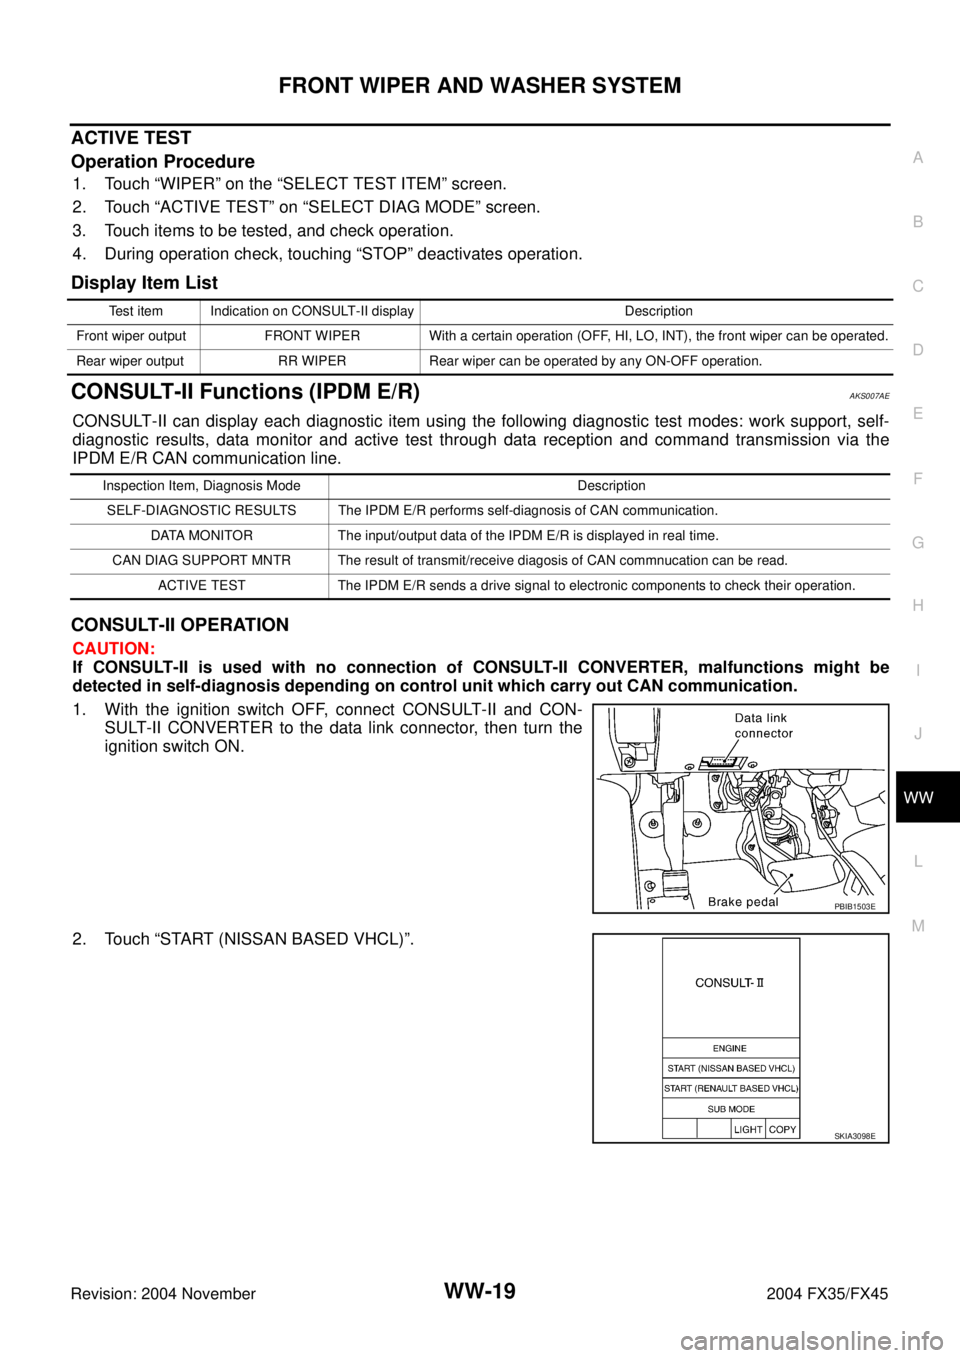
1. With the ignition switch OFF, connect CONSULT-II and CON-
SULT-II CONVERTER to the data link connector, then turn the
ignition switch ON.
2. Touch “START (NISSAN BASED VHCL)”.
Test item Indication on CONSULT-II display Description
Front wiper output FRONT WIPER With a certain operation (OFF, HI, LO, INT), the front wiper can be operated.
Rear wiper output RR WIPER Rear wiper can be operated by any ON-OFF operation.
Inspection Item, Diagnosis Mode Description
SELF-DIAGNOSTIC RESULTS The IPDM E/R performs self-diagnosis of CAN communication.
DATA MONITOR The input/output data of the IPDM E/R is displayed in real time.
CAN DIAG SUPPORT MNTR The result of transmit/receive diagosis of CAN commnucation can be read.
ACTIVE TEST The IPDM E/R sends a drive signal to electronic components to check their operation.
PBIB1503E
SKIA3098E
Page 4411 of 4449
WW-20
FRONT WIPER AND WASHER SYSTEM
Revision: 2004 November 2004 FX35/FX45
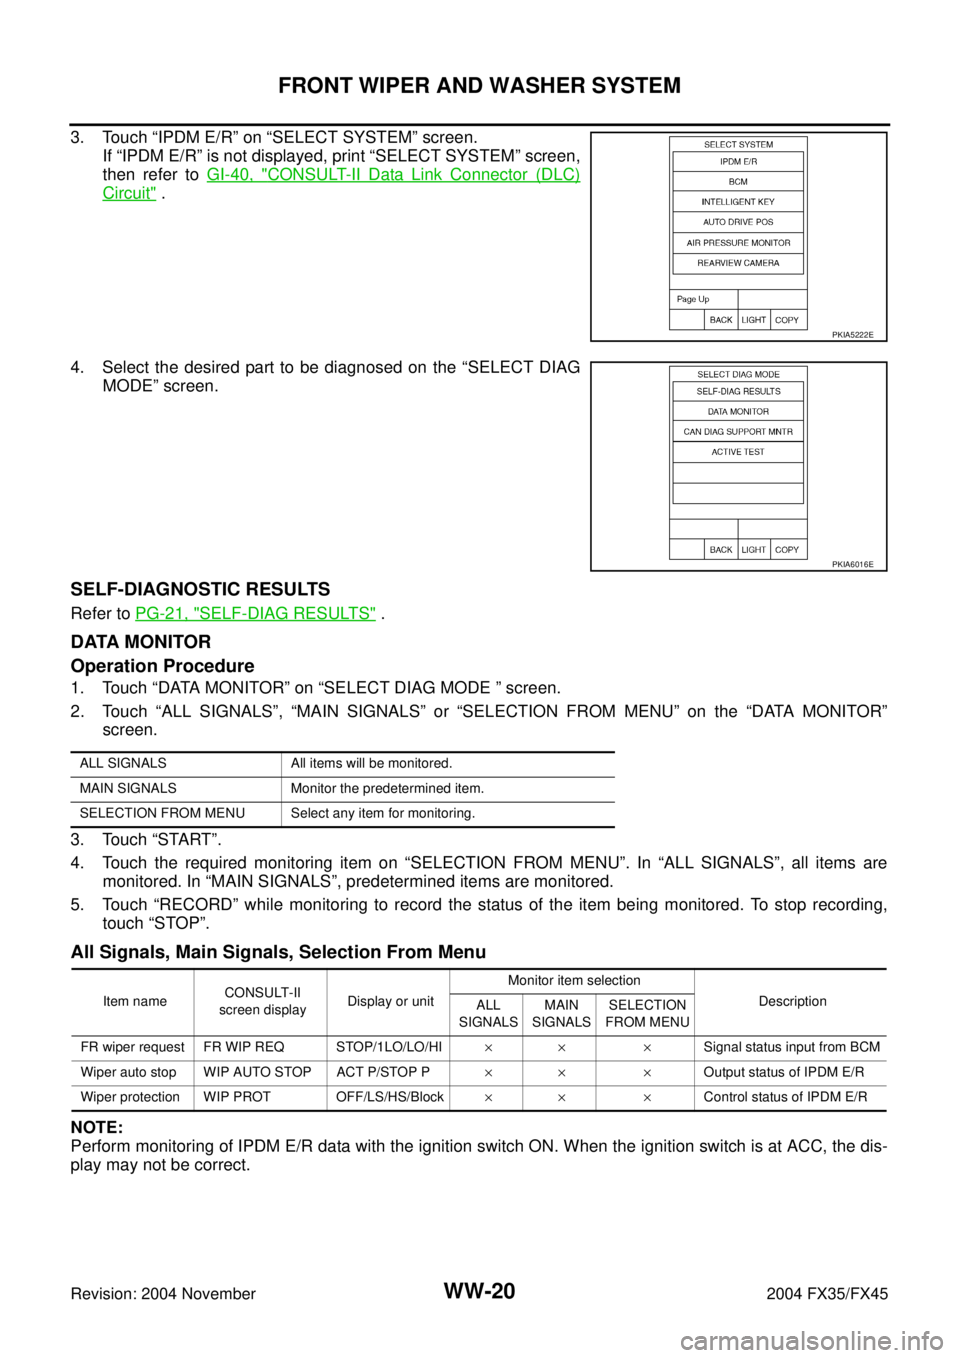
3. Touch “IPDM E/R” on “SELECT SYSTEM” screen.
If “IPDM E/R” is not displayed, print “SELECT SYSTEM” screen,
then refer to GI-40, "
CONSULT-II Data Link Connector (DLC)
Circuit" .
4. Select the desired part to be diagnosed on the “SELECT DIAG
MODE” screen.
SELF-DIAGNOSTIC RESULTS
Refer to PG-21, "SELF-DIAG RESULTS" .
DATA MONITOR
Operation Procedure
1. Touch “DATA MONITOR” on “SELECT DIAG MODE ” screen.
2. Touch “ALL SIGNALS”, “MAIN SIGNALS” or “SELECTION FROM MENU” on the “DATA MONITOR”
screen.
3. Touch “START”.
4. Touch the required monitoring item on “SELECTION FROM MENU”. In “ALL SIGNALS”, all items are
monitored. In “MAIN SIGNALS”, predetermined items are monitored.
5. Touch “RECORD” while monitoring to record the status of the item being monitored. To stop recording,
touch “STOP”.
All Signals, Main Signals, Selection From Menu
NOTE:
Perform monitoring of IPDM E/R data with the ignition switch ON. When the ignition switch is at ACC, the dis-
play may not be correct.
PKIA5222E
PKIA6016E
ALL SIGNALS All items will be monitored.
MAIN SIGNALS Monitor the predetermined item.
SELECTION FROM MENU Select any item for monitoring.
Item nameCONSULT-II
screen displayDisplay or unitMonitor item selection
Description
ALL
SIGNALSMAIN
SIGNALSSELECTION
FROM MENU
FR wiper request FR WIP REQ STOP/1LO/LO/HI×× ×Signal status input from BCM
Wiper auto stop WIP AUTO STOP ACT P/STOP P×× ×Output status of IPDM E/R
Wiper protection WIP PROT OFF/LS/HS/Block×× ×Control status of IPDM E/R
Page 4412 of 4449
FRONT WIPER AND WASHER SYSTEM
WW-21
C
D
E
F
G
H
I
J
L
MA
B
WW
Revision: 2004 November 2004 FX35/FX45
ACTIVE TEST
Operation Procedure
1. Touch “ACTIVE TEST” on “SELECT DIAG MODE” screen.
2. Touch item to be tested, and check operation.
3. Touch “START”.
4. Touch “STOP” while testing to stop the operation.
Front Wiper Does Not OperateAKS0079W
CAUTION:
�During IPDM E/R fail-safe control, front wipers may not operate. Refer to PG-18, "CAN COMMUNI-
CATION LINE CONTROL" in “PG IPDM E/R” to make sure that it is not in fail-safe status.
1. CHECK IPDM E/R TO FRONT WIPERS (1)
With CONSULT-ll
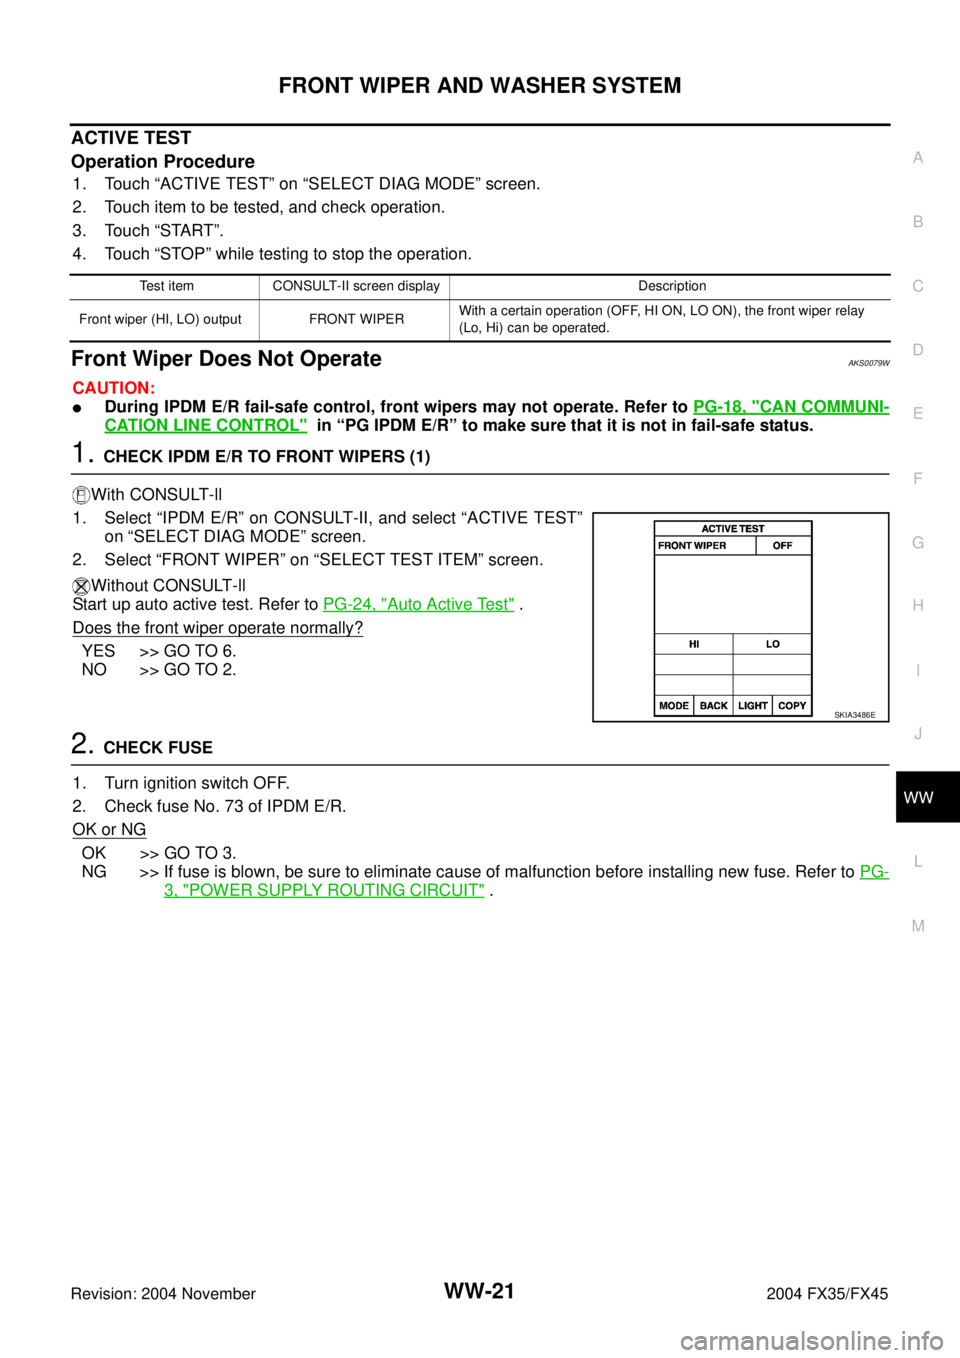
1. Select “IPDM E/R” on CONSULT-II, and select “ACTIVE TEST”
on “SELECT DIAG MODE” screen.
2. Select “FRONT WIPER” on “SELECT TEST ITEM” screen.
Without CONSULT-ll
Start up auto active test. Refer to PG-24, "
Auto Active Test" .
Does the front wiper operate normally?
YES >> GO TO 6.
NO >> GO TO 2.
2. CHECK FUSE
1. Turn ignition switch OFF.
2. Check fuse No. 73 of IPDM E/R.
OK or NG
OK >> GO TO 3.
NG >> If fuse is blown, be sure to eliminate cause of malfunction before installing new fuse. Refer to PG-
3, "POWER SUPPLY ROUTING CIRCUIT" .
Test item CONSULT-II screen display Description
Front wiper (HI, LO) output FRONT WIPERWith a certain operation (OFF, HI ON, LO ON), the front wiper relay
(Lo, Hi) can be operated.
SKIA3486E
Page 4414 of 4449
FRONT WIPER AND WASHER SYSTEM
WW-23
C
D
E
F
G
H
I
J
L
MA
B
WW
Revision: 2004 November 2004 FX35/FX45
5. CHECK IPDM E/R
With CONSULT-ll
1. Connect IPDM E/R connector and front wiper motor connector.
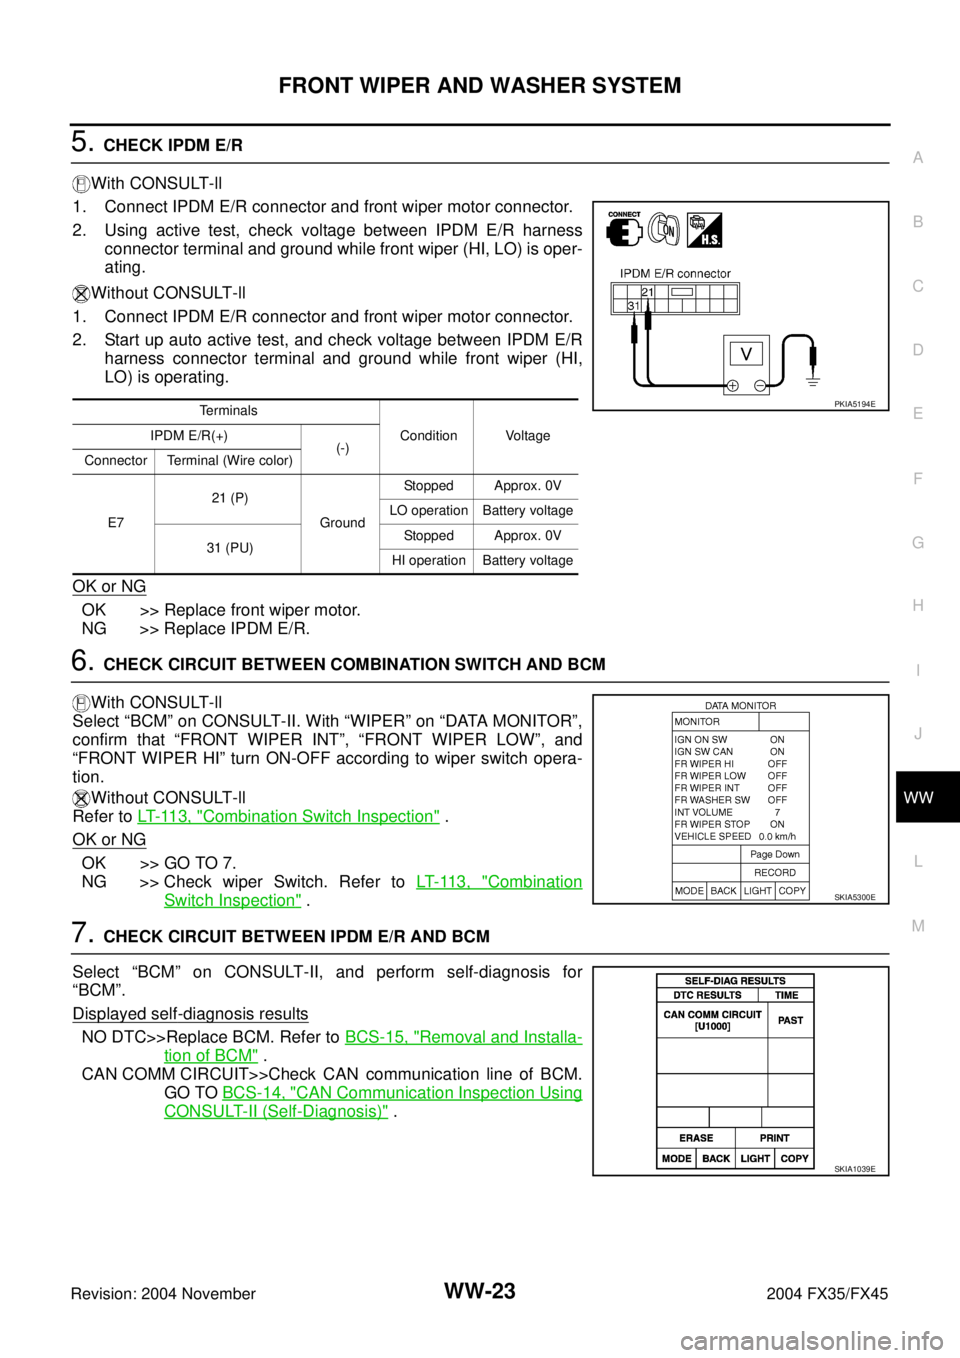
2. Using active test, check voltage between IPDM E/R harness
connector terminal and ground while front wiper (HI, LO) is oper-
ating.
Without CONSULT-ll
1. Connect IPDM E/R connector and front wiper motor connector.
2. Start up auto active test, and check voltage between IPDM E/R
harness connector terminal and ground while front wiper (HI,
LO) is operating.
OK or NG
OK >> Replace front wiper motor.
NG >> Replace IPDM E/R.
6. CHECK CIRCUIT BETWEEN COMBINATION SWITCH AND BCM
With CONSULT-ll
Select “BCM” on CONSULT-II. With “WIPER” on “DATA MONITOR”,
confirm that “FRONT WIPER INT”, “FRONT WIPER LOW”, and
“FRONT WIPER HI” turn ON-OFF according to wiper switch opera-
tion.
Without CONSULT-ll
Refer to LT- 11 3 , "
Combination Switch Inspection" .
OK or NG
OK >> GO TO 7.
NG >> Check wiper Switch. Refer to LT- 11 3 , "
Combination
Switch Inspection" .
7. CHECK CIRCUIT BETWEEN IPDM E/R AND BCM
Select “BCM” on CONSULT-II, and perform self-diagnosis for
“BCM”.
Displayed self
-diagnosis results
NO DTC>>Replace BCM. Refer to BCS-15, "Removal and Installa-
tion of BCM" .
CAN COMM CIRCUIT>>Check CAN communication line of BCM.
GO TO BCS-14, "
CAN Communication Inspection Using
CONSULT-II (Self-Diagnosis)" .
Terminals
Condition Voltage IPDM E/R(+)
(-)
Connector Terminal (Wire color)
E721 (P)
GroundStopped Approx. 0V
LO operation Battery voltage
31 (PU)Stopped Approx. 0V
HI operation Battery voltagePKIA5194E
SKIA5300E
SKIA1039E
Page 4431 of 4449
WW-40
REAR WIPER AND WASHER SYSTEM
Revision: 2004 November 2004 FX35/FX45
How to Proceed With Trouble DiagnosisAKS0057L
1. Confirm the symptoms and customer complaint.
2. Understand operation description and function description. Refer to WW-35, "
System Description" .
3. Perform the Preliminary Check. Refer to WW-40, "
Preliminary Check" .
4. Check symptom and repair or replace the cause of malfunction.
5. Does the rear wiper and washer operate normally? If YES: GO TO 6. If NO: GO TO 4.
6. INSPECTION END
Preliminary CheckAKS0057M
INSPECTION POWER SUPPLY AND GROUND CIRCUIT
Inspection Procedure
1. CHECK FUSE
�Check if wiper and washer fusible link and fuse is blown.
Refer to WW-37, "Wiring Diagram — WIP/ R —" .
OK or NG
OK >> GO TO 2.
NG >> If fuse or fusible link is blown, be sure to eliminate cause of malfunction before installing new fuse
or fusible link. Refer to PG-3, "
POWER SUPPLY ROUTING CIRCUIT" .
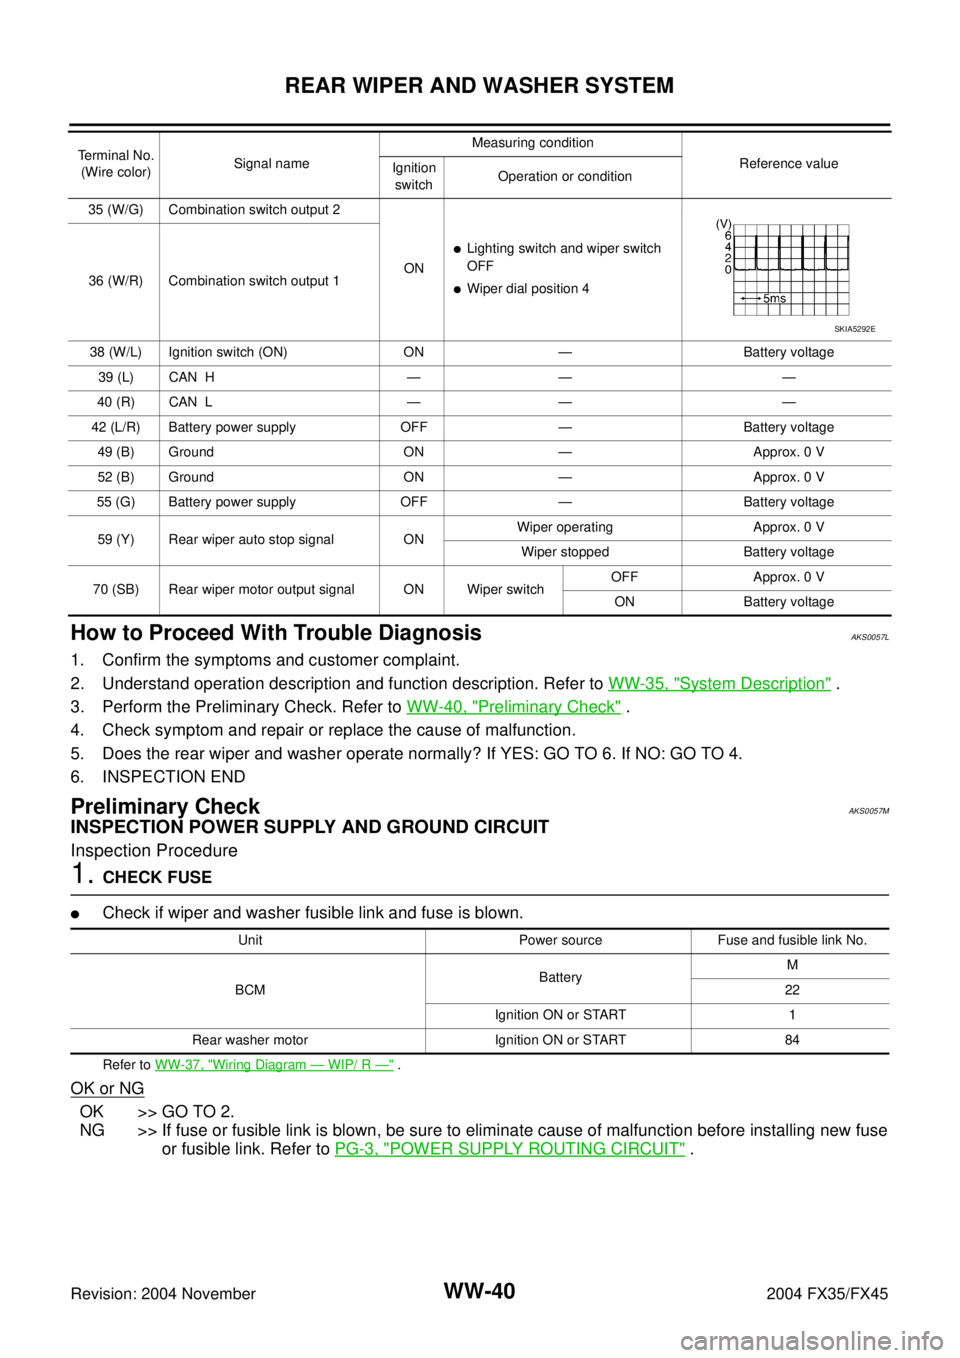
35 (W/G) Combination switch output 2
ON
�Lighting switch and wiper switch
OFF
�Wiper dial position 4 36 (W/R) Combination switch output 1
38 (W/L) Ignition switch (ON) ON — Battery voltage
39 (L) CAN H — — —
40 (R) CAN L — — —
42 (L/R) Battery power supply OFF — Battery voltage
49 (B) Ground ON — Approx. 0 V
52 (B) Ground ON — Approx. 0 V
55 (G) Battery power supply OFF — Battery voltage
59 (Y) Rear wiper auto stop signal ONWiper operating Approx. 0 V
Wiper stopped Battery voltage
70 (SB) Rear wiper motor output signal ON Wiper switchOFF Approx. 0 V
ON Battery voltage Terminal No.
(Wire color)Signal nameMeasuring condition
Reference value
Ignition
switchOperation or condition
SKIA5292E
Unit Power source Fuse and fusible link No.
BCMBatteryM
22
Ignition ON or START 1
Rear washer motor Ignition ON or START 84
Page 4433 of 4449
WW-42
REAR WIPER AND WASHER SYSTEM
Revision: 2004 November 2004 FX35/FX45
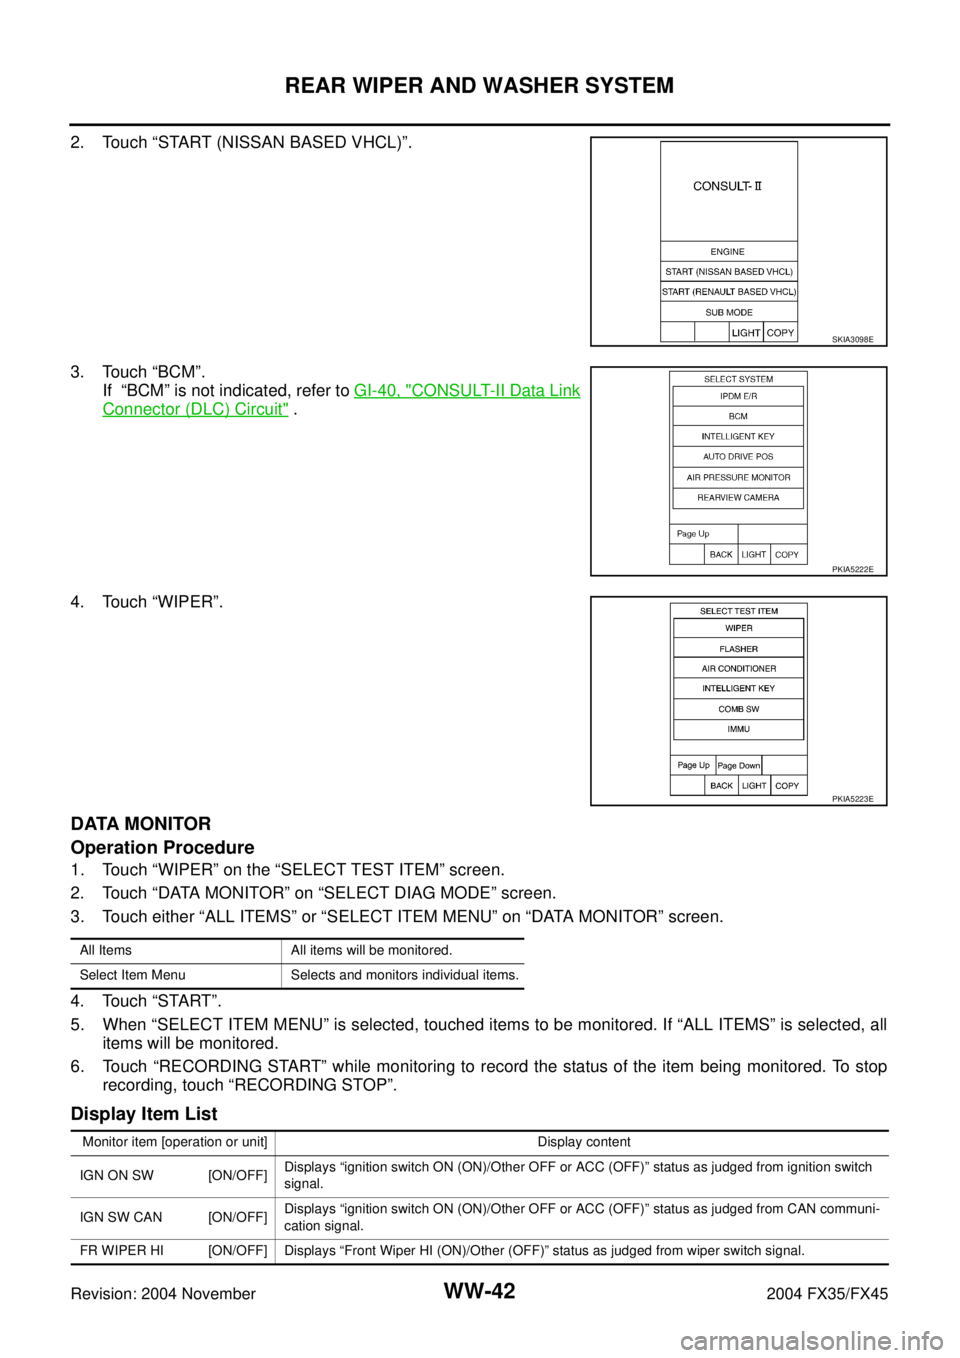
2. Touch “START (NISSAN BASED VHCL)”.
3. Touch “BCM”.
If “BCM” is not indicated, refer to GI-40, "
CONSULT-II Data Link
Connector (DLC) Circuit" .
4. Touch “WIPER”.
DATA MONITOR
Operation Procedure
1. Touch “WIPER” on the “SELECT TEST ITEM” screen.
2. Touch “DATA MONITOR” on “SELECT DIAG MODE” screen.
3. Touch either “ALL ITEMS” or “SELECT ITEM MENU” on “DATA MONITOR” screen.
4. Touch “START”.
5. When “SELECT ITEM MENU” is selected, touched items to be monitored. If “ALL ITEMS” is selected, all
items will be monitored.
6. Touch “RECORDING START” while monitoring to record the status of the item being monitored. To stop
recording, touch “RECORDING STOP”.
Display Item List
SKIA3098E
PKIA5222E
PKIA5223E
All Items All items will be monitored.
Select Item Menu Selects and monitors individual items.
Monitor item [operation or unit] Display content
IGN ON SW [ON/OFF]Displays “ignition switch ON (ON)/Other OFF or ACC (OFF)” status as judged from ignition switch
signal.
IGN SW CAN [ON/OFF]Displays “ignition switch ON (ON)/Other OFF or ACC (OFF)” status as judged from CAN communi-
cation signal.
FR WIPER HI [ON/OFF] Displays “Front Wiper HI (ON)/Other (OFF)” status as judged from wiper switch signal.