2004 DAEWOO LACETTI length
[x] Cancel search: lengthPage 915 of 2643
2B – 8IWHEEL ALIGNMENT
DAEWOO V–121 BL4
PRELIMINARY INSPECTION
ChecksAction
Check the tires for proper inflation pressures and normal
tread wear.Inflate the tires to the proper tire pressure. Replace the
tires as needed.
Check the wheel bearings for looseness.Tighten the axle nut to the proper specification. Replace
the strut wheel bearing as needed.
Check for loose ball joints and tie rod ends.Tighten the ball joints and the tie rods.
Check the runout of the wheels and the tires.Measure and correct the tire runout.
Check the vehicle trim heights.Correct the trim heights. Make the correction before ad-
justing the toe.
Check for loose rack and pinion mounting.Tighten the mounting brackets for the rack and pinion as-
sembly.
Check for improperly operating struts.Replace the strut assembly.
Check for loose control arms.Tighten the control arm attachment bolts. Replace the con-
trol arm bushings as needed.
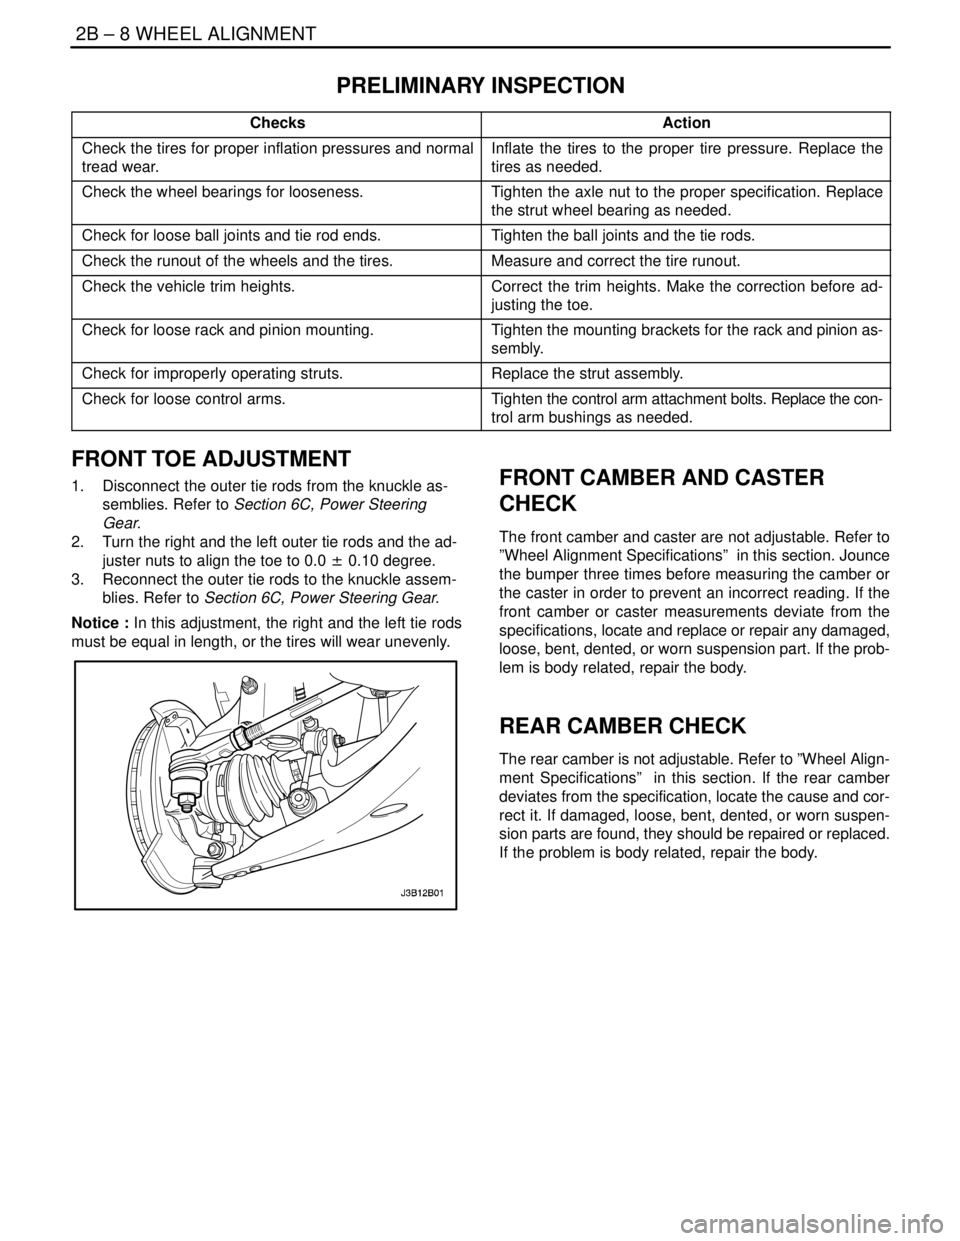
FRONT TOE ADJUSTMENT
1. Disconnect the outer tie rods from the knuckle as-
semblies. Refer to Section 6C, Power Steering
Gear.
2. Turn the right and the left outer tie rods and the ad-
juster nuts to align the toe to 0.0 ± 0.10 degree.
3. Reconnect the outer tie rods to the knuckle assem-
blies. Refer to Section 6C, Power Steering Gear.
Notice : In this adjustment, the right and the left tie rods
must be equal in length, or the tires will wear unevenly.FRONT CAMBER AND CASTER
CHECK
The front camber and caster are not adjustable. Refer to
”Wheel Alignment Specifications” in this section. Jounce
the bumper three times before measuring the camber or
the caster in order to prevent an incorrect reading. If the
front camber or caster measurements deviate from the
specifications, locate and replace or repair any damaged,
loose, bent, dented, or worn suspension part. If the prob-
lem is body related, repair the body.
REAR CAMBER CHECK
The rear camber is not adjustable. Refer to ”Wheel Align-
ment Specifications” in this section. If the rear camber
deviates from the specification, locate the cause and cor-
rect it. If damaged, loose, bent, dented, or worn suspen-
sion parts are found, they should be repaired or replaced.
If the problem is body related, repair the body.
Page 994 of 2643
AUTOMATIC TRANSAXLE DRIVE AXLE 3A – 5
DAEWOO V–121 BL4
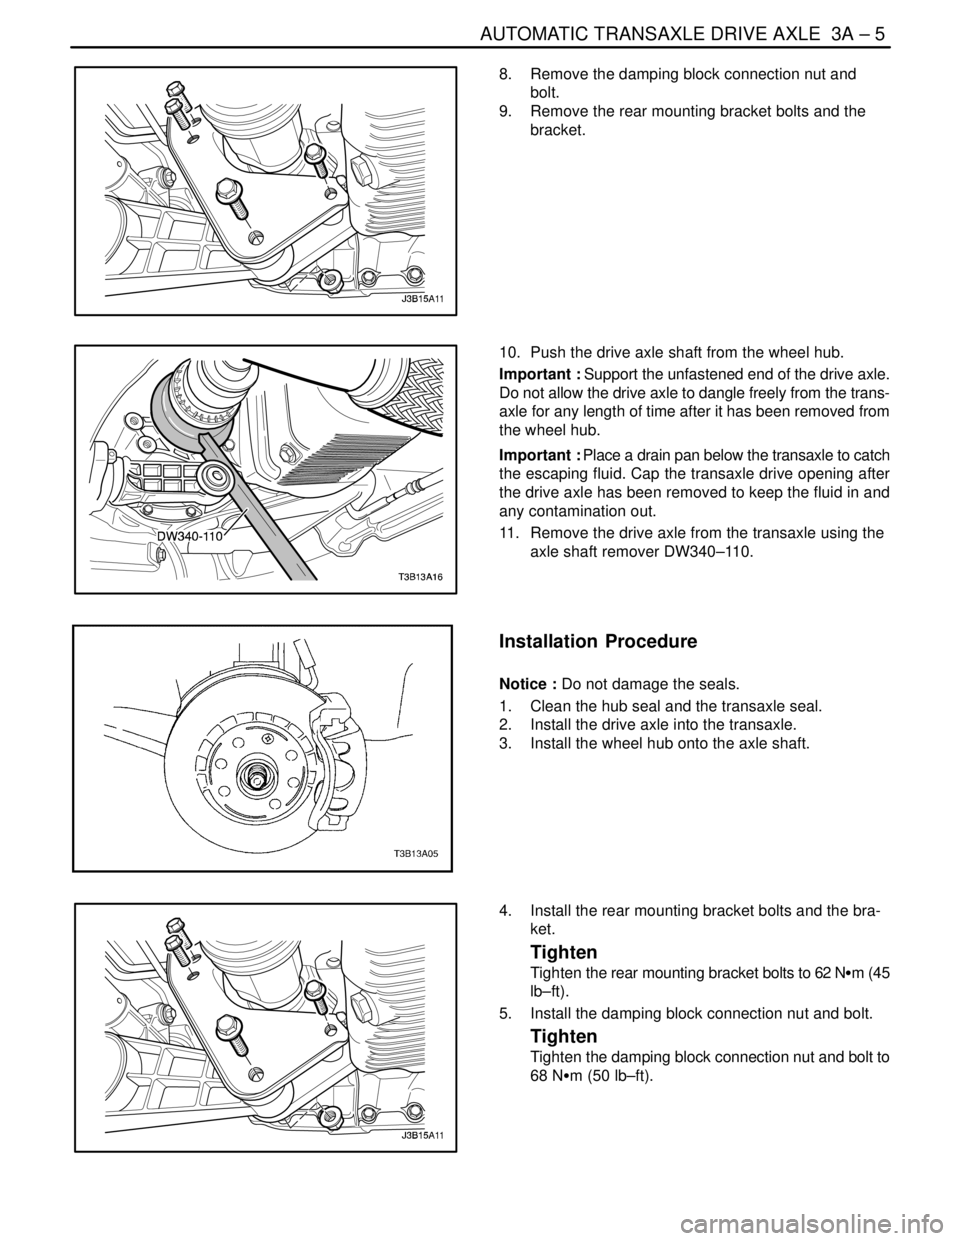
8. Remove the damping block connection nut and
bolt.
9. Remove the rear mounting bracket bolts and the
bracket.
10. Push the drive axle shaft from the wheel hub.
Important : Support the unfastened end of the drive axle.
Do not allow the drive axle to dangle freely from the trans-
axle for any length of time after it has been removed from
the wheel hub.
Important : Place a drain pan below the transaxle to catch
the escaping fluid. Cap the transaxle drive opening after
the drive axle has been removed to keep the fluid in and
any contamination out.
11. Remove the drive axle from the transaxle using the
axle shaft remover DW340–110.
Installation Procedure
Notice : Do not damage the seals.
1. Clean the hub seal and the transaxle seal.
2. Install the drive axle into the transaxle.
3. Install the wheel hub onto the axle shaft.
4. Install the rear mounting bracket bolts and the bra-
ket.
Tighten
Tighten the rear mounting bracket bolts to 62 NSm (45
lb–ft).
5. Install the damping block connection nut and bolt.
Tighten
Tighten the damping block connection nut and bolt to
68 NSm (50 lb–ft).
Page 1005 of 2643
3B – 6IMANUAL TRANSAXLE DRIVE AXLE
DAEWOO V–121 BL4
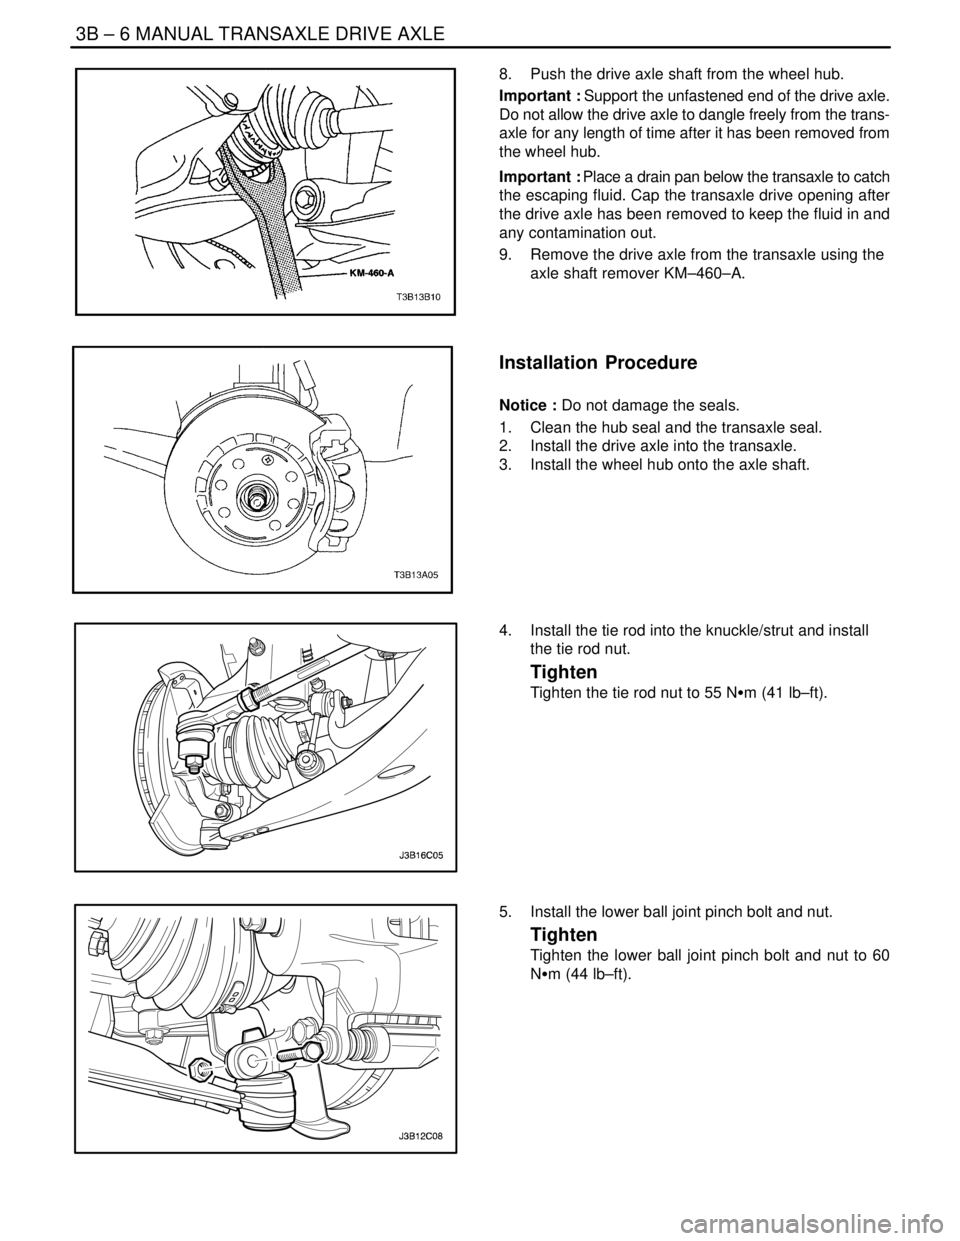
8. Push the drive axle shaft from the wheel hub.
Important : Support the unfastened end of the drive axle.
Do not allow the drive axle to dangle freely from the trans-
axle for any length of time after it has been removed from
the wheel hub.
Important : Place a drain pan below the transaxle to catch
the escaping fluid. Cap the transaxle drive opening after
the drive axle has been removed to keep the fluid in and
any contamination out.
9. Remove the drive axle from the transaxle using the
axle shaft remover KM–460–A.
Installation Procedure
Notice : Do not damage the seals.
1. Clean the hub seal and the transaxle seal.
2. Install the drive axle into the transaxle.
3. Install the wheel hub onto the axle shaft.
4. Install the tie rod into the knuckle/strut and install
the tie rod nut.
Tighten
Tighten the tie rod nut to 55 NSm (41 lb–ft).
5. Install the lower ball joint pinch bolt and nut.
Tighten
Tighten the lower ball joint pinch bolt and nut to 60
NSm (44 lb–ft).
Page 1021 of 2643

HYDRAULIC BRAKES 4A – 5
DAEWOO V–121 BL4
DIAGNOSIS
BRAKE SYSTEM TESTING
Brakes should be tested on a dry, clean, reasonably
smooth and level roadway. A true test of brake perfor-
mance cannot be made if the roadway is wet, greasy, or
covered with loose dirt whereby all tires do not grip the
road equally. Testing will also be adversely affected if the
roadway is crowned so as to throw the weight so roughly
that the wheels tend to bounce.
Test the brakes at different vehicle speeds with both light
and heavy pedal pressure; however, avoid locking the
brakes and sliding the tires. Locked brakes and sliding
tires do not indicate brake efficiency since heavily braked,
but turning, wheels will stop the vehicle in less distance
than locked brakes. More tire–to–road friction is present
with a heavily–braked, turning tire than with a sliding tire.
Because of the high deceleration capability, a firmer pedal
may be felt at higher deceleration levels.
There are three major external conditions that affect brake
performance:
S Tires having unequal contact and grip of the road
will cause unequal braking. Tires must be equally
inflated, and the tread pattern of the right and the
left tires must be approximately equal.
S Unequal loading of the vehicle can affect the brake
performance since the most heavily loaded wheels
require more braking power, and thus more braking
effort, than the others.
S Misalignment of the wheels, particularly conditions
of excessive camber and caster, will cause the
brakes to pull to one side.
To check for brake fluid leaks, hold constant foot pressure
on the pedal with the engine running at idle and the shift
lever in NEUTRAL. If the pedal gradually falls away with
the constant pressure, the hydraulic system may be leak-
ing. Perform a visual check to confirm any suspected
leaks.
Check the master cylinder fluid level. While a slight drop
in the reservoir level results from normal lining wear, an ab-
normally low level indicates a leak in the system. The hy-
draulic system may be leaking either internally or external-
ly. Refer to the procedure below to check the master
cylinder. Also, the system may appear to pass this test
while still having a slight leak. If the fluid level is normal,
check the vacuum booster pushrod length. If an incorrect
pushrod length is found, adjust or replace the rod.
Check the master cylinder using the following procedure:
S Check for a cracked master cylinder casting or
brake fluid leaking around the master cylinder.
Leaks are indicated only if there is at least one drop
of fluid. A damp condition is not abnormal.S Check for a binding pedal linkage and for an incor-
rect pushrod length. If both of these parts are in
satisfactory condition, disassemble the master cyl-
inder and check for an elongated or swollen primary
cylinder or piston seals. If swollen seals are found,
substandard or contaminated brake fluid should be
suspected. If contaminated brake fluid is found, all
the components should be disassembled and
cleaned, and all the rubber components should be
replaced. All of the pipes must also be flushed.
Improper brake fluid, or mineral oil or water in the fluid,
may cause the brake fluid to boil or cause deterioration of
the rubber components. If the primary piston cups in the
master cylinder are swollen, then the rubber parts have
deteriorated. This deterioration may also be evidenced by
swollen wheel cylinder piston seals on the drum brake
wheels.
If deterioration of rubber is evident, disassemble all the hy-
draulic parts and wash the parts with alcohol. Dry these
parts with compressed air before reassembly to keep alco-
hol out of the system. Replace all the rubber parts in the
system, including the hoses. Also, when working on the
brake mechanisms, check for fluid on the linings. If exces-
sive fluid is found, replace the linings.
If the master cylinder piston seals are in satisfactory condi-
tion, check for leaks or excessive heat conditions. If these
conditions are not found, drain the fluid, flush the master
cylinder with brake fluid, refill the master cylinder, and
bleed the system. Refer to ”Manual Bleeding the Brakes”
or”Pressure Bleeding the Brakes” in this section.
BRAKE HOSE INSPECTION
The hydraulic brake hoses should be inspected at least
twice a year. The brake hose assembly should be checked
for road hazard damage, cracks, chafing of the outer cov-
er, and for leaks or blisters. Inspect the hoses for proper
routing and mounting. A brake hose that rubs on a suspen-
sion component will wear and eventually fail. A light and
a mirror may be needed for an adequate inspection. If any
of the above conditions are observed on the brake hose,
adjust or replace the hose as necessary.
WARNING LAMP OPERATION
This brake system uses a BRAKE warning lamp located
in the instrument panel cluster. When the ignition switch
is in the START position, the BRAKE warning lamp should
glow and go OFF when the ignition switch returns to the
RUN position.
The following conditions will activate the BRAKE lamp:
S Parking brake applied. The light should be ON
whenever the parking brake is applied and the igni-
tion switch is ON.
S Low fluid level. A low fluid level in the master cylin-
der will turn the BRAKE lamp ON.
S EBD system is disabled. The light should be ON
when the EBD system is malfunctioning.
Page 1152 of 2643

ANTILOCK BRAKE SYSTEM 4F – 71
DAEWOO V–121 BL4
TIRES AND ABS/EBD
Replacement Tires
Tire size is important for proper performance of the ABS
system. Replacement tires should be the same size, load
range, and construction as the original tires. Replace tires
in axle sets and only with tires of the same tire perfor-
mance criteria (TPC) specification number. Use of any
other size or type may seriously affect the ABS operation.
TIRES AND ABS/EBD
Notice : There is no serviceable or removable EEPROM.
The EBCM must be replaced as an assembly.
The EBCM is attached to the hydraulic unit in the engine
compartment. The controlling element of ABS 5.3 is a mi-
croprocessor–based EBCM. Inputs to the system include
the four wheel speed sensors, the stoplamp switch, the
ignition switch, and the unswitched battery voltage. There
is an output to a bi–directional serial data link, located in
pin K of Data Link Connector (DLC) for service diagnostic
tools and assembly plant testing.
The EBCM monitors the speed of each wheel. If any wheel
begins to approach lockup and the brake switch is closed
(brake pedal depressed), the EBCM controls the sole-
noids to reduce brake pressure to the wheel approaching
lockup. Once the wheel regains traction, brake pressure
is increased until the wheel again begins to approach lock-
up. This cycle repeats until either the vehicle comes to a
stop, the brake pedal is released, or no wheels approach
lockup.
Additionally, the EBCM monitors itself, each input (except
the serial data link), and each output for proper operation.
If it detects any system malfunction, the EBCM will store
a DTC in nonvolatile memory (EEPROM) (DTCs will not
disappear if the battery is disconnected). Refer to ”Self
Diagnostics” in this section for more detailed information.
FRONT WHEEL SPEED SENSOR
The front wheel speed sensors are of a variable reluctance
type. Each sensor is attached to the steering knuckle,
close to a toothed ring. The result, as teeth pass by the
sensor, is an AC voltage with a frequency proportional to
the speed of the wheel. The magnitude of the voltage and
frequency increase with increasing speed. The sensor is
not repairable, nor is the air gap adjustable.
FRONT WHEEL SPEED SENSOR
RINGS
The toothed ring mentioned above is pressed onto the
wheel–side (outer) constant velocity joint. Each ring con-
tains 47 equally spaced teeth. Exercise care during ser-
vice procedures to avoid prying or contacting this ring. Ex-cessive contact may cause damage to one or more teeth.
If the ring is damaged, the wheel–side constant velocity
joint must be replaced.
REAR WHEEL SPEED SENSOR AND
RINGS
The rear wheel speed sensors operate in the same man-
ner as the front wheel speed sensors. They incorporate a
length of flexible harness with the connector attached to
the end of the harness. The rear wheel speed rings are in-
corporated into the hub assemblies and cannot be re-
placed separately, but require replacement of the rear
hub/bearing assembly.
VALUE RELAY AND PUMP MOTOR
RELAY
The valve relay and the motor pump relay are located in-
side the electronic brake control module (EBCM) and are
not replaceable. If one should fail, replace the EBCM.
WIRING HARNESS
The wiring harness is the mechanism by which the elec-
tronic brake control module (EBCM) is electrically con-
nected to power and to ground, to the wheel speed sen-
sors, the fuses, the switches, the indicators, and the serial
communications port. The components, considered part
of the wiring harness, are the wires that provide electrical
interconnection, and connectors (terminals, pins, con-
tacts, or lugs) that provide an electrical/mechanical inter-
face from the wire to a system component.
INDICATORS
The electronic brake control module (EBCM) continuously
monitors itself and the other ABS components. If the
EBCM detects a problem with the system, the amber ABS
indicator will light continuously to alert the driver to the
problem. An illuminated ABS indicator indicates that the
ABS system has detected a problem that affects the op-
eration of ABS. No antilock braking will be available. Nor-
mal, non–antilock brake performance will remain. In order
to regain ABS braking ability, the ABS must be serviced.
The red BRAKE indicator will be illuminated when the sys-
tem detects a low brake fluid level in the master cylinder
or when the parking brake switch is closed (the parking
brake is engaged) or EBD system is diabled.
WARNING : EBD INDICATOR LAMP WIRING IS CON-
NECTED TO THE PARKING BRAKE LAMP. IF THE
PARKING BRAKE LAMP IS TURNED ON WHEN YOU
DRIVING, CHECKING ON WHETHER THE PARKING
BRAKE LEVER IS ENAGED OR THE BRAKE FLUID
LEVEL IS LOW. IF THE SYSTEM HAS NO PROBLEM,
THE EBD SYSTEM IS WORKING IMPROPERLY. THE
EBD SYSTEM MUST BE SERVICED.
Page 1155 of 2643
PARKING BRAKE 4G – 3
DAEWOO V–121 BL4
7. Inspect and replace any parts of doubtful strength
or quality. This can be shown by discoloration from
heat or stress.
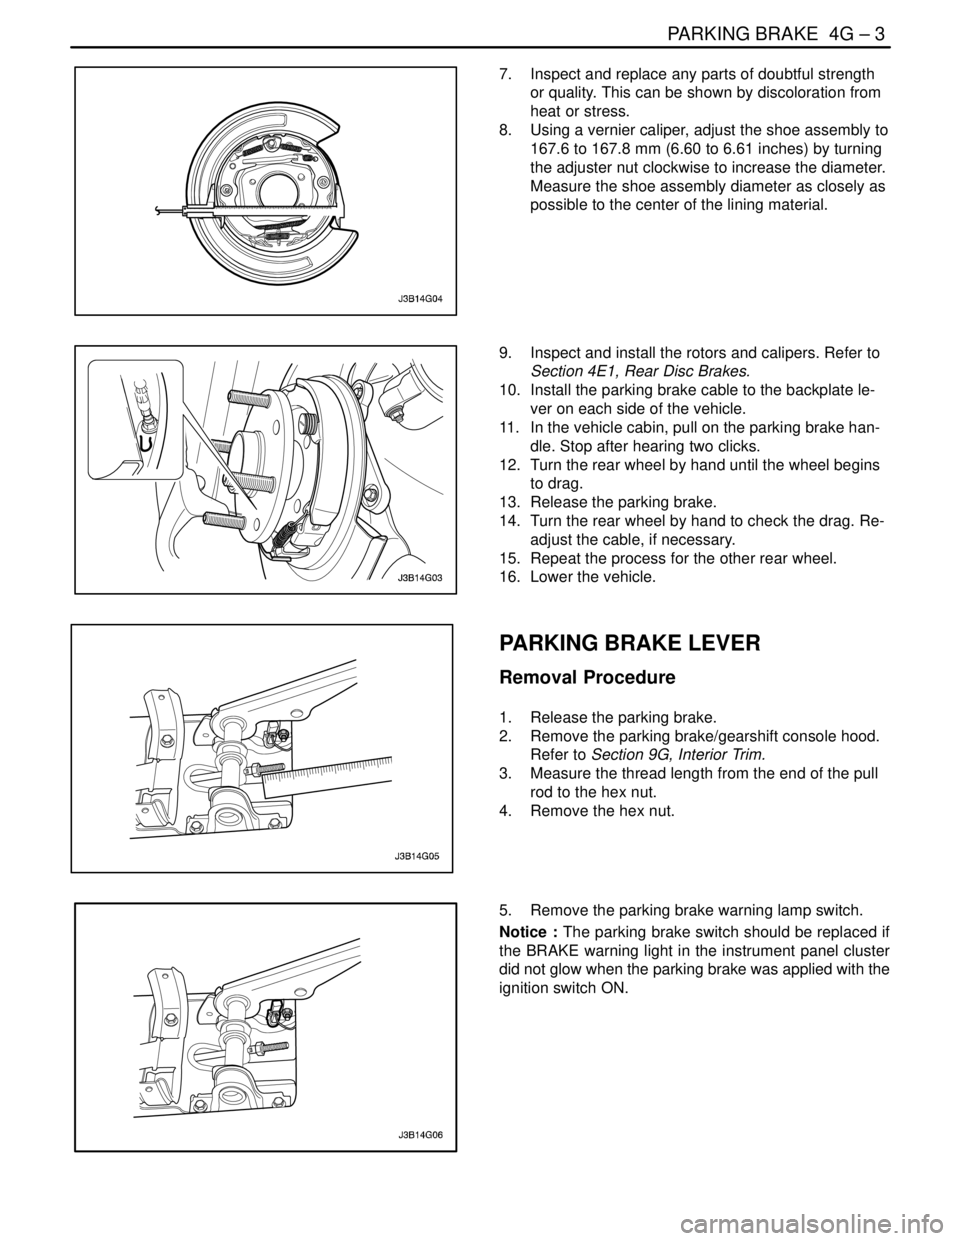
8. Using a vernier caliper, adjust the shoe assembly to
167.6 to 167.8 mm (6.60 to 6.61 inches) by turning
the adjuster nut clockwise to increase the diameter.
Measure the shoe assembly diameter as closely as
possible to the center of the lining material.
9. Inspect and install the rotors and calipers. Refer to
Section 4E1, Rear Disc Brakes.
10. Install the parking brake cable to the backplate le-
ver on each side of the vehicle.
11. In the vehicle cabin, pull on the parking brake han-
dle. Stop after hearing two clicks.
12. Turn the rear wheel by hand until the wheel begins
to drag.
13. Release the parking brake.
14. Turn the rear wheel by hand to check the drag. Re-
adjust the cable, if necessary.
15. Repeat the process for the other rear wheel.
16. Lower the vehicle.
PARKING BRAKE LEVER
Removal Procedure
1. Release the parking brake.
2. Remove the parking brake/gearshift console hood.
Refer to Section 9G, Interior Trim.
3. Measure the thread length from the end of the pull
rod to the hex nut.
4. Remove the hex nut.
5. Remove the parking brake warning lamp switch.
Notice : The parking brake switch should be replaced if
the BRAKE warning light in the instrument panel cluster
did not glow when the parking brake was applied with the
ignition switch ON.
Page 1620 of 2643

5A2 – 30IAISIN AUTOMATIC TRANSAXLE
DAEWOO V–121 BL4
Manual Shifting Test
Manual shifting test is to determine whether failure symp-
tom is within electrical failure or mechanical failure.
1. Disconnect wire harness of shift solenoid, check
the range and gear positions correspond with below
table when driving by manual shifting.
Range
Gear
D3rd gear
RReverse
Notice : Make sure to disconnect only wire harness of shift
solenoid.
UNIT INSPECTION
Drive Plate Deflection
S Inspect drive plate deflection if within standard
value.
Standard Value
within 0.2mm (0.008 in)
Action :
Standard value is not within the specified value, replace
drive plate.
When ”abnormal wear” or ”stick” on torque converter
sleeve or oil pump is found, replace torque converter and
A/T.
Notice :
S When assembling torque converter and drive plate.
Be sure to use correct bolt with correct length. The
bolt pushes up torque converter front cover, and it
damages lock–up clutch lining. As a result, it cause
major failure ”No move”.
S Do not tighten the bolts by using impact wrench.
Cooler Pipe Bending and Choke
S Inspect it whether there is abnormal pipe bending in
the cooler pipe, pipe deformation and small cross–
section area of pipe line.
Action : Replace failure parts.S Apply compressed air of 2kg/cm
2 from cooler pipe
inlet side, inspect whether there is not cooler pipe
choke by confirming air flow smooth.
Action : Remove foreign particles and clean inside of pipe
line.
Normal
Vehicle Speed Sensor
1. Remove the connector of vehicle speed sensor,
connect 12V power supply and voltmeter to the ter-
minal.(Do not mistake polarity)
2. Check voltage change from approx. 0V to 12V with
vehicle speed sensor driven gear rotated.
Notice : The voltage change should be 4 times for 1 revo-
lution of the vehicle speed sensor driven gear.
Action : If the result of inspection is bad, replace the ve-
hicle speed sensor.
Page 1727 of 2643
AISIN AUTOMATIC TRANSAXLE 5A2 – 137
DAEWOO V–121 BL4
MAJOR COMPONENT ASSEMBLY
Tools Required
DW240–020 Brake/Clutch Spring Compressor
DW240–050 Overdrive Brake Adapter
DW240–060–01 Brake Spring Compressor Bolt/Nut
DW240–060–02 Brake Spring Compressor Plate
DW240–070 1st / Reverse Brake Adapter
DW240–100 Counter Drive Gear Installation Adapter
DW240–130 Differential Preload Adapter
DW260–031–01 Transaxle Housing Oil Seal Installer
DW260–031–02 Transaxle Case Oil Seal Installer
DW260–041 Planetary Ring Gear Nut Removal/Installa-
tion Socket
DW240–160 Transaxle Case Outer Tapered Roller Bear-
ing Race Adapter
DW240–140 Transaxle Housing Side Bearing Outer Race
Adapter
DW240–170 Adapter Handle
Assembly Procedure
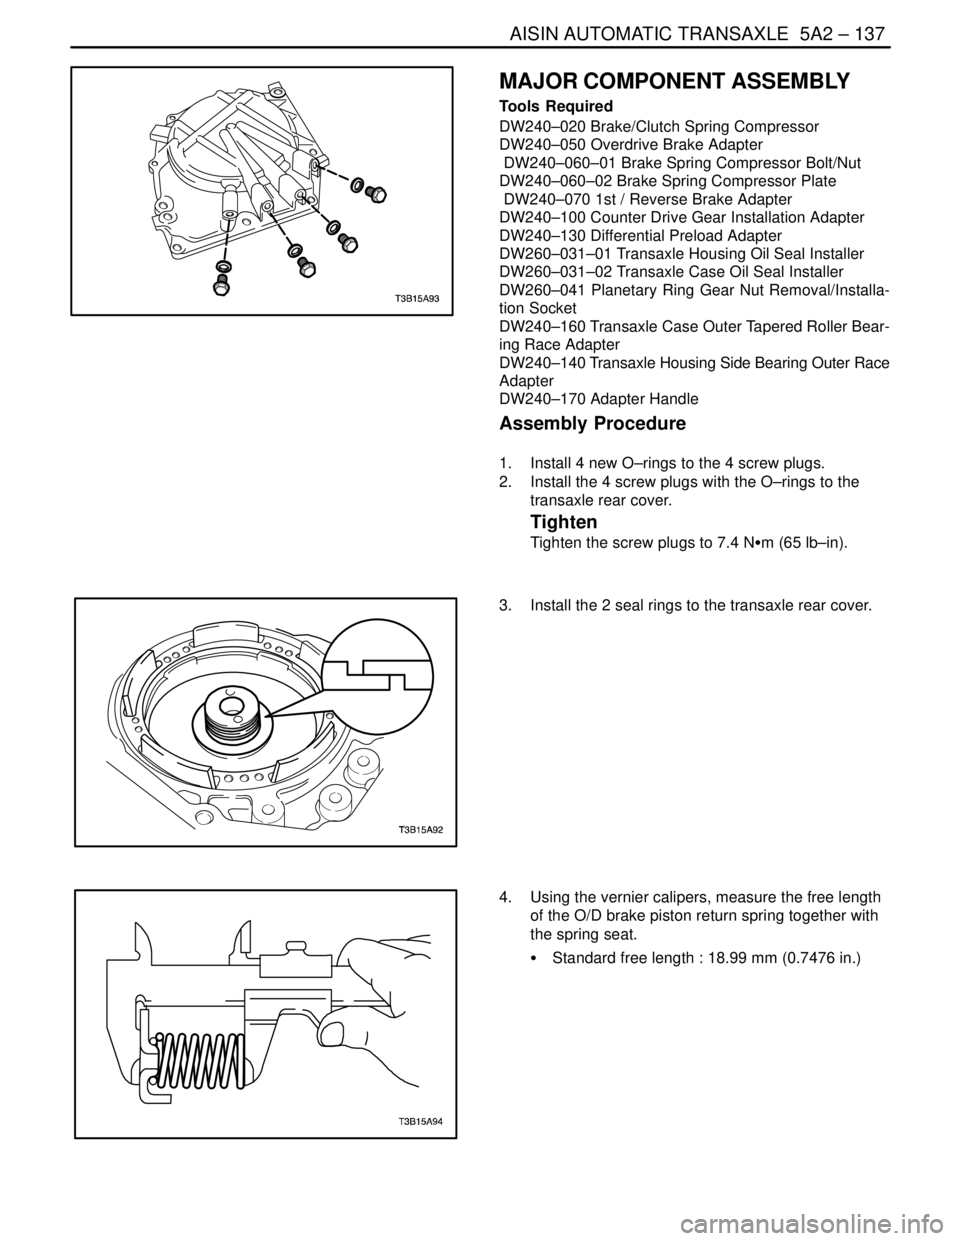
1. Install 4 new O–rings to the 4 screw plugs.
2. Install the 4 screw plugs with the O–rings to the
transaxle rear cover.
Tighten
Tighten the screw plugs to 7.4 NSm (65 lb–in).
3. Install the 2 seal rings to the transaxle rear cover.
4. Using the vernier calipers, measure the free length
of the O/D brake piston return spring together with
the spring seat.
S Standard free length : 18.99 mm (0.7476 in.)