Page 257 of 338
The following steps will tell you how to use the jack
and change a tire.
Removing the Spare Tire and Tools
The spare tire and tools you will need are located in
the trunk.
A. Jack
B. Wheel WrenchC. Jack Handle
D. Screwdriver1. Lift and remove the trim cover.
2. Turn the retainer
on the spare tire
counterclockwise
and remove the
retainer.
3. Remove the spare tire. SeeSpare Tire on page 5-68
for more information.
4. Remove the jack, the jack handle and the wheel
wrench. Your vehicle’s jack is stored in a foam
tray in the left side of the trunk. The tools are stored
in a bag in the trunk.
5-63
Page 259 of 338
{CAUTION:
Getting under a vehicle when it is jacked up is
dangerous. If the vehicle slips off the jack you
could be badly injured or killed. Never get under
a vehicle when it is supported only by a jack.
{CAUTION:
Raising your vehicle with the jack improperly
positioned can damage the vehicle and even
make the vehicle fall. To help avoid personal
injury and vehicle damage, be sure to �t the
jack lift head into the proper location before
raising the vehicle.4. Insert the jack handle into the jack and the wheel
wrench onto the end of the jack handle.
5. Raise the vehicle by turning the wheel wrench
clockwise. Raise the vehicle far enough off the
ground so there is enough room for the spare tire
to fit underneath the wheel well.
6. Remove all of the wheel nuts by turning them
counterclockwise.
7. Remove the flat tire.
5-65
Page 260 of 338

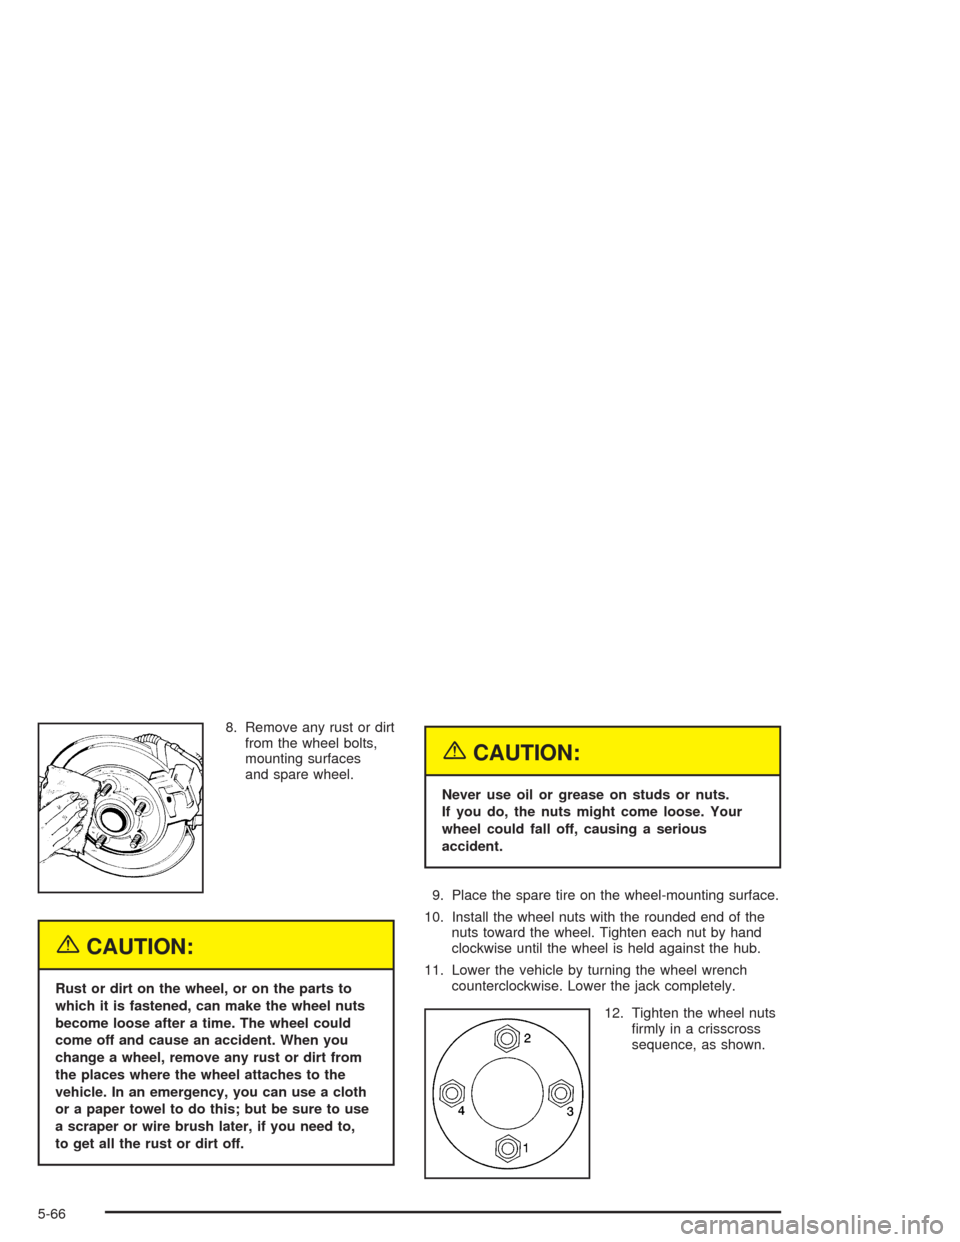
8. Remove any rust or dirt
from the wheel bolts,
mounting surfaces
and spare wheel.
{CAUTION:
Rust or dirt on the wheel, or on the parts to
which it is fastened, can make the wheel nuts
become loose after a time. The wheel could
come off and cause an accident. When you
change a wheel, remove any rust or dirt from
the places where the wheel attaches to the
vehicle. In an emergency, you can use a cloth
or a paper towel to do this; but be sure to use
a scraper or wire brush later, if you need to,
to get all the rust or dirt off.
{CAUTION:
Never use oil or grease on studs or nuts.
If you do, the nuts might come loose. Your
wheel could fall off, causing a serious
accident.
9. Place the spare tire on the wheel-mounting surface.
10. Install the wheel nuts with the rounded end of the
nuts toward the wheel. Tighten each nut by hand
clockwise until the wheel is held against the hub.
11. Lower the vehicle by turning the wheel wrench
counterclockwise. Lower the jack completely.
12. Tighten the wheel nuts
firmly in a crisscross
sequence, as shown.
5-66
Page 275 of 338
Fuses Usage
BCM
ABSBody Control Module (BCM),
Antilock Brake System (ABS)
CLSTR
AUTO A/CInstrument Panel Cluster, Automatic
Temperature Control, Daytime
Running Lamps (DRL)
LTR Cigarette Lighter, Glove Box Lamp
RADIO Radio
CLKClock, Dome Lamp, Key
Interlock Unit
WSWA Windshield Washer
WPR Wiper
HTD/MIROutside Rearview Mirror (OSRVM),
Rear Glass Defogger Switch
RADIO
CRUISERadio Battery Positive
Voltage, Cruise
HTD/SEATHeating Mat, Accessory
Power Outlet
AUTO A/C
CLSTRAutomatic Temperature
Control, Cluster
DLC Data Link Connector (DLC)Engine Compartment Fuse Block
The engine compartment fuse block is located on the
driver’s side of the vehicle, near the battery. SeeEngine
Compartment Overview on page 5-12for more
information on location. To access the fuses, press the
top and bottom flaps to release the cover.
To reinstall the cover, push until it is secure.
5-81
Page 325 of 338

Check
Engine Light...............................................3-39
Check Engine Light.........................................3-39
Checking Coolant............................................5-20
Checking Engine Oil........................................5-14
Checking Things Under the Hood......................5-10
Checking Your Restraint Systems......................1-55
Chemical Paint Spotting...................................5-75
Child Restraints
Child Restraint Systems...............................1-34
Infants and Young Children...........................1-30
Lower Anchorages and Top Tethers for
Children (LATCH System)..........................1-40
Older Children.............................................1-28
Securing a Child Restraint Designed for
the LATCH System...................................1-43
Securing a Child Restraint in a Center Rear
Seat Position...........................................1-46
Securing a Child Restraint in a Rear Outside
Seat Position...........................................1-43
Securing a Child Restraint in the Right Front
Seat Position...........................................1-46
Top Strap...................................................1-37
Top Strap Anchor Location............................1-39
Where to Put the Restraint...........................1-37
Cigarette Lighter.............................................3-18Cleaning
Inside of Your Vehicle..................................5-69
Outside of Your Vehicle................................5-72
Underbody Maintenance...............................5-75
Weatherstrips..............................................5-72
Cleaning Aluminum Wheels..............................5-74
Cleaning Exterior Lamps/Lenses.......................5-73
Cleaning Fabric/Carpet....................................5-69
Cleaning Glass Surfaces..................................5-71
Cleaning Interior Plastic Components.................5-71
Cleaning Leather............................................5-71
Cleaning the Top of the Instrument Panel...........5-71
Cleaning Tires................................................5-74
Cleaning Vinyl................................................5-70
Cleaning Windshield and Wiper Blades..............5-73
Climate Control System...................................3-18
Air Filter, Passenger Compartment.................3-28
Automatic...................................................3-22
Outlet Adjustment........................................3-28
Clock............................................................3-46
Coinholder(s)..................................................2-33
Control of a Vehicle.......................................... 4-5
Coolant
Engine Temperature Gage............................3-39
Heater, Engine............................................2-21
Surge Tank Pressure Cap.............................5-21
3
Page:
< prev 1-8 9-16 17-24