2004 CHEVROLET EPICA air condition
[x] Cancel search: air conditionPage 116 of 338
Ashtrays and Cigarette Lighter
The front ashtray and cigarette lighter are located at
the lower part of the center instrument panel, behind a
cover. Press in the cover and it will automatically open.
To remove the front ashtray for cleaning, pull the bin
out. To replace, press the bin back into place.
The rear ashtray is located at the rear of the center
console. To remove the rear ashtray, press in the
retaining spring and pull the bin out. To replace the rear
ashtray, insert the bottom tabs first and then press in
the retaining spring and push the ashtray closed.
Notice:If you put papers or other �ammable items
in the ashtray, hot cigarettes or other smoking
materials could ignite them and possibly damage
your vehicle. Never put �ammable items in the
ashtray.
The cigarette lighter is located to the right of the front
ashtray. To use it, turn the ignition to ACC or ON, push
the cigarette lighter in all the way and let go. When it
is ready, it will pop back out by itself.
Notice:Holding a cigarette lighter in while it is
heating will not allow the lighter to back away from
the heating element when it is hot. Damage from
overheating may occur to the lighter or heating
element. Do not hold a cigarette lighter in while it
is heating.
Climate Controls
Climate Control System
Your vehicle may have a manual climate control system.
With this system you can control the heating, cooling and
ventilation for your vehicle.
9(Fan):Turn the left knob clockwise or
counterclockwise to increase or decrease the fan speed.
In any setting other than off, the fan will run continuously
with the ignition on. The fan must be on in order for
the air conditioning compressor to run.
0 (Off):To turn the fan off, turn the knob all the way
counterclockwise to the off position.
3-18
Page 117 of 338
TEMP (Temperature):Turn the middle knob clockwise
or counterclockwise to manually increase or decrease
the temperature inside your vehicle. Turn the knob to the
blue area to get cool air and to the red area to get
warm air.
To change the current mode, select one of the following
from the right knob:
E(Vent):This mode directs air to the instrument
panel outlets.
((Bi-Level):This mode directs about half of the air
to the instrument panel outlets, and then directs the
remaining air to the floor outlets.
5(Floor):This mode directs most of the air to the
floor outlets. If your vehicle has rear outlets, some of the
air will also be directed to them. Be sure to keep the
area under the front seats clear to allow the flow of air to
the rear compartment.
The right knob can also be used to select the defog and
defrost modes. Information on defogging and defrosting
can be found later in this section.
?(Recirculation):This mode keeps outside air from
coming in the vehicle. It can be used to prevent outside
air and odors from entering your vehicle or to help
heat or cool the air inside your vehicle more quickly.
Press this button to turn the recirculation mode on or off.
When the button is pressed, an indicator light in the
button will come on. Using the recirculation mode for
extended periods may cause your windows to fog.
If this happens, select the defrost mode.
A/C (Air Conditioning):Press this button to turn the
air conditioning compressor on and off. When A/C
is pressed, an indicator light in the button will come on
to let you know that air conditioning is activated.
On hot days, open the windows to let hot inside air
escape; then close them. This helps to reduce the time
it takes for your vehicle to cool down. It also helps
the system to operate more efficiently.
For quick cool down on hot days, do the following:
1. Select the vent mode.
2. Select the highest fan speed.
3. Press the A/C button.
4. Select the recirculation mode.
5. Select the coolest temperature.
3-19
Page 118 of 338
Using these settings together for long periods of time
may cause the air inside of your vehicle to become too
dry. To prevent this from happening, after the air in
your vehicle has cooled, turn the recirculation mode off.
The air conditioning system removes moisture from
the air, so you may sometimes notice a small amount of
water dripping underneath your vehicle while idling or
after turning off the engine. This is normal.
Defogging and Defrosting
Fog on the inside of windows is a result of high humidity
or moisture condensing on the cool window glass. This
can be minimized if the climate control system is used
properly. There are two modes to clear fog or frost from
your windshield. Use the defog mode to clear the
windows of fog or moisture and warm the passengers.
Use the defrost mode to remove fog or frost from the
windshield more quickly.
Select one of these available modes from the
right knob.
É(Defog):This mode directs most of the air to the
windshield and the floor outlets. A small amount of air is
also directed to the outboard outlets for the side
windows.
To help clear the side windows quickly, do the following:
1. Select the bi-level mode.
2. Select the highest fan speed.
3. Select A/C.
4. Select the temperature.
0(Defrost):This mode directs the air to the
windshield and the outboard outlets for the side
windows.
To help clear the windshield quickly, do the following:
1. Select the defrost mode.
2. Select the highest temperature.
3. Select the highest fan speed.
Do not drive the vehicle until all windows are clear.
3-20
Page 120 of 338
Automatic Climate Control System
Your vehicle may have an automatic climate control
system. With this system you can control the heating,
cooling and ventilation for your vehicle.
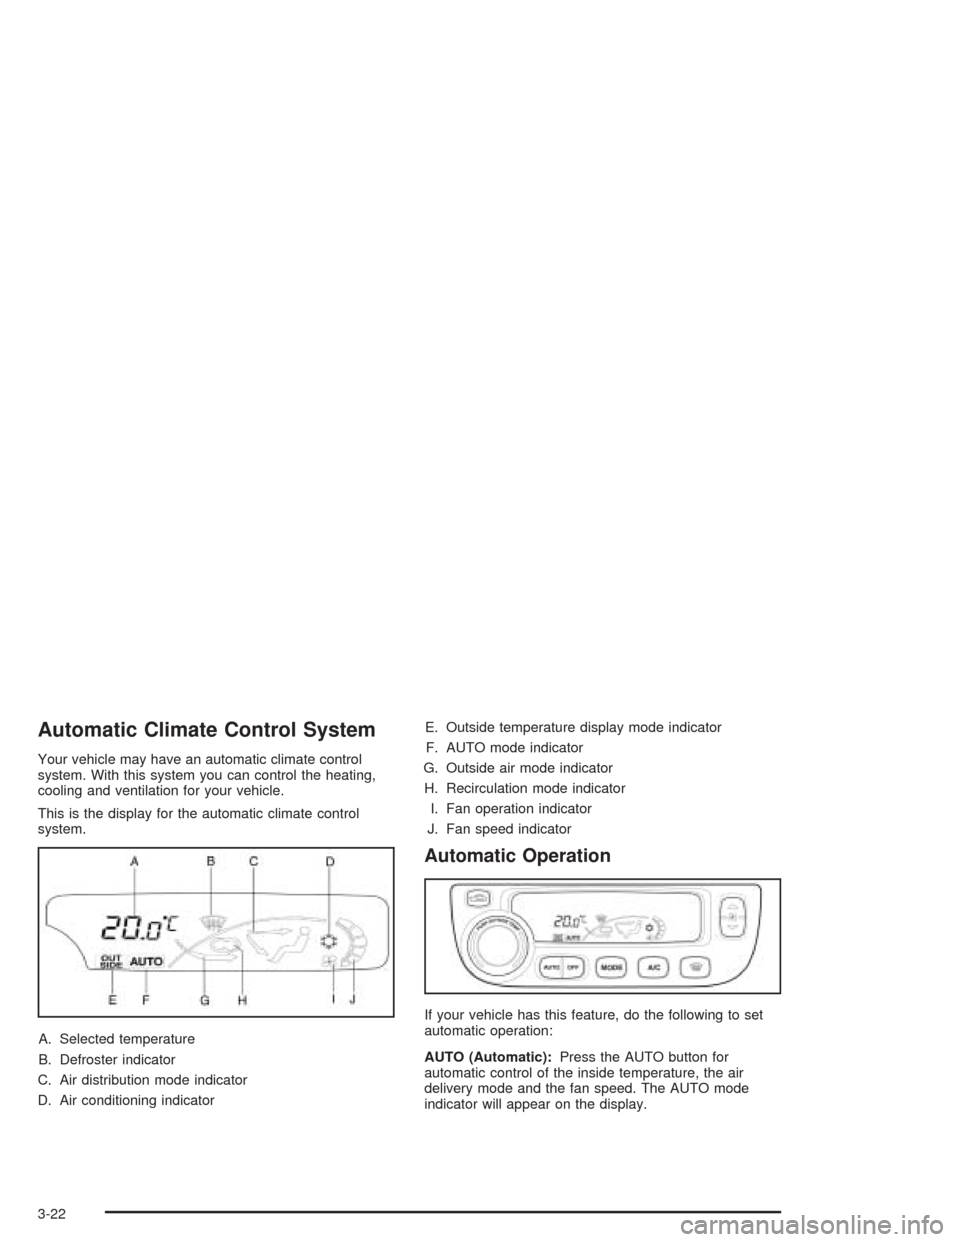
This is the display for the automatic climate control
system.
A. Selected temperature
B. Defroster indicator
C. Air distribution mode indicator
D. Air conditioning indicatorE. Outside temperature display mode indicator
F. AUTO mode indicator
G. Outside air mode indicator
H. Recirculation mode indicator
I. Fan operation indicator
J. Fan speed indicator
Automatic Operation
If your vehicle has this feature, do the following to set
automatic operation:
AUTO (Automatic):Press the AUTO button for
automatic control of the inside temperature, the air
delivery mode and the fan speed. The AUTO mode
indicator will appear on the display.
3-22
Page 122 of 338

?(Recirculation):Press this button to keep
outside air from coming in the vehicle. It can be used
to prevent outside air and odors from entering your
vehicle or to help heat or cool the air inside your vehicle
more quickly. Press this button to turn the recirculation
mode on or off.
Using the recirculation mode for extended periods may
cause your windows to fog. If this happens, select
the defrost mode.
A/C (Air Conditioning):Press this button to override
the automatic system and turn the air conditioning
system on or off. When A/C is pressed, the indicator
light on the display panel will come on to let you know
that it is activated.
Press this button again to turn the air conditioning
system off, or press the OFF button to turn the entire
system off.
On hot days, open the windows to let hot inside air
escape; then close them. This helps to reduce the time
it takes for your vehicle to cool down. It also helps
the system to operate more efficiently.
For quick cool down on hot days, press the AUTO button
and the system will automatically enter recirculation
mode and the temperature will be at the full cold position
for maximum cooling.Using these settings together for long periods of time may
cause the air inside of your vehicle to become too dry.
To prevent this from happening, after the air in your
vehicle has cooled, turn the recirculation mode off.
The air conditioning system removes moisture from the
air, so you may sometimes notice a small amount of
water dripping underneath your vehicle while idling or
after turning off the engine. This is normal.
Outside Temperature:To display the outside
temperature, press the temperature control knob.
Pressing this knob again will cancel the outside
temperature display, otherwise the display will return
to the temperature inside of the vehicle after about
five seconds.
The outside temperature sensor is located near the
front bumper, so the displayed temperature may
be affected by road or engine heat while the vehicle
is idling or traveling at slow speeds. For this reason,
the displayed temperature will be most accurate
at speeds over 25 mph (40 km/h).
3-24
Page 132 of 338
If the air bag readiness light stays on after you start the
vehicle or comes on when you are driving, your air
bag system may not work properly. Have your vehicle
serviced right away.
{CAUTION:
If the air bag readiness light stays on after you
start your vehicle, it means the air bag system
may not be working properly. The air bags in
your vehicle may not in�ate in a crash, or they
could even in�ate without a crash. To help
avoid injury to yourself or others, have your
vehicle serviced right away if the air bag
readiness light stays on after you start your
vehicle.
The air bag readiness light should turn on for a few
seconds when you turn the ignition to ON. If the light
does not come on then, have it fixed so it will be ready
to warn you if there is a problem.
Charging System Light
The charging system light
will come on briefly when
you turn on the ignition,
and the engine is not
running, as a check
to show you it is working.
Then it should go out when the engine is started.
If it stays on, or comes on while you are driving, you
may have a problem with the electrical charging system.
It could indicate that you have a loose generator drive
belt, or another electrical problem. Have it checked right
away. Driving while this light is on could drain your
battery.
If you must drive a short distance with the light on, be
certain to turn off all your accessories, such as the radio
and air conditioner.
3-34
Page 138 of 338
Notice:If you keep driving your vehicle with this
light on, after a while, your emission controls may
not work as well, your fuel economy may not be as
good and your engine may not run as smoothly.
This could lead to costly repairs that may not be
covered by your warranty.
Notice:Modi�cations made to the engine, transaxle,
exhaust, intake or fuel system of your vehicle or
replacement tires that do not match your vehicle’s
original tires can affect your vehicle’s emission
controls and may cause this light to come on.
Modi�cations to these systems could lead to costly
repairs not covered by your warranty. This may also
result in a failure to pass a required Emission
Inspection/Maintenance test.
When the ignition is on, this light should come on
and should go out after a few seconds as a check to
show you it is working. If the light does not come
on, have it repaired.
This light will also come on during a malfunction in
one of two ways:
•Light Flashing— A misfire condition has been
detected. A misfire increases vehicle emissions and
may damage the emission control system on your
vehicle. Diagnosis and service may be required.
•Light On Steady— An emission control system
malfunction has been detected on your vehicle.
Diagnosis and service may be required.
If the Light Is Flashing
The following may prevent more serious damage to
your vehicle:
•Reducing vehicle speed.
•Avoiding hard accelerations.
•Avoiding steep uphill grades.
If the light stops flashing and remains on steady,
see “If the Light Is On Steady” following.
If the light continues to flash, when it is safe to do so,
stop the vehicle.Find a safe place to park your vehicle.
Turn the key off, wait at least 10 seconds and restart the
engine. If the light remains on steady, see “If the Light Is
On Steady” following. If the light is still flashing, follow the
previous steps, and see your dealer for service as soon
as possible.
If the Light Is On Steady
You also may be able to correct the emission system
malfunction by considering the following:
3-40
Page 200 of 338
California Fuel
If your vehicle is certified to meet California Emission
Standards (see the underhood emission control label),
it is designed to operate on fuels that meet California
specifications. If this fuel is not available in states
adopting California emissions standards, your vehicle
will operate satisfactorily on fuels meeting federal
specifications, but emission control system performance
may be affected. The malfunction indicator lamp may
turn on (seeMalfunction Indicator Lamp on page 3-39)
and your vehicle may fail a smog-check test. If this
occurs, return to your authorized GM dealer for
diagnosis. If it is determined that the condition is caused
by the type of fuel used, repairs may not be covered
by your warranty.
Additives
To provide cleaner air, all gasolines in the United States
are now required to contain additives that will help
prevent engine and fuel system deposits from forming,
allowing your emission control system to work
properly. You should not have to add anything to your
fuel. However, some gasolines contain only the
minimum amount of additive required to meet U.S.
Environmental Protection Agency regulations.General Motors recommends that you buy gasolines that
are advertised to help keep fuel injectors and intake
valves clean. If your vehicle experiences problems due to
dirty injectors or valves, try a different brand of gasoline.
Gasolines containing oxygenates, such as ethers and
ethanol, and reformulated gasolines may be available in
your area to contribute to clean air. General Motors
recommends that you use these gasolines, particularly if
they comply with the specifications described earlier.
Notice:Your vehicle was not designed for fuel that
contains methanol. Do not use fuel containing
methanol. It can corrode metal parts in your fuel
system and also damage the plastic and rubber
parts. That damage would not be covered under
your warranty.
Some gasolines that are not reformulated for low
emissions may contain an octane-enhancing additive
called methylcyclopentadienyl manganese tricarbonyl
(MMT); ask the attendant where you buy gasoline
whether the fuel contains MMT. General Motors does
not recommend the use of such gasolines. Fuels
containing MMT can reduce the life of spark plugs and
the performance of the emission control system may
be affected. The malfunction indicator lamp may turn on.
If this occurs, return to your authorized GM dealer for
service.
5-6