Page 73 of 120

Reference
At a glance
Controls
Driving tips
Mobility
71
behind the seats may prevent the backrest
from engaging properly. Ensure that the
backrest is securely locked by moving the
seat forward if necessary. Refer to
page 28.<
Always position and secure the load
correctly. If you do not, it can endan-
ger the passengers during braking or eva-
sive maneuvers.
Do not exceed the approved gross vehicle
weight or the specified maximum axle
loads. Refer to page 101. Otherwise the
vehicle's operating safety is no longer
assured and you are in violation of the law.
Do not stow heavy or hard objects in the
passenger compartment without first
securing them. Otherwise they would be
thrown around during braking and evasive
maneuvers and would endanger the occu-
pants.<
Convertible top compartment
With the convertible top closed, you
can enlarge the luggage compart-
ment, refer to page 20.
It is recommended that you always fold the
convertible top compartment panel down
as soon as you have removed cargo from
the luggage compartment. This way, you
can be sure that you can always operate
the convertible top at any time.
Conversely, when the convertible top is
closed, raise the convertible top compart-
ment panel before stowing your cargo in
the luggage compartment to avoid any
damage to the convertible top compart-
ment or your load.<
If you stow cargo behind the seats of your
BMW:
>Only stow light objects such as cloth-
ing, etc.
>Do not pile objects higher than the top
edge of the backrests.
Hardtop preparation*
Pull covers off, see arrow 1.
The brackets for attaching the hardtop
are located underneath the covers; see
arrow 2.
For instructions on how to install the
hardtop, please read the accompany-
ing assembly information.<
The hardtop is available from your
BMW center as a special option.<
Page 74 of 120
Page 75 of 120
Mobility
To ensure that you stay mobile,
the following chapter provides you with
important information on fuels and fluids,
tires and wheels, maintenance procedures
and steps to take in the event of a break-
down.
Page 76 of 120

Refueling
74
Refueling
Fuel filler door
1.Open fuel filler door
2.Turn the gas cap in a counter-clockwise
direction
3.Place the gas cap in the bracket on the
filler door.
Releasing manually
If an electrical malfunction occurs, you can
unlock the fuel filler door manually:
1.Remove the covers of the tail lamps by
turning the lock to the right; refer also to
page 90
2.Pull the luggage compartment trim
panel slightly toward the interior.
The green button with the fuel pump
symbol is revealed
3.Undo the adhesive strip and pull off
4.Pull the button
The fuel filler door is released.
Pull on the button slowly and
carefully as it could otherwise be
torn off.<
Fuel gas cap
Close the gas cap carefully after refuel-
ing until a click is heard. While closing,
be sure not to squeeze the strap which is fas-
tened to the cap. A loose or missing cap will
activate the CHECK GAS CAP lamp
*.<
Check Gas Cap
*
This indicator lamp comes on when
the gas cap is loose or missing.
Close the gas cap tightly as described
above.
Tank capacity: approx. 14.5 gallons/
55 liters, of which approx. 2.1 gallons/
8 liters are reserve capacity.
Simple and environmentally friendly
When handling fuels, comply with all
of the applicable safety precautions
posted at the service station.<
When refueling, insert the filler nozzle com-
pletely into the filler pipe. Lifting the nozzle
during refueling
>results in premature shutoff
>and will reduce the effect of the vapor
recovery system on the pump.
The fuel tank is full when the filler nozzle
shuts off the first time.
Fill the fuel tank before it is com-
pletely empty. Driving to the last drop
of fuel can prevent the engine from operat-
ing properly and result in damage.<
Fuel specifications
The engine uses lead-free gasoline only.
Required fuel:
>Premium Unleaded Gasoline,
min. 91 AKI.
AKI = Anti Knock Index
Do not use leaded fuels. The use of
leaded fuels will cause permanent
damage to the system's oxygen sensor and
the catalytic converter.<
Page 77 of 120

Reference
At a glance
Controls
Driving tips
Mobility
75
Wheels and tires
Tire inflation pressure
Information for your safety
It is not merely the tire's service life, but
also driving comfort and driving safety that
largely depend on the condition of the tires
and the maintenance of the specified tire
pressure.
Check tire inflation pressures regu-
larly and correct them if necessary: at
least every two weeks and before every
extended journey. If this is not done, incor-
rect tire pressures can cause driving insta-
bility or tire damage, ultimately resulting in
accidents.
Do not drive with a deflated, i.e. flat, tire
unless your vehicle is equipped with Run
Flat tires. A flat tire greatly impairs steering
and braking response, and can lead to
complete loss of control over the vehicle.<
Checking tire pressures
Check the tire inflation pressures only
when the tires are cold. This means after a
maximum driving distance of 1.25 miles/
2 km or if the vehicle has been parked for at
least 2 hours. Warm tires have higher infla-
tion pressures.
Reinitialize the Flat Tire Monitor after cor-
recting the tire inflation pressure. Refer to
page 55.
Inflation pressures for original tires
The specified inflation pressures for tires at
ambient temperature are provided on the
placard on the B-pillar and are visible when
the driver's door is open.
Inflation pressures for other tire
sizes
The following tire inflation pressure tables
show the inflation pressures for the speci-
fied tire sizes at ambient temperature.
Reinitialize the Flat Tire Monitor after
correcting the tire inflation pressure.
Refer to page 55.<
Tire size
The inflation pressures in the table apply to
BMW-approved tire sizes and brands. Your
BMW center will be glad to supply this
information.
Page 78 of 120
Wheels and tires
76
Z4 2.5i
Z4 3.0i
TiresPressure specifications in psi/kPa
Tires
All pressure specifications in the table are
indicated in psi/kilopascal with cold tires,
cold = ambient temperature
225/50 R 16 92 V
225/45 R 17 91 W30/210 33/230
225/40 R 18 88 W 30/210 –
245/40 R 17 91 W
255/35 R 18 90 W–33/230
All winter tires 30/210 33/230
You will find more information about permissible loads and weights on page 101.
TiresPressure specifications in psi/kPa
Tires
All pressure specifications in the table are
indicated in psi/kilopascal with cold tires,
cold = ambient temperature
225/45 R 17 91 W 33/230 36/250
225/40 R 18 88 W 33/230 –
245/40 R 17 91 W
255/35 R 18 90 W–36/250
All winter tires 33/230 36/250
You will find more information about permissible loads and weights on page 101.
Page 79 of 120

Reference
At a glance
Controls
Driving tips
Mobility
77
Tire coding
Understanding the lettering on the tire
sidewall makes it easier to identify and
choose the correct tires.
Tire size
e.g. 225/50 R 16 92 V
Nominal width in mm
Cross-sectional
ratio in %
Radial belt construction
Rim diameter in inches
Load index,
not on ZR tires
Speed code letter,
in front of the R on ZR tires
Speed code letters
Q= up to 105 mph / 160 km/h
T= up to 118 mph / 190 km/h
H= up to 131 mph / 210 km/h
V= up to 150 mph / 240 km/h
W= up to 167 mph / 270 km/h
Y= up to 186 mph / 300 km/h
Tire Identification Number
Tires with DOT codes meet the guidelines
of the U.S. Department of Transportation.
DOT code:
e.g. DOT xxxx xxx 3603
Manufacturer's code
for tire brand
Tire size and
tire version
Tire age
Tire age
The date on which the tire was manufac-
tured is indicated by the code on the side-
wall:
DOT … 3603 indicates that the tire was
manufactured in week 36 of the year 2003.BMW recommends the replacement of all
tires every 6 years at the latest, even if a tire
usage of 10 years is possible.
Uniform Tire Quality Grading
Quality grades can be found where appli-
cable on the tire sidewall between tread
shoulder and maximum section width. For
example:
Treadwear 200 Traction AA
Temperature A
DOT quality grades
Treadwear
Traction AA A B C
Temperature A B C
All passenger car tires must conform
to Federal Safety Requirements in
addition to these grades.<
Tread wear
The tread wear grade is a comparative rat-
ing based on the wear rate of the tire when
tested under controlled conditions on a
specified government test course.
For example, a tire graded 150 would wear
one and one-half, 1 1/2, times as well on
the government course as a tire graded
100. The relative performance of tires
depends upon the actual conditions of their
use, however, and may depart significantly
from the norm due to variations in driving
habits, service practices and differences in
road characteristics and climate.
Traction
The traction grades, from highest to lowest,
are AA, A, B and C.
Those grades represent the tire's ability to
stop on wet pavement as measured under
controlled conditions on specified govern-
ment test surfaces of asphalt and concrete.
A tire marked C may have poor traction
performance.
The traction grade assigned to this
tire is based on straight-ahead brak-
ing traction tests, and does not include
acceleration, cornering, hydroplaning, or
peak traction characteristics.<
Page 80 of 120

Wheels and tires
78
Temperature
The temperature grades are A, the highest,
B and C, representing the tire’s resistance
to the generation of heat and its ability to
dissipate heat when tested under con-
trolled conditions on a specified indoor lab-
oratory test wheel.
Sustained high temperature can cause the
material of the tire to degenerate and
reduce tire life, and excessive temperature
can lead to sudden tire failure. The grade C
corresponds to a level of performance
which all passenger car tires must meet
under the Federal Motor Vehicle Safety
Standard No. 109. Grades B and A repre-
sent higher levels of performance on the
laboratory test wheel than the minimum
required by law.
The temperature grade for this tire is
established for a tire that is properly
inflated and not overloaded. Excessive
speed, under-inflation, or excessive load-
ing, either separately or in combination,
can cause heat buildup and possible tire
failure.<
RSC: Run Flat tires
Run Flat tires are labeled on the sidewall
with a circular symbol containing the letters
RSC. Refer to page 80.
M+S
Winter and all-season tires.
These have better winter performance
properties than summer tires.
Tire condition
Inspect your tires frequently for tread wear,
signs of damage and for foreign objects
lodged in the tread. Check the tread depth.
Tire tread
Tread depth should not be allowed to go
below 1/8 in/3 mm even though in Europe,
for example, the legally specified minimum
tread depth is only 1/16 in/1.6 mm. Below
1/8 in/3 mm tread depth, there is a very
high risk of hydroplaning, even at relatively moderate speeds and with only small
amounts of water on the road.
At tread depths below approx. 1/6 in/
4 mm, winter tires display a perceptible
decrease in their ability to cope with winter
driving conditions, and should be replaced
in the interest of safety.
Tread wear indicators in the tread-groove
base, see arrow, are distributed around the
wheel circumference and are labeled on
the tire sidewall as TWI, Tread Wear Indica-
tor. At a tread depth of 1/16 in/1.6 mm, the
indicators signal that the legally permissi-
ble wear limit has been reached.
Tire damage
Unusual vibrations encountered dur-
ing normal vehicle operation can indi-
cate tire failure or some other vehicle mal-
function. This type of problem can be
caused by contact with curbs, etc. This is
also true for irregularities in the vehicle's
handling characteristics, such as a pro-
nounced tendency to pull to the left or right.
Should this occur, respond by immediately
reducing your speed. Proceed carefully to
the nearest BMW center or professional tire
center, or have the vehicle towed there to
have it and its wheels or tires inspected.
Tire damage up to and including sudden
and complete air loss can pose an extreme
hazard for both vehicle occupants and
other road users.<
 1
1 2
2 3
3 4
4 5
5 6
6 7
7 8
8 9
9 10
10 11
11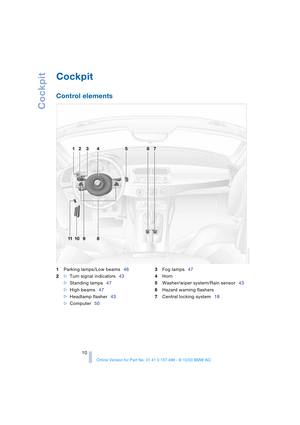 12
12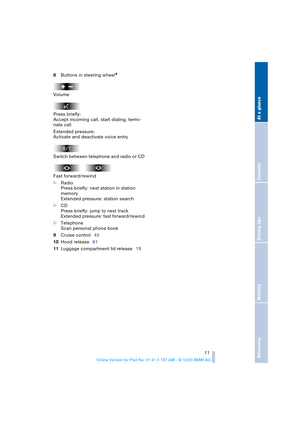 13
13 14
14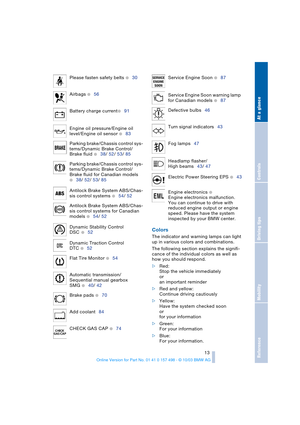 15
15 16
16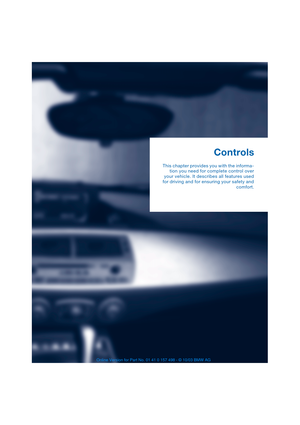 17
17 18
18 19
19 20
20 21
21 22
22 23
23 24
24 25
25 26
26 27
27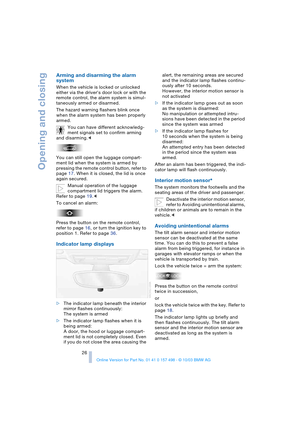 28
28 29
29 30
30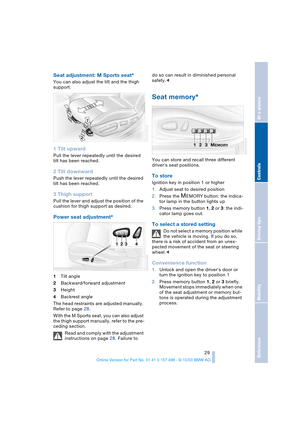 31
31 32
32 33
33 34
34 35
35 36
36 37
37 38
38 39
39 40
40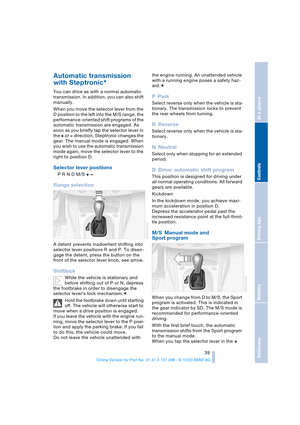 41
41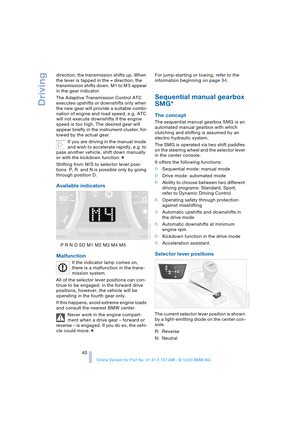 42
42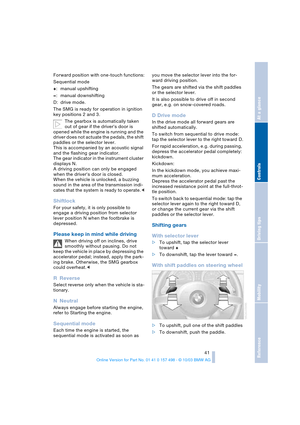 43
43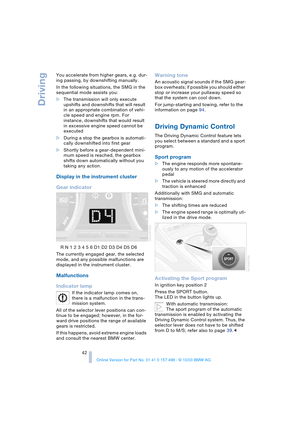 44
44 45
45 46
46 47
47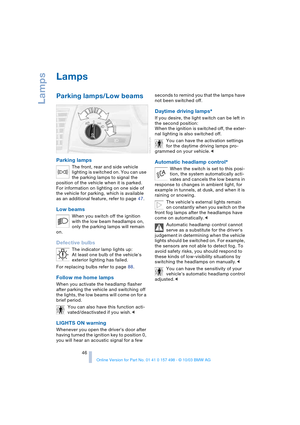 48
48 49
49 50
50 51
51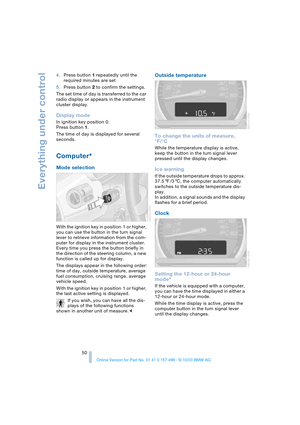 52
52 53
53 54
54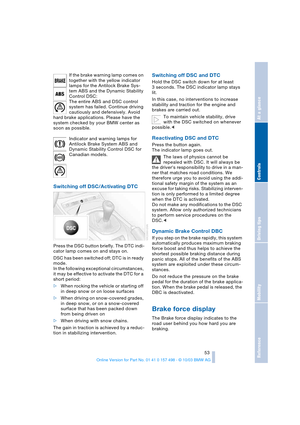 55
55 56
56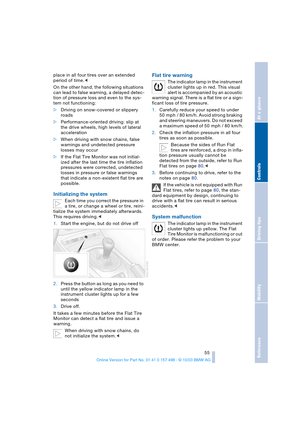 57
57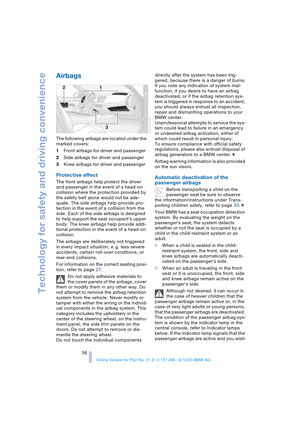 58
58 59
59 60
60 61
61 62
62 63
63 64
64 65
65 66
66 67
67 68
68 69
69 70
70 71
71 72
72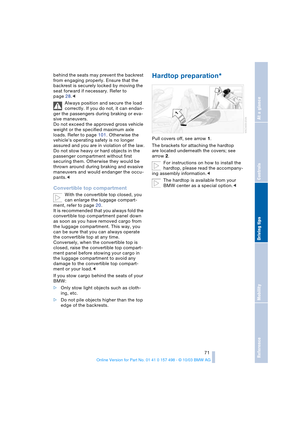 73
73 74
74 75
75 76
76 77
77 78
78 79
79 80
80 81
81 82
82 83
83 84
84 85
85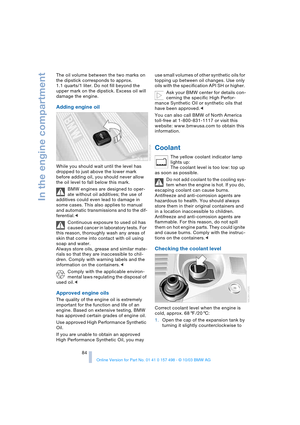 86
86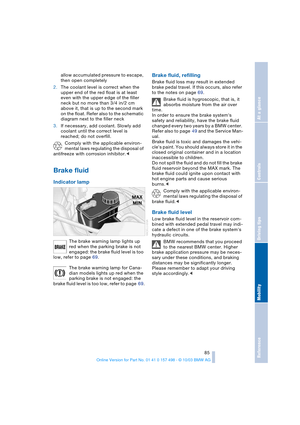 87
87 88
88 89
89 90
90 91
91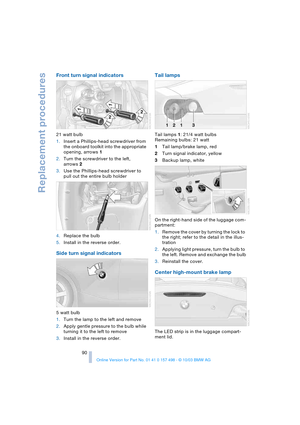 92
92 93
93 94
94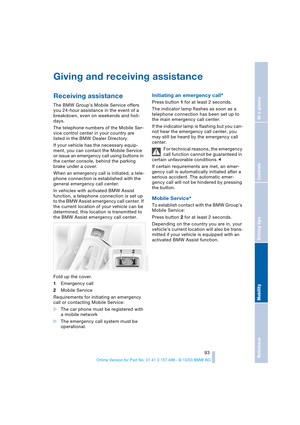 95
95 96
96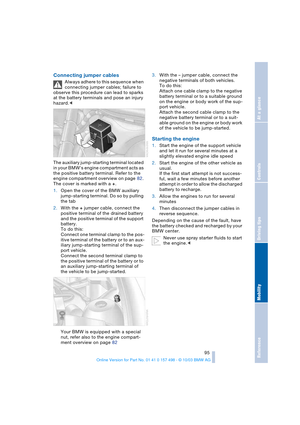 97
97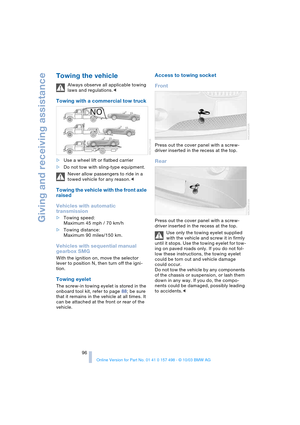 98
98 99
99 100
100 101
101 102
102 103
103 104
104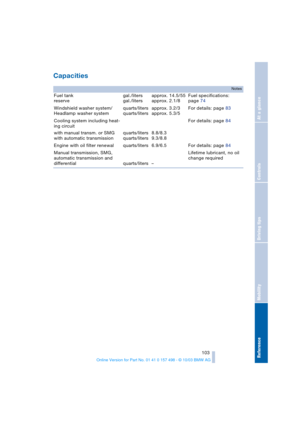 105
105 106
106 107
107 108
108 109
109 110
110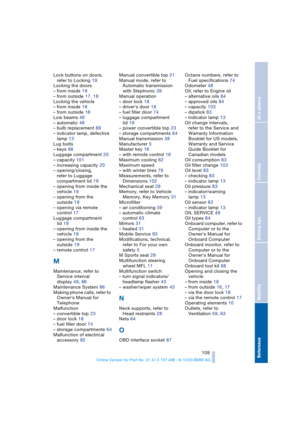 111
111 112
112 113
113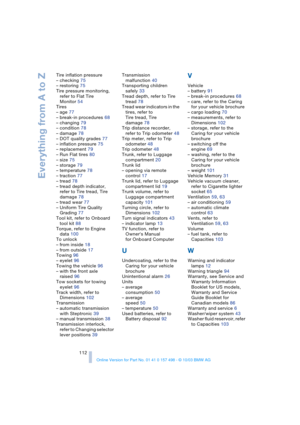 114
114 115
115 116
116 117
117 118
118 119
119

