2004 BMW Z4 ROADSTER 3.0I service indicator
[x] Cancel search: service indicatorPage 14 of 120

Cockpit
12
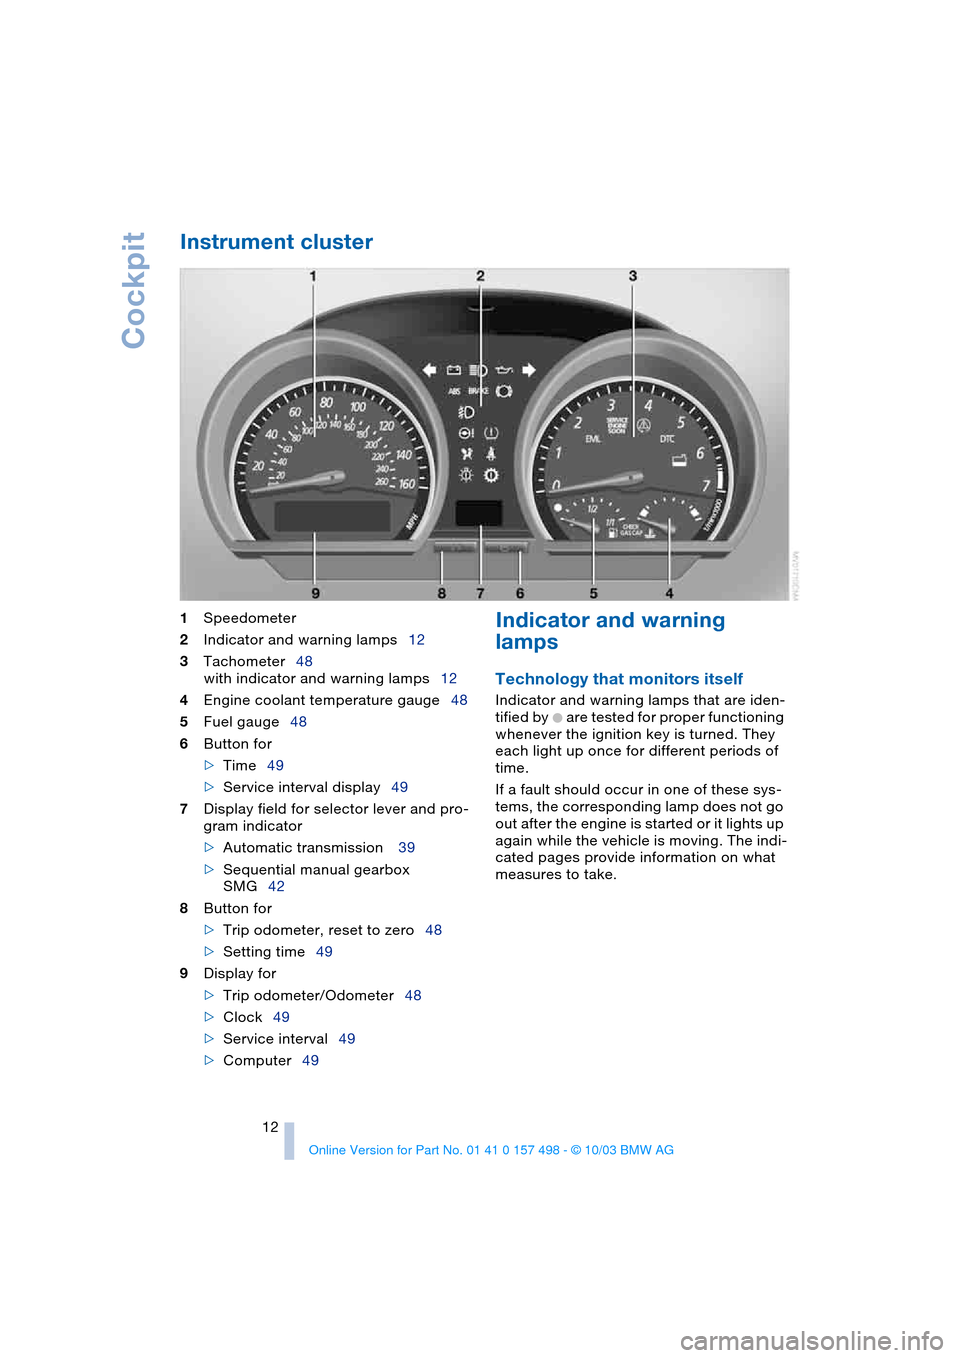
Instrument cluster
1
Speedometer
2
Indicator and warning lamps12
3
Tachometer48
with indicator and warning lamps12
4
Engine coolant temperature gauge48
5
Fuel gauge48
6
Button for
>
Time49
>Service interval display49
7Display field for selector lever and pro-
gram indicator
>Automatic transmission 39
>Sequential manual gearbox
SMG42
8Button for
>Trip odometer, reset to zero48
>Setting time49
9Display for
>Trip odometer/Odometer48
>Clock49
>Service interval49
>Computer49
Indicator and warning
lamps
Technology that monitors itself
Indicator and warning lamps that are iden-
tified by
+ are tested for proper functioning
whenever the ignition key is turned. They
each light up once for different periods of
time.
If a fault should occur in one of these sys-
tems, the corresponding lamp does not go
out after the engine is started or it lights up
again while the vehicle is moving. The indi-
cated pages provide information on what
measures to take.
Page 15 of 120

At a glance
Controls
Driving tips
Mobility Reference
13
Colors
The indicator and warning lamps can light
up in various colors and combinations.
The following section explains the signifi-
cance of the individual colors as well as
how you should respond.
>Red:
Stop the vehicle immediately
or
an important reminder
>Red and yellow:
Continue driving cautiously
>Yellow:
Have the system checked soon
or
for your information
>Green:
For your information
>Blue:
For your information. Please fasten safety belts
+30
Airbags
+56
Battery charge current
+91
Engine oil pressure/Engine oil
level/Engine oil sensor
+83
Parking brake/Chassis control sys-
tems/Dynamic Brake Control/
Brake fluid
+38/ 52/ 53/ 85
Parking brake/Chassis control sys-
tems/Dynamic Brake Control/
Brake fluid for Canadian models
+38/ 52/ 53/ 85
Antilock Brake System ABS/Chas-
sis control systems
+54/ 52
Antilock Brake System ABS/Chas-
sis control systems for Canadian
models
+54/ 52
Dynamic Stability Control
DSC
+52
Dynamic Traction Control
DTC
+52
Flat Tire Monitor
+54
Automatic transmission/
Sequential manual gearbox
SMG
+40/ 42
Brake pads
+70
Add coolant84
CHECK GAS CAP
+74
Service Engine Soon +87
Service Engine Soon warning lamp
for Canadian models
+87
Defective bulbs46
Turn signal indicators43
Fog lamps47
Headlamp flasher/
High beams43/ 47
Electric Power Steering EPS
+43
Engine electronics
+
Engine electronics malfunction.
You can continue to drive with
reduced engine output or engine
speed. Please have the system
inspected by your BMW center.
Page 54 of 120

Technology for safety and driving convenience
52
Technology for safety and driving
convenience
Dynamic Stability Control
DSC
The concept
This system optimizes driving stability and
traction, especially when just starting off,
when accelerating or when cornering. It
also maintains vehicle stability, even in crit-
ical driving situations.
DSC recognizes unstable vehicle condi-
tions, such as understeering or oversteer-
ing, and, within physically feasible limits,
helps keeping the vehicle on a steady
course by reducing engine speed and by
brake applications at individual wheels.
The DSC is operational every time you start
the engine. It includes the following func-
tions:
>Automatic Stability Control plus Trac-
tion ASC+T
>Dynamic Traction Control DTC
>Dynamic Brake Control DBC
The laws of physics cannot be
repealed even with DSC. It will always
be the driver's responsibility to drive in a
manner that matches road conditions. We
therefore urge you to avoid using the addi-
tional safety margin of the system as an
excuse for taking risks.
Do not make any modifications to the DSC
system. Allow only authorized technicians
to perform service procedures on the
DSC.<
Indicator lamps
The indicator lamps in the instrument clus-
ter go out shortly after you switch on the
ignition.
Dynamic Stability Control DSC indi-
cator lamp flashes:
The system is active and governs
drive torque and braking forces.The indicator lamp stays lit:
Dynamic Stability Control DSC and
Dynamic Traction Control DTC have been
switched off via the button.
Dynamic Traction Control DTC indi-
cator lamp lights up permanently:
DTC has been deactivated via the
DSC button.
Dynamic Stability Control DSC indi-
cator lamp flashes:
Dynamic Traction Control DTC indi-
cator lamp lights up permanently:
DTC is actively regulating drive
torque and braking forces.
Interventions to increase stability are
being performed to a limited degree
only.<
The Dynamic Stability Control DSC
indicator lamp and yellow brake
warning lamp for Dynamic Brake
Control DBC light up continuously:
Dynamic Stability Control DSC,
Dynamic Traction Control DTC and
Dynamic Brake Control DBC are malfunc-
tioning.
Have the system repaired at your BMW
center.
Dynamic Stability Control DSC indi-
cator lamp and yellow brake warn-
ing lamp for Dynamic Brake Control
DBC for Canadian models:
The vehicle remains completely oper-
ational without the DSC, DTC and
DBC functions.<
In the event of a malfunction, please see
your BMW center.
Page 55 of 120

Reference
At a glance
Controls
Driving tips
Mobility
53
If the brake warning lamp comes on
together with the yellow indicator
lamps for the Antilock Brake Sys-
tem ABS and the Dynamic Stability
Control DSC:
The entire ABS and DSC control
system has failed. Continue driving
cautiously and defensively. Avoid
hard brake applications. Please have the
system checked by your BMW center as
soon as possible.
Indicator and warning lamps for
Antilock Brake System ABS and
Dynamic Stability Control DSC for
Canadian models.
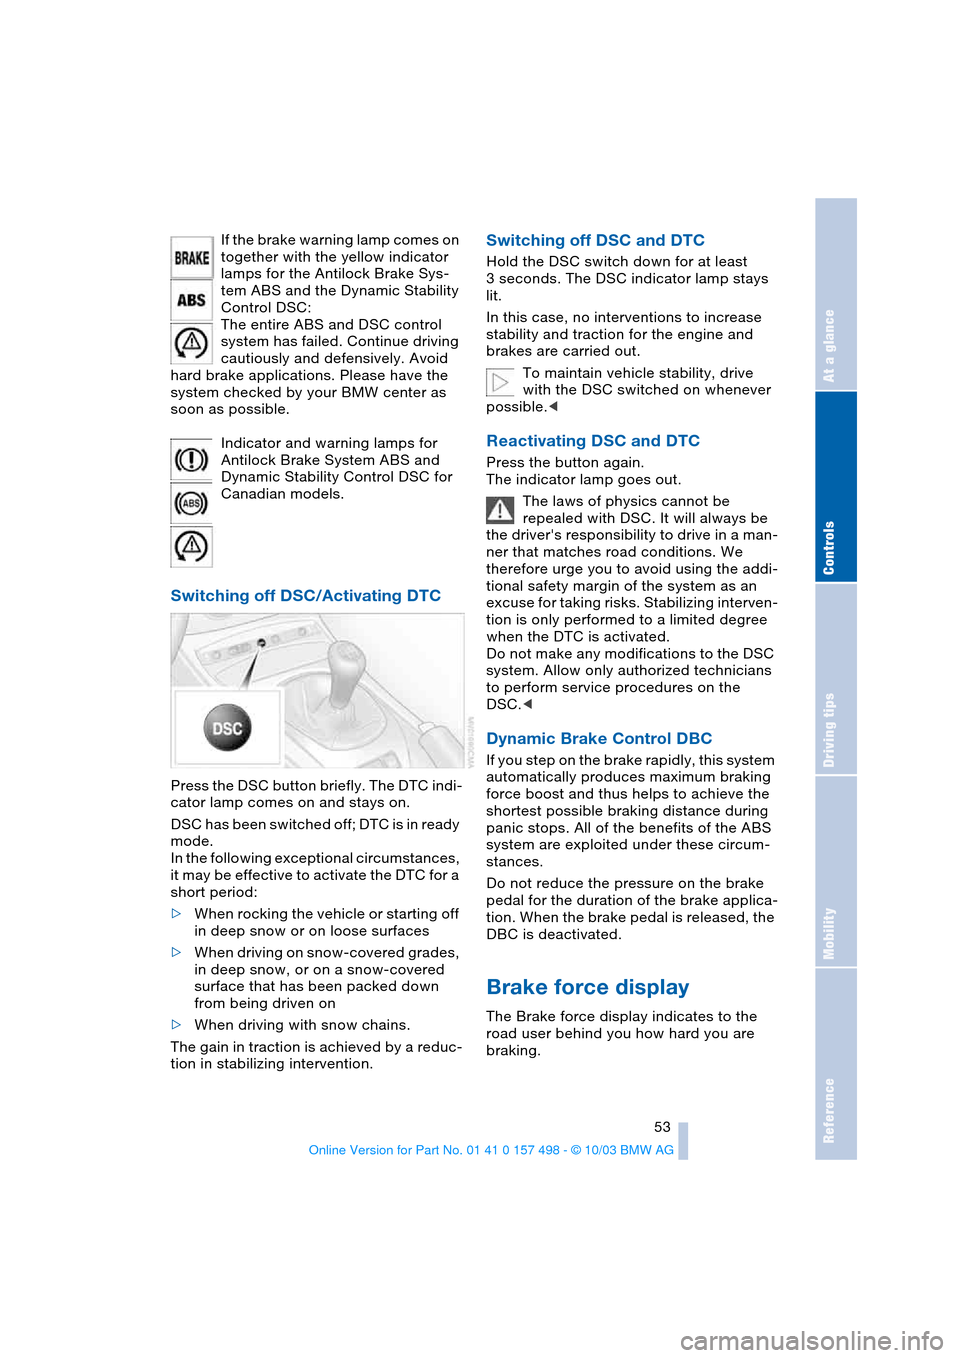
Switching off DSC/Activating DTC
Press the DSC button briefly. The DTC indi-
cator lamp comes on and stays on.
DSC has been switched off; DTC is in ready
mode.
In the following exceptional circumstances,
it may be effective to activate the DTC for a
short period:
>When rocking the vehicle or starting off
in deep snow or on loose surfaces
>When driving on snow-covered grades,
in deep snow, or on a snow-covered
surface that has been packed down
from being driven on
>When driving with snow chains.
The gain in traction is achieved by a reduc-
tion in stabilizing intervention.
Switching off DSC and DTC
Hold the DSC switch down for at least
3 seconds. The DSC indicator lamp stays
lit.
In this case, no interventions to increase
stability and traction for the engine and
brakes are carried out.
To maintain vehicle stability, drive
with the DSC switched on whenever
possible.<
Reactivating DSC and DTC
Press the button again.
The indicator lamp goes out.
The laws of physics cannot be
repealed with DSC. It will always be
the driver's responsibility to drive in a man-
ner that matches road conditions. We
therefore urge you to avoid using the addi-
tional safety margin of the system as an
excuse for taking risks. Stabilizing interven-
tion is only performed to a limited degree
when the DTC is activated.
Do not make any modifications to the DSC
system. Allow only authorized technicians
to perform service procedures on the
DSC.<
Dynamic Brake Control DBC
If you step on the brake rapidly, this system
automatically produces maximum braking
force boost and thus helps to achieve the
shortest possible braking distance during
panic stops. All of the benefits of the ABS
system are exploited under these circum-
stances.
Do not reduce the pressure on the brake
pedal for the duration of the brake applica-
tion. When the brake pedal is released, the
DBC is deactivated.
Brake force display
The Brake force display indicates to the
road user behind you how hard you are
braking.
Page 58 of 120

Technology for safety and driving convenience
56
Airbags
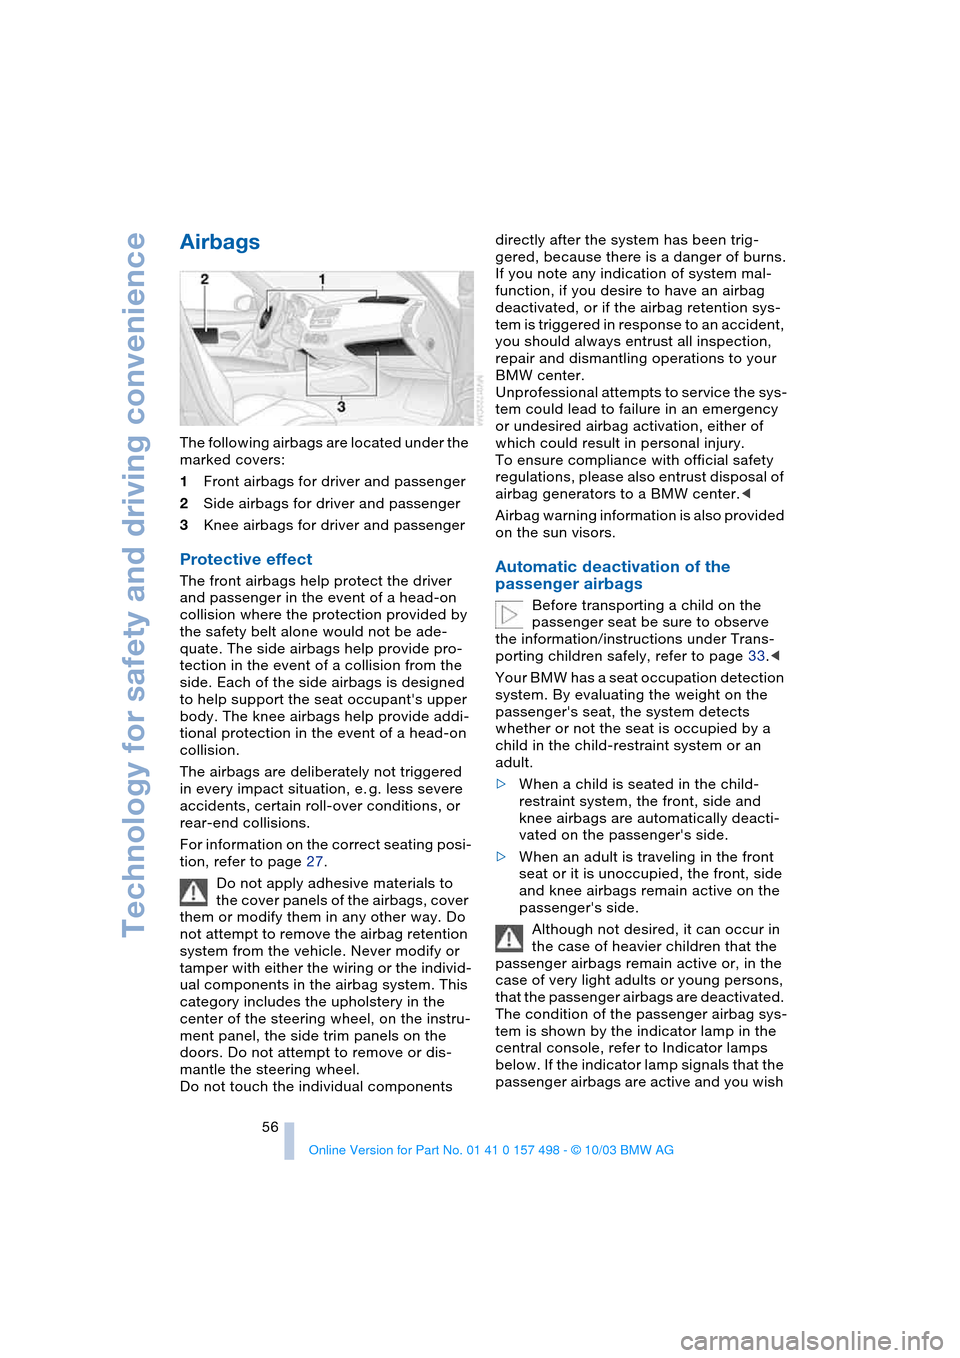
The following airbags are located under the
marked covers:
1Front airbags for driver and passenger
2Side airbags for driver and passenger
3Knee airbags for driver and passenger
Protective effect
The front airbags help protect the driver
and passenger in the event of a head-on
collision where the protection provided by
the safety belt alone would not be ade-
quate. The side airbags help provide pro-
tection in the event of a collision from the
side. Each of the side airbags is designed
to help support the seat occupant's upper
body. The knee airbags help provide addi-
tional protection in the event of a head-on
collision.
The airbags are deliberately not triggered
in every impact situation, e. g. less severe
accidents, certain roll-over conditions, or
rear-end collisions.
For information on the correct seating posi-
tion, refer to page 27.
Do not apply adhesive materials to
the cover panels of the airbags, cover
them or modify them in any other way. Do
not attempt to remove the airbag retention
system from the vehicle. Never modify or
tamper with either the wiring or the individ-
ual components in the airbag system. This
category includes the upholstery in the
center of the steering wheel, on the instru-
ment panel, the side trim panels on the
doors. Do not attempt to remove or dis-
mantle the steering wheel.
Do not touch the individual components directly after the system has been trig-
gered, because there is a danger of burns.
If you note any indication of system mal-
function, if you desire to have an airbag
deactivated, or if the airbag retention sys-
tem is triggered in response to an accident,
you should always entrust all inspection,
repair and dismantling operations to your
BMW center.
Unprofessional attempts to service the sys-
tem could lead to failure in an emergency
or undesired airbag activation, either of
which could result in personal injury.
To ensure compliance with official safety
regulations, please also entrust disposal of
airbag generators to a BMW center.<
Airbag warning information is also provided
on the sun visors.Automatic deactivation of the
passenger airbags
Before transporting a child on the
passenger seat be sure to observe
the information/instructions under Trans-
porting children safely, refer to page 33.<
Your BMW has a seat occupation detection
system. By evaluating the weight on the
passenger's seat, the system detects
whether or not the seat is occupied by a
child in the child-restraint system or an
adult.
>When a child is seated in the child-
restraint system, the front, side and
knee airbags are automatically deacti-
vated on the passenger's side.
>When an adult is traveling in the front
seat or it is unoccupied, the front, side
and knee airbags remain active on the
passenger's side.
Although not desired, it can occur in
the case of heavier children that the
passenger airbags remain active or, in the
case of very light adults or young persons,
that the passenger airbags are deactivated.
The condition of the passenger airbag sys-
tem is shown by the indicator lamp in the
central console, refer to Indicator lamps
below. If the indicator lamp signals that the
passenger airbags are active and you wish
Page 76 of 120

Refueling
74
Refueling
Fuel filler door
1.Open fuel filler door
2.Turn the gas cap in a counter-clockwise
direction
3.Place the gas cap in the bracket on the
filler door.
Releasing manually
If an electrical malfunction occurs, you can
unlock the fuel filler door manually:
1.Remove the covers of the tail lamps by
turning the lock to the right; refer also to
page 90
2.Pull the luggage compartment trim
panel slightly toward the interior.
The green button with the fuel pump
symbol is revealed
3.Undo the adhesive strip and pull off
4.Pull the button
The fuel filler door is released.
Pull on the button slowly and
carefully as it could otherwise be
torn off.<
Fuel gas cap
Close the gas cap carefully after refuel-
ing until a click is heard. While closing,
be sure not to squeeze the strap which is fas-
tened to the cap. A loose or missing cap will
activate the CHECK GAS CAP lamp
*.<
Check Gas Cap
*
This indicator lamp comes on when
the gas cap is loose or missing.
Close the gas cap tightly as described
above.
Tank capacity: approx. 14.5 gallons/
55 liters, of which approx. 2.1 gallons/
8 liters are reserve capacity.
Simple and environmentally friendly
When handling fuels, comply with all
of the applicable safety precautions
posted at the service station.<
When refueling, insert the filler nozzle com-
pletely into the filler pipe. Lifting the nozzle
during refueling
>results in premature shutoff
>and will reduce the effect of the vapor
recovery system on the pump.
The fuel tank is full when the filler nozzle
shuts off the first time.
Fill the fuel tank before it is com-
pletely empty. Driving to the last drop
of fuel can prevent the engine from operat-
ing properly and result in damage.<
Fuel specifications
The engine uses lead-free gasoline only.
Required fuel:
>Premium Unleaded Gasoline,
min. 91 AKI.
AKI = Anti Knock Index
Do not use leaded fuels. The use of
leaded fuels will cause permanent
damage to the system's oxygen sensor and
the catalytic converter.<
Page 87 of 120

Reference
At a glance
Controls
Driving tips
Mobility
85
allow accumulated pressure to escape,
then open completely
2.The coolant level is correct when the
upper end of the red float is at least
even with the upper edge of the filler
neck but no more than 3/4 in/2 cm
above it, that is up to the second mark
on the float. Refer also to the schematic
diagram next to the filler neck
3.If necessary, add coolant. Slowly add
coolant until the correct level is
reached; do not overfill.
Comply with the applicable environ-
mental laws regulating the disposal of
antifreeze with corrosion inhibitor.<
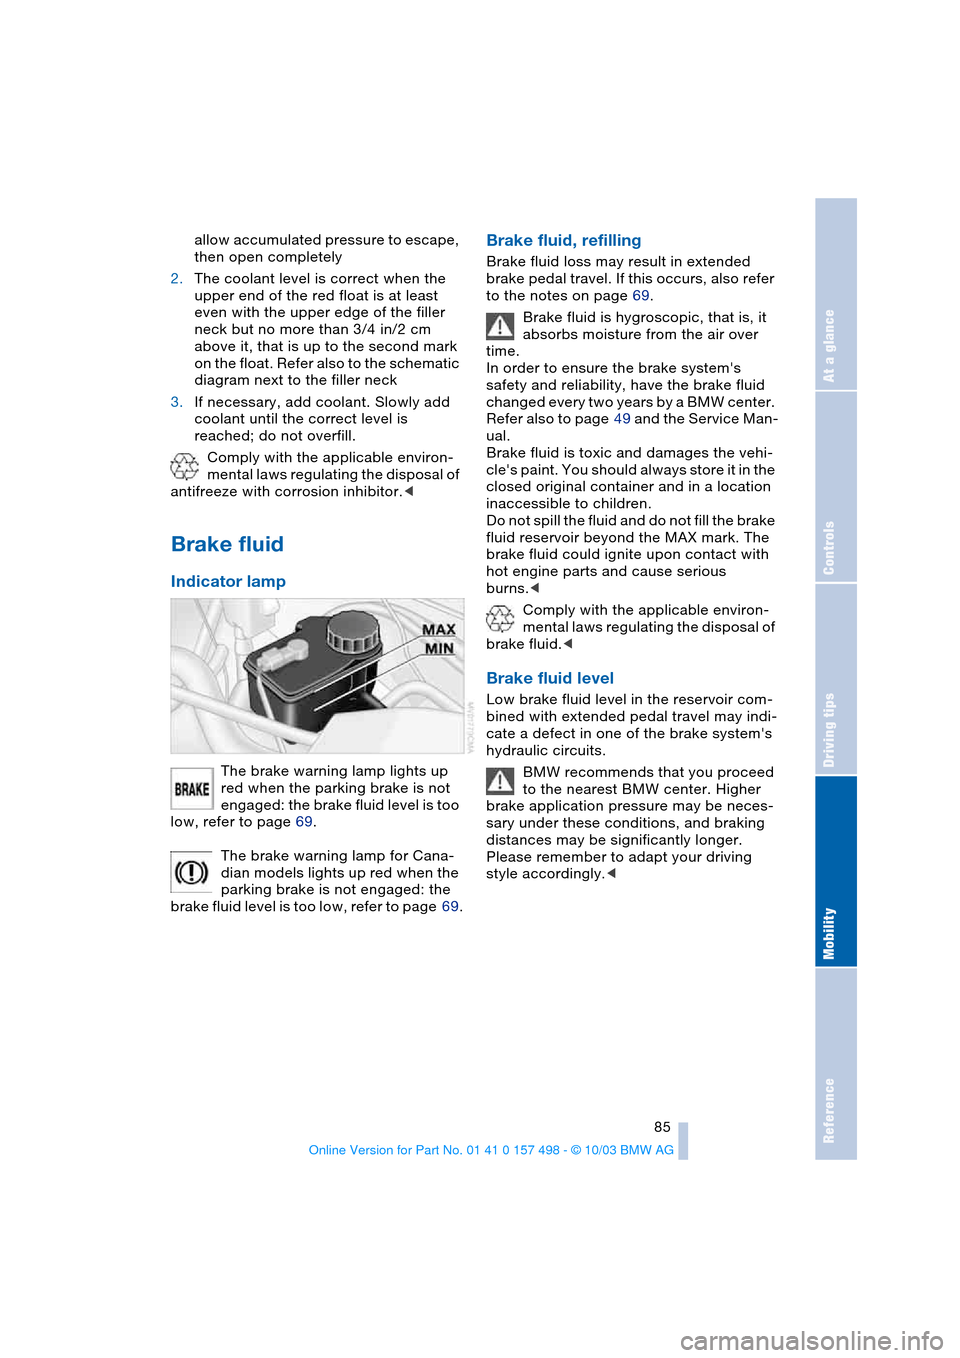
Brake fluid
Indicator lamp
The brake warning lamp lights up
red when the parking brake is not
engaged: the brake fluid level is too
low, refer to page 69.
The brake warning lamp for Cana-
dian models lights up red when the
parking brake is not engaged: the
brake fluid level is too low, refer to page 69.
Brake fluid, refilling
Brake fluid loss may result in extended
brake pedal travel. If this occurs, also refer
to the notes on page 69.
Brake fluid is hygroscopic, that is, it
absorbs moisture from the air over
time.
In order to ensure the brake system's
safety and reliability, have the brake fluid
changed every two years by a BMW center.
Refer also to page 49 and the Service Man-
ual.
Brake fluid is toxic and damages the vehi-
cle's paint. You should always store it in the
closed original container and in a location
inaccessible to children.
Do not spill the fluid and do not fill the brake
fluid reservoir beyond the MAX mark. The
brake fluid could ignite upon contact with
hot engine parts and cause serious
burns.<
Comply with the applicable environ-
mental laws regulating the disposal of
brake fluid.<
Brake fluid level
Low brake fluid level in the reservoir com-
bined with extended pedal travel may indi-
cate a defect in one of the brake system's
hydraulic circuits.
BMW recommends that you proceed
to the nearest BMW center. Higher
brake application pressure may be neces-
sary under these conditions, and braking
distances may be significantly longer.
Please remember to adapt your driving
style accordingly.<
Page 89 of 120

Reference
At a glance
Controls
Driving tips
Mobility
87
Laws and regulations
California Proposition 65
warning
California laws require us to state the fol-
lowing warning:
Engine exhaust and a wide variety of
automobile components and parts,
including components found in the interior
furnishings in a vehicle, contain or emit
chemicals known to the State of California
to cause cancer and birth defects and
reproductive harm. In addition, certain flu-
ids contained in vehicles and certain prod-
ucts of component wear contain or emit
chemicals known to the State of CA to
cause cancer and birth defects or other
reproductive harm. Battery posts, terminals
and related accessories contain lead and
lead compounds. Wash your hands after
handling. Used engine oil contains chemi-
cals that have caused cancer in laboratory
animals. Always protect your skin by wash-
ing thoroughly with soap and water.<
OBD interface socket
The Onboard Diagnostic OBD interface
socket is located on the left of the driver's
side under the instrument panel and under
a cover.
The cover has the letters OBD on it.
The purpose of the OBD system is to
ensure proper operation of the emission
control system for the vehicle's lifetime. The system monitors emission-related
components and system for deterioration
and malfunction.
If the Service Engine Soon indicator
lamp comes on either continuously
or intermittently, this indicates a
fault in the emissions-related electronic
systems. Although the vehicle remains
operational, you should have the systems
checked by your BMW center at the earli-
est possible opportunity.
The illuminated indicator informs you of the
need for service, not that you need to stop
the vehicle. However, the systems should
be checked by your BMW center at the
next opportunity.
If the indicator blinks or flashes, this indi-
cates a high level of engine misfire. Reduce
speed and contact the nearest BMW center
immediately. Severe engine misfiring over
even a short period of time can seriously
damage emission control system compo-
nents, especially the catalytic converter.
Service Engine Soon warning lamp
for Canadian models.
If the gas cap is not on tight enough,
the OBD system can detect leaking
vapor and the indicator will light up. If the
gas cap is then tightened, the indicator will
usually go out after a short period of time.<