2004 BMW 645CI COUPE&CONVERTIBLE ignition
[x] Cancel search: ignitionPage 71 of 216
Controls
69Reference
At a glance
Driving tips
Communications
Navigation
Entertainment
Mobility
Computer
Mode selection
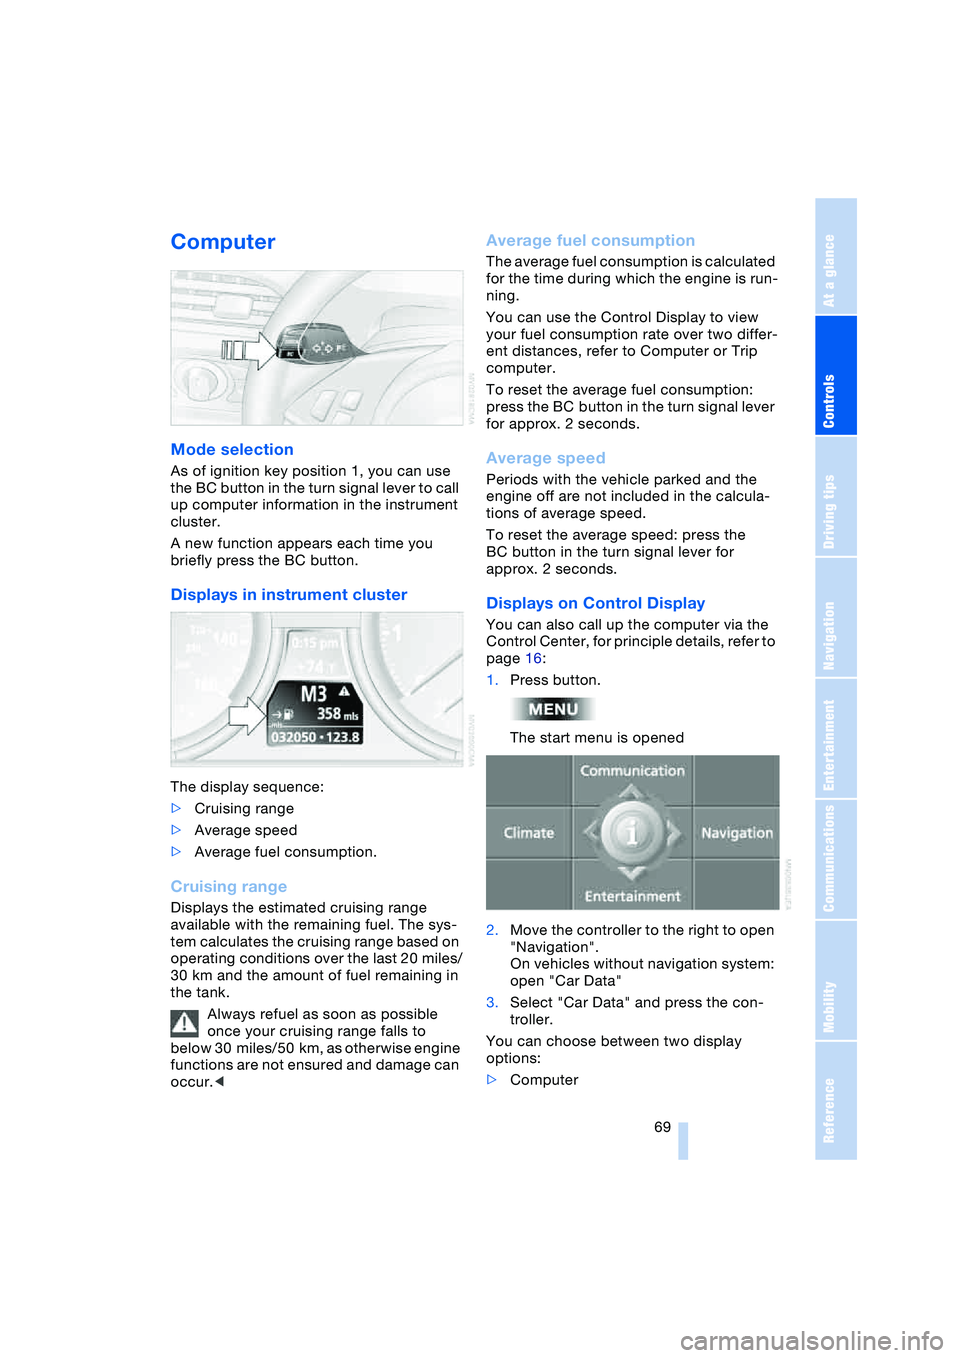
As of ignition key position 1, you can use
the BC button in the turn signal lever to call
up computer information in the instrument
cluster.
A new function appears each time you
briefly press the BC button.
Displays in instrument cluster
The display sequence:
>Cruising range
>Average speed
>Average fuel consumption.
Cruising range
Displays the estimated cruising range
available with the remaining fuel. The sys-
tem calculates the cruising range based on
operating conditions over the last 20 miles/
30 km and the amount of fuel remaining in
the tank.
Always refuel as soon as possible
once your cruising range falls to
below 30 miles/50 km, as otherwise engine
functions are not ensured and damage can
occur.<
Average fuel consumption
The average fuel consumption is calculated
for the time during which the engine is run-
ning.
You can use the Control Display to view
your fuel consumption rate over two differ-
ent distances, refer to Computer or Trip
computer.
To reset the average fuel consumption:
press the BC button in the turn signal lever
for approx. 2 seconds.
Average speed
Periods with the vehicle parked and the
engine off are not included in the calcula-
tions of average speed.
To reset the average speed: press the
BC button in the turn signal lever for
approx. 2 seconds.
Displays on Control Display
You can also call up the computer via the
Control Center, for principle details, refer to
page 16:
1.Press button.
The start menu is opened
2.Move the controller to the right to open
"Navigation".
On vehicles without navigation system:
open "Car Data"
3.Select "Car Data" and press the con-
troller.
You can choose between two display
options:
>Computer
Page 77 of 216

Controls
75Reference
At a glance
Driving tips
Communications
Navigation
Entertainment
Mobility
Technology for comfort, convenience
and safety
PDC Park Distance Control*
The concept
The PDC assists you when you are parking.
Signal tones and a visual display
* indicate
the current distance to an object behind or
in front of your vehicle. To measure the dis-
tance, there are four ultrasonic sensors in
each bumper. The sensors at the front and
at the two rear corners have a range of
approx. 20 in/50 cm; the rear middle sen-
sors have approx. 5 ft/1.50 m.
PDC is a parking aid that can indicate
objects when they are approached
slowly, as is usually the case when parking.
Avoid approaching an object at high speed,
as otherwise the physical circumstances
would mean that the system warning was
too late.<
Automatic mode
In ignition key position 2, the system auto-
matically assumes operational status after
a few seconds each time you engage
reverse gear or selector-lever position R.
Wait this short period before driving.<
The system is automatically deacti-
vated once the vehicle travels approx.
165 ft/50 m or exceeds a speed of roughly
20 mph/30 km/h; the indicator lamp goes
out. You can reactivate the system manu-
ally as needed.
Manual mode
With the ignition key in position 2, press the
button; the indicator lamp lights up.
Deactivating manual mode
Press the button again; the indicator lamp
goes out.
Signal tones
The signal indicating the distance to the
nearest obstacle is directional. Thus, an
object detected to the left rear of the vehi-
cle will be indicated by a signal tone from
the left rear speaker, etc. As the distance
between vehicle and object decreases, the
intervals between the tones become
shorter. The signal tone becomes continu-
ous once the distance to the nearest object
falls to below roughly 1 ft/30 cm.
The warning signal is canceled after
approx. 3 seconds if you are moving paral-
lel to a wall.
Malfunctions
The indicator lamp within the button
flashes and a message appears on the
Control Display. PDC has failed. Switch off
PDC. Have the system checked.
As a preventive measure, keep the sensors
clean and free of ice or snow in order to
ensure that they will continue to operate
effectively.
PDC with visual warning*
You also enjoy the option of having the sys-
tem show distances to objects on the Con-
trol Display. The Control Display will also
Page 83 of 216
Controls
81Reference
At a glance
Driving tips
Communications
Navigation
Entertainment
Mobility
Airbags
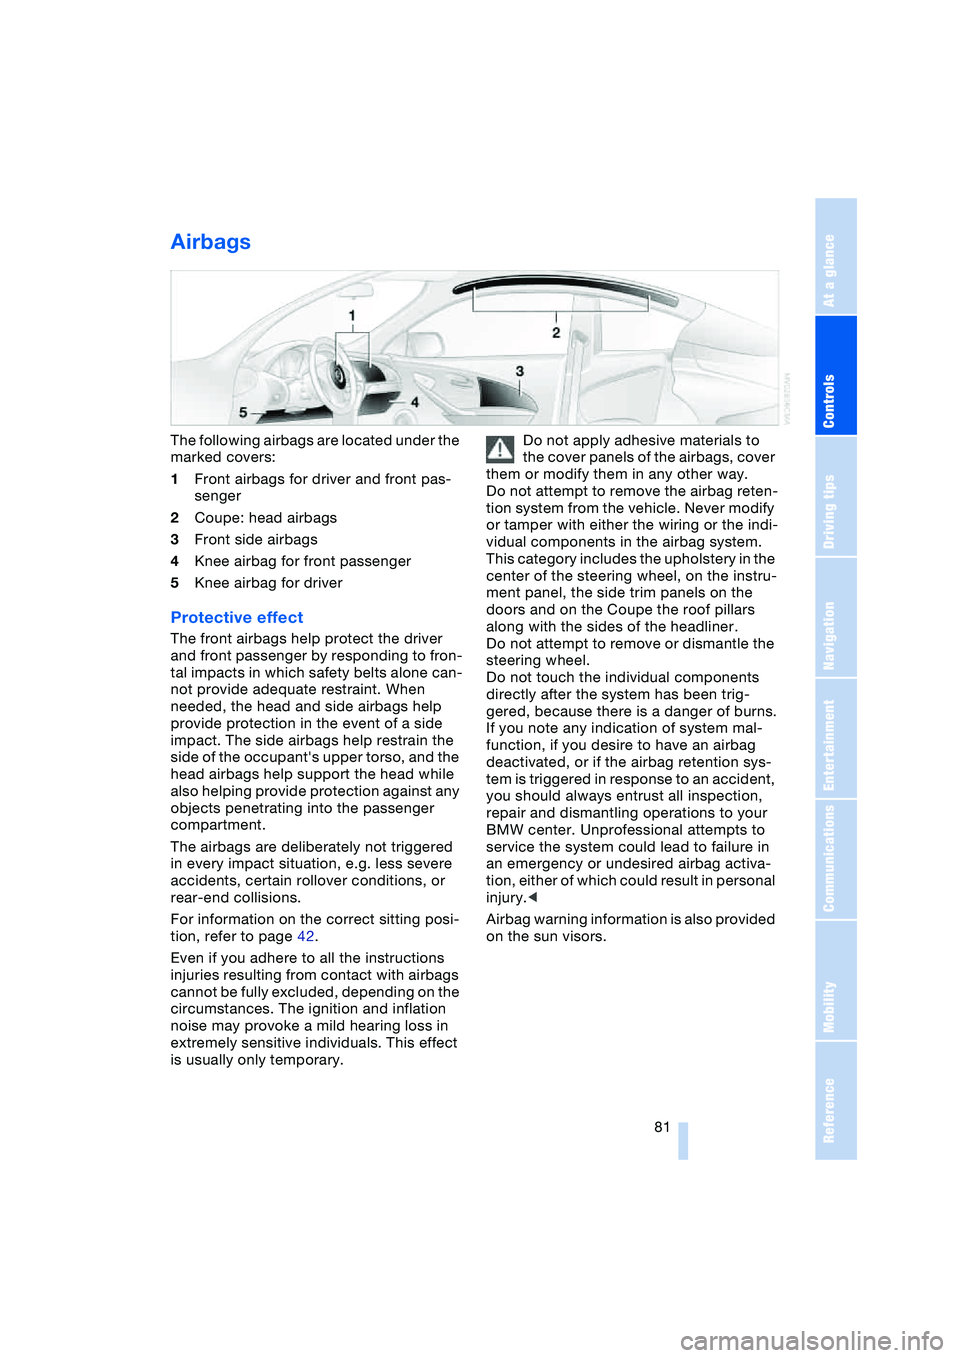
The following airbags are located under the
marked covers:
1Front airbags for driver and front pas-
senger
2Coupe: head airbags
3Front side airbags
4Knee airbag for front passenger
5Knee airbag for driver
Protective effect
The front airbags help protect the driver
and front passenger by responding to fron-
tal impacts in which safety belts alone can-
not provide adequate restraint. When
needed, the head and side airbags help
provide protection in the event of a side
impact. The side airbags help restrain the
side of the occupant's upper torso, and the
head airbags help support the head while
also helping provide protection against any
objects penetrating into the passenger
compartment.
The airbags are deliberately not triggered
in every impact situation, e.g. less severe
accidents, certain rollover conditions, or
rear-end collisions.
For information on the correct sitting posi-
tion, refer to page 42.
Even if you adhere to all the instructions
injuries resulting from contact with airbags
cannot be fully excluded, depending on the
circumstances. The ignition and inflation
noise may provoke a mild hearing loss in
extremely sensitive individuals. This effect
is usually only temporary.Do not apply adhesive materials to
the cover panels of the airbags, cover
them or modify them in any other way.
Do not attempt to remove the airbag reten-
tion system from the vehicle. Never modify
or tamper with either the wiring or the indi-
vidual components in the airbag system.
This category includes the upholstery in the
center of the steering wheel, on the instru-
ment panel, the side trim panels on the
doors and on the Coupe the roof pillars
along with the sides of the headliner.
Do not attempt to remove or dismantle the
steering wheel.
Do not touch the individual components
directly after the system has been trig-
gered, because there is a danger of burns.
If you note any indication of system mal-
function, if you desire to have an airbag
deactivated, or if the airbag retention sys-
tem is triggered in response to an accident,
you should always entrust all inspection,
repair and dismantling operations to your
BMW center. Unprofessional attempts to
service the system could lead to failure in
an emergency or undesired airbag activa-
tion, either of which could result in personal
injury.<
Airbag warning information is also provided
on the sun visors.
Page 84 of 216
Technology for comfort, convenience and safety
82
Airbag system operational
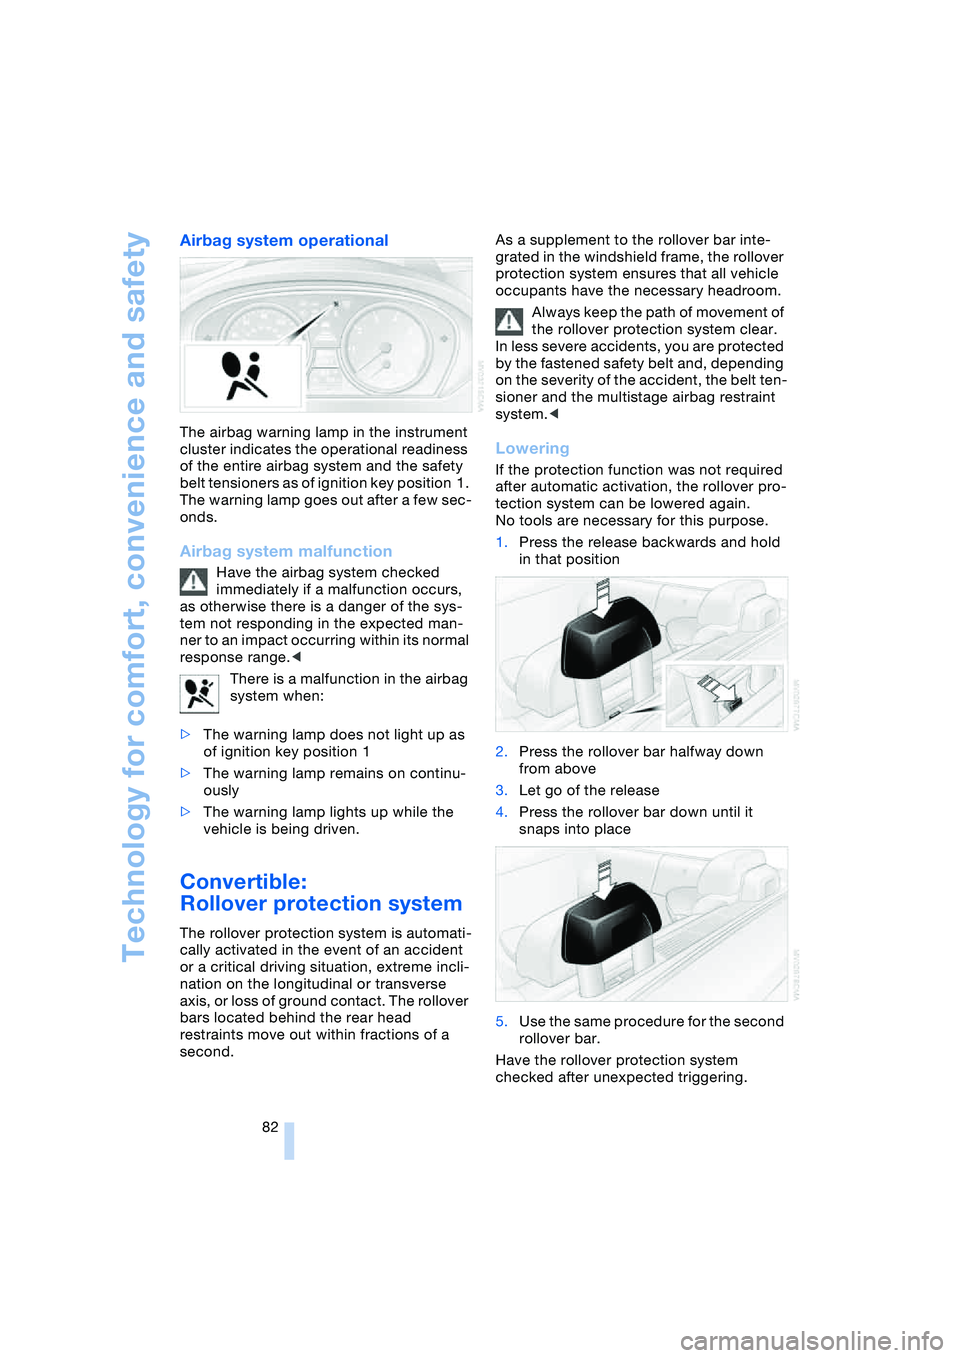
The airbag warning lamp in the instrument
cluster indicates the operational readiness
of the entire airbag system and the safety
belt tensioners as of ignition key position 1.
The warning lamp goes out after a few sec-
onds.
Airbag system malfunction
Have the airbag system checked
immediately if a malfunction occurs,
as otherwise there is a danger of the sys-
tem not responding in the expected man-
ner to an impact occurring within its normal
response range.<
There is a malfunction in the airbag
system when:
>The warning lamp does not light up as
of ignition key position 1
>The warning lamp remains on continu-
ously
>The warning lamp lights up while the
vehicle is being driven.
Convertible:
Rollover protection system
The rollover protection system is automati-
cally activated in the event of an accident
or a critical driving situation, extreme incli-
nation on the longitudinal or transverse
axis, or loss of ground contact. The rollover
bars located behind the rear head
restraints move out within fractions of a
second.As a supplement to the rollover bar inte-
grated in the windshield frame, the rollover
protection system ensures that all vehicle
occupants have the necessary headroom.
Always keep the path of movement of
the rollover protection system clear.
In less severe accidents, you are protected
by the fastened safety belt and, depending
on the severity of the accident, the belt ten-
sioner and the multistage airbag restraint
system.<
Lowering
If the protection function was not required
after automatic activation, the rollover pro-
tection system can be lowered again.
No tools are necessary for this purpose.
1.Press the release backwards and hold
in that position
2.Press the rollover bar halfway down
from above
3.Let go of the release
4.Press the rollover bar down until it
snaps into place
5.Use the same procedure for the second
rollover bar.
Have the rollover protection system
checked after unexpected triggering.
Page 85 of 216
Controls
83Reference
At a glance
Driving tips
Communications
Navigation
Entertainment
Mobility
Never move the convertible top when
the rollover protection system is
raised.
No changes of any nature may be made to
the individual components of the rollover
protection system and wiring.
Work on the rollover protection system may
only be performed at a BMW center.
Unprofessional attempts to service the sys-
tem can lead to failure or malfunction.
For a system check and to ensure long-
term functioning, you must comply with the
maintenance intervals of the service
requirement display.<
Head-Up Display*
The concept
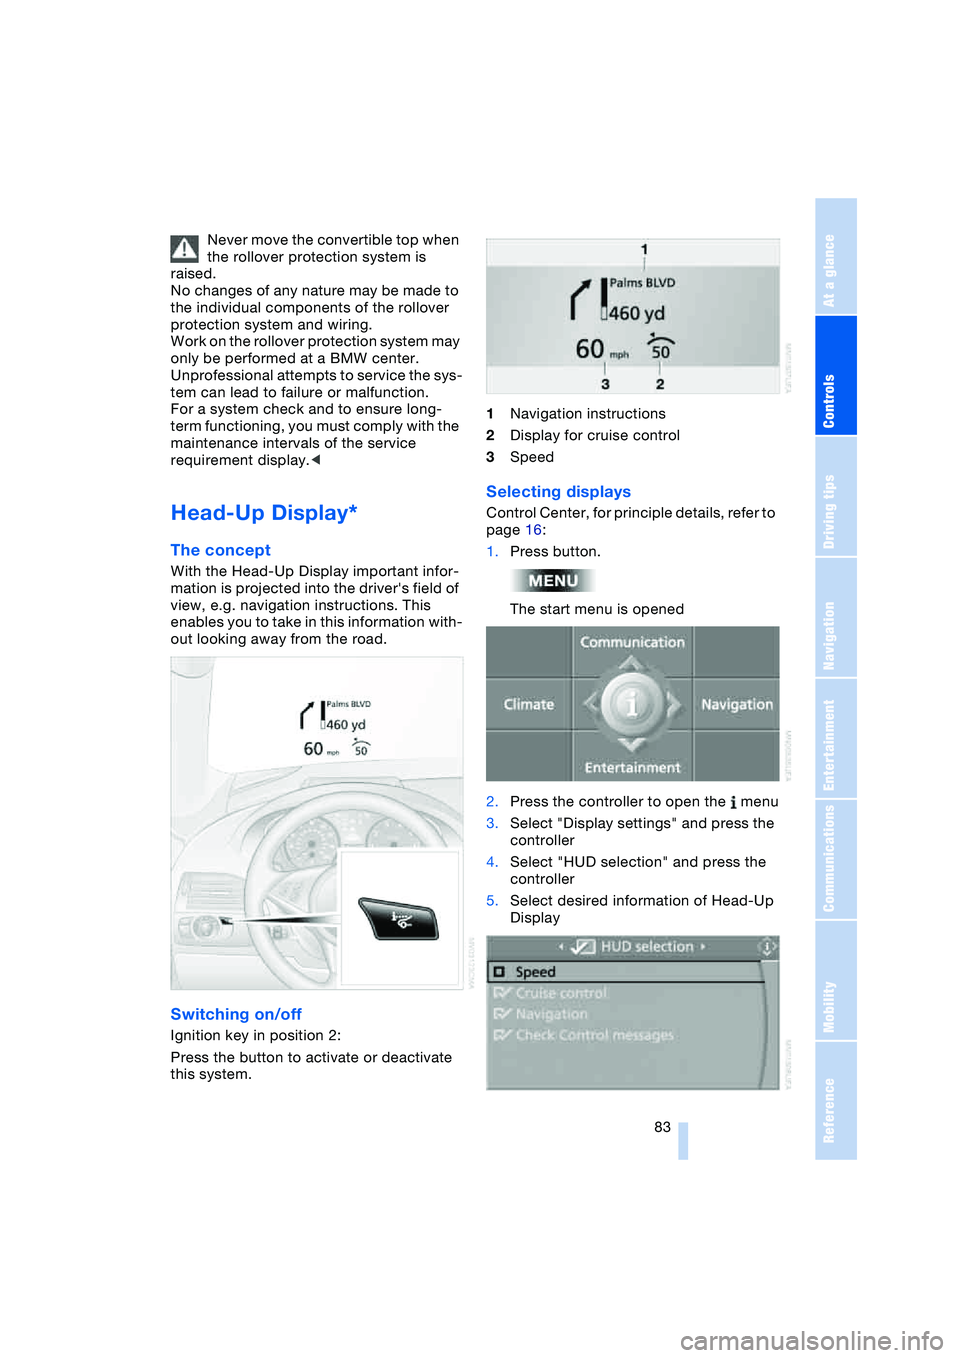
With the Head-Up Display important infor-
mation is projected into the driver's field of
view, e.g. navigation instructions. This
enables you to take in this information with-
out looking away from the road.
Switching on/off
Ignition key in position 2:
Press the button to activate or deactivate
this system.1Navigation instructions
2Display for cruise control
3Speed
Selecting displays
Control Center, for principle details, refer to
page 16:
1.Press button.
The start menu is opened
2.Press the controller to open the menu
3.Select "Display settings" and press the
controller
4.Select "HUD selection" and press the
controller
5.Select desired information of Head-Up
Display
Page 87 of 216
Controls
85Reference
At a glance
Driving tips
Communications
Navigation
Entertainment
Mobility
Lamps
Parking lamps/low beams
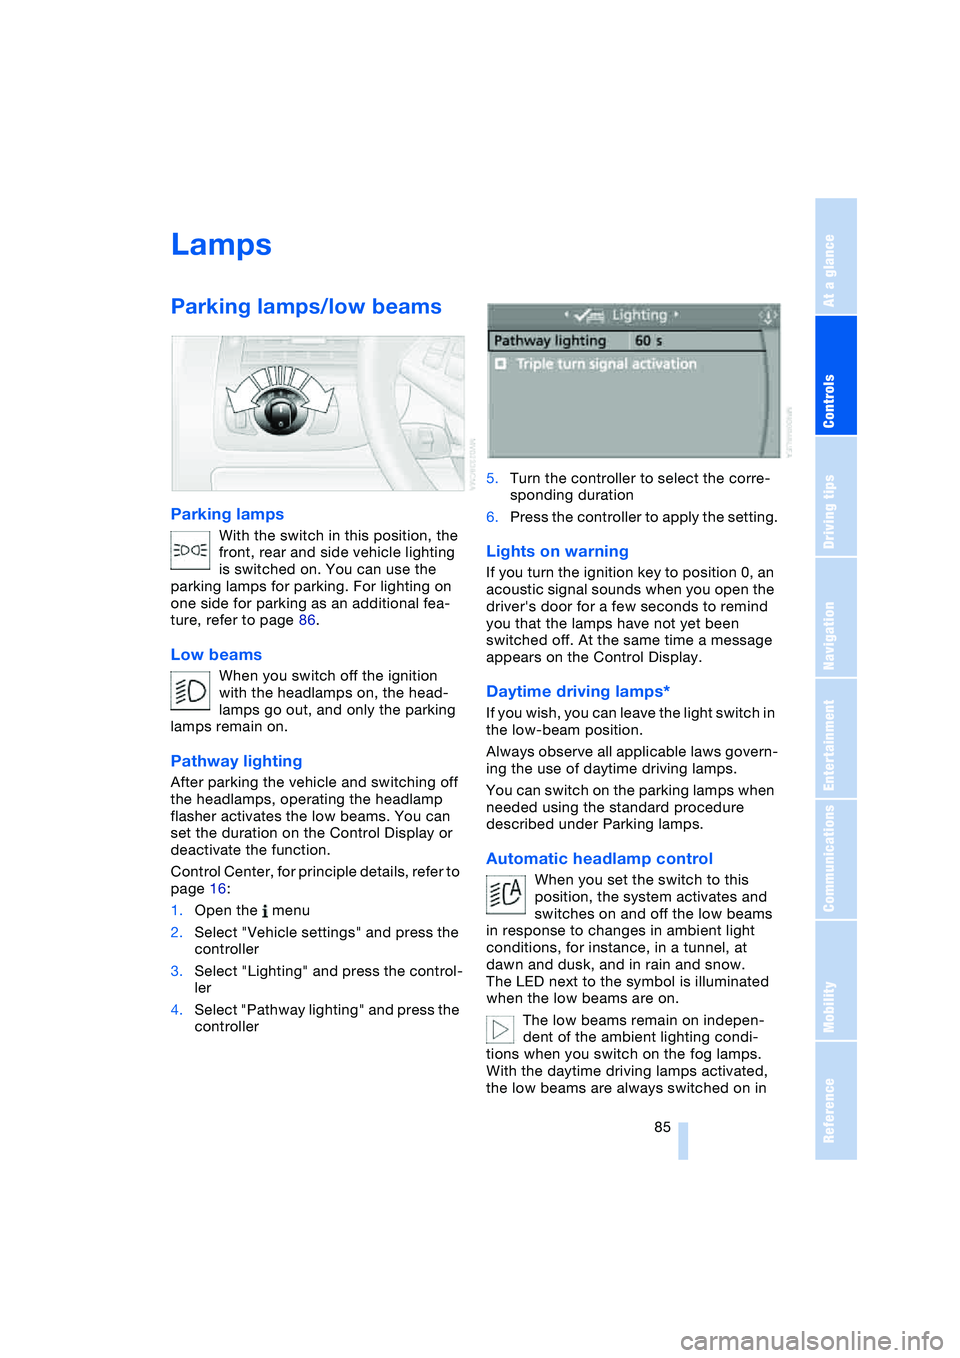
Parking lamps
With the switch in this position, the
front, rear and side vehicle lighting
is switched on. You can use the
parking lamps for parking. For lighting on
one side for parking as an additional fea-
ture, refer to page 86.
Low beams
When you switch off the ignition
with the headlamps on, the head-
lamps go out, and only the parking
lamps remain on.
Pathway lighting
After parking the vehicle and switching off
the headlamps, operating the headlamp
flasher activates the low beams. You can
set the duration on the Control Display or
deactivate the function.
Control Center, for principle details, refer to
page 16:
1.Open the menu
2.Select "Vehicle settings" and press the
controller
3.Select "Lighting" and press the control-
ler
4.Select "Pathway lighting" and press the
controller5.Turn the controller to select the corre-
sponding duration
6.Press the controller to apply the setting.
Lights on warning
If you turn the ignition key to position 0, an
acoustic signal sounds when you open the
driver's door for a few seconds to remind
you that the lamps have not yet been
switched off. At the same time a message
appears on the Control Display.
Daytime driving lamps*
If you wish, you can leave the light switch in
the low-beam position.
Always observe all applicable laws govern-
ing the use of daytime driving lamps.
You can switch on the parking lamps when
needed using the standard procedure
described under Parking lamps.
Automatic headlamp control
When you set the switch to this
position, the system activates and
switches on and off the low beams
in response to changes in ambient light
conditions, for instance, in a tunnel, at
dawn and dusk, and in rain and snow.
The LED next to the symbol is illuminated
when the low beams are on.
The low beams remain on indepen-
dent of the ambient lighting condi-
tions when you switch on the fog lamps.
With the daytime driving lamps activated,
the low beams are always switched on in
Page 88 of 216
Lamps
86 this switch position with the ignition key in
position 2.<
The automatic headlamp control can-
not serve as a substitute for your per-
sonal judgment in determining when the
lamps should be switched on in response
to ambient lighting conditions. For exam-
ple, the system cannot detect fog. To avoid
safety risks, you should always switch on
the lamps manually under these condi-
tions.<
Adaptive Head Light*
The concept
Adaptive Head Light is a variable headlamp
control system that enables better illumina-
tion of the road surface. Depending on the
steering angle and other assumptions, the
light from the headlamp follows the course
of the road.
Activating Adaptive Head Light
In ignition key position 2, turn the
light switch to the position 'Auto-
matic headlamp control', refer to
page 85.
So that oncoming traffic is not dazzled,
Adaptive Head Light is
>not active when the vehicle is reversing
>only active toward passenger's side
when stopped.
Malfunction
The LED beside the symbol for automatic
headlamp control flashes. The Adaptive
Head Light has a malfunction or has failed.
Have the system checked as soon as pos-
sible.
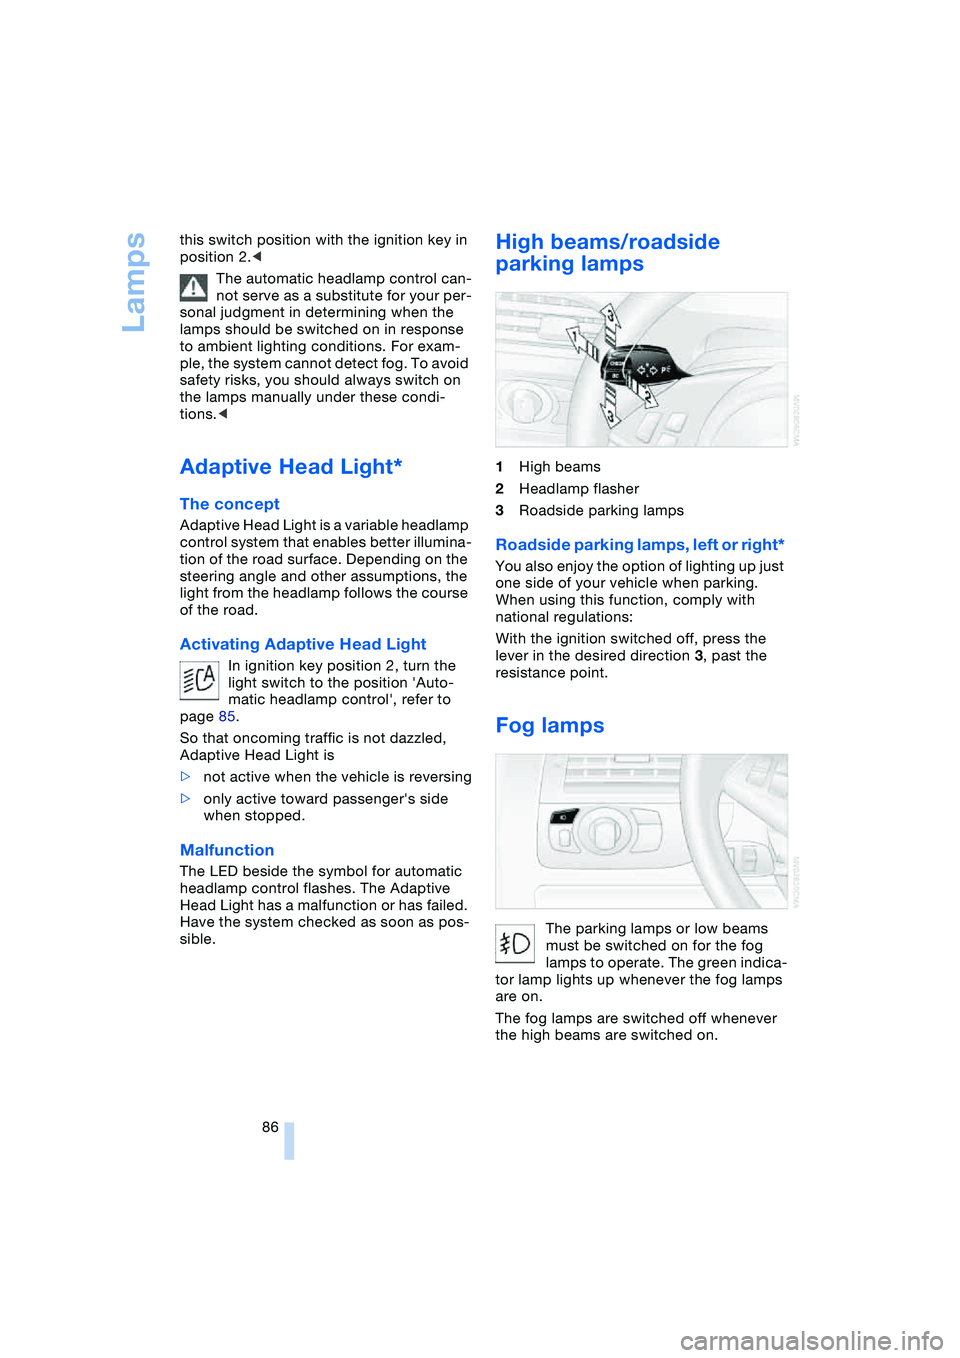
High beams/roadside
parking lamps
1High beams
2Headlamp flasher
3Roadside parking lamps
Roadside parking lamps, left or right*
You also enjoy the option of lighting up just
one side of your vehicle when parking.
When using this function, comply with
national regulations:
With the ignition switched off, press the
lever in the desired direction 3, past the
resistance point.
Fog lamps
The parking lamps or low beams
must be switched on for the fog
lamps to operate. The green indica-
tor lamp lights up whenever the fog lamps
are on.
The fog lamps are switched off whenever
the high beams are switched on.
Page 89 of 216
Controls
87Reference
At a glance
Driving tips
Communications
Navigation
Entertainment
Mobility
If the automatic headlamp control is
activated, the low beams will come on
automatically when you switch on the fog
lamps.<
Instrument lighting
Turn the serrated dial to adjust the illumina-
tion intensity.
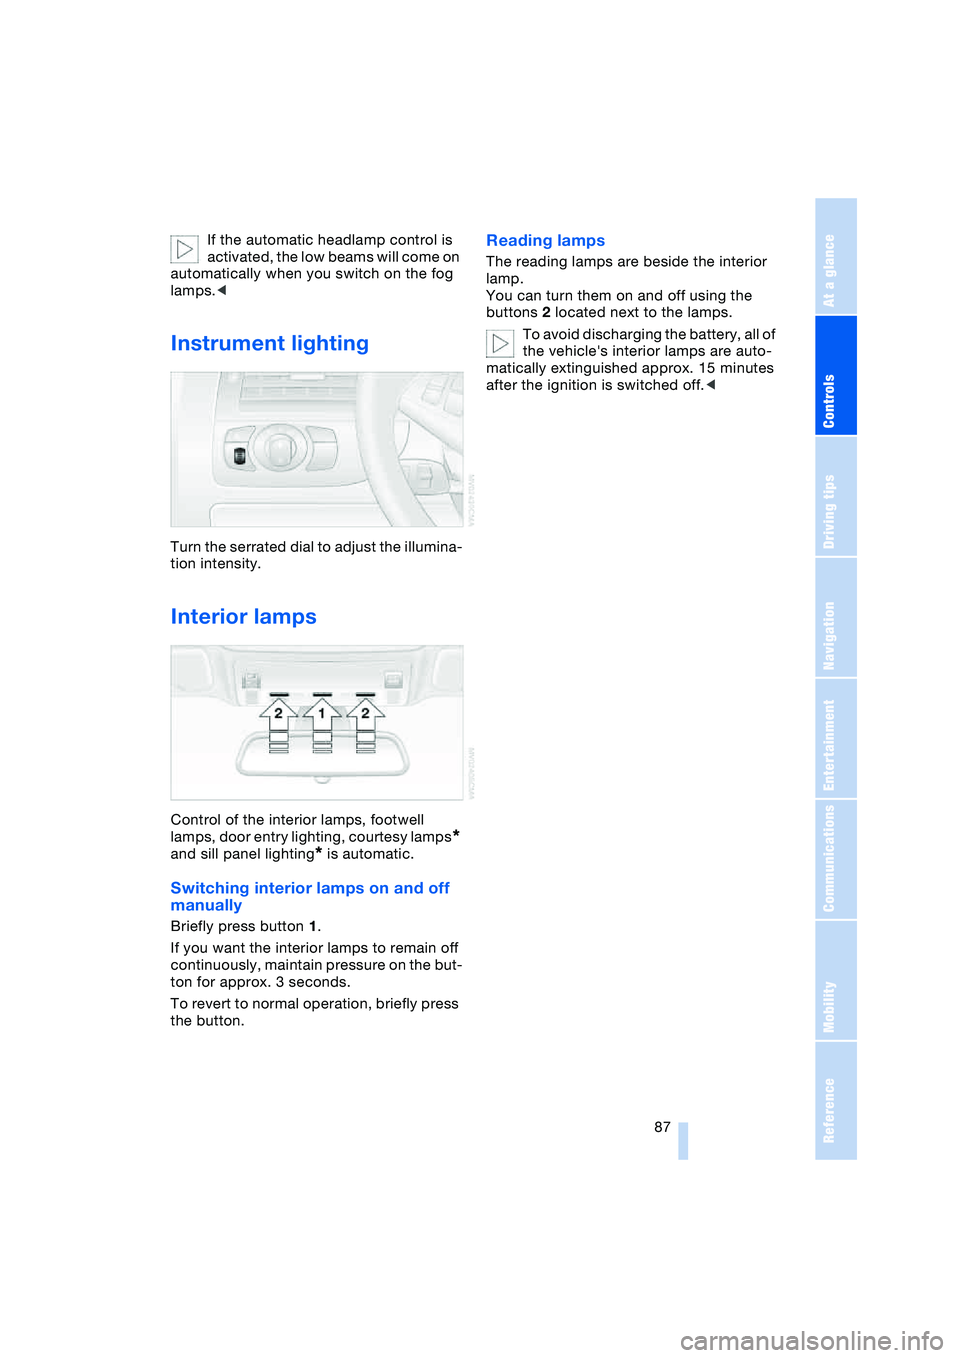
Interior lamps
Control of the interior lamps, footwell
lamps, door entry lighting, courtesy lamps
*
and sill panel lighting
* is automatic.
Switching interior lamps on and off
manually
Briefly press button 1.
If you want the interior lamps to remain off
continuously, maintain pressure on the but-
ton for approx. 3 seconds.
To revert to normal operation, briefly press
the button.
Reading lamps
The reading lamps are beside the interior
lamp.
You can turn them on and off using the
buttons 2 located next to the lamps.
To avoid discharging the battery, all of
the vehicle's interior lamps are auto-
matically extinguished approx. 15 minutes
after the ignition is switched off.<