2004 BMW 645CI COUPE&CONVERTIBLE ignition
[x] Cancel search: ignitionPage 38 of 216
Opening and closing
36
Raising and closing glass roof
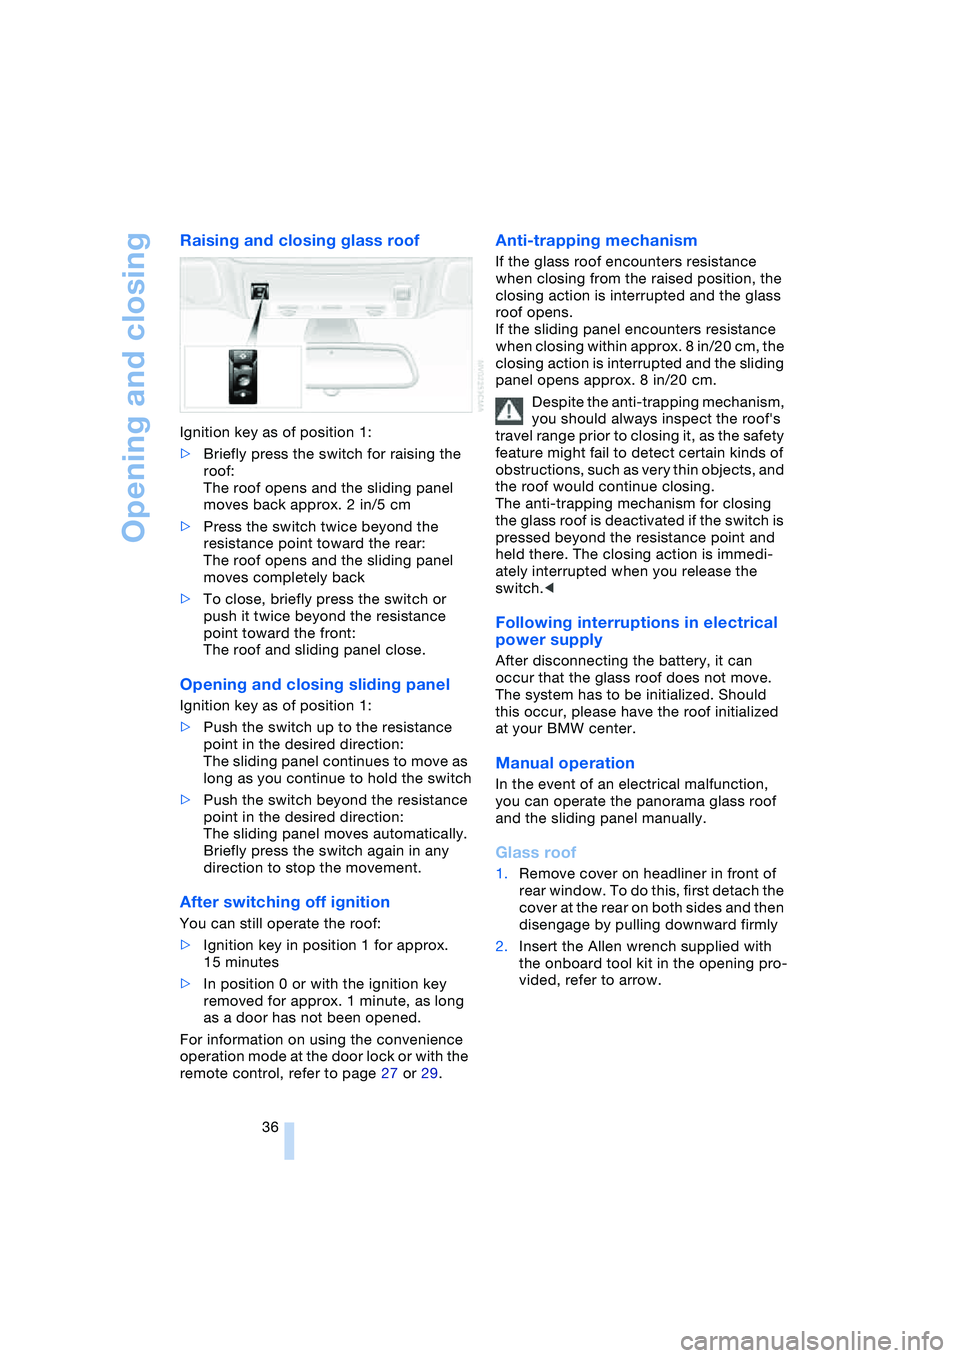
Ignition key as of position 1:
>Briefly press the switch for raising the
roof:
The roof opens and the sliding panel
moves back approx. 2 in/5 cm
>Press the switch twice beyond the
resistance point toward the rear:
The roof opens and the sliding panel
moves completely back
>To close, briefly press the switch or
push it twice beyond the resistance
point toward the front:
The roof and sliding panel close.
Opening and closing sliding panel
Ignition key as of position 1:
>Push the switch up to the resistance
point in the desired direction:
The sliding panel continues to move as
long as you continue to hold the switch
>Push the switch beyond the resistance
point in the desired direction:
The sliding panel moves automatically.
Briefly press the switch again in any
direction to stop the movement.
After switching off ignition
You can still operate the roof:
>Ignition key in position 1 for approx.
15 minutes
>In position 0 or with the ignition key
removed for approx. 1 minute, as long
as a door has not been opened.
For information on using the convenience
operation mode at the door lock or with the
remote control, refer to page 27 or 29.
Anti-trapping mechanism
If the glass roof encounters resistance
when closing from the raised position, the
closing action is interrupted and the glass
roof opens.
If the sliding panel encounters resistance
when closing within approx. 8 in/20 cm, the
closing action is interrupted and the sliding
panel opens approx. 8 in/20 cm.
Despite the anti-trapping mechanism,
you should always inspect the roof's
travel range prior to closing it, as the safety
feature might fail to detect certain kinds of
obstructions, such as very thin objects, and
the roof would continue closing.
The anti-trapping mechanism for closing
the glass roof is deactivated if the switch is
pressed beyond the resistance point and
held there. The closing action is immedi-
ately interrupted when you release the
switch.<
Following interruptions in electrical
power supply
After disconnecting the battery, it can
occur that the glass roof does not move.
The system has to be initialized. Should
this occur, please have the roof initialized
at your BMW center.
Manual operation
In the event of an electrical malfunction,
you can operate the panorama glass roof
and the sliding panel manually.
Glass roof
1.Remove cover on headliner in front of
rear window. To do this, first detach the
cover at the rear on both sides and then
disengage by pulling downward firmly
2.Insert the Allen wrench supplied with
the onboard tool kit in the opening pro-
vided, refer to arrow.
Page 40 of 216
Opening and closing
38 Partial vacuums that occur at higher
speeds in the passenger compart-
ment can make the convertible top flap.
Use the ventilation controls to increase the
air supply so that no partial vacuum occurs
in the vehicle.<
To close the electrically activated side
windows while the vehicle is being
driven, always close the rear windows or
all four windows simultaneously first, as
otherwise the windows cannot close tightly
at higher speeds.<
Prior to opening and closing
>Read carefully and comply with the
safety precautions that appear above
>Ensure that the convertible top com-
partment floor in the luggage compart-
ment is folded down, refer to page 32,
as otherwise the convertible top cannot
be opened
>Ensure that the luggage compartment
lid is closed.
Opening and closing
As of ignition key position 1, with the vehi-
cle stationary:
So as not to place an excessive load
on the battery, only operate the con-
vertible top with the engine running, if pos-
sible.
Before closing the convertible top, remove
foreign bodies from the windshield frame,
as these might inhibit closing of the con-
vertible top.<
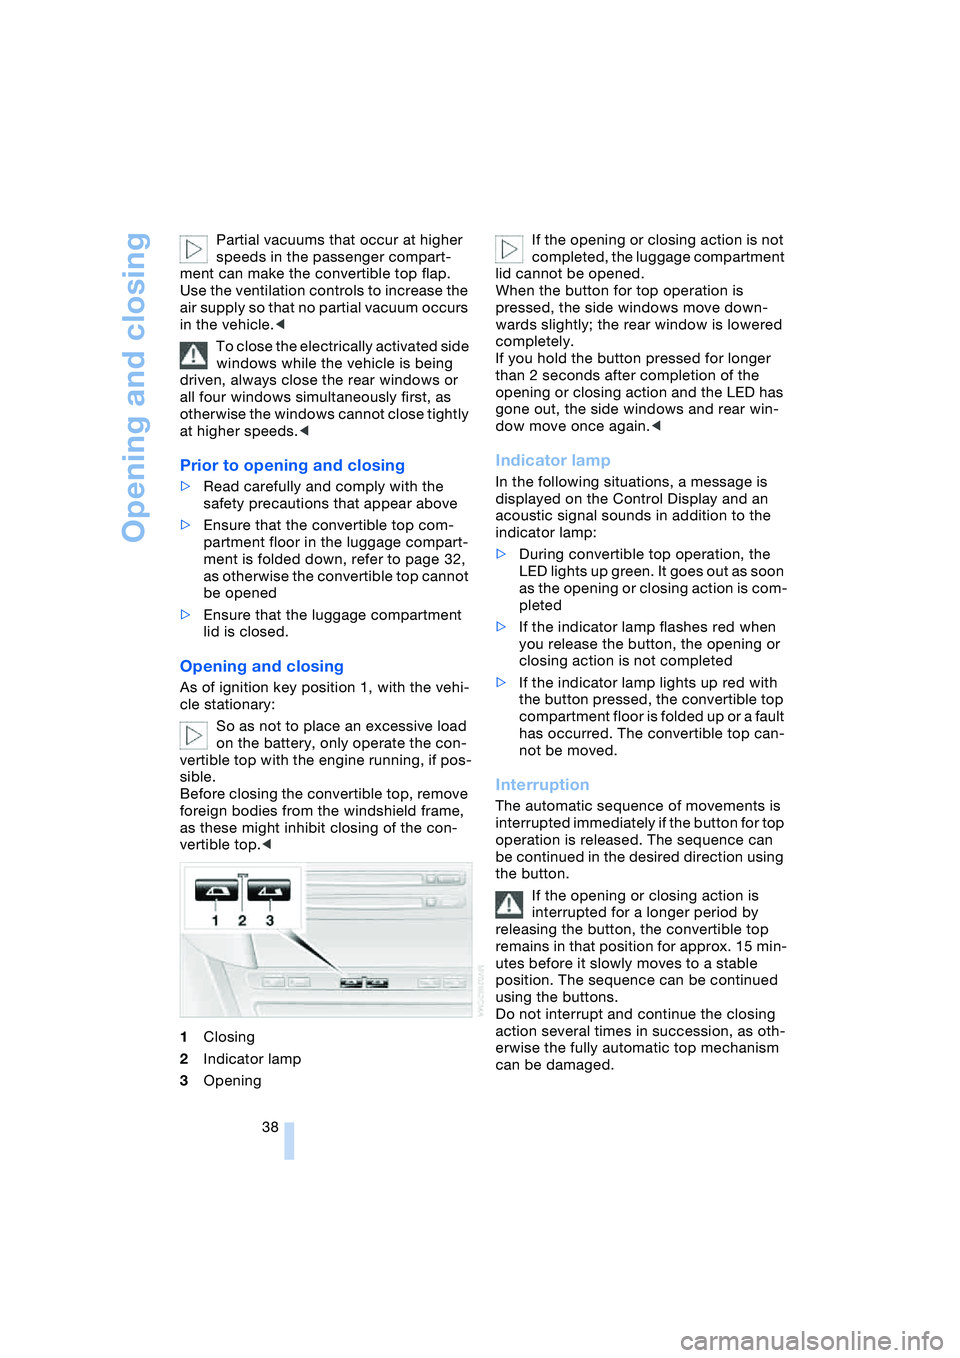
1Closing
2Indicator lamp
3OpeningIf the opening or closing action is not
completed, the luggage compartment
lid cannot be opened.
When the button for top operation is
pressed, the side windows move down-
wards slightly; the rear window is lowered
completely.
If you hold the button pressed for longer
than 2 seconds after completion of the
opening or closing action and the LED has
gone out, the side windows and rear win-
dow move once again.<
Indicator lamp
In the following situations, a message is
displayed on the Control Display and an
acoustic signal sounds in addition to the
indicator lamp:
>During convertible top operation, the
LED lights up green. It goes out as soon
as the opening or closing action is com-
pleted
>If the indicator lamp flashes red when
you release the button, the opening or
closing action is not completed
>If the indicator lamp lights up red with
the button pressed, the convertible top
compartment floor is folded up or a fault
has occurred. The convertible top can-
not be moved.
Interruption
The automatic sequence of movements is
interrupted immediately if the button for top
operation is released. The sequence can
be continued in the desired direction using
the button.
If the opening or closing action is
interrupted for a longer period by
releasing the button, the convertible top
remains in that position for approx. 15 min-
utes before it slowly moves to a stable
position. The sequence can be continued
using the buttons.
Do not interrupt and continue the closing
action several times in succession, as oth-
erwise the fully automatic top mechanism
can be damaged.
Page 44 of 216
Adjustments
42
Adjustments
Sitting safely
The ideal sitting position can make a vital
contribution to relaxed, fatigue-free driving.
The sitting position also plays an important
role together with the safety belts and air-
bags in providing occupants with maximum
levels of passive safety in an accident. To
ensure that the safety systems operate with
optimal efficiency, we strongly urge you to
observe the instructions contained in the
following section.
For additional information on transporting
children safely, refer to page 51.
Sitting safely with airbags
Always maintain an adequate dis-
tance between yourself and the air-
bags. Always hold the steering wheel by
its rim with hands at the 9 o'clock and
3 o'clock positions, to minimize the risk of
injuries to your hands and arms in the event
of airbag deployment.
No one and nothing is to come between the
airbags and the seat occupant.
Do not use the cover of the front airbag on
the front passenger side as a storage area.
Make sure that the front passenger is sit-
ting correctly and does not rest feet or legs
on the instrument panel, otherwise leg inju-
ries can occur if the knee and front airbags
are triggered.
Never let an occupant's head rest near or
on a side airbag because the inflating air-
bag could cause a serious or fatal injury.<
Even if you adhere to all the instructions
injuries resulting from contact with airbags
cannot be fully excluded, depending on the
circumstances. The ignition and inflation
noise may provoke a mild – usually tempo-
rary – hearing loss in extremely sensitive
individuals.
For airbag locations and additional infor-
mation on airbags, refer to page 81.
Sitting safely with safety belts
Fasten your safety belt before starting any
trip. Airbags complement the safety belt as
an additional safety device, but they do not
represent a substitute.
Your vehicle has four seats that are all
equipped with a safety belt.
At all times, occupants should sit
upright and be properly restrained:
infants and small children in appropriate
child-restraint systems; larger children and
adults using the safety belts.
Never allow more than one person to wear
a single safety belt. Never allow infants or
small children to ride in a passenger's lap.
Expectant mothers should always wear
their safety belts, taking care to position
the lap belt against the lower hips, where it
will not exert pressure against the abdomi-
nal area.
Do not route the belt across your neck, or
run it across sharp edges. Be sure that the
belt does not become caught or jammed.
Avoid twisting the belt while routing it firmly
across the hips and shoulder. Do not allow
the belt to rest against hard or fragile
objects. Otherwise, in the event of a frontal
impact, a loose lap belt could slide over
your hips, leading to abdominal injury.
Avoid wearing clothing that prevents the
belt from fitting properly and pull the lap
belt periodically to readjust the tension
across your shoulder in order to avoid a
reduction in the retention effect of the
safety belt.<
For instructions on operating safety belts,
refer to page 47.
Page 46 of 216
Adjustments
44
Seat, mirror and steering
wheel memory
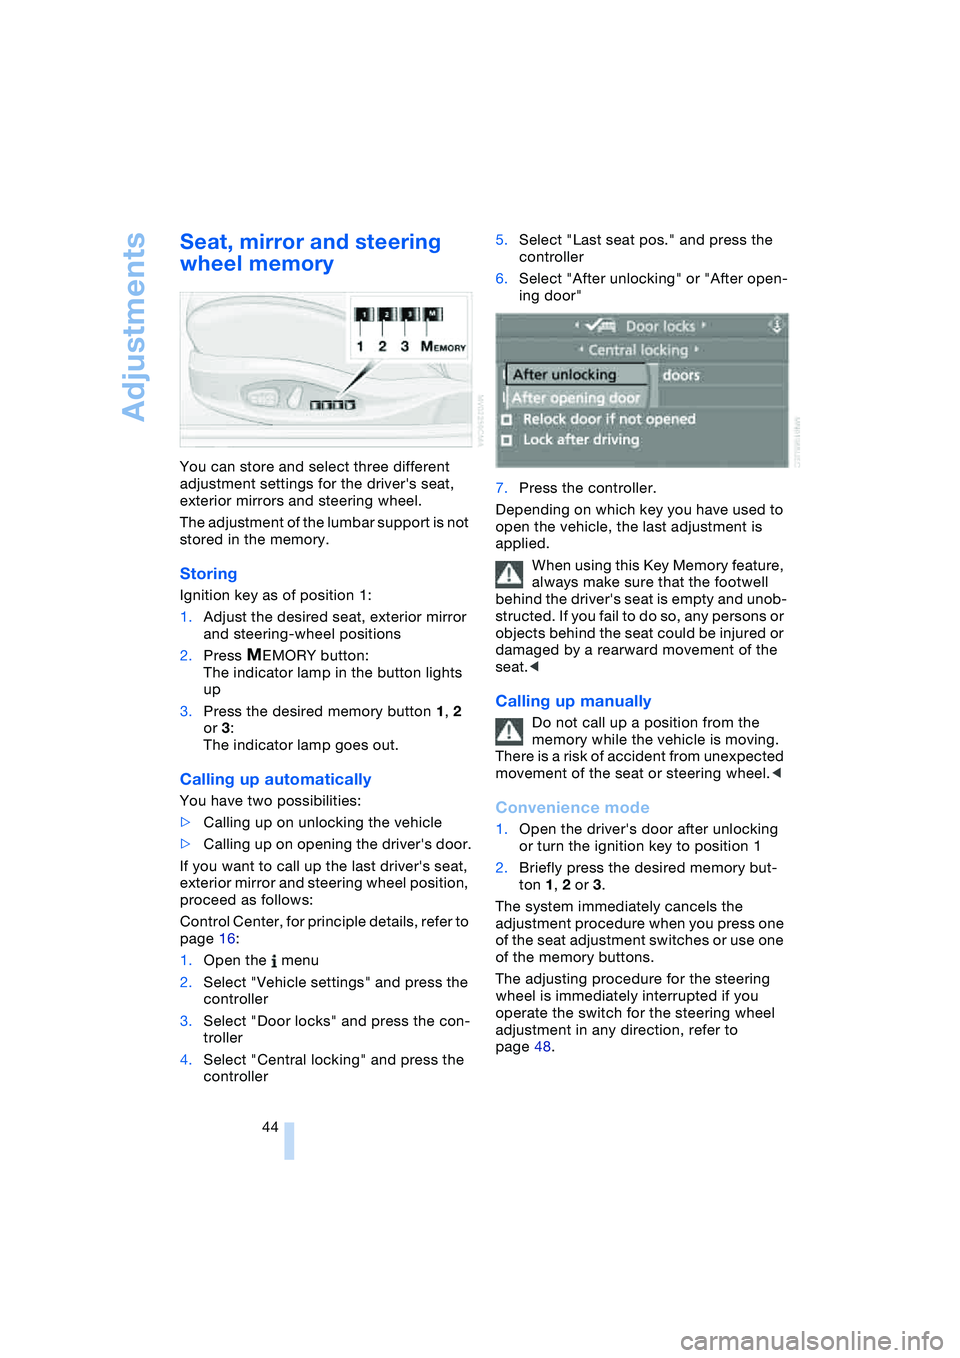
You can store and select three different
adjustment settings for the driver's seat,
exterior mirrors and steering wheel.
The adjustment of the lumbar support is not
stored in the memory.
Storing
Ignition key as of position 1:
1.Adjust the desired seat, exterior mirror
and steering-wheel positions
2.Press
MEMORY button:
The indicator lamp in the button lights
up
3.Press the desired memory button 1, 2
or 3:
The indicator lamp goes out.
Calling up automatically
You have two possibilities:
>Calling up on unlocking the vehicle
>Calling up on opening the driver's door.
If you want to call up the last driver's seat,
exterior mirror and steering wheel position,
proceed as follows:
Control Center, for principle details, refer to
page 16:
1.Open the menu
2.Select "Vehicle settings" and press the
controller
3.Select "Door locks" and press the con-
troller
4.Select "Central locking" and press the
controller5.Select "Last seat pos." and press the
controller
6.Select "After unlocking" or "After open-
ing door"
7.Press the controller.
Depending on which key you have used to
open the vehicle, the last adjustment is
applied.
When using this Key Memory feature,
always make sure that the footwell
behind the driver's seat is empty and unob-
structed. If you fail to do so, any persons or
objects behind the seat could be injured or
damaged by a rearward movement of the
seat.<
Calling up manually
Do not call up a position from the
memory while the vehicle is moving.
There is a risk of accident from unexpected
movement of the seat or steering wheel.<
Convenience mode
1.Open the driver's door after unlocking
or turn the ignition key to position 1
2.Briefly press the desired memory but-
ton 1, 2 or 3.
The system immediately cancels the
adjustment procedure when you press one
of the seat adjustment switches or use one
of the memory buttons.
The adjusting procedure for the steering
wheel is immediately interrupted if you
operate the switch for the steering wheel
adjustment in any direction, refer to
page 48.
Page 47 of 216
Controls
45Reference
At a glance
Driving tips
Communications
Navigation
Entertainment
Mobility
Safety feature
1.Close the driver's door and turn the
ignition key to position 0 or 2
2.Press the desired memory button 1, 2
or 3 and maintain pressure until the
adjustment process has been com-
pleted.
If you press the
MEMORY button acciden-
tally:
Press the button again; the indicator lamp
goes out.
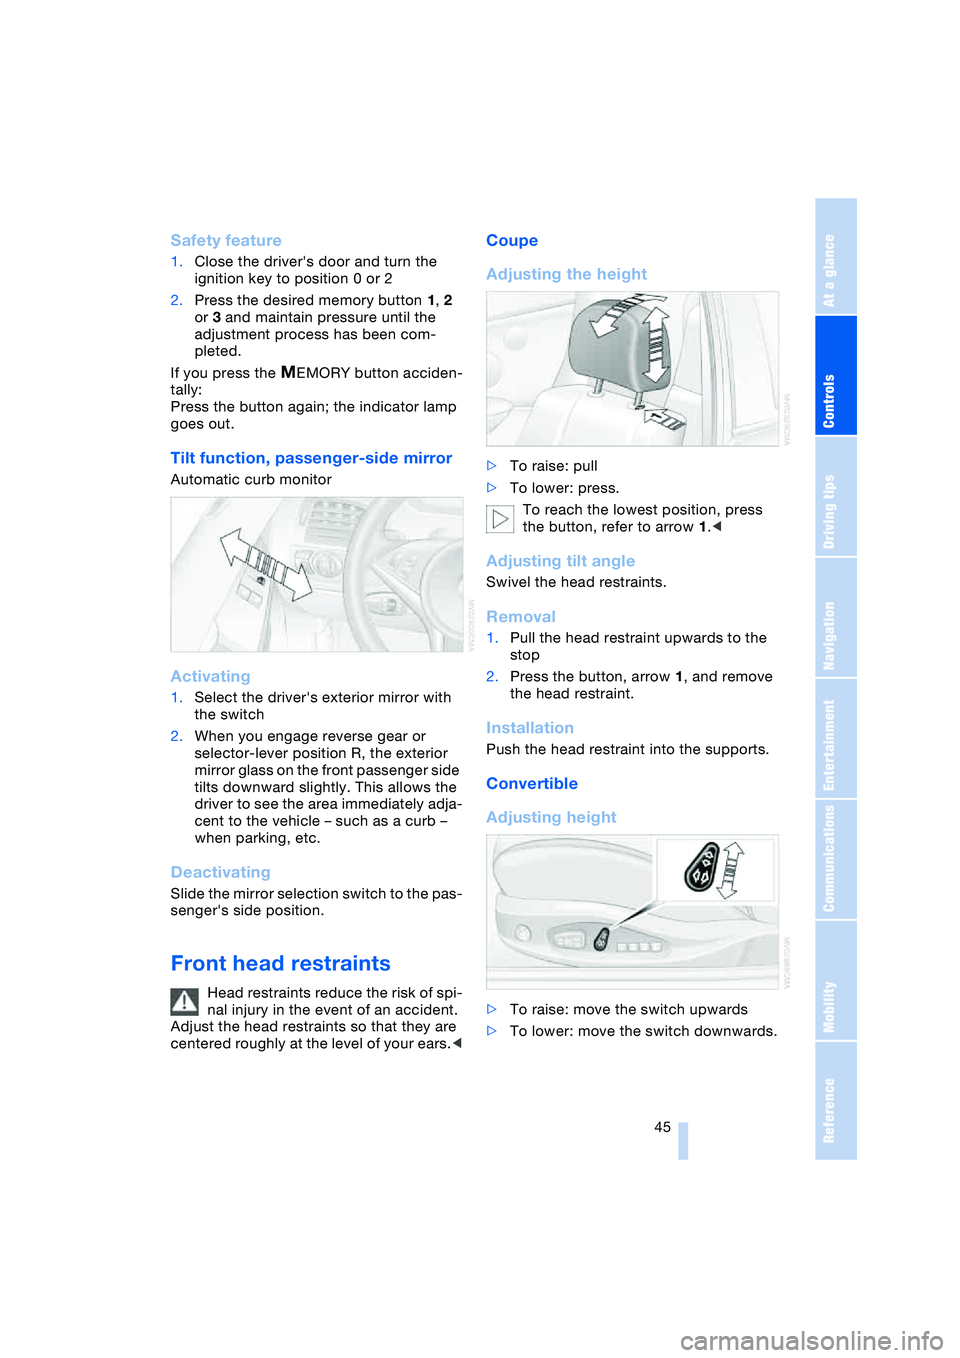
Tilt function, passenger-side mirror
Automatic curb monitor
Activating
1.Select the driver's exterior mirror with
the switch
2.When you engage reverse gear or
selector-lever position R, the exterior
mirror glass on the front passenger side
tilts downward slightly. This allows the
driver to see the area immediately adja-
cent to the vehicle – such as a curb –
when parking, etc.
Deactivating
Slide the mirror selection switch to the pas-
senger's side position.
Front head restraints
Head restraints reduce the risk of spi-
nal injury in the event of an accident.
Adjust the head restraints so that they are
centered roughly at the level of your ears.<
Coupe
Adjusting the height
>To raise: pull
>To lower: press.
To reach the lowest position, press
the button, refer to arrow 1.<
Adjusting tilt angle
Swivel the head restraints.
Removal
1.Pull the head restraint upwards to the
stop
2.Press the button, arrow 1, and remove
the head restraint.
Installation
Push the head restraint into the supports.
Convertible
Adjusting height
>To raise: move the switch upwards
>To lower: move the switch downwards.
Page 50 of 216
Adjustments
48
Mirrors
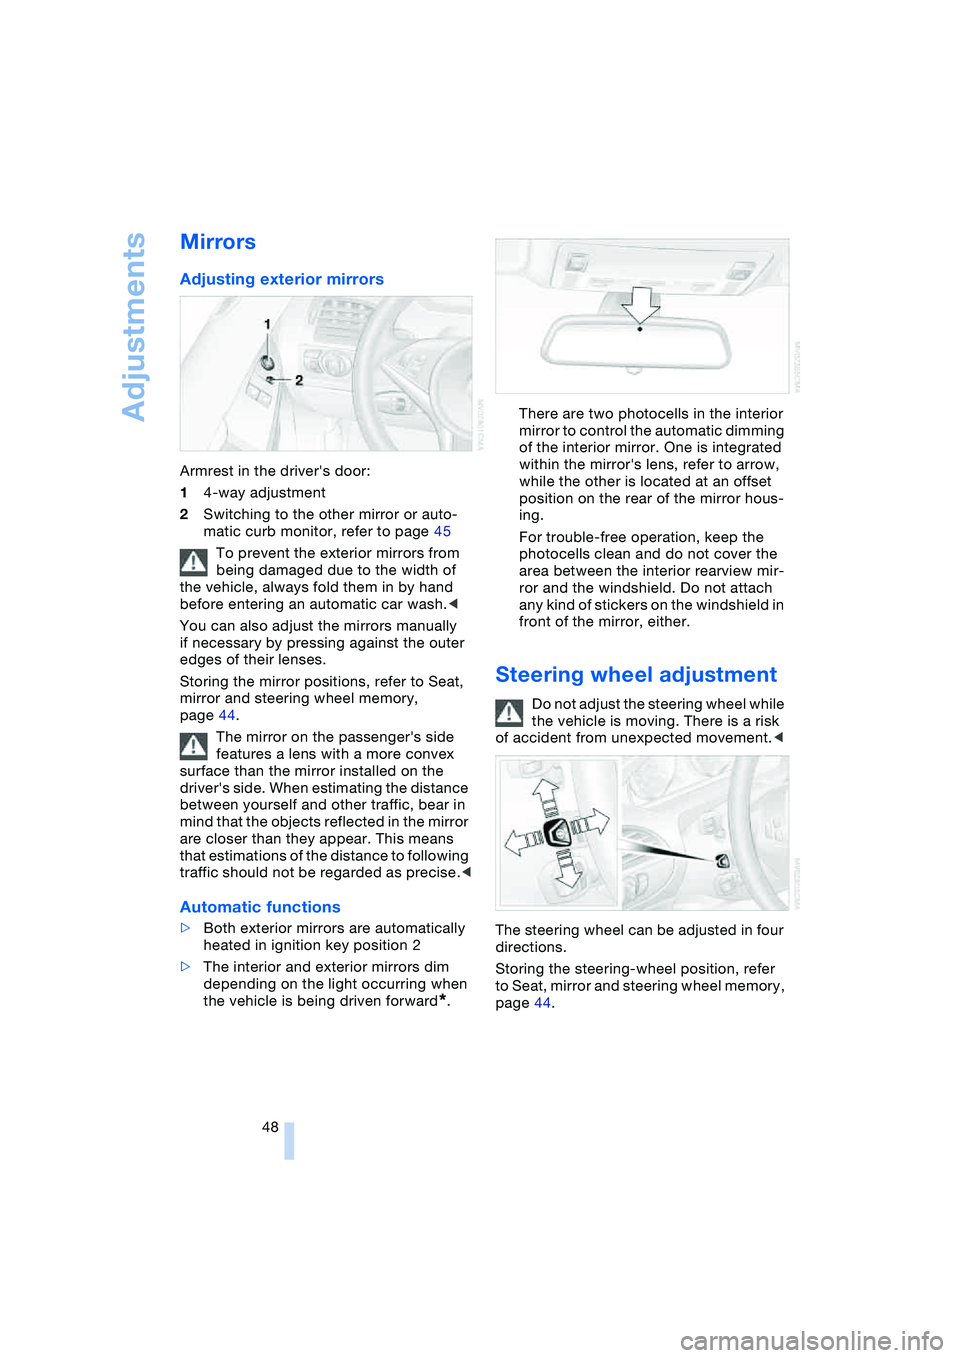
Adjusting exterior mirrors
Armrest in the driver's door:
14-way adjustment
2Switching to the other mirror or auto-
matic curb monitor, refer to page 45
To prevent the exterior mirrors from
being damaged due to the width of
the vehicle, always fold them in by hand
before entering an automatic car wash.<
You can also adjust the mirrors manually
if necessary by pressing against the outer
edges of their lenses.
Storing the mirror positions, refer to Seat,
mirror and steering wheel memory,
page 44.
The mirror on the passenger's side
features a lens with a more convex
surface than the mirror installed on the
driver's side. When estimating the distance
between yourself and other traffic, bear in
mind that the objects reflected in the mirror
are closer than they appear. This means
that estimations of the distance to following
traffic should not be regarded as precise.<
Automatic functions
>Both exterior mirrors are automatically
heated in ignition key position 2
>The interior and exterior mirrors dim
depending on the light occurring when
the vehicle is being driven forward
*.There are two photocells in the interior
mirror to control the automatic dimming
of the interior mirror. One is integrated
within the mirror's lens, refer to arrow,
while the other is located at an offset
position on the rear of the mirror hous-
ing.
For trouble-free operation, keep the
photocells clean and do not cover the
area between the interior rearview mir-
ror and the windshield. Do not attach
any kind of stickers on the windshield in
front of the mirror, either.
Steering wheel adjustment
Do not adjust the steering wheel while
the vehicle is moving. There is a risk
of accident from unexpected movement.<
The steering wheel can be adjusted in four
directions.
Storing the steering-wheel position, refer
to Seat, mirror and steering wheel memory,
page 44.
Page 51 of 216
Controls
49Reference
At a glance
Driving tips
Communications
Navigation
Entertainment
Mobility
Automatic steering wheel
adjustment
In conjunction with seat, mirror and steer-
ing wheel memory.
The steering wheel automatically moves as
high up and far forward as possible to ease
driver entry and exit before then returning
to the standard position or stored memory
setting.
This automatic feature is governed by the
driver's door and the ignition lock.
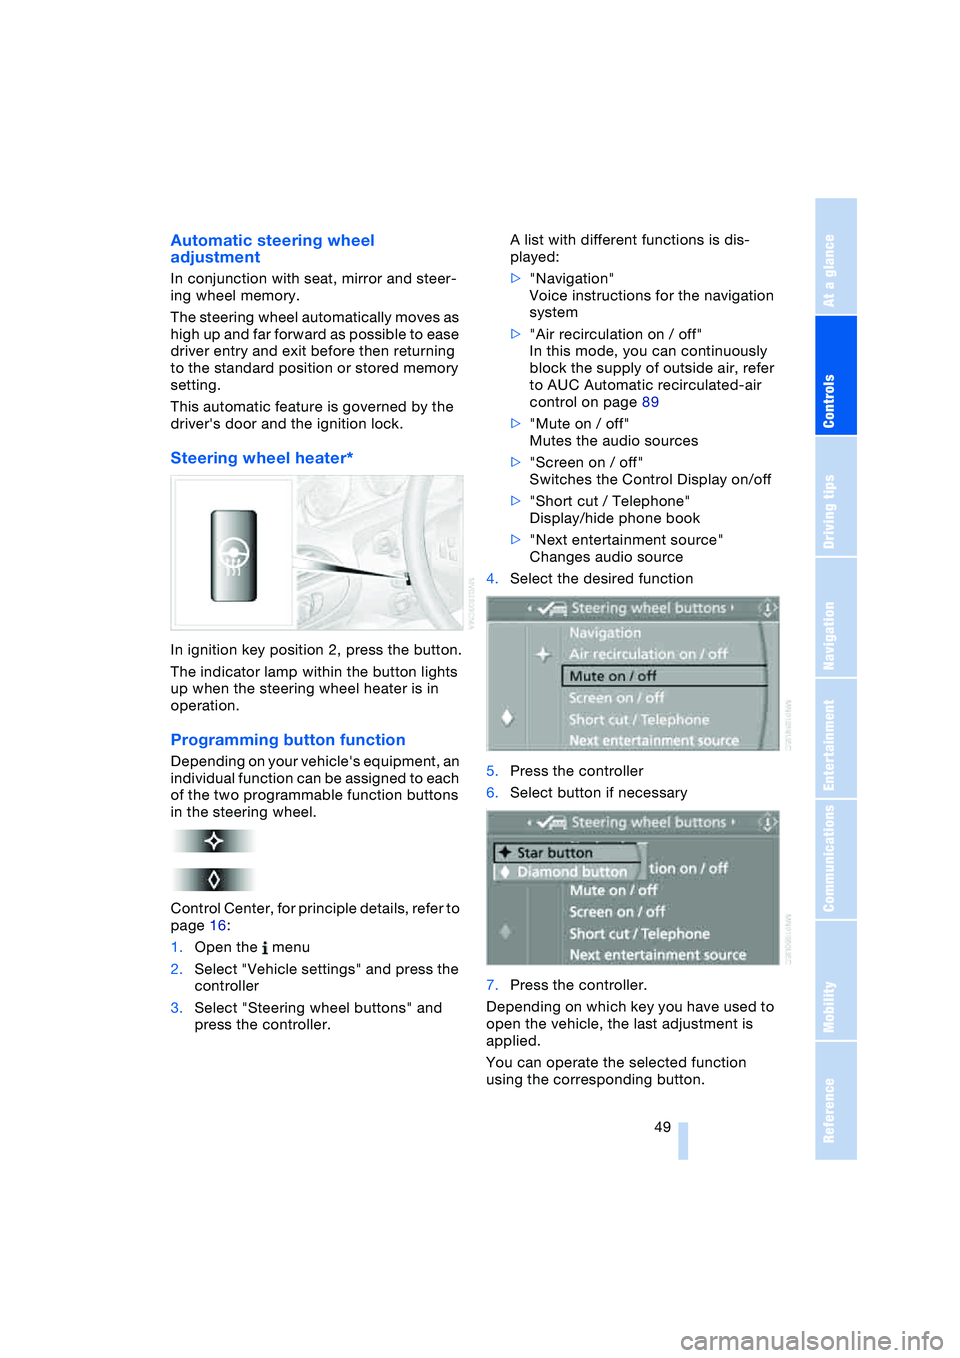
Steering wheel heater*
In ignition key position 2, press the button.
The indicator lamp within the button lights
up when the steering wheel heater is in
operation.
Programming button function
Depending on your vehicle's equipment, an
individual function can be assigned to each
of the two programmable function buttons
in the steering wheel.
Control Center, for principle details, refer to
page 16:
1.Open the menu
2.Select "Vehicle settings" and press the
controller
3.Select "Steering wheel buttons" and
press the controller.A list with different functions is dis-
played:
>"Navigation"
Voice instructions for the navigation
system
>"Air recirculation on / off"
In this mode, you can continuously
block the supply of outside air, refer
to AUC Automatic recirculated-air
control on page 89
>"Mute on / off"
Mutes the audio sources
>"Screen on / off"
Switches the Control Display on/off
>"Short cut / Telephone"
Display/hide phone book
>"Next entertainment source"
Changes audio source
4.Select the desired function
5.Press the controller
6.Select button if necessary
.
7.Press the controller.
Depending on which key you have used to
open the vehicle, the last adjustment is
applied.
You can operate the selected function
using the corresponding button.
Page 56 of 216
Driving
54
Driving
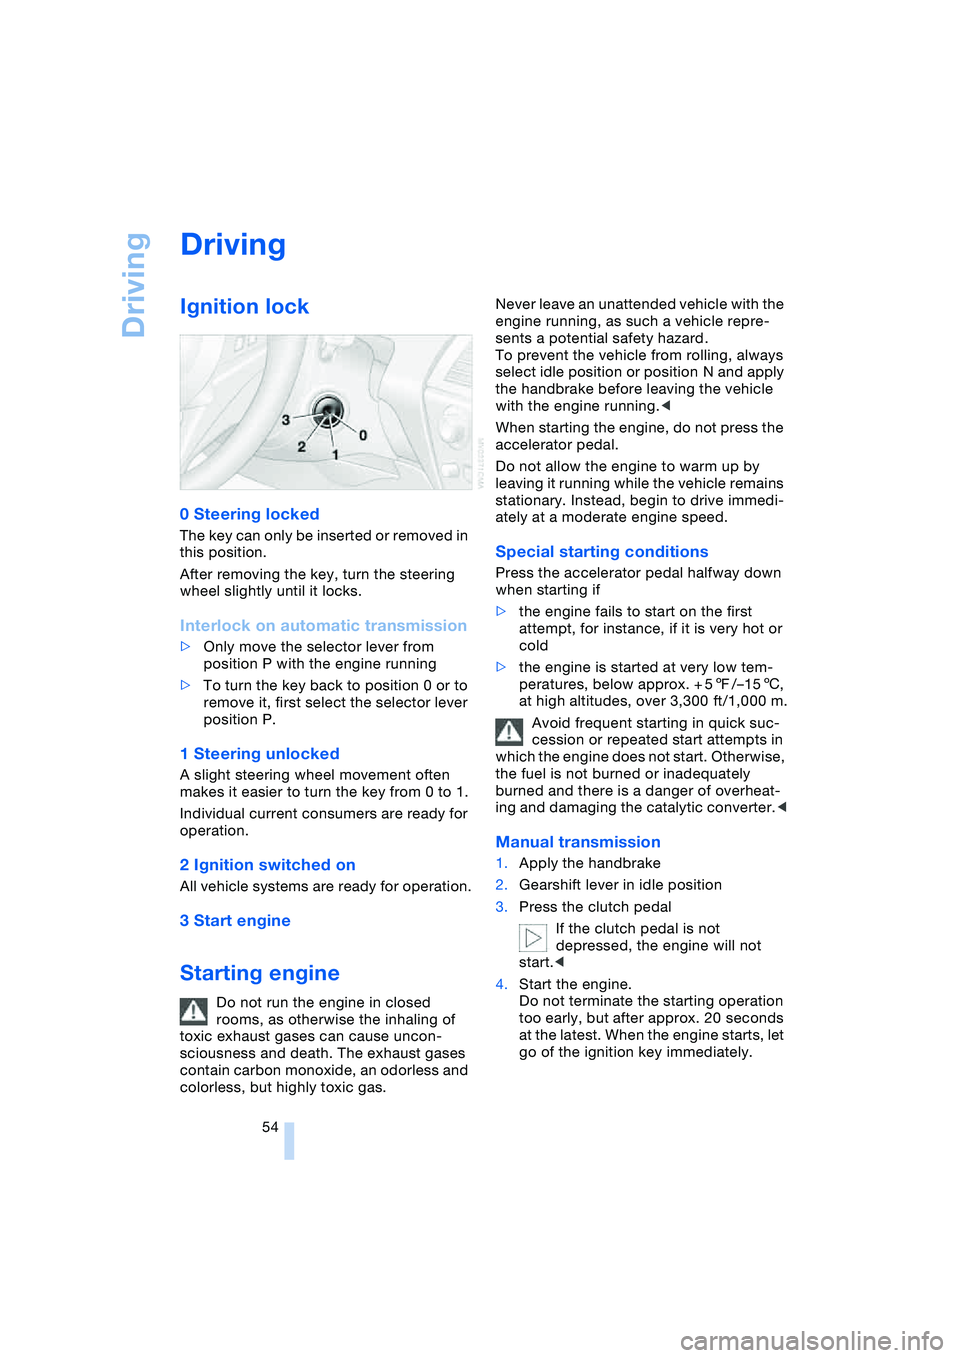
Ignition lock
0 Steering locked
The key can only be inserted or removed in
this position.
After removing the key, turn the steering
wheel slightly until it locks.
Interlock on automatic transmission
>Only move the selector lever from
position P with the engine running
>To turn the key back to position 0 or to
remove it, first select the selector lever
position P.
1 Steering unlocked
A slight steering wheel movement often
makes it easier to turn the key from 0 to 1.
Individual current consumers are ready for
operation.
2 Ignition switched on
All vehicle systems are ready for operation.
3 Start engine
Starting engine
Do not run the engine in closed
rooms, as otherwise the inhaling of
toxic exhaust gases can cause uncon-
sciousness and death. The exhaust gases
contain carbon monoxide, an odorless and
colorless, but highly toxic gas.Never leave an unattended vehicle with the
engine running, as such a vehicle repre-
sents a potential safety hazard.
To prevent the vehicle from rolling, always
select idle position or position N and apply
the handbrake before leaving the vehicle
with the engine running.<
When starting the engine, do not press the
accelerator pedal.
Do not allow the engine to warm up by
leaving it running while the vehicle remains
stationary. Instead, begin to drive immedi-
ately at a moderate engine speed.
Special starting conditions
Press the accelerator pedal halfway down
when starting if
>the engine fails to start on the first
attempt, for instance, if it is very hot or
cold
>the engine is started at very low tem-
peratures, below approx. + 57/–156,
at high altitudes, over 3,300 ft/1,000 m.
Avoid frequent starting in quick suc-
cession or repeated start attempts in
which the engine does not start. Otherwise,
the fuel is not burned or inadequately
burned and there is a danger of overheat-
ing and damaging the catalytic converter.<
Manual transmission
1.Apply the handbrake
2.Gearshift lever in idle position
3.Press the clutch pedal
If the clutch pedal is not
depressed, the engine will not
start.<
4.Start the engine.
Do not terminate the starting operation
too early, but after approx. 20 seconds
at the latest. When the engine starts, let
go of the ignition key immediately.