2004 BMW 645CI COUPE&CONVERTIBLE engine
[x] Cancel search: enginePage 13 of 216
At a glance
11Reference
Controls
Driving tips
Communications
Navigation
Entertainment
Mobility
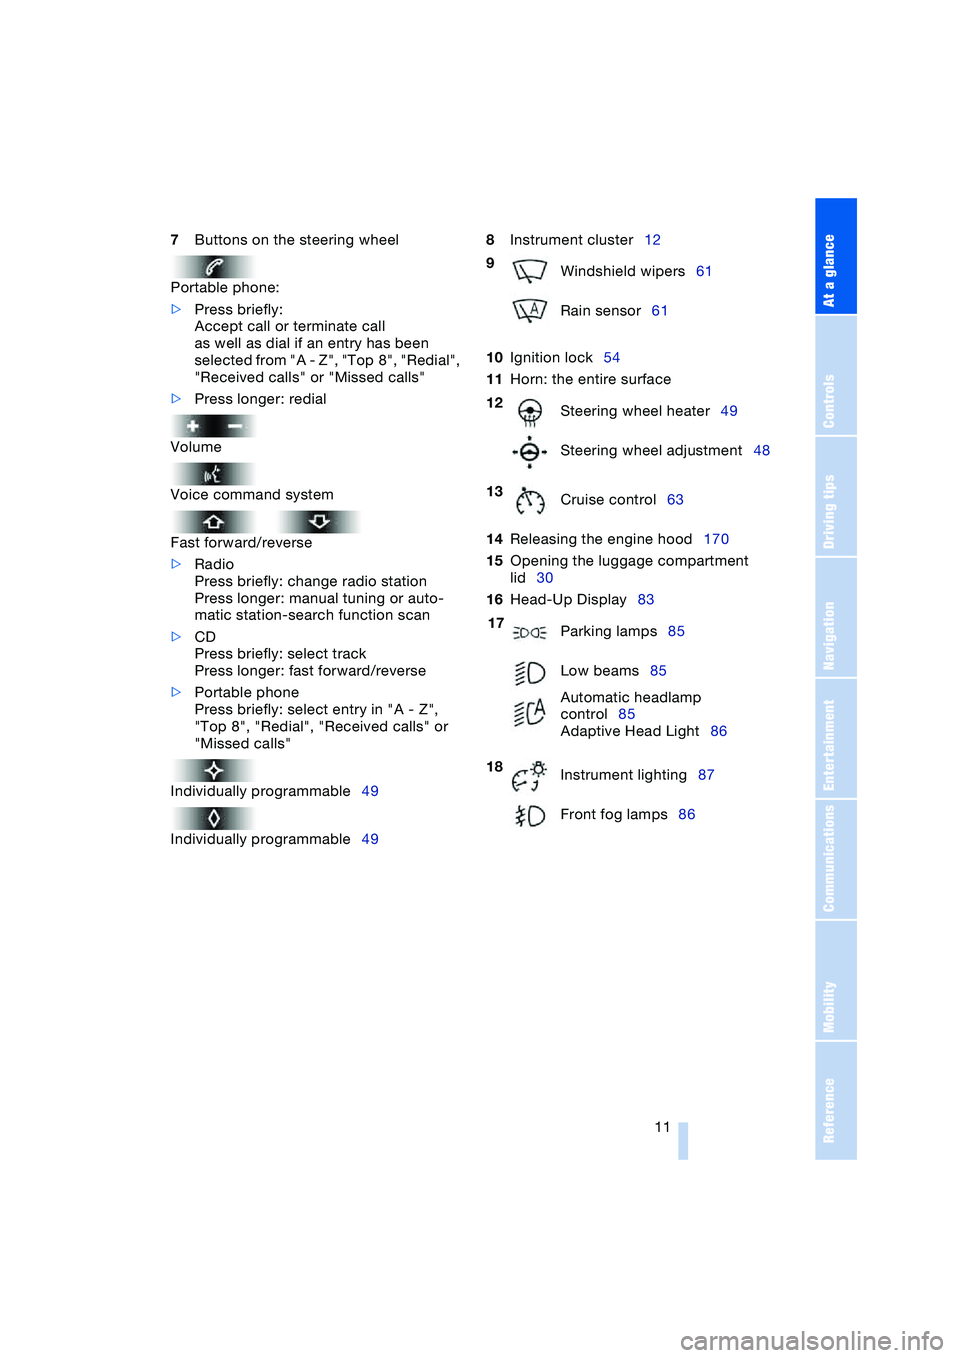
7Buttons on the steering wheel
Portable phone:
>Press briefly:
Accept call or terminate call
as well as dial if an entry has been
selected from "A - Z", "Top 8", "Redial",
"Received calls" or "Missed calls"
>Press longer: redial
Volume
Voice command system
Fast forward/reverse
>Radio
Press briefly: change radio station
Press longer: manual tuning or auto-
matic station-search function scan
>CD
Press briefly: select track
Press longer: fast forward/reverse
>Portable phone
Press briefly: select entry in "A - Z",
"Top 8", "Redial", "Received calls" or
"Missed calls"
Individually programmable49
Individually programmable498Instrument cluster12
10Ignition lock54
11Horn: the entire surface
14Releasing the engine hood170
15Opening the luggage compartment
lid30
16Head-Up Display83
9
Windshield wipers61
Rain sensor61
12
Steering wheel heater49
Steering wheel adjustment48
13
Cruise control63
17
Parking lamps85
Low beams85
Automatic headlamp
control85
Adaptive Head Light86
18
Instrument lighting87
Front fog lamps86
Page 14 of 216
Cockpit
12
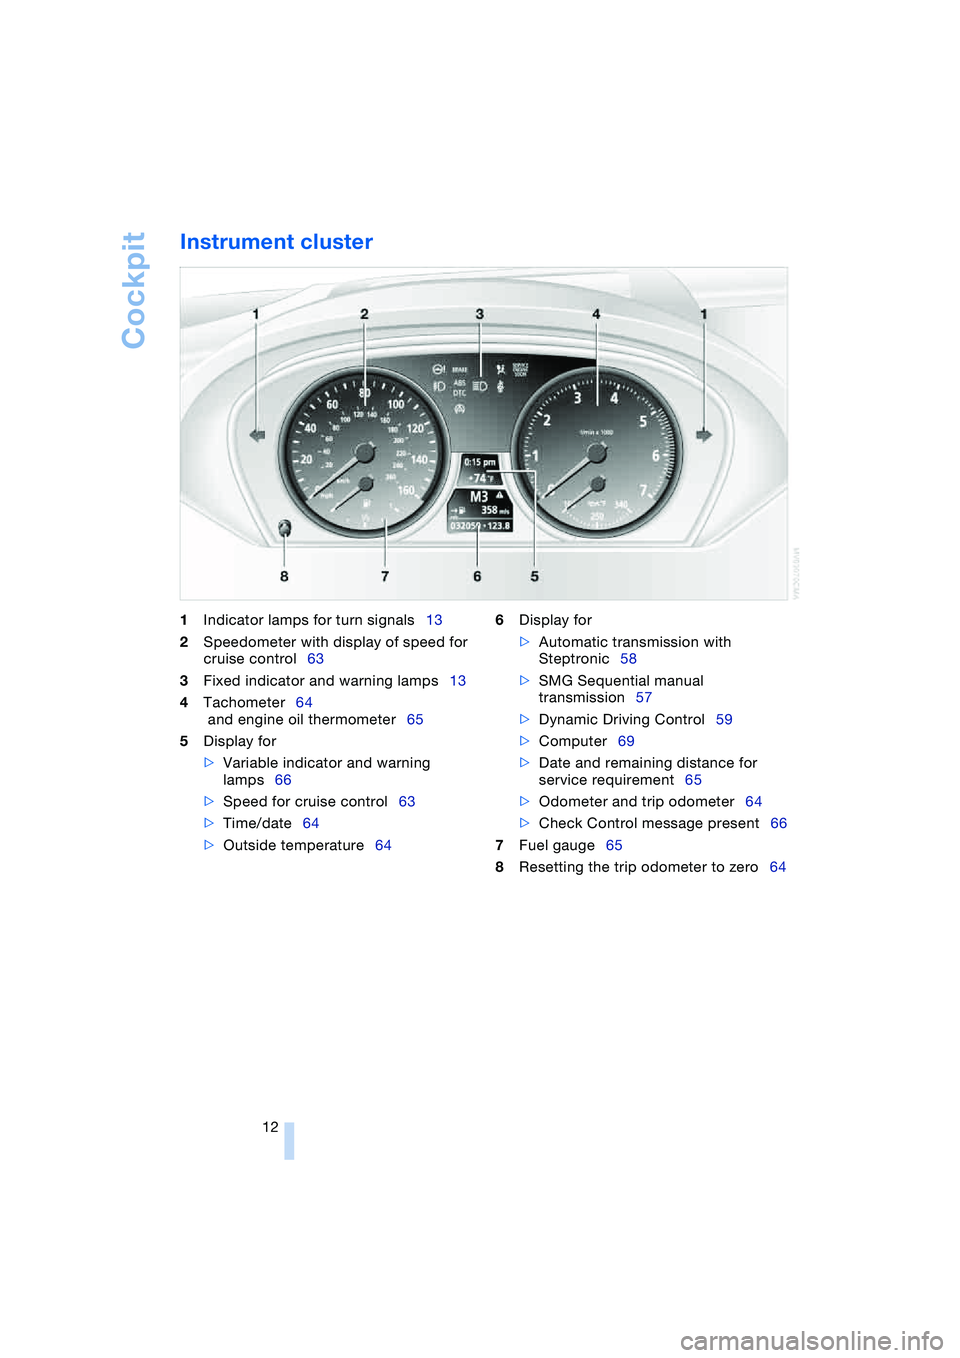
Instrument cluster
1Indicator lamps for turn signals13
2Speedometer with display of speed for
cruise control63
3Fixed indicator and warning lamps13
4Tachometer64
and engine oil thermometer65
5Display for
>Variable indicator and warning
lamps66
>Speed for cruise control63
>Time/date64
>Outside temperature646Display for
>Automatic transmission with
Steptronic58
>SMG Sequential manual
transmission57
>Dynamic Driving Control59
>Computer69
>Date and remaining distance for
service requirement65
>Odometer and trip odometer64
>Check Control message present66
7Fuel gauge65
8Resetting the trip odometer to zero64
Page 15 of 216
At a glance
13Reference
Controls
Driving tips
Communications
Navigation
Entertainment
Mobility
Indicator and warning
lamps
Technology that monitors itself
The indicator and warning lamps identified
by the
+ symbol are subjected to an oper-
ation check each time you switch on the
ignition or start the engine. They each light
up once for different periods of time.
When a malfunction occurs in a monitored
system, the corresponding lamp will either
fail to go out when the engine is started, or
it will come on again during normal driving,
usually accompanied by a Check Control
message. You will find more details on the
specified pages.
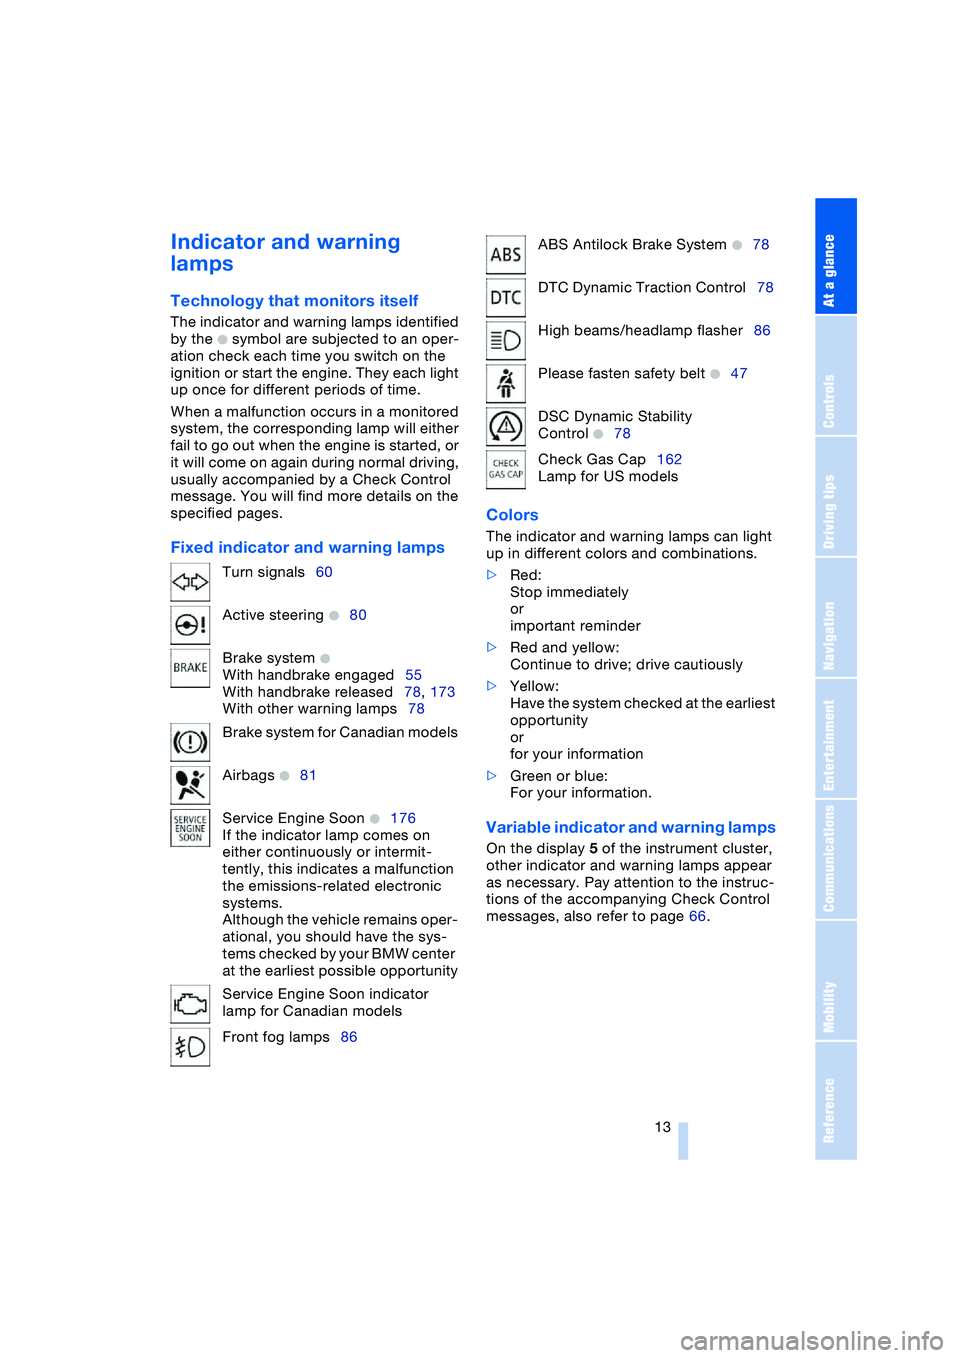
Fixed indicator and warning lampsColors The indicator and warning lamps can light
up in different colors and combinations.
>Red:
Stop immediately
or
important reminder
>Red and yellow:
Continue to drive; drive cautiously
>Yellow:
Have the system checked at the earliest
opportunity
or
for your information
>Green or blue:
For your information.
Variable indicator and warning lamps
On the display 5 of the instrument cluster,
other indicator and warning lamps appear
as necessary. Pay attention to the instruc-
tions of the accompanying Check Control
messages, also refer to page 66. Turn signals60
Active steering
+80
Brake system
+
With handbrake engaged55
With handbrake released78, 173
With other warning lamps78
Brake system for Canadian models
Airbags
+81
Service Engine Soon
+176
If the indicator lamp comes on
either continuously or intermit-
tently, this indicates a malfunction
the emissions-related electronic
systems.
Although the vehicle remains oper-
ational, you should have the sys-
tems checked by your BMW center
at the earliest possible opportunity
Service Engine Soon indicator
lamp for Canadian models
Front fog lamps86
ABS Antilock Brake System +78
DTC Dynamic Traction Control78
High beams/headlamp flasher86
Please fasten safety belt
+47
DSC Dynamic Stability
Control
+78
Check Gas Cap162
Lamp for US models
Page 40 of 216
Opening and closing
38 Partial vacuums that occur at higher
speeds in the passenger compart-
ment can make the convertible top flap.
Use the ventilation controls to increase the
air supply so that no partial vacuum occurs
in the vehicle.<
To close the electrically activated side
windows while the vehicle is being
driven, always close the rear windows or
all four windows simultaneously first, as
otherwise the windows cannot close tightly
at higher speeds.<
Prior to opening and closing
>Read carefully and comply with the
safety precautions that appear above
>Ensure that the convertible top com-
partment floor in the luggage compart-
ment is folded down, refer to page 32,
as otherwise the convertible top cannot
be opened
>Ensure that the luggage compartment
lid is closed.
Opening and closing
As of ignition key position 1, with the vehi-
cle stationary:
So as not to place an excessive load
on the battery, only operate the con-
vertible top with the engine running, if pos-
sible.
Before closing the convertible top, remove
foreign bodies from the windshield frame,
as these might inhibit closing of the con-
vertible top.<
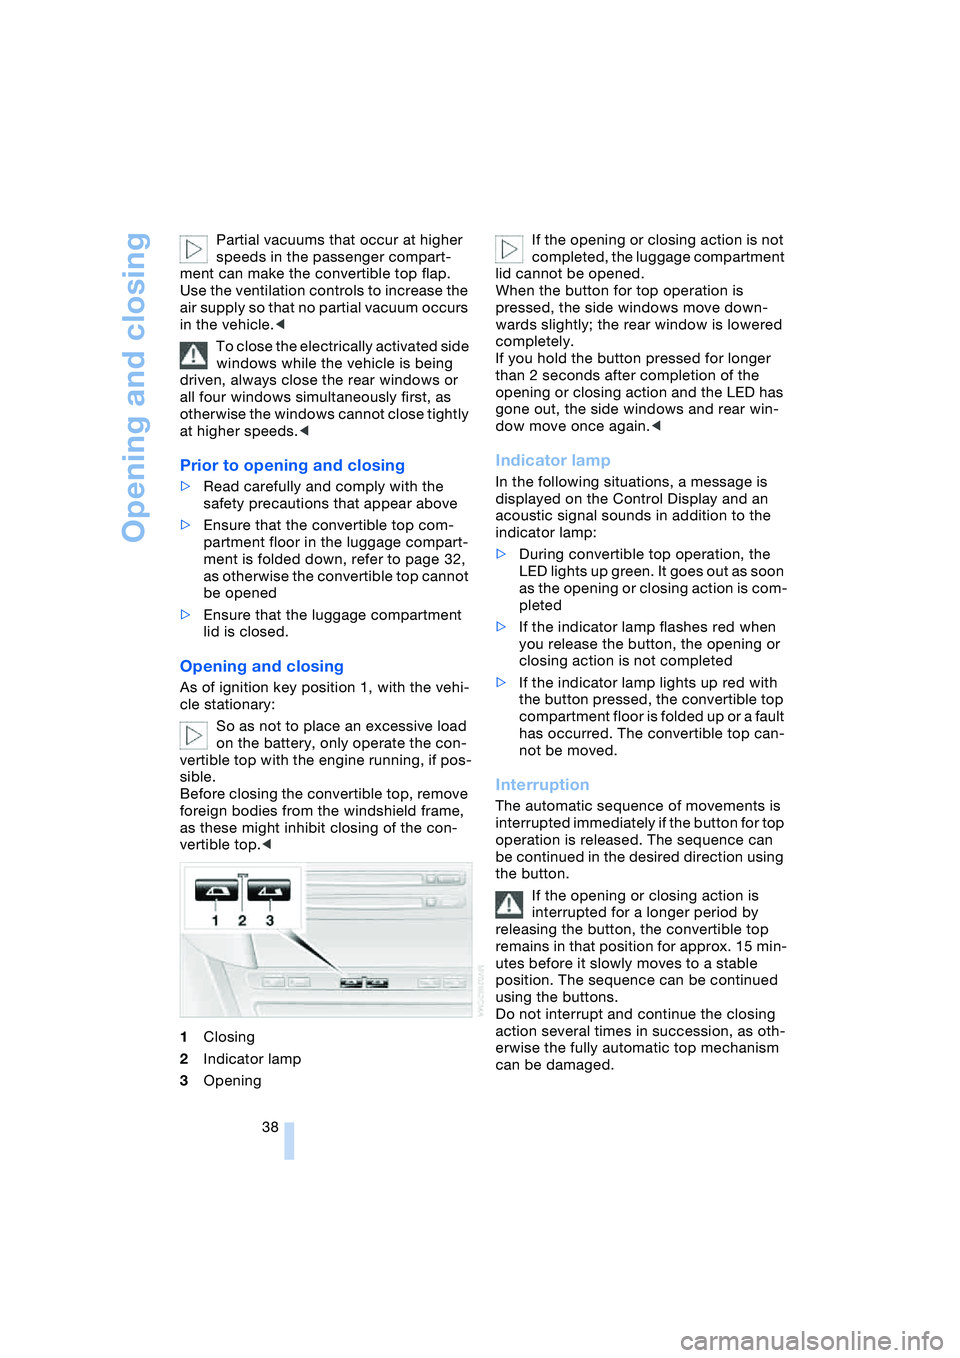
1Closing
2Indicator lamp
3OpeningIf the opening or closing action is not
completed, the luggage compartment
lid cannot be opened.
When the button for top operation is
pressed, the side windows move down-
wards slightly; the rear window is lowered
completely.
If you hold the button pressed for longer
than 2 seconds after completion of the
opening or closing action and the LED has
gone out, the side windows and rear win-
dow move once again.<
Indicator lamp
In the following situations, a message is
displayed on the Control Display and an
acoustic signal sounds in addition to the
indicator lamp:
>During convertible top operation, the
LED lights up green. It goes out as soon
as the opening or closing action is com-
pleted
>If the indicator lamp flashes red when
you release the button, the opening or
closing action is not completed
>If the indicator lamp lights up red with
the button pressed, the convertible top
compartment floor is folded up or a fault
has occurred. The convertible top can-
not be moved.
Interruption
The automatic sequence of movements is
interrupted immediately if the button for top
operation is released. The sequence can
be continued in the desired direction using
the button.
If the opening or closing action is
interrupted for a longer period by
releasing the button, the convertible top
remains in that position for approx. 15 min-
utes before it slowly moves to a stable
position. The sequence can be continued
using the buttons.
Do not interrupt and continue the closing
action several times in succession, as oth-
erwise the fully automatic top mechanism
can be damaged.
Page 56 of 216
Driving
54
Driving
Ignition lock
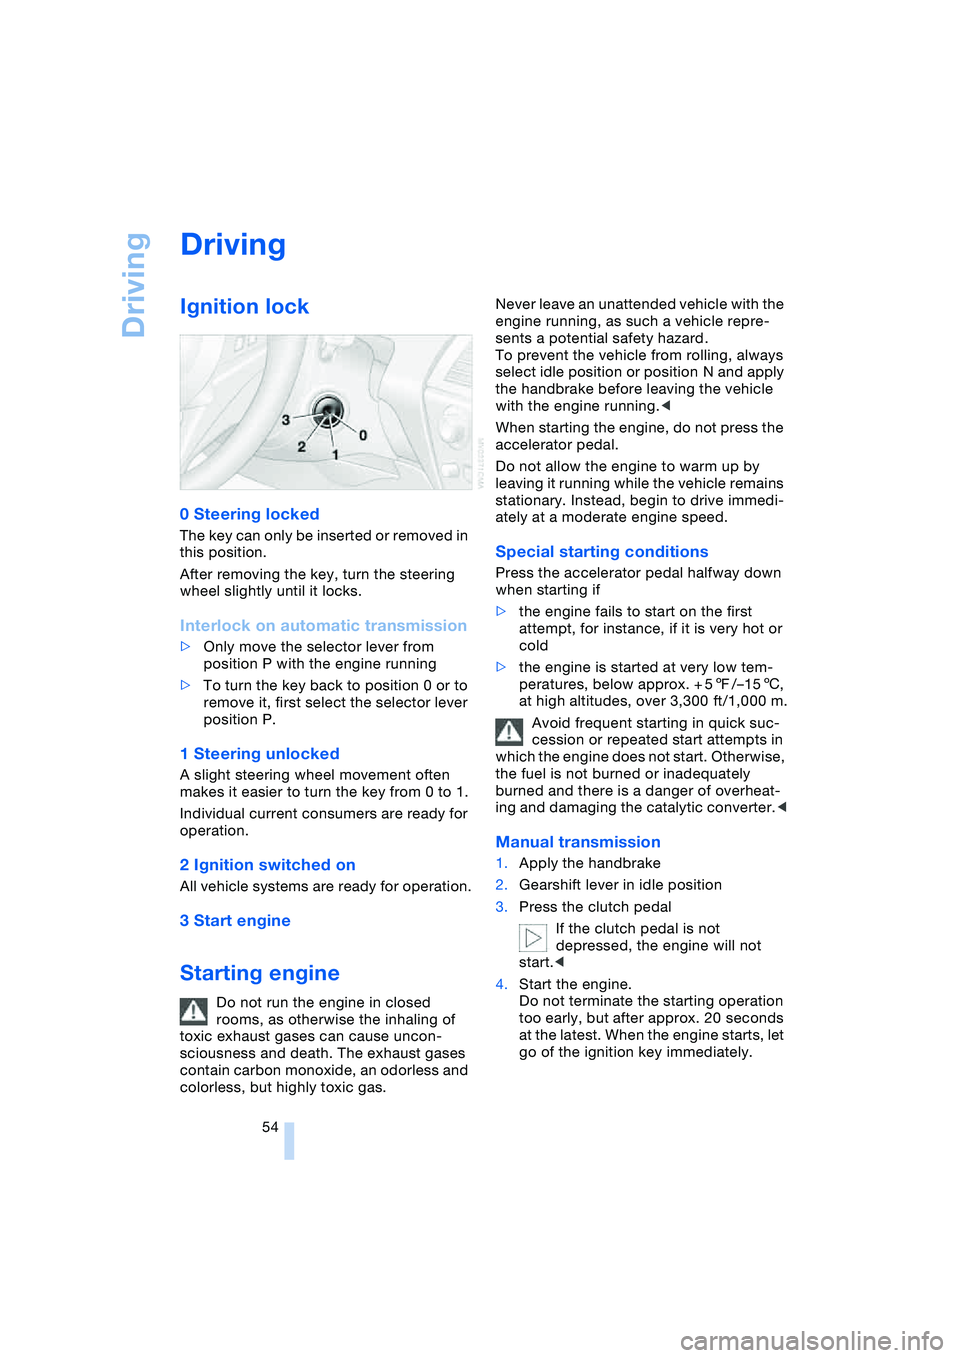
0 Steering locked
The key can only be inserted or removed in
this position.
After removing the key, turn the steering
wheel slightly until it locks.
Interlock on automatic transmission
>Only move the selector lever from
position P with the engine running
>To turn the key back to position 0 or to
remove it, first select the selector lever
position P.
1 Steering unlocked
A slight steering wheel movement often
makes it easier to turn the key from 0 to 1.
Individual current consumers are ready for
operation.
2 Ignition switched on
All vehicle systems are ready for operation.
3 Start engine
Starting engine
Do not run the engine in closed
rooms, as otherwise the inhaling of
toxic exhaust gases can cause uncon-
sciousness and death. The exhaust gases
contain carbon monoxide, an odorless and
colorless, but highly toxic gas.Never leave an unattended vehicle with the
engine running, as such a vehicle repre-
sents a potential safety hazard.
To prevent the vehicle from rolling, always
select idle position or position N and apply
the handbrake before leaving the vehicle
with the engine running.<
When starting the engine, do not press the
accelerator pedal.
Do not allow the engine to warm up by
leaving it running while the vehicle remains
stationary. Instead, begin to drive immedi-
ately at a moderate engine speed.
Special starting conditions
Press the accelerator pedal halfway down
when starting if
>the engine fails to start on the first
attempt, for instance, if it is very hot or
cold
>the engine is started at very low tem-
peratures, below approx. + 57/–156,
at high altitudes, over 3,300 ft/1,000 m.
Avoid frequent starting in quick suc-
cession or repeated start attempts in
which the engine does not start. Otherwise,
the fuel is not burned or inadequately
burned and there is a danger of overheat-
ing and damaging the catalytic converter.<
Manual transmission
1.Apply the handbrake
2.Gearshift lever in idle position
3.Press the clutch pedal
If the clutch pedal is not
depressed, the engine will not
start.<
4.Start the engine.
Do not terminate the starting operation
too early, but after approx. 20 seconds
at the latest. When the engine starts, let
go of the ignition key immediately.
Page 57 of 216
Controls
55Reference
At a glance
Driving tips
Communications
Navigation
Entertainment
Mobility
SMG Sequential manual
transmission and automatic
transmission
Your BMW is equipped with the conve-
nience starting feature. Here, it is sufficient
to turn the ignition key only briefly to posi-
tion 3 'Start engine' and to let go of it right
away. The system responds by automati-
cally engaging the starter for a certain
period and allowing it to run until the engine
starts, after which it then disengages auto-
matically.
SMG Sequential manual
transmission
1.Press the brake pedal
2.Engage selector-lever position N
3.Start the engine.
If the engine does not start, engage
the last gear selected again, refer to
instrument cluster display, and then
engage selector-lever position N.<
Automatic transmission with
Steptronic
1.Press the brake pedal
2.Engage selector-lever position P or N
3.Start the engine.
Switching off engine
Do not remove the ignition key while
the vehicle is rolling, as otherwise the
steering wheel lock would engage while
steering.
When leaving the vehicle, remove the igni-
tion key and lock the steering.
When parking on a downhill incline, apply
the handbrake, as otherwise the vehicle
could roll away.<
Manual transmission
1.Turn the ignition key to position 1 or 0
2.Engage first or reverse gear.
SMG Sequential manual
transmission
1.Engage a drive position
2.Turn the ignition key to position 1 or 0.
A signal sounds if the idle position N is
engaged on stopping the engine.
Automatic transmission with
Steptronic
1.Engage selector-lever position P
2.Turn the ignition key to position 1 or 0.
Handbrake
The handbrake is primarily intended to pre-
vent the vehicle from rolling while parked;
it brakes the rear wheels.
Indicator lamp
The indicator lamp lights up, and an
acoustic signal also sounds when
starting off. The handbrake is
engaged.
Indicator lamp for Canadian mod-
els.
Engaging
The lever locks into place automatically;
the indicator lamp in the instrument cluster
lights up as of ignition key position 1.
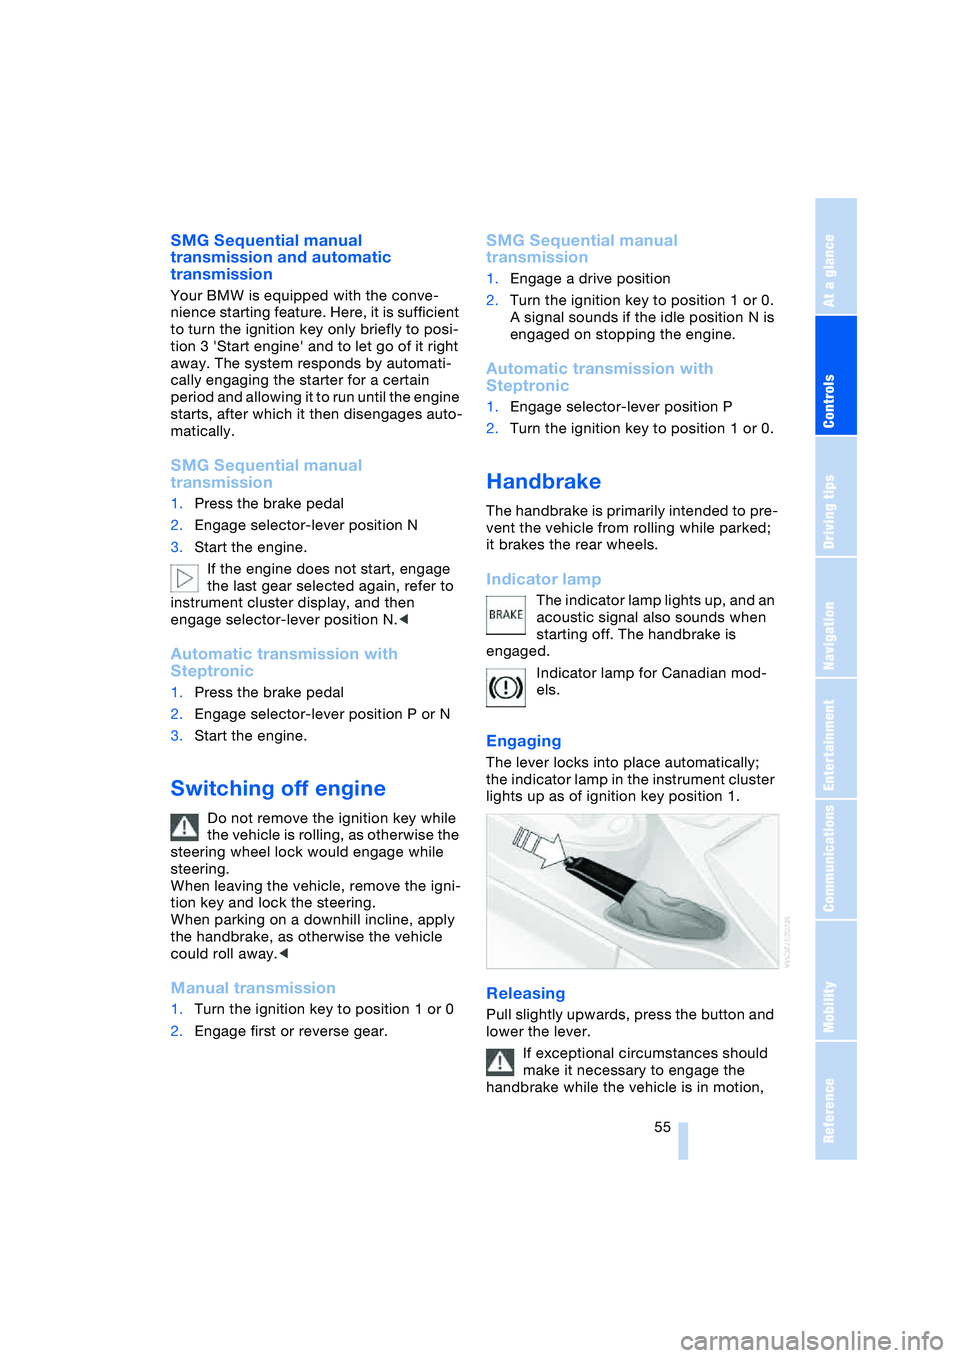
Releasing
Pull slightly upwards, press the button and
lower the lever.
If exceptional circumstances should
make it necessary to engage the
handbrake while the vehicle is in motion,
Page 58 of 216
Driving
56 do not pull it too strongly. In doing so, con-
tinuously press the button of the handbrake
lever.
Strong application of the handbrake can
lead to overbraking of the rear axle and
associated 'fishtailing' of the vehicle rear
end.
The brake lamps do not light up when the
handbrake is engaged.
Vehicles with manual or SMG transmission:
When parking on inclines, engage the
handbrake, as even engaging the first or
reverse gear might not under certain cir-
cumstances secure the vehicle against
moving.
Vehicles with automatic transmission:
Engage selector-lever position P.<
To prevent corrosion and one-sided
braking action, occasionally engage
the handbrake lightly when the vehicle is
slowly coming to a standstill if the traffic
conditions are suitable.<
Manual transmission
While shifting gear in the 5th/6th gear
level, press the gearshift lever to the
right, as otherwise engine damage could
occur from inadvertently engaging a gear in
the 3rd/4th gear level.
On inclines, do not hold the vehicle with the
clutch; use the handbrake. Otherwise there
is high clutch wear.<
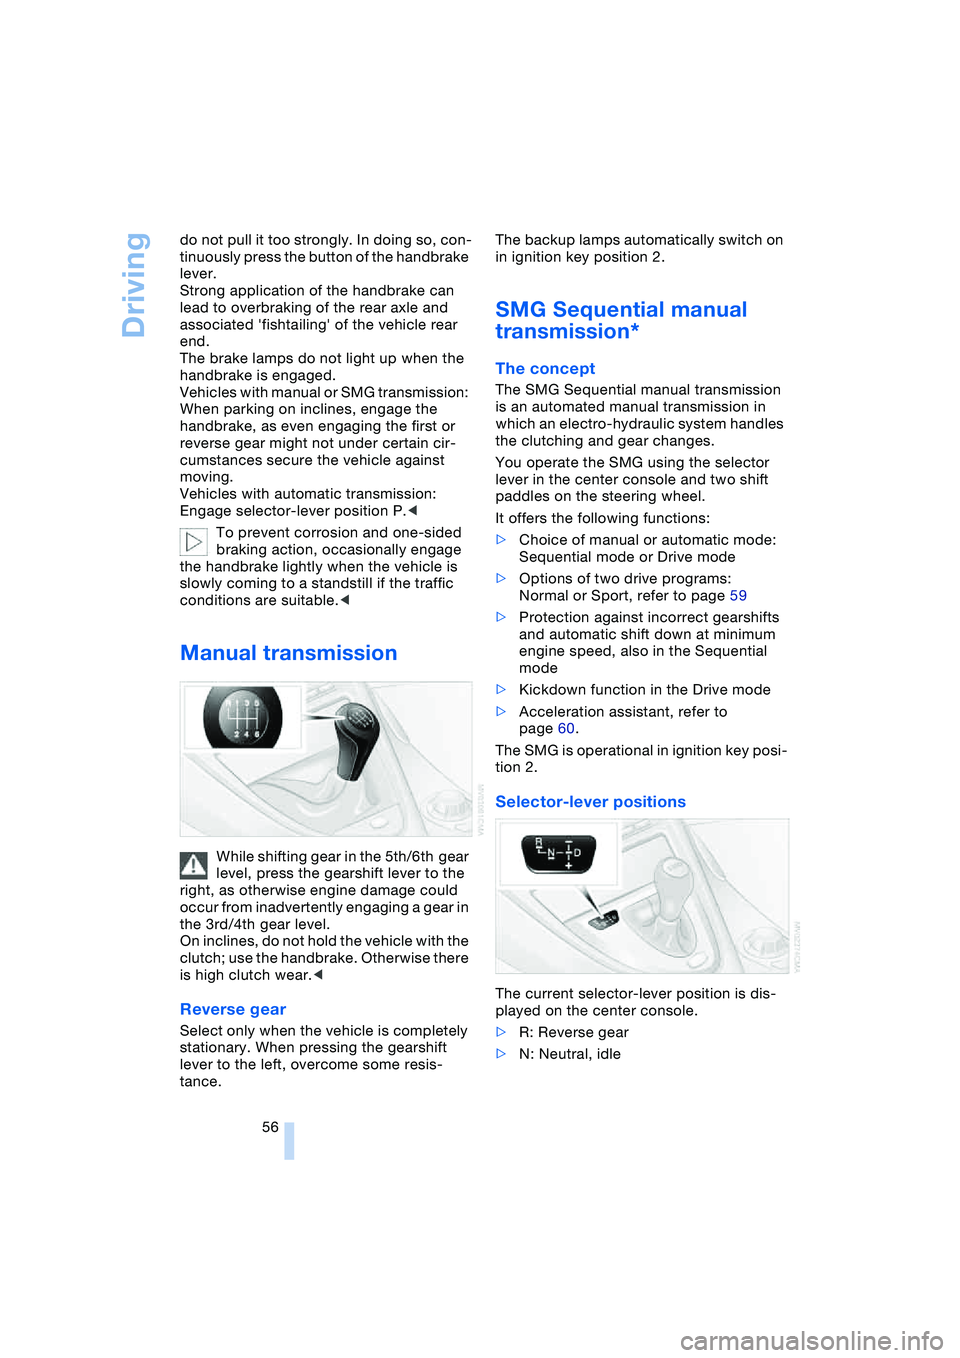
Reverse gear
Select only when the vehicle is completely
stationary. When pressing the gearshift
lever to the left, overcome some resis-
tance.The backup lamps automatically switch on
in ignition key position 2.
SMG Sequential manual
transmission*
The concept
The SMG Sequential manual transmission
is an automated manual transmission in
which an electro-hydraulic system handles
the clutching and gear changes.
You operate the SMG using the selector
lever in the center console and two shift
paddles on the steering wheel.
It offers the following functions:
>Choice of manual or automatic mode:
Sequential mode or Drive mode
>Options of two drive programs:
Normal or Sport, refer to page 59
>Protection against incorrect gearshifts
and automatic shift down at minimum
engine speed, also in the Sequential
mode
>Kickdown function in the Drive mode
>Acceleration assistant, refer to
page 60.
The SMG is operational in ignition key posi-
tion 2.
Selector-lever positions
The current selector-lever position is dis-
played on the center console.
>R: Reverse gear
>N: Neutral, idle
Page 59 of 216
Controls
57Reference
At a glance
Driving tips
Communications
Navigation
Entertainment
Mobility
>One-touch function for Sequential
mode
+: manual upshifts
—: manual downshifts
>D: Drive mode.
N is automatically engaged if the
driver's door is opened with the
engine running and neither pedals, shift
paddles nor the selector lever are oper-
ated.
This is indicated by an acoustic signal and
the flashing display N in the instrument
cluster.<
Gear display
R N 1 to 6
The currently engaged gear is displayed, in
the Drive mode preceded by a D.
Shiftlock
Press the brake pedal before shifting out
of N; the shift command will not be exe-
cuted unless the brake is applied.
R Reverse
Select only when the vehicle is completely
stationary.
Sequential mode
After every engine start, as soon as the
selector lever is pushed to the right and the
brake pedal is pressed, the Sequential
mode is activated.
The gear is changed using the shift paddles
or selector lever.
Driving off is also possible in second gear,
e.g. when the roadway is icy.
D Drive mode
In the Drive mode, all forward gears are
shifted automatically.
To switch from Sequential to Drive mode:
Briefly press the selector lever to the right
towards D.
Kickdown:
For rapid acceleration, e.g. overtaking,
press the accelerator pedal as far down as
it will go: you achieve maximum accelera-
tion.
To switch back to the Sequential mode:
briefly press the selector lever back to the
right towards D or change the current gear
using the shift paddles or selector lever.
Start off quickly on slopes. Do not
hold the vehicle on a hill by applying
the throttle, but engage the handbrake
instead. Otherwise overheating can occur
in the area of the transmission.<
Gear changes
Using selector lever
>To shift up, briefly press the selector
lever towards +
>To shift down, briefly press towards —.
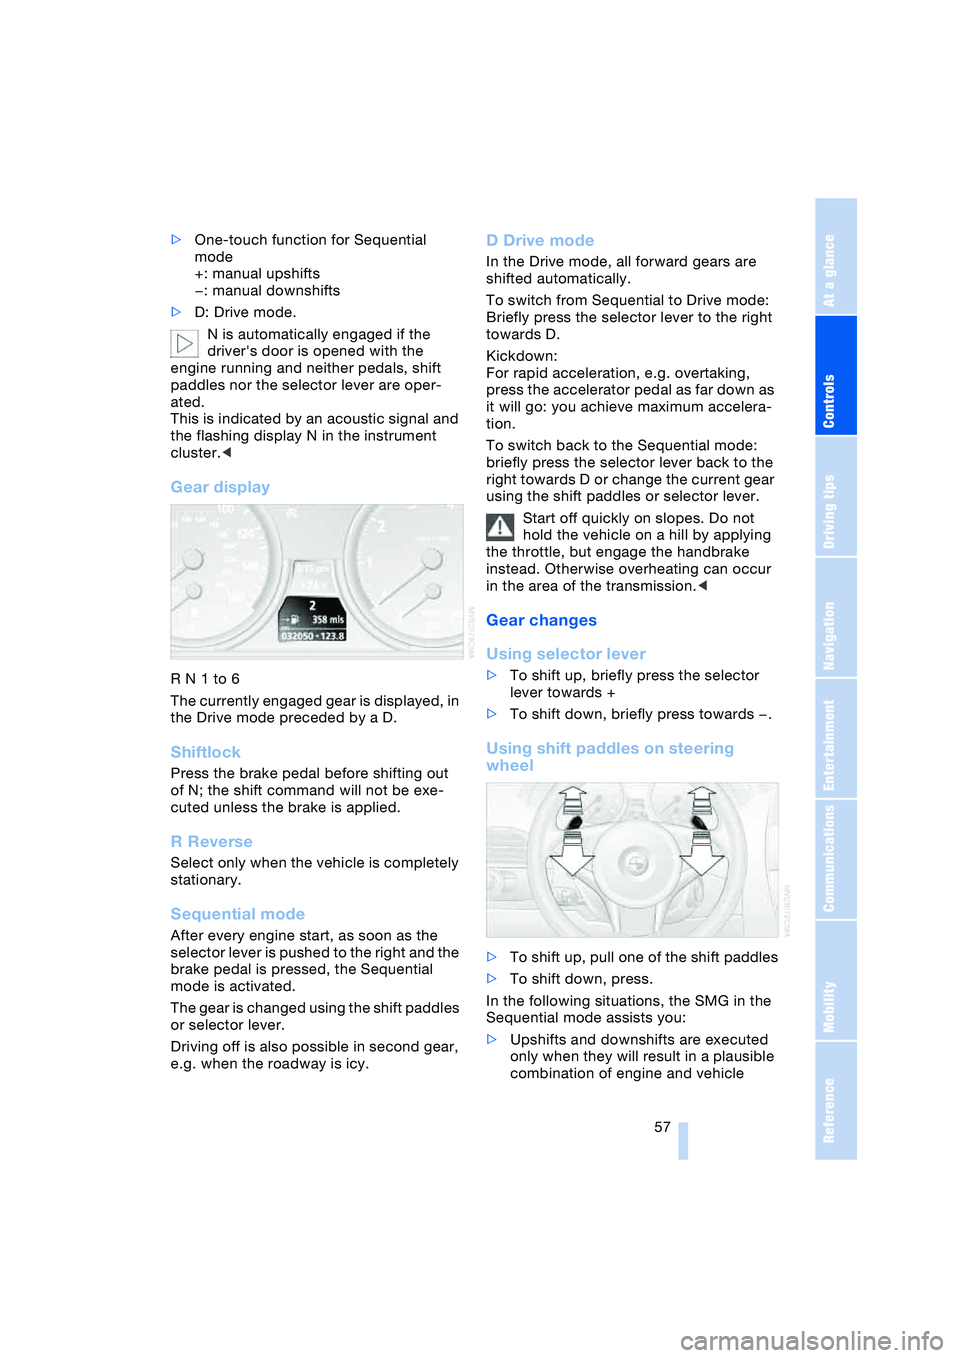
Using shift paddles on steering
wheel
>To shift up, pull one of the shift paddles
>To shift down, press.
In the following situations, the SMG in the
Sequential mode assists you:
>Upshifts and downshifts are executed
only when they will result in a plausible
combination of engine and vehicle